background image

User Guide for the SIP-T29G IP Phone 

22 

Secondary DNS fields respectively. 


5.


Press the Save soft key to accept the change or the Back soft key to cancel. 

If you are using an xDSL modem for IPv4 network connection, you can connect your 
phone to the Internet via PPPoE mode. Set the WAN port as a PPPoE port. The PPPoE port 
will perform a PPP negotiation to obtain the IP address. Contact your system 
administrator for the PPPoE user name and password. 

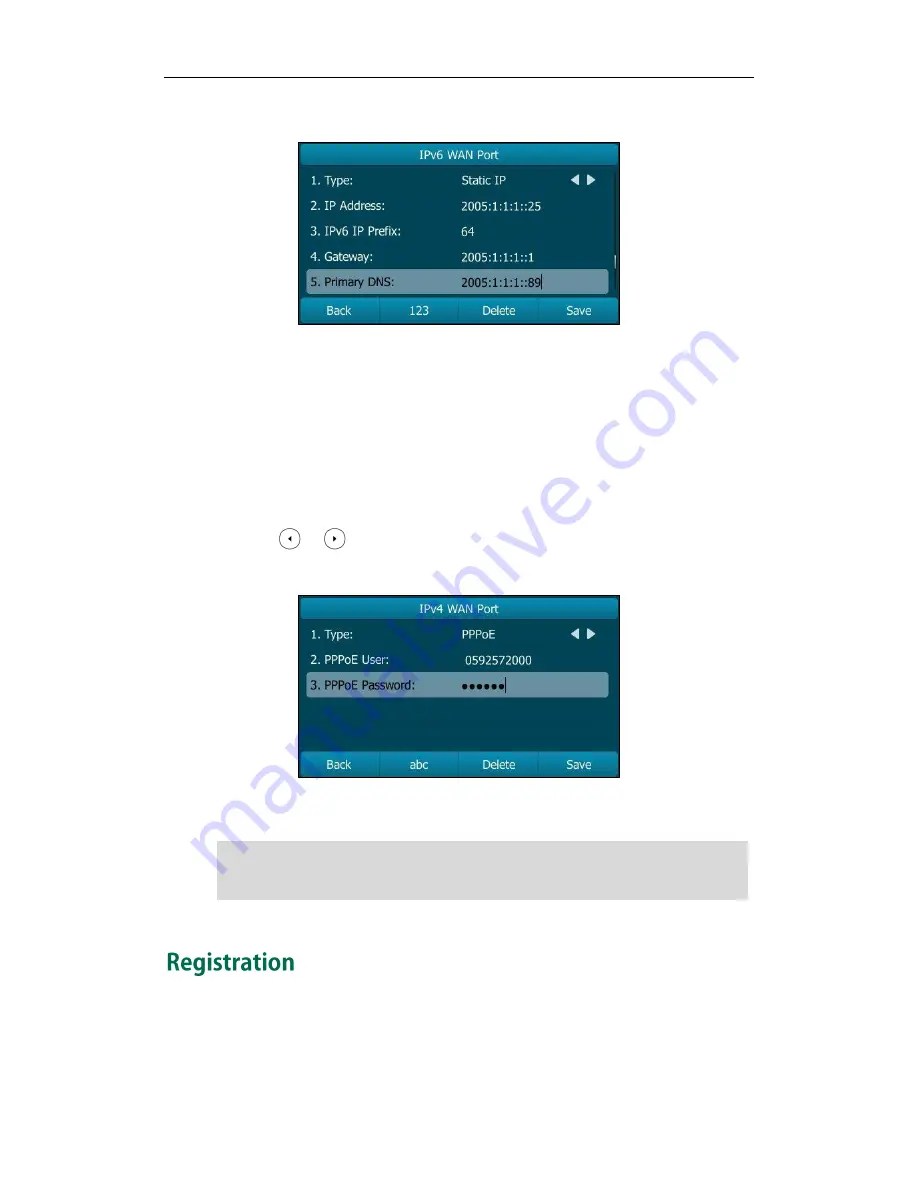
To configure PPPoE via phone user interface: 

1.


Press Menu->Advanced (default password: admin) ->Network->WAN Port->IPv4. 

2.


Press          or          , or the Switch soft key to select the PPPoE from the Type field. 

3.


Enter the user name and password in the corresponding fields. 


4.


Press the Save soft key to accept the change or the Back soft key to cancel. 

Note 

Generally, your phone will be deployed with multiple other phones. In this case, your 
system administrator will configure the phone parameters beforehand, so that after you 
start up your phone, the phone will be registered and ready for use. The SIP-T29G IP 
phone supports up to 16 accounts. If your phone is not registered, you may have to 

Wrong network settings may result in inaccessibility of your phone and may also have an 
impact on your network performance. For more information on these parameters, 
contact your system administrator. 

Summary of Contents for SIP-T29G

Page 1: ......

Page 2: ...SUBJECT TO CHANGE WITHOUT NOTICE ALL STATEMENTS INFORMATION AND RECOMMENDATIONS IN THIS GUIDE ARE BELIEVED TO BE ACCURATE AND PRESENTED WITHOUT WARRANTY OF ANY KIND EXPRESS OR IMPLIED USERS MUST TAKE...

Page 3: ...ion reception which can be determined by turning the equipment off and on the user is encouraged to try to correct the interference by one or more of the following measures 1 Reorient or relocate the...

Page 4: ...ware under the specific terms of the GPL Please refer to the GPL for the exact terms and conditions of the license The original GPL license source code of components licensed under GPL and used in Yea...

Page 5: ...and use the SIP T29G IP phone Note Topics provided in this guide include Chapter 1 Overview Chapter 2 Getting Started Chapter 3 Customizing Your Phone Chapter 4 Basic Call Features Chapter 5 Advanced...

Page 6: ...are new Short Message Service SMS on page 170 Major updates have occurred to the following sections Icon Instructions on page 3 Time Date on page 29 Bluetooth Headset on page 62 Anonymous Call Rejecti...

Page 7: ...tructions 3 LED Instructions 6 User Interfaces 9 Phone User Interface 9 Web User Interface 9 Documentations 11 Getting Started 13 Packaging Contents 13 Optional Accessories 14 Phone Installation 16 Ph...

Page 8: ...ement 80 Dial Plan 83 Emergency Number 88 Live Dialpad 90 Hotline 91 Basic Call Features 93 Placing Calls 93 Answering Calls 96 Ending Calls 97 Redialing Numbers 97 Recent Call In Dialing 97 Auto Answ...

Page 9: ...ld 146 Automatic Call Distribution ACD 147 Shared Call Appearance SCA 149 Configuring SCA Feature on the IP Phone 150 Using SCA Feature on the IP Phone 157 Bridged Line Appearance BLA 164 Configuring...

Page 10: ...User Guide for the SIP T29G IP Phone x...

Page 11: ...dware Component Instructions Icon Instructions LED Instructions User Interfaces Documentations If you require additional information or assistance with your new phone contact your system administrator...

Page 12: ...r context sensitive features Scroll through the displayed information Confirms actions or answers incoming calls Cancels actions or rejects incoming calls HEADSET Key Toggles and indicates the headset...

Page 13: ...line laying the handset down on the handset cradle the phone disconnects from the line Icons appearing on the LCD screen are described in the following table Icons Description Network is unavailable...

Page 14: ...ll Mute Ringer volume is 0 Phone Lock Received Calls Placed Calls Missed Calls Recording box is full A call cannot be recorded Recording starts successfully Recording cannot be started Recording canno...

Page 15: ...e Log out the ACD system Directory Local Group XML Group LDAP BLF BLF List BLF BLF list idle state BLF BLF list ringing state BLF BLF list hold state BLF BLF list calling state BLF BLF list failed sta...

Page 16: ...itializing Fast flashing red 300ms The phone is ringing Slow flashing red 1s The phone receives a voice mail or text message Off The phone is powered off The phone is idle The phone is busy The call i...

Page 17: ...dle Fast flashing red 200ms The monitored user receives an incoming call Solid red The monitored user is busy The monitored user s conversation is placed on hold This LED status requires server suppor...

Page 18: ...in conversation The shared line is dialing The shared line is seized The shared line conversation is barged in by the other shared line party Slow flashing green for local SCA phone Slow flashing red...

Page 19: ...erface to operate the phone and change settings You can customize your phone by pressing the Menu soft key to access the phone user interface The Advanced option is only accessible to the administrato...

Page 20: ...Interface Web User Interface Status IP Address MAC Firmware Network Phone Accounts Basic Phone Settings Contrast Wallpaper Backlight Language Time Date Administrator Password Key as Send Phone Lock Ri...

Page 21: ...matic Call Distribution ACD x Shared Call Appearance SCA x Bridged Line Appearance BLA x Messages SIP Account User Options Activation Label Display Name Register Name User Name Password Server Options...

Page 22: ...phone customizations On the website In the package English User Guide Phone Web user interface settings Basic call features and advanced phone features On the website English Note You can also downlo...

Page 23: ...IP T29G IP phone Topics include Packaging Contents Phone Installation Phone Initialization Phone Status Basic Network Settings Registration Idle Screen If you require additional information or assista...

Page 24: ...ndset Cord Ethernet Cable Quick Start Guide Check the list before installation If you find anything missing contact your system administrator The following items are optional accessories for your SIP...

Page 25: ...Getting Started 15 Power Adapter Wall Mount Bracket Headset Wireless Headset Adapter EHS36 Bluetooth USB Dongle BT40...

Page 26: ...Connect the handset and optional headset 3 Connect the network and power 1 Attach the stand or the optional wall mount bracket Desk Mount Method Wall Mount Method Optional Note The hookswitch tab has...

Page 27: ...o the DC5V port on the phone and connect the other end of the power adapter into an electrical power outlet 2 Connect the included or a standard Ethernet cable between the Internet port on the phone a...

Page 28: ...reen displays Welcome Initializing Please wait during the initialization DHCP Dynamic Host Configuration Protocol The phone attempts to contact a DHCP server in your network to obtain valid IPv4 netwo...

Page 29: ...tus e g register status of SIP accounts Note To view the phone status via phone user interface 1 Press or press Menu Status 2 Press or to scroll through the list and view the specific information To v...

Page 30: ...nfigure network settings manually The IP phone can support either or both IPv4 and IPv6 addresses To configure the IP address mode via phone user interface 1 Press Menu Advanced default password admin...

Page 31: ...the IP Address Subnet Mask Gateway Primary DNS and Secondary DNS fields respectively 5 Press the Save soft key to accept the change or the Back soft key to cancel To configure a static IPv6 address v...

Page 32: ...4 2 Press or or the Switch soft key to select the PPPoE from the Type field 3 Enter the user name and password in the corresponding fields 4 Press the Save soft key to accept the change or the Back so...

Page 33: ...ne s time date and feature status For more information refer to Icon Instructions on page 3 2 This area shows the line key labels You can customize the line key as other functions For more information...

Page 34: ...User Guide for the SIP T29G IP Phone 24...

Page 35: ...udio Settings Contact Management Call History Management System Customizations If you require additional information or assistance with your new phone contact your system administrator You can customi...

Page 36: ...ge The customized wallpaper appears in the pull down list of Wallpaper Note Backlight has three options Backlight Active Level The intensity of the LCD screen when the phone is active You can change t...

Page 37: ...ht Active Level field 3 Press or or the Switch soft key to select the desired value from the Backlight Inactive Level field 4 Press or or the Switch soft key to select the desired time from the Backli...

Page 38: ...rface is English If the language of your web browser is not supported by the phone the web user interface will use English by default You can change the language for the phone user interface and the w...

Page 39: ...automatically or configure the time and date manually If the phone cannot obtain the time and date from the Simple Network Time Protocol SNTP server contact your system administrator for more informa...

Page 40: ...change or the Back soft key to cancel Note To configure the time and date manually via phone user interface 1 Press Menu Basic Time Date General Manual Settings 2 Enter the specific date and time 3 Pr...

Page 41: ...e abbreviation of the weekday DD represents the two digit day and MMM represents the first three letters of the month The date formats available Date Format Example 2015 05 16 WWW MMM DD Sat May 16 DD...

Page 42: ...or the Back soft key to cancel Administrator password is configurable via web user interface at the path Security Password You can set the or to perform as a send key while dialing To configure key a...

Page 43: ...s by lifting the handset pressing the Speakerphone key the HEADSET key the OK key or Answer soft key and end the call by hanging up the handset pressing the Speakerphone key EndCall soft key or X key...

Page 44: ...ss the Save soft key to accept the change When the phone is locked the LCD screen prompts Phone locked and displays the icon To unlock the phone you must know the phone unlock PIN The default phone un...

Page 45: ...can long press or wait for a period of time if configured to lock the phone again Note To deactivate the phone lock via phone user interface 1 Press Menu Advanced default password admin Phone Lock 2...

Page 46: ...engaged audio devices handset speakerphone or headset when the phone is in use To adjust the volume when the phone is idle 1 Press to adjust the ringer volume Note To adjust the volume when the phone...

Page 47: ...3 Press the Save soft key to accept the change or the Back soft key to cancel A ring tone for the phone is configurable via web user interface at the path Settings Preference Ring Type To select a rin...

Page 48: ...e Upload Ringtone field click Browse to locate a ring tone the file format must be wav file from your local system 3 Click Upload to upload the file Note Single custom ring tone file must be within 8M...

Page 49: ...ory via web user interface 1 Click on Directory Setting 2 In the Directory block select the desired list from the Disabled column and then click The selected list appears in the Enabled column 3 Repea...

Page 50: ...User Guide for the SIP T29G IP Phone 40 Note To view the directory via phone user interface 1 Press the Directory soft key when the phone is idle Directory is configurable via web user interface only...

Page 51: ...or search for a contact or simply dial a contact number from the local directory To add a group to the local directory 1 Press the Directory soft key The IP phone enters the local directory directly...

Page 52: ...ng tone refer to Ring Tones Phone ring tone refer to Ring Tones If a specific ring tone is selected this group will use the ring tone according to the priority Contact ring tone refer to Adding Contac...

Page 53: ...the Back soft key to cancel To delete a group from the local directory 1 Press the Directory soft key The IP phone enters the local directory directly as there is only Local Directory enabled in the...

Page 54: ...one of the following ways Manually From call history From a remote phone book Adding Contacts Manually To add a contact to the local directory manually 1 Press the Directory soft key The IP phone ent...

Page 55: ...p ring tone refer to Adding Groups Account ring tone refer to Ring Tones Phone ring tone refer to Ring Tones 7 Press or or the Switch soft key to select the desired group from the Group field 8 Press...

Page 56: ...e Phone Book to enter the remote phone book 2 Select the desired remote group and then press the Enter soft key 3 Press or to highlight the desired entry 4 Press the Option soft key and then select Ad...

Page 57: ...to enter the local directory 2 Select the desired contact group and then press the Enter soft key 3 Press or to highlight the desired contact 4 Press the Option soft key and then select Detail from th...

Page 58: ...Press or to highlight the desired contact 4 Press the Option soft key and then select Delete from the prompt list The LCD screen prompts the following warning 5 Press the OK soft key to confirm the d...

Page 59: ...the contact via web user interface 1 Click on Directory Local Directory 2 Click to select the desired entry which you want to edit 3 Select the desired photo from the pull down list of Photo 4 Click...

Page 60: ...rectory is removed from the directory press Menu Directory Local Directory to enter the local directory 2 Select the desired contact group and then press the Enter soft key 3 Press or to highlight the...

Page 61: ...the contact name or continuous numbers of the contact number office mobile or other number using the keypad The contacts whose name or phone number matches the characters entered will appear on the L...

Page 62: ...esired list and click or The LCD screen will display search results in the adjusted order 6 Click Confirm to accept the change Note To search for an entry in the enabled search source lists 1 Pick up...

Page 63: ...y via phone user interface or web user interface But you can only import or export the contact list via web user interface To import an XML contact list file via web user interface 1 Click on Director...

Page 64: ...existing contacts while importing the contact list 6 Select the contact information you want to import into the local directory from the pull down list of Index At least one item should be selected to...

Page 65: ...se the default account when placing calls to the contact from the blacklist directory 5 Press the Save soft key to accept the change or the Back soft key to cancel To add a contact to the blacklist di...

Page 66: ...ctory search for a contact or simply dial a contact number from the remote phone book You can configure your new phone to access up to 5 remote phone books For the access URL of the remote phone book...

Page 67: ...back to the previous interface To search for a contact in the remote phone book 1 Press Menu Directory Remote Phone Book If Remote Phone Book is added to the directory press Directory Remote Phone Bo...

Page 68: ...ia web user interface 1 Click on Directory Remote Phone Book 2 Select Enabled from the pull down list of Incoming Outgoing Call lookup 3 Enter the desired refresh period in the Update Time Interval Se...

Page 69: ...tory soft key 2 Press or to switch between All Placed Received Missed and Forwarded call lists 3 Press or to select the desired entry 4 Press the Send soft key To add a contact to the local directory...

Page 70: ...ion on physically connecting a headset refer to Phone Installation on page 16 If you want to use a wireless headset insert the Bluetooth USB dongle into the USB port on the back of the phone For more...

Page 71: ...n Features General Information 2 Select Enabled from the pull down list of Headset Prior 3 Click Confirm to accept the change To use headset prior you should activate the headset mode in advance 1 Phy...

Page 72: ...Confirm to accept the change Note The SIP T29G IP phone supports Bluetooth Bluetooth enables low bandwidth wireless connections within a range of 10 meters 32 feet The best performance is in the 1 to...

Page 73: ...n displays the Bluetooth icon Before you pair a Bluetooth headset check the indicator on the Bluetooth headset to make sure that the Bluetooth headset is discoverable For more information refer to the...

Page 74: ...Password field The default PIN is 0000 or 1234 5 Press the OK soft key The Bluetooth headset is then automatically connected to your phone The Bluetooth icon appears on the LCD screen With the Blueto...

Page 75: ...Bluetooth headset Auto Connection Enables or disables the Bluetooth headset to connect with the phone automatically To edit device information via phone user interface 1 Press Menu Basic Bluetooth 2...

Page 76: ...ooth headset it will still remain paired and be displayed in the Paired Bluetooth Device list So you can easily connect it to your phone again To disconnect your Bluetooth headset from your phone 1 Pr...

Page 77: ...er interface at the path Features Bluetooth There are three types of DSS keys Line Keys Programable Keys and Ext Keys Details will be introduced in the following The SIP T29G IP phone supports 27 line...

Page 78: ...Account ID field 6 Optional Enter a string that will appear on the LCD screen in the Label field 7 Optional Enter the corresponding value in the Value field 8 Optional Enter the corresponding value in...

Page 79: ...f line keys You can use page tips feature to enable the page icon and page switch key LED to indicate different statuses This feature is disabled by default The following table lists the page icons to...

Page 80: ...ls for some key features which will be displayed on the idle LCD screen If the length of the label exceeds the maximum display length the phone only displays the first few characters You can configure...

Page 81: ...rface 1 Click on DSSKey Line Key 2 Select Extended from the pull down list of Label Length 3 Click Confirm to accept the change Note Line key features are explained in the following subchapters in det...

Page 82: ...Default Lock Usage When the phone receives an incoming call the DSS key LED flashes green 1 Press the DSS key to accept the incoming call 2 Press the DSS key to place a call and the active call is pla...

Page 83: ...wer someone else s incoming call on the phone Dependencies Type Key Event Key Type DPickup Account ID the account this feature will be applied to Label key label displayed on the LCD screen Value the...

Page 84: ...p You can use this key feature to quickly access a contact group in the local directory For more information refer to Local Directory on page 41 Dependencies Type Key Event Key Type Local Group Local...

Page 85: ...the DSS key to access the LDAP search screen 2 Enter a few continuous characters of the contact name or continuous numbers of the contact number using the keypad The contacts whose name or phone numb...

Page 86: ...key is Attended Transfer press the DSS key to dial out the number specified in the Value field and then perform the attended or semi attended transfer When the transfer mode on DSS key is New Call pre...

Page 87: ...page 170 Dependencies Type Key Event Key Type SMS Label key label displayed on the LCD screen Usage Press the DSS key when the phone is idle to access text message Group Listening You can use this key...

Page 88: ...You can use this key feature to trigger the phone to send an HTTP GET request containing a specific URL Dependencies Type URL Label key label displayed on the LCD screen URL the URL contained in the...

Page 89: ...field Label is configurable only when customizing SoftKey 1 4 4 Click Confirm to accept the change You can click Reset to default to reset custom settings to defaults Then you can press the keys on th...

Page 90: ...ace 1 Click on DSSKey Ext Key 2 Customize specific features for these keys 3 Click Confirm to accept the change For more information refer to Yealink EXP38 User Guide or Yealink EXP39 User Guide Note...

Page 91: ...tbound proxy servers do the following 1 Press or or the Switch soft key to select Enabled from the Outbound Status field 2 Enter the desired value in the Outbound Proxy1 2 and Proxy Fallback Interval...

Page 92: ...ciate with an account This enhances call visualization and simplifies call handling If this is the case the LCD screen will resemble the following figure Incoming calls to this account will be distrib...

Page 93: ...7 1234 would match 9151234 9161234 9171234 The parentheses can be used to group together patterns for instance to logically combine two or more patterns Example 1 9 2 7 3 would match 923 153 773 etc...

Page 94: ...hen press the Send soft key the phone will dial out 1234567 instead Note To edit a replace rule via web user interface 1 Click on Settings Dial Plan Replace Rule 2 Select the desired replace rule by c...

Page 95: ...phone To add a dial now rule via web user interface 1 Click on Settings Dial Plan Dial now 2 Enter the desired value e g 1xxx in the Rule field 3 Enter the desired line ID in the Account field or lea...

Page 96: ...are also known as Numbering Plan Areas NPAs They usually indicate geographical areas in a country This feature is necessary when dialing a phone number outside the code area For example an area code...

Page 97: ...om being dialed on your phone When you dial a block out number on your phone the dialing will fail and the LCD screen will prompt Forbidden Number To add a block out number via web user interface 1 Cl...

Page 98: ...r assistance when necessary The emergency telephone number may differ from country to country It is typically a three digit number so that it can be easily remembered and dialed quickly Some countries...

Page 99: ...on page 33 Note To specify emergency numbers via web user interface 1 Click on Features Phone Lock 2 Enter the emergency number in the Emergency field Contact your local phone service provider for ava...

Page 100: ...P phone to automatically dial out a phone number without pressing the send key You can also configure a delay and then the phone will dial out the phone number automatically after the designated perio...

Page 101: ...fter the designated period of time To configure the hotline number via phone user interface 1 Press Menu Features Others Hot Line 2 Enter the desired number in the Number field 3 Enter the delay time...

Page 102: ...User Guide for the SIP T29G IP Phone 92 Information...

Page 103: ...phone Topics include Placing Calls Answering Calls Ending Calls Redialing Numbers Recent Call In Dialing Auto Answer Auto Redial Call Completion ReCall Call Mute Call Hold Resume Do Not Disturb DND Ca...

Page 104: ...r 1002 has lasted 5 seconds To place a call using the handset 1 Pick up the handset 2 Enter the desired number using the keypad 3 Press or the Send soft key The key is configured as a send key by defa...

Page 105: ...The SIP T29G IP phone can handle a maximum of 50 calls at one time To place multiple calls You can have more than one call on your SIP T29G IP phone To place a new call during an active call do one o...

Page 106: ...key LED flashes green To answer a call using the headset Do one of the following Press With the headset mode activated press the Answer soft key With the headset mode activated press the line key the...

Page 107: ...number from your phone 1 Press twice A call to your last dialed number is attempted To redial a previously dialed number from your phone 1 Press when the phone is idle 2 Press or to select the desired...

Page 108: ...ng screen 1 Pick up the handset press the speakerphone key or press the line key The LCD screen displays the placed calls list You can use auto answer feature to automatically answer an incoming call...

Page 109: ...tically redial a phone number when the called party is busy You can also configure the number of auto redial attempts and the time to wait between redial attempts To configure auto redial via phone us...

Page 110: ...th Features General Information To use auto redial When the called party is busy the LCD screen prompts the following 1 Press the OK soft key to activate auto redial The following prompt will appear o...

Page 111: ...ess or or the Switch soft key to select Enabled from the Call Completion field 3 Press the Save soft key to accept the change or the Back soft key to cancel Call completion is configurable via web use...

Page 112: ...2 Select the desired DSS key 3 Press or or the Switch soft key to select Key Event from the Type field 4 Press or or the Switch soft key to select ReCall from the Key Type field 5 Optional Enter a st...

Page 113: ...n mute a call 1 Press again to un mute the call You can place an active call on hold Only one active call can be in progress at any time Other calls can be made and received while placing the original...

Page 114: ...of missed calls will appear on the LCD screen and callers will receive a busy message All calls you receive while DND is enabled are logged to your missed calls list Note You can enable disable DND fo...

Page 115: ...the status bar indicates that DND is enabled Incoming calls will be rejected automatically and n New Missed Call s n indicates the number of missed calls will appear on the LCD screen Note DND mode is...

Page 116: ...e to and the icon will appear on the status bar If you activate DND for the non default account only the associated line icon will change to Incoming calls on the specific line will be rejected automa...

Page 117: ...y to accept the change The icon appears on the status bar and all line icons change to Incoming calls will be rejected automatically and the LCD screen will prompt n New Missed Call s n indicates the...

Page 118: ...ty through static forwarding You can also forward calls while your phone is ringing refer to the dynamic forwarding Static Forwarding Three types of static forwarding Always Forward Incoming calls are...

Page 119: ...eatures Forward DND 2 In the Forward block mark the desired radio box in the Mode field 3 Click Confirm to accept the change Note To enable call forward in phone mode 1 Press Menu Features Call Forwar...

Page 120: ...g calls to when the phone is busy in the Forward to field 3 Optional Enter the busy forward on code or off code respectively in the On Code or Off Code field c If you select No Answer Forward 1 Press...

Page 121: ...rward in custom mode 1 Press Menu Features Call Forward 2 Press or to select the desired account and then press the Enter soft key 3 Press or to select the desired forwarding type and then press the E...

Page 122: ...g 1 Press or to highlight the Always Forward field 2 Press the All Lines soft key The LCD screen prompts Copy to all lines 3 Press the OK soft key to accept the change or the Cancel soft key to cancel...

Page 123: ...CD screen prompts Copy to all lines 3 Press the OK soft key to accept the change or the Cancel soft key to cancel c If you select No Answer Forward you can enable it for a specific account 1 Press or...

Page 124: ...nge or the Back soft key to cancel If you activate call forward for the default account the associated line icon will change to and the icon will appear on the status bar If you activate call forward...

Page 125: ...call forward is enabled on the phone the phone cannot forward incoming calls from the numbers specified in the Forward Authorized Numbers field Note To disable call forward in phone mode Do one of the...

Page 126: ...another party 1 When the phone is ringing press the FWD soft key 2 Enter the number you want to forward the incoming call to 3 Press or the Send soft key The LCD screen prompts a call forward message...

Page 127: ...39 for more information Press the Directory soft key and then select Remote Phone Book Select the desired group and search for the contact Directory should be configured in advance Refer to Directory...

Page 128: ...ing on the phone If call waiting is enabled you can receive another call while there is already an active call on the phone Otherwise another incoming call is automatically rejected by the phone with...

Page 129: ...ference soft key to place a new call The active call is placed on hold 3 Enter the number of the second party and press or the Send soft key 4 When the second party answers the call press or the Confe...

Page 130: ...ce call Press the New Call soft key to place a new call Press the Back soft key to return to the previous screen Press to mute the conference call Press the EndCall soft key to drop the conference cal...

Page 131: ...arty to the conference 5 Press or the Conference soft key to place a new call The conference is placed on hold 6 Enter the number of the new party and then press or the Send soft key 7 When the new pa...

Page 132: ...Press or or the Switch soft key to select the desired line from the Account ID field 6 Optional Enter the string that will appear on the LCD screen in the Label field 7 Enter the call park code in th...

Page 133: ...pickup code beforehand on a global or per line basis via web user interface Note Directed Call Pickup To enable directed call pickup and configure the directed call pickup code on a global basis via...

Page 134: ...firm to accept the change To pick up a call directly 1 Pick up the handset press the speakerphone or press the line key and then press the More soft key The DPickup soft key appears on the LCD screen...

Page 135: ...ace 1 Click on Features Call Pickup 2 Select Enabled from the pull down list of Group Call Pickup 3 Enter the group call pickup code in the Group Call Pickup Code field 4 Click Confirm to accept the c...

Page 136: ...alled party when you call someone For example you want to call to consult some of the services but don t want to be harassed Anonymous call is configurable on a per line basis You can also configure t...

Page 137: ...s call off code in the Off Code field 7 Press the Save soft key to accept the change or the Back soft key to cancel Anonymous call is configurable via web user interface at the path Account Basic To p...

Page 138: ...ey to select the desired value from the Send Rejection Code field The phone will send the configured on code or off code depending on your selection when you enable or disable anonymous call rejection...

Page 139: ...iend s line busy or idle The BLF key LED illuminates solid red when the friend s line is in use For more information on BLF key LED indicators refer to LED Instructions on page 6 You can press a BLF k...

Page 140: ...incoming call You can also enable visual alert feature for BLF pickup on the phone This allows the LCD screen of the monitoring phone to display the caller ID when the monitored line receives an inco...

Page 141: ...r1 and user2 The key LEDs illuminate either flashing or solid depending on the status of those users For more BLF List key LED indicators refer to LED Instructions on page 6 You can use the BLF List k...

Page 142: ...monitored user Before retrieving the parked call ensure that the BLF List Retrieve call parked Code has been configured in advance If the code is not configured the phone will place a call to the moni...

Page 143: ...eader Record on off to trigger a recording URL Record The phone sends HTTP URL request to trigger a recording Contact your system administrator for the predefined URL Note To configure a record key vi...

Page 144: ...n the LCD screen in the Label field 5 Enter the URL e g http 10 1 2 224 phonerecording cgi in the URL Record field 6 Press the Save soft key to accept the change or the Back soft key to cancel Record...

Page 145: ...ystem For example you can dial an access code to listen to the recordings Note Hot desking originates from the definition of being the temporary physical occupant of a work station or surface by a par...

Page 146: ...rom the Key Type field 5 Optional Enter a string that will appear on the LCD screen in the Label field 6 Press the Save soft key to accept the change or the Back soft key to cancel Hot desking key is...

Page 147: ...igured target extension for outgoing intercom calls and the target extension will automatically answer incoming intercom calls by default Note To configure an intercom key via phone user interface 1 P...

Page 148: ...know Intercom Feature Description Accept Intercom Enable or disable the IP phone to answer an incoming intercom call Intercom Mute Enable or disable the IP phone s microphone for intercom calls Inter...

Page 149: ...e or disable the phone to automatically answer an incoming intercom call while there is already an active call on the phone If Intercom Barge is enabled the phone will automatically answer the interco...

Page 150: ...rotocol RTP stream to the pre configured multicast address es without involving SIP signaling You can configure the phone to receive an RTP stream from pre configured multicast listening address es wi...

Page 151: ...ter the string that will appear on the LCD screen in the Label field 6 Press the Save soft key to accept the change or the Back soft key to cancel Paging list key is configurable via web user interfac...

Page 152: ...s or to select a desired group 3 Press the Option soft key and then select Delete from the prompt list The LCD screen prompts Delete selected paging group 4 Press the OK soft key to accept the change...

Page 153: ...rity of the voice call in progress If the priority of an incoming multicast paging call is lower than that of the active call it will be ignored automatically If Disabled is selected from the pull dow...

Page 154: ...lect the desired value from the pull down list of Paging Barge 3 Select the desired value from the pull down list of Paging Priority Active 4 Enter the multicast IP address es and port number e g 224...

Page 155: ...session press the Resume soft key The multicast RTP session is established again 4 To end the multicast RTP session press the EndCall soft key Note To send RTP stream via a paging list key when the r...

Page 156: ...he Music on Hold Server account The Music on Hold Server account automatically answers the SIP INVITE messages and immediately plays audio from some source located anywhere LAN Internet to the held pa...

Page 157: ...fer to Icon Instructions on page 3 Note To configure an ACD key via phone user interface 1 Press Menu Features DSS Keys 2 Select the desired DSS key 3 Press or or the Switch soft key to select ACD fro...

Page 158: ...status synchronizes on both IP phone and ACD system When you set the ACD user status to be available the ACD key LED illuminates solid green and then the server begins distributing calls to your phon...

Page 159: ...ension will cause both phones to ring simultaneously The incoming call can be answered on either phone but not both This feature is very useful in the boss and secretary scenario For example the secre...

Page 160: ...auto linekeys feature is enabled For example party A party B share the account 4603 phone A registers the primary account 4603 and assigns line key 1 and line key 2 for the account 4603 phone B regist...

Page 161: ...Advanced Phone Features 151 If Auto LineKeys is enabled you can automatically assign multiple DSS keys with Line type for a registered shared line on the phone 3 Click Confirm to accept the change...

Page 162: ...line key on phone A via web user interface 1 Register the primary account 4603 2 Click on Advanced and then select Shared Call Appearance from the pull down list of Shared Line 3 Enter the desired nu...

Page 163: ...accept the change The phone A will automatically configure the line keys from the first unused DSS key according to the configured number in the Number of line key field To configure the shared line s...

Page 164: ...account 4603 in the Register Name field 2 Click on Advanced and then select Shared Call Appearance from the pull down list of Shared Line 3 Enter the desired number in the Number of line key field Th...

Page 165: ...to retrieve the held call For example you can retrieve the held call on either phone A or phone B when you place a call on public hold you can retrieve the held call only on phone A when you place a c...

Page 166: ...from the Type field 4 Press or or the Switch soft key to select Private Hold from the Key Type field 5 Optional Enter a string that will appear on the LCD screen in the Label field 6 Press the Save so...

Page 167: ...ed information on using the SIP T29G IP phone in a SCA Hybrid Key System scenario In a SCA Hybrid Key System scenario the status of the line key LED which associates with a shared line will change For...

Page 168: ...ss the NewCall soft key to enter the pre dialing screen Enter the desired number using the keypad Press or the Send soft key Phone A will dial the entered number using the line key 2 automatically Pre...

Page 169: ...hone A Press the line key 2 Phone B stops ringing Press the Answer soft key Phone B stop ringing Press to access the new call Press or the Answer soft key Phone B stop ringing The incoming call is ans...

Page 170: ...A when party A and party C are talking The line key LEDs on phone A slow flash green and phone B slow flash red when the shared line call is placed on hold To place a call on private hold 1 Press the...

Page 171: ...D indicator or the Resume soft key The conversation between phone A and phone C is retrieved To retrieve the call on phone B Do one of the following Press the line key with the slow flashing red LED i...

Page 172: ...l do the following 1 Long press the desired line key on phone B The Cancel CallPull NewCall and Barge In soft keys appear on the LCD screen of phone B 2 Press the Barge In soft key to interrupt the ac...

Page 173: ...key to interrupt the active call of phone A Party B may hear a warning tone and then set up a conference call with the other parties of the active call 4 Press the Hold or the EndCall soft key If any...

Page 174: ...s the CallPull soft key The active call has been retrieved from the phone A successfully If there is a held call between phone A and phone C do the following 1 Long press the desired line key on phone...

Page 175: ...call to the BLA number can be presented to multiple phones in the group simultaneously The incoming call can be answered on any IP phone of the group but not all You can share a BLA number on two or m...

Page 176: ...IP T29G IP Phone 166 To register account and configure BLA feature on phone A via web user interface 1 Register the account 14019833020 2 Click on Advanced and then select Draft BLA from the pull down...

Page 177: ...Features 167 3 Enter the desired number in the BLA Number field 4 Click Confirm to accept the change To register account and configure BLA feature on phone B via web user interface 1 Register the acco...

Page 178: ...cenario In a BLA scenario the status of the line key LED which associates with a bridged line will change For more information on line key LED indicators refer to LED Instructions on page 6 You can do...

Page 179: ...keypad Press or the Send soft key Phone A will dial the entered number When the phone C dials the BLA number 14084588327 an incoming call will arrive on the bridged line The phone A and phone B ring...

Page 180: ...To retrieve the held call on phone B 1 Press the line key with the slow flash red LED indicator on phone B The conversation is established between phone B and phone C phone A disconnects the call You...

Page 181: ...an 100 the phone will directly delete the oldest text message in the box Note To read a text message 1 Press Menu Message Text Message Inbox 2 Select the desired message and press the View soft key No...

Page 182: ...6 Press the Send soft key to send the message or the Back soft key to cancel Sending a text message is configurable via web user interface at the path Features SMS To reply a text message 1 Press Menu...

Page 183: ...screen prompts Delete the selected message 4 Press the OK soft key to delete this message or the Cancel soft key to cancel You can also delete all text messages by pressing the Option soft key and th...

Page 184: ...rs it won t pop up again unless the user receives a new voice mail or the user re registers the account that has unread voice mail s Note To leave a voice mail You can leave a voice mail for someone e...

Page 185: ...voice mail access code 2 Follow the voice prompt to listen to your voice mails Note To view the voice mail via phone user interface 1 Press Menu Message Voice Mail View Voice Mail The LCD screen disp...

Page 186: ...ou need to know Options Description Subscribe for MWI Enable or disable a subscription for MWI service MWI Subscription Period Period of MWI subscription The IP phone sends a refresh SUBSCRIBE request...

Page 187: ...ll subscribe to the account number for MWI service by default To enable subscribe MWI to voice mail via web user interface 1 Click on Account Advanced 2 Select the desired account from the pull down l...

Page 188: ...esired voice mail number in the Voice Mail field 6 Click Confirm to accept the change The IP phone will subscribe to the voice mail number for MWI service using Subscribe MWI to Voice Mail Note MWI su...

Page 189: ...not loose Ensure that the switch or hub in your network is operational Why doesn t the phone display time and date correctly Check if you have configured the phone to obtain the time and date from th...

Page 190: ...k that call forward is disabled on the phone Refer to Call Forward on page 108 Check whether the caller number is stored in the blacklist directory Refer to Blacklist on page 54 Why is my handset not...

Page 191: ...General Information 2 Select the desired value from the pull down list of Play Hold Tone 3 Enter the desired time in the Play Hold Tone Delay field 4 Click Confirm to accept the change Why does the wa...

Page 192: ...d 4 Click Confirm to accept the change You can also contact your system administrator for help Note How to make a call using SRTP You can enable SRTP to encrypt the audio stream s of phone calls The p...

Page 193: ...pt the change Note How to reboot the phone To reboot the phone via web user interface 1 Click on Settings Upgrade 2 Click Reboot to reboot the IP phone Any reboot of the phone may take a few minutes S...

Page 194: ...the trace 4 Click Stop to stop the capture 5 Click Export to open file download window and then save the file to your local system How to export system log We may need you to provide a system log to h...

Page 195: ...to upgrade firmware To upgrade firmware via web user interface 1 Click on Settings Upgrade 2 Click Browse to locate the required firmware from your local system 3 Click Upgrade to upgrade the firmware...

Page 196: ...ll history set on the phone will be reset Userdata Reset All custom data e g ring tone set on the phone will be reset Contact your system administrator before resetting the phone To reset the phone vi...

Page 197: ...Troubleshooting 187 The phone will be reset to factory settings sucessfully after startup Note Reset of your phone may take a few minutes Do not power off until the phone has started up successfully...

Page 198: ...User Guide for the SIP T29G IP Phone 188...

Page 199: ...se safety instructions before use The following basic safety precautions should always be followed to reduce the risk of fire electrical shock and other personal injury General Requirements Before you...

Page 200: ...nplugging any cable make sure that your hands are completely dry Do not spill liquid of any kind on the product or use the equipment near water for example near a bathtub washbowl kitchen sink wet bas...

Page 201: ...Regulatory Notices 191 Keep the power plug clean and dry Using a dirty or wet power plug may lead to electric shock or other perils...

Page 202: ...User Guide for the SIP T29G IP Phone 192...

Page 203: ...nchal Spain Canary Islands Las Palmas UK London 1 Albania Tirane Austria Vienna Belgium Brussels Caicos Chad Croatia Zagreb Czech Republic Prague Denmark Kopenhagen France Paris Germany Berlin Hungary...

Page 204: ...bane Australia Hobart Australia Sydney Melboume Canberra Russia Vladivostok 10 30 Australia Lord Howe Islands 11 New Caledonia Noumea Russia Srednekolymsk Time 11 30 Norfolk Island 12 New Zealand Well...

Page 205: ...9 Contrast 27 Copyright vi Customizing Your Phone 25 D Declaration of Conformity vi Deleting Contacts 47 Dial now 85 Dial Plan 83 Do Not Disturb DND 104 Documentation 11 DSS Keys 67 E Editing Contacts...

Page 206: ...ration 22 Regulatory Notices 189 Remote Phone Book 56 Replace Rule 83 Ring Tones 36 S Safety Instructions 189 Search Source List in Dialing 51 Searching for Contacts 51 Semi attended Transfer 116 Serv...

Reviews: