


2. Inspection and Adjustment
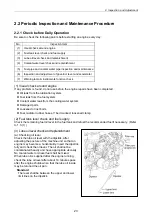
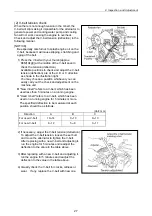
(2) V-belt tension check
When there is not enough tension in the V-belt, the
V-belt will slip making it impossible for the alternator to
generate power and cooling water pump and cooling
an will not work causing the engine to overheat.
f
Check and adjust the V-belt tension (deflection) in the
following manner.
[NOTICE]
Be especially careful not to splash engine oil on the
V-belt, because it will cause slipping, stretching and
aging of the belt.
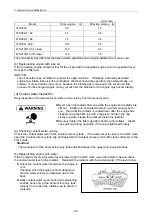
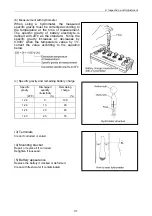
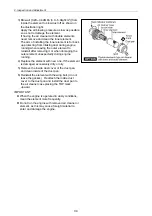
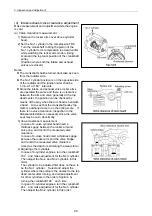
1) Press the V-belt with your thumb [approx.
98N(10kgf)] at the middle of the V-belt span to
check the tension (deflection).
Available positions to check and adjust the V-belt
tension (deflection) are at the A, B or C direction
as shown in the illustration right.
You may choose a position whichever you can
easily carry out the check and adjustment on the
machine unit.
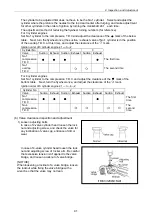
"New V-belt" refers to a V-belt, which has been
used less than 5 minutes on a running engine.
"Used V-belt" refers to a V-belt, which has been
used on a running engine for 5 minutes or more.
The specified deflection to be measured at each
position should be as follows.
(Unit: mm)
Direction A
B
C
For used V-belt
10 14
7 10
9 13
For new V-belt
8 12 5 8 7 11
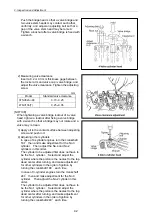
2) If necessary, adjust the V-belt tension (deflection).
To adjust the V-belt tension, loosen the set bolt
and move the alternator to tighten the V-belt.
After replacing with a new V-belt and adjusting it,
run the engine for 5 minutes and readjust the
deflection to the value in the table above.
3) After replacing with a new V-belt and adjusting it,
run the engine for 5 minutes and readjust the
deflection to the value in the table above.
4) Visually check the V-belt for cracks, oiliness or
wear. If any, replace the V-belt with new one.
27
Summary of Contents for 3TNV Series
Page 1: ...4TNV106 4TNV106T 4TNV94L 4TNV98 4TNV98T 3TNV82A 3TNV84 T 4TNV84 T 3TNV88 4TNV88 ...
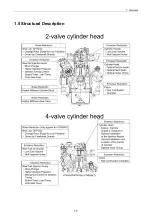
Page 31: ...1 General 1 4 Engine External Views 16 ...
Page 32: ...1 General 1 5 Structural Description 17 ...
Page 156: ...9 Starting Motor 9 1 2 Components 141 ...
Page 157: ...9 Starting Motor 9 1 3 Troubleshooting 142 ...
Page 172: ...9 Starting Motor 9 2 3 Troubleshooting 157 ...
Page 175: ...9 Starting Motor 2 Removal of magnetic switch Remove the M6 bolts 10mm 2 160 ...
Page 185: ...9 Starting Motor 3 Brush 1 Check wear of the brush and the brush spring force 170 ...
Page 194: ...10 Alternator 179 10 1 6 Troubleshooting ...
Page 195: ...11 Electric Wiring 180 11 ELECTRIC WIRING 11 1 Electric Wiring Diagram ...
Page 213: ......


