FUEL INJECTION SYSTEM
8-31
TIP
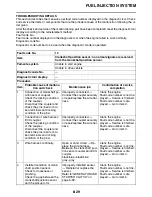
• If fault code numbers 13 and 14 are both displayed, perform the checks and maintenance jobs for
fault code number 13 first.
• Before troubleshooting, disconnect the starter motor lead from the starter relay.
4
Installed condition of intake
air pressure sensor.
Check for looseness or
pinching.
Improperly installed sensor
Reinstall or replace the
sensor.
Push the start switch.
Fault code number is not dis-
played
Service is finished.
Fault code number is dis-
played
Go to item 5.
5
Defective intake air pressure
sensor.
Execute the diagnostic mode.
(Code No. 03)
When engine is stopped:
Atmospheric pressure at the
current altitude and weather
conditions is indicated.
At sea level: Approx. 101 kPa
1000 m above sea level: Ap-
prox. 90 kPa
2000 m above sea level: Ap-
prox. 80 kPa
3000 m above sea level: Ap-
prox. 70 kPa
When engine is cranking:
Make sure that the indication
value changes.
The value does not change
when engine is cranking.
Check the intake air pressure
sensor.
Replace if defective.
Refer to “CHECKING THE
INTAKE AIR PRESSURE
SENSOR” on page 8-71.
Push the start switch.
Fault code number is not dis-
played
Service is finished.
Fault code number is dis-
played
Go to item 6.
6
Malfunction in ECU.
Replace the ECU.
Fault code No.
14
Item
Intake air pressure sensor: hose system malfunction (clogged
or detached hose).
Fail-safe system
Able to start engine
Able to drive vehicle
Diagnostic code No.
03
Diagnostic tool display
Displays the intake air pressure.
Procedure
Operate the throttle while pushing the start switch.(If the display
value changes, the performance is OK.)
Item
Probable cause of malfunc-
tion and check
Maintenance job
Confirmation of service
completion
Fault code No.
13
Item
Intake air pressure sensor: open or short circuit detected.
Summary of Contents for YZ 2018 Series
Page 6: ...EASB916006 YAMAHA MOTOR CORPORATION U S A YZ MOTORCYCLE LIMITED WARRANTY...
Page 10: ......
Page 40: ...MOTORCYCLE CARE AND STORAGE 1 28...
Page 64: ...LUBRICATION SYSTEM CHART AND DIAGRAMS 2 23...
Page 66: ...LUBRICATION SYSTEM CHART AND DIAGRAMS 2 25...
Page 68: ...LUBRICATION SYSTEM CHART AND DIAGRAMS 2 27...
Page 70: ...CABLE ROUTING DIAGRAM 2 29 EASB29B065 CABLE ROUTING DIAGRAM...
Page 72: ...CABLE ROUTING DIAGRAM 2 31...
Page 74: ...CABLE ROUTING DIAGRAM 2 33...
Page 76: ...CABLE ROUTING DIAGRAM 2 35...
Page 78: ...CABLE ROUTING DIAGRAM 2 37...
Page 80: ...CABLE ROUTING DIAGRAM 2 39...
Page 82: ...CABLE ROUTING DIAGRAM 2 41...
Page 84: ...CABLE ROUTING DIAGRAM 2 43...
Page 255: ...OIL PUMP AND BALANCER GEAR 5 58 a 2 10 b 2 9 1 b 5 3 a 4 10 5 9 3 E c d 6 7 8 8 b 6...
Page 276: ...TRANSMISSION 5 79...
Page 290: ...FUEL TANK 7 5 A Left B Right 1 1 A 0 mm 0 in B 1 1 15 mm 0 59 in...
Page 296: ...THROTTLE BODY 7 11...
Page 299: ......
Page 313: ...CHARGING SYSTEM 8 14...
Page 321: ...COOLING SYSTEM For JPN 8 22...
Page 351: ...FUEL PUMP SYSTEM 8 52 EASB29B345...
Page 352: ...ELECTRICAL COMPONENTS 8 53 ELECTRICAL COMPONENTS EASB29B346 9 10 11 1 3 2 4 5 6 7 8...
Page 354: ...ELECTRICAL COMPONENTS 8 55 11 10 9 2 3 1 6 7 8 4 5...
Page 356: ...ELECTRICAL COMPONENTS 8 57 EASB29B347 CHECKING THE SWITCHES 4 1 3 2 B B Sb B B B B B B B B...
Page 372: ...ELECTRICAL COMPONENTS 8 73 c Measure the fuel injector resistance...


