background image

8-52

WorkCentre C2424 Service Manual 

Motors, Gears, Solenoids, Clutches, and Fans

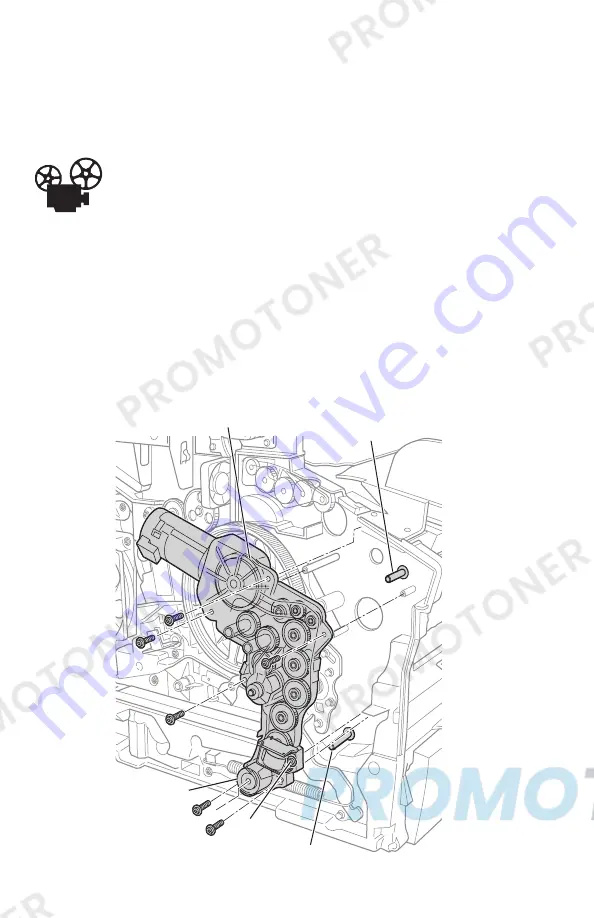
Media Drive Gearbox with Two Clutches and Solenoid 

(PL 4.14)

Videos are available with instructions for replacing the media drive 
gearbox. Videos are located on the WorkCentre C2424 Product 
training CD-ROM.

1.

Remove the output paper tray and left side cover (page 8-11).

2.

Disconnect the media path motor, deskew clutch, pick clutch, and Tray 1 pick 
solenoid wiring harnesses.

3.

Remove 6 screws securing the media drive gearbox and remove the entire 
assembly

Caution

Do NOT remove the screw for the Tray 1 pick solenoid.

Media Drive Gearbox

Pick Clutch

s2424-025

Duplex Roller Shaft

Pick Roller Shaft

Loosen Only
(Do Not Remove)

Summary of Contents for WorkCentre C2424/DX

Page 1: ...WorkCentre C2424 copier printer Service Manual...

Page 2: ......

Page 3: ...ng servicing instructions are for use by qualified service personnel only To avoid personal injury do not perform any servicing other than that contained in the operating instructions unless you are q...

Page 4: ...d States and or other countries HP GL HP UX and PCL are trademarks of Hewlett Packard Corporation in the United States and or other countries IBM and AIX are trademarks of International Business Machi...

Page 5: ...of the system to aid in troubleshooting problems not associated with a control panel message or error code This section also covers the Service Diagnostic functions of the system Section 5 Image Quali...

Page 6: ...ng or maintenance procedure practice or condition that is neccessary to efficiently accomplish a task A note can provide additional information related to a specific subject or add a comment on the re...

Page 7: ...gs are provided to prevent overheating of the system Do not drop paper clips or staples into the system The power cord is attached to the system as a plug in device on the side of the system If it is...

Page 8: ...or supplied with the system options and supplies Caution Use of other than Genuine Xerox WorkCentre C2424 Solid Ink may affect print and copy quality and system reliability It is the only ink designed...

Page 9: ...lways secure the scanhead shipping restraint on the left side of the scanner to lock the scanhead before removing the scanner portion of the system Shipping the scanner with the scanhead unlocked can...

Page 10: ...nt or Total Satisfaction Guarantee Note The Total Satisfaction Guarantee is available in the United States and Canada Coverage may vary outside these areas please contact your local representative for...

Page 11: ...rap before applying power to the unit under test to avoid potential shock After removing a static sensitive assembly from its anti static bag place it on a grounded conductive surface If the anti stat...

Page 12: ...rotective ground connection by way of the grounding conductor in the power cord is essential for safe operation Warning Labels Read and obey all posted warning labels Throughout the printer warning la...

Page 13: ...ical Components When servicing mechanical components within the printer manually rotate drive assemblies rollers and gears Warning Do not try to manually rotate or manually stop the drive assemblies w...

Page 14: ...e use shielded interface cables A shielded parallel cable can be purchased directly from Xerox at www xerox com office supplies Xerox has tested this product to internationally accepted electromagneti...

Page 15: ...an or equal to 16A per phase EN 61000 3 3 1995 IEC61000 3 3 Part 3 Limits Section 3 Limitation of voltage fluctuations and flicker in low voltage supply systems for equipment with rated current less t...

Page 16: ...xii WorkCentre C2424 Copier Printer...

Page 17: ...ical Dimensions and Clearances 1 12 Print Engine IOT Functional Specifications 1 13 System Electrical Specifications 1 14 System Environmental Specifications 1 14 Scanner DADF IIT Specifications 1 14...

Page 18: ...Codes 3 3 BIST Error Reporting 3 3 POST Error Reporting 3 4 PEST Error Reporting 3 7 Fault Code Error Message Troubleshooting 3 8 Fault Code Error Reporting 3 8 Interpreting Fault Codes 3 8 1 000 4x E...

Page 19: ...Sequence 4 54 Mechanical Initialization of the Print Engine 4 55 Head Cleaning Cycle Performance 4 57 Electrical Troubleshooting 4 58 Electronics Module 4 58 Document Feeder Lamp Does Not Turn ON 4 5...

Page 20: ...anner Image Quality Problems 5 8 Dark Streaks on the Copied Image 5 8 Copied Image is Skewed 5 8 Copied Image is Lighter Darker than the Original 5 8 Copy Image Colors Do Not Match the Original 5 9 Fu...

Page 21: ...aning and Maintenance Inspection 7 2 System Self Maintenance 7 3 Printhead Maintenance Cycle Eliminate Light Stripes 7 3 Paper Preheater Cleaning Remove Print Smears 7 4 Transfix Roller Oiling 7 4 Dru...

Page 22: ...9 Transfix Load Module 8 30 Transfix Camshaft Assembly 8 34 Drum Maintenance Camshaft Assembly 8 35 Drum Maintenance Pivot Plate Assembly 8 36 Drum Assembly 8 37 Purge Pressure Pump 8 41 Paper Path 8...

Page 23: ...Block Wiring Diagram Continued 10 7 Scanner Exit Module Power Supply and MEP Exit Module Board 10 8 Right Side Wiring Diagram 10 9 Right Side Wiring Diagram Continued 10 10 Left Side Wiring Diagram 10...

Page 24: ...xx WorkCentre C2424 Copier Printer...

Page 25: ...rmation In this chapter System Introduction and Overview System Features and Configurations Routine Maintenance Items and Consumables Life Expectancy Control Panel Layout System Specifications Tray an...

Page 26: ...verview The Xerox WorkCentre C2424 Copier Printer Service Manual is the primary document used for repairing maintaining and troubleshooting the system To ensure understanding of this product complete...

Page 27: ...s main assemblies power supply circuit boards sensors paper path and functions see Section 2 Theory of Operation on page 2 1 Standard Configurations The WorkCentre C2424 is offered in three configurat...

Page 28: ...et capacity custom size and manual feed 5 Output tray 6 Exit cover 7 Control panel 8 DADF front cover 9 Duplex Automatic Document Feeder DADF 10 Interface I O cover 11 Waste tray maintenance kit side...

Page 29: ...1 Maintenance kit 2 Waste tray 3 Power cord connection 4 Power switch 5 Scanner cable connection 6 USB connection 7 Configuration card 8 Ethernet 10 100 Base T connection 1 RAM slots 2 NVRAM chip 3 H...

Page 30: ...access to the electronics module RAM and NVRAM chips The system s hard drive is mounted on the rear panel When installing a new electronics module in the system the following components need to be tr...

Page 31: ...ycles 0 20 coverage 20 000 20 100 coverage Ink 1220 prints per stick Standard Capacity Maintenance Kit 10 000 cycles Waste Tray Empty every 5 Purges 35 g DADF Pick Rollers and Separator Pad 50 000 sca...

Page 32: ...r print copy and scan jobs Displays menus that enable changing the system s settings and accesses tools to help resolve problems The control panel is divided into three major areas Left side Copying a...

Page 33: ...Output button and LEDs copy only Press to select Uncollated or Collated for your copies 2 Color Mode button and LEDs Press to select B W black and white or Color for your copy or scan job 3 2 Sided b...

Page 34: ...play shows status messages and menus 8 Up Arrow button Scrolls upward 9 Enter button The menu option selected 10 Status Indicator LED Blinking green System is busy or in Standby or PowerSaver mode Ste...

Page 35: ...hen press the Enter button to print The menu map can also be found in the appendix of this manual See Control Panel Menu Map on page A 2 1 Number keys Press to enter a number such as for the number of...

Page 36: ...OT only 30 0 kg 66 1 lbs Scanner Unit and DADF Unit Value Scanner Weight 6 3 kg 14 lbs DADF Weight 4 8 kg 10 6 lbs Optional 525 Sheet Feeder Value Weight 5 kg 11 lbs Optional Cart Value Width 50 cm 19...

Page 37: ...2400 for 400 zoom FPOT 6 seconds from Ready FPOT Color Copy 15 seconds per page 1st copy subsequent copies at printer speed Memory 2 slots minumum 256 MB maximum 512 MB PC133 DRAM 256 MB RAM standard...

Page 38: ...Nominal Operating Environment Temperature 10 32 C 50 90 F operating Humidity 10 80 RH Non Condensing operating Characteristic Specification Printing Process Print Engine Scan to Capabilities Scan to...

Page 39: ...Always equals optical resolution Calibration Time less than 2 seconds performed prior to copier and scan operations Power Saver Mode Scanner and DADF are switched OFF Also lamps automatically turn off...

Page 40: ...1 Xerox Professional Solid Ink Photo Paper Xerox Professional Solid Ink Glossy Paper and Xerox Professional Solid Ink Trifold Brochures can be printed from any tray although they exceed the recommende...

Page 41: ...s completely dry Use the glass rather than the document feeder to copy or scan the following types of originals Paper with paper clips or staples attached Paper with wrinkles curls folds tears or notc...

Page 42: ...Trifold Brochures Transparency Labels A6 105 x 148 mm Index Cards 3 x 5 in Plain Paper Card Stock 60 220 g m2 16 40 lb Bond 22 80 lb Cover Custom Width 140 216 mm 5 5 8 5 in and Height 210 356 mm 8 3...

Page 43: ...void light heat and dampness Avoid attics kitchens garages and basements for storing paper Inside walls are drier than outside walls where moisture can collect Store paper flat Paper should be stored...

Page 44: ...on IIT IOT Charecteristic Specification Printed Left Side Margin 5 0 mm 2 0 mm 0 197 in 080 in Leading Edge Margin 5 0 mm 1 3 mm 0 197 in 050 in Image Area Tolerance Zone Image Skew Envelopes 11 5 mil...

Page 45: ...chapter System Overview Image Input Terminal IIT Image Output Terminal IOT Sub Assemblies System Electronics Paper Path and Paper Pick System Motors Solenoids and Drive The Print Process Configuration...

Page 46: ...lies and sub assembly interactions for this system This section is broken down into the following The Image Input Terminal IIT DADF and paper path The Scanner Assembly with Control Panel System Electr...

Page 47: ...Feeder DADF Scanner Assembly with Control Panel Major Components of the DADF and Scanner Input Tray Output Tray CVT Window Lamp Scanner Flatbed Scan Head DADF Hinges DADF Connector s2424 235 DADF CVT...

Page 48: ...DF operation is inhibited given sufficient time an error message appears on the control panel display instructing the user to close the access cover Pick Roller and Separator Pad The pick roller is th...

Page 49: ...DADF to the IOT DADF Hinges Mechanical connection between the DADF and the scanner portion of the IIT consists of a set of hinges These hinges allow for the DADF to lift from the platen glass to faci...

Page 50: ...the original or of varying the distance between the imaging device and the target document Copy Scan Imaging When using the document feeder for a copy or a scan the DADF scanhead scans the second sid...

Page 51: ...of the IIT contains a moveable scanhead that includes the CCD imaging board main control board drive motor and lamp assembly The lamps are Cold Cathode Flourescent Lamps same as the lamps in the DADF...

Page 52: ...ystem Automatic calibration uses built in targets of the system The target for the flatbed is on the back of the diverter strip the target for the DADF is located on the back of a moveable flap intern...

Page 53: ...tion control 6 Scanhead moves back to the home position under the CVT window Manual Calibration The manual calibration is a maintenance procedure accessed through the system s control panel This calib...

Page 54: ...ides low level motor control for the exit module components The system also contains a second scanner power supply located next to the exit module MEP board contained in the backframe This supplies po...

Page 55: ...electronics module is replaced as one assembly Main Board The main board controls the operation of all the mechanical and electrical systems in the IOT Through the power control and I O boards signal...

Page 56: ...of the electronics module This device stores printer information and interacts with the printer s NVRAM chip The configuration card supports the transfer of network configuration information from a fa...

Page 57: ...l fuses are located on the printhead and on the ink melting elements The DC power supply generates 3 3 V 15 V and 50 V These voltages are used directly or regulated to other voltage values as needed b...

Page 58: ...tral Line Gnd Ref Neutral D r u m I n k 4 I n k 3 I n k 2 I n k 1 r e s 2 r e s 1 js r js I P r e h t H 8 H 9 H 1 3 H 1 2 H 1 1 H 1 0 H 4 H 3 H 2 H 1 AC Line AC Neutral Low Switcher 3 3 V 15 V 15 V 50...

Page 59: ...Drive The Media Path Drive The Ink Loader The Printhead The Drum Maintenance System The Preheat and Deskew System The Drum Assembly and Transfix System The Exit Module or Media Exit Path MEP The Purg...

Page 60: ...4 Service Manual Sub Assemblies of the IOT Exit Module s2424 008 Duplex Print Path Transfix System Paper Preheater and Deskew Printhead Drum Ink Loader Wiper Assembly Paper Media Tray Drum Maintenance...

Page 61: ...surface a layer of silicone oil on the surface of the drum prior to printing The oil keeps the ink from sticking to the drum s surface and facilitates its transfer to the sheet of paper or transparen...

Page 62: ...vided by the lift plate force against a cam causes the roller to rotate enough so the missing tooth gear engages the drive train The pick roller rotates to pick the paper and the separator pad assembl...

Page 63: ...letes the deskew process When using the optional 525 sheet feeder paper is pre picked from the tray and staged in the paper path while the printer is printing previous pages The deskew process uses a...

Page 64: ...ge of the paper is adjacent to the exit rollers The exit rollers then pull the paper back into the duplex path From a non rotating deskew nip the print continues through the paper preheater and transf...

Page 65: ...Exit Door Sensor Control Panel Sensor Strip Sensor Paper Exit Sensor Drum Temperature Sensor Drum Position Encoder Tray Paper Size Sensor Board Preheater Sensor Deskew Sensor Pick Sensor 525 Sheet Fee...

Page 66: ...Service Manual System Motors Solenoids and Drive s2424 237 DADF Motor Elevator Motor Media Drive Gearbox Media Path Motor Y Axis Motor Tray 1 Pick Solenoid Tray Lift Motor Paper Drive Motor Process Dr...

Page 67: ...rain Operation of the transfix and drum maintenance system is controlled by the rotational direction of the motor When the process motor rotates in one direction the swing gear engages the lower gears...

Page 68: ...o the exit rollers which are built into the MEP Gear trains located within the media path drive assembly along with two clutches and a solenoid allow the motor to control the pick take away duplex and...

Page 69: ...sary In the ready state the print process consists of the following steps which are described in this section Drum Preparation Printing Ink Loader Printhead Drum Assembly Transfix System Purge System...

Page 70: ...resolution As the drum reaches the correct speed the jets begin to fire to deposit the image on the oiled portion of the drum As the jets fire the printhead moves from right to left to complete the im...

Page 71: ...ach channel are pressed by coil spring pressure into the melting elements As ink is required by the printhead the appropriate color s melting element is activated and the end of the ink stick is melte...

Page 72: ...its 1236 jet nozzles 309 jets for each primary color with a horizontal motion of slightly less than 5 mm 0 2 inches the printhead can print the entire image on the rotating drum The printhead provides...

Page 73: ...sponding nozzles Looking at the printhead face the nozzles are arranged in 12 rows in color order KYKYKYCMCMCM where K black Y yellow C cyan and M magenta During the printing process the printhead wou...

Page 74: ...ing a fine thread screw system The printhead mounted to the X Axis shaft moves laterally across the surface of the drum To find the printhead home position the X Axis system drives the printhead in an...

Page 75: ...as a latching feature to unlatch and latch the missing tooth gear to engage the printhead tilt drive train 3 The cam profile has a standby dwell the portion of the cam that has a constant radius This...

Page 76: ...her printer operations The cam has a latching mechanism to unlatch and latch the missing tooth gear to engage the printhead tilt drive train The cam s latching mechanism also holds the tilt gear in pl...

Page 77: ...ism is pulled back into position by the return spring As viewed from the left side of the printer when the arrows do not align the tilt gear is engaged To accommodate printhead maintenance the printhe...

Page 78: ...the transfix roller the image is transferred to the sheet of paper An encoder disk and sensor on the left end of the drum monitors the drum s speed and position The drum heater heats the surface of t...

Page 79: ...spring actively adjusts the tension Note The drum rotates in different directions for each process Transfix CW Maintenance CCW Printing CCW Warning Always keep your fingers away from the drum drive s...

Page 80: ...to advance the paper during the transfix process The drum continues to advance the paper until the transfix roller is disengaged The transfix roller is lifted and lowered by the action of the process...

Page 81: ...he process drive then rotates in the opposite direction to lower the drum maintenance system The blade removes oil and drains it back into the maintenance kit drawer through a felt filter The oil roll...

Page 82: ...wiper blade is then raised in front of the printhead The media path drive governs wiper movement when it engages a clutch on the exit shaft of the printer The purge pump applies pressure to the ink r...

Page 83: ...ot purging a more serious failure can occur if the ink overfills and the reservoir cannot vent properly Warning When servicing the printer be careful of the purge system as it passes the printhead If...

Page 84: ...is perfectly aligned for transfix to the paper The process drive lifts and lowers the transfix roller At the point which the transfix roller is loaded but before the drum begins to rotate the paper st...

Page 85: ...Theory of Operation 2 41 ss2424 049 Drum Transfix Cam Transfix Load Arm Transfix Load Module Transfer Roller Transfix Load Spring Transfix Cam Process Drive Transfix Roller Gear...

Page 86: ...re not driven during transfixing The media path drive rotates the exit rollers in the correct direction to pull the paper out with the deskew clutch de energized As the process drive lifts the transfi...

Page 87: ...Theory of Operation 2 43 s2424 052 Release blade Strip solenoid Engine Exit Sensor Preheat Exit Sensor Transfix Roller Paper Preheater Strip Sensor Paper Exit Sensor...

Page 88: ...ix speed 7 ips 7 ips 7 ips 7 ips Setpoint OHP Media Peak Transfix Speed 5 ips Approximate Print Speeds Tray source Resolution Simplex A4 Paper Auto Duplex A4 Paper Tray 1 Fast Color 300 x 300 dpi 10 p...

Page 89: ...oard s NVRAM chip to the configuration card during the normal operation of the printer When the configuration card is inserted into a new printer the personality parameters on the configuration card a...

Page 90: ...TP Information Forwarding 1 HTTP SMTP Server Automatic 1 HTTP Legal Settings 1 HTTP Admin_Password 11 HTTP Admin_Username 11 HTTP KeyUser_Password 11 HTTP KeyUser_Username 11 HTTP Admin_HostAccessList...

Page 91: ...ERVER On 1 PSERVER Enabled 1 PSERVER_IPX Enabled 1 Notes 1 Parallel and USB On and Enabled parameters have not been identified as personality parameters They are not tied to networking 2 NCL Nest Conf...

Page 92: ...2 48 WorkCentre C2424 Service Manual...

Page 93: ...ror Messages and Codes In this chapter Introduction Power Up Error Messages and LED Codes BIST Error Reporting POST Error Reporting PEST Error Reporting Fault Code Error Message Troubleshooting 3 Digi...

Page 94: ...ee Service Diagnostics Menu Functions on page 4 4 For troubleshooting system problems not associate with or displaying an error code or message such as startup or system power on media paper path prin...

Page 95: ...power was applied so it was shut down Follow the troubleshooting procedures for electrical shorts see Electrical Troubleshooting on page 4 58 and check the power supply fuses On Solid dimly On Solid...

Page 96: ...are no rear panel LED codes associated with soft errors Most soft errors will cause the system to print a Startup Page with the error message on it Note Before replacing the electronics module for any...

Page 97: ...ter and then 04 blinks Hard TMVL mismatch write read failed 04 04 Flutter and then 04 blinks Hard TMVH mismatch write read failed 05 01 Flutterand then 05 blinks Hard Communications error PLD I O Boar...

Page 98: ...working without the configuration card 13 01 Flutter and then 13 blinks Hard PHY reset failure reset stuck low 13 02 Flutter and then 13 blinks Hard PHY ID error mismatch erro 14 xx Flutterand then 14...

Page 99: ...Hard CPU interrupt error IRQ spurious assertion 16 01 Flutter only Soft Real time clock read failure 16 02 Flutter only Soft Real time clock write failure 16 03 Flutter only Soft Real time clock re re...

Page 100: ...xx yyy zz 123 when the error occurred xx yyy 4x Device faults are indicated by a 4 in the tenths place of the fault code This indicates a hardware problem The most common device faults troubleshooting...

Page 101: ...eet feeder 2 Remove the feeder and inspect the connector 3 Replace any damaged connectors either on the 525 sheet feeder or engine 4 Reseat and reconnect the 525 sheet feeder to the system 5 Did this...

Page 102: ...pened for reading idiags 2 006 65 This fault code indicates a problem with the system program ROM could not be loaded idiags 2 007 66 This fault code indicates a problem with the system program idiags...

Page 103: ...control system Declared when the printer is booted in FTTR mode and the drum is dirty Cleaning the drum when very cold could increase the chance of gluing media to the drum surface and creating an ung...

Page 104: ...1 Run the Wiper Drive test 2 Did the test fail Go to Step 3 Go to Step 5 3 1 Inspect the wiper drive system and wiper lock system Look for ink in the belts 2 Is the wipe system operating correctly Go...

Page 105: ...p 2 2 1 Ensure the wiring around the printhead is routed properly 2 Is the wiring blocking the printhead Re route all wiring to the printhead Go to Step 3 3 1 Remove the waste tray and printhead and l...

Page 106: ...nsure ground integrity for the system see Ensuring Ground Integrity on page 4 73 c Replace the EEPROM chip d Reboot the system Troubleshooting Procedure Step Questions and Actions Yes No 1 1 From the...

Page 107: ...the X axis uninitialized 6 032 68 Could not find a solution to the described home motion profile 6 033 60 Could not allocate memory for X axis move parameters a Reset NVRAM and then retest b Ensure g...

Page 108: ...ectly aligned 3 Are the gears damaged Replace the process gearbox Go to Step 4 4 1 Use service diagnostics to run the Process Motor test 2 Did the test fail Replace the process gearbox Go to Step 5 5...

Page 109: ...rly left and right Go to Step 5 Remove any obstructions or replace any defective parts 5 1 Ensure the gears are correctly aligned and homed see Homing the Process Gear Drive Train on page 6 8 2 Are th...

Page 110: ...t the problem Complete Go to Step 2 2 1 Ensure the gears are correctly aligned and homed see see Homing the Process Gear Drive Train on page 6 8 2 Did this correct the problem Complete Go to Step 3 3...

Page 111: ...Use service diagnostics to run the Tilt Axis Drive test 2 Did the test fail Replace the process gearbox Go to Step 7 7 1 Use service diagnostics to run the Process Motor test 2 Did the test fail Repl...

Page 112: ...while moving the cap wipe DOWN 8 055 44 The media path motor stalled while engaging headtilt Troubleshooting Procedure Step Questions and Actions Yes No 1 For an 8 005 48 error 1 Check for paper in t...

Page 113: ...Homing the Printhead Wiper on page 6 4 3 Did this correct the problem Complete Go to Step 7 7 1 Run the Head Maintenance Clutch test 2 Did the test pass Go to Step 8 Replace the maintenance clutch 8...

Page 114: ...n but the ink does not appear to be dripping 9 009 44 and 900X 6x 9 009 44 This fault code indicates a device failure attempting to access NVRAM a Reset NVRAM and retest b Ensure ground integrity for...

Page 115: ...match 11 014 42 Control Panel version mismatch 11 015 43 Printhead PLD version mismatch 11 016 44 Lower 525 sheet feeder PLD version mismatch 11 017 45 Upper 525 sheet feeder PLD version mismatch 11 0...

Page 116: ...13 003 42 13 007 46 11 006 43 and 11 015 43 Replace the printhead For all other 11 000 4x errors Replace the electronics module Troubleshooting Procedures Step Questions and Actions Yes No 1 1 Ensure...

Page 117: ...system see Ensuring Ground Integrity on page 4 73 2 Are all components grounded properly Go to Step 3 Resolve ground integrity 3 1 Is the error code associated with an overheat condition Go to Step 4...

Page 118: ...133 46 The preheater thermistor circuit is shorted 8 1 Using service diagnostics run the Drum Heater test 2 Did the test pass Replace the drum assembly Replace the drum temperature sensor Troubleshoot...

Page 119: ...room is within the systems optimal environmental specification see System Environmental Specifications on page 1 14 2 Is the room too cold or too hot Advise customer of specification requirements Go t...

Page 120: ...mbient temperature of the room is within the systems optimal environmental specification see System Environmental Specifications on page 1 14 2 Is the room too cold or too hot Advise customer of envir...

Page 121: ...erify that the ambient temperature of the room is within the system s optimal environmental specification see System Environmental Specifications on page 1 14 2 Is the room too cold or too hot Advise...

Page 122: ...t the ambient temperature of the room is within the system s optimal environmental specification see System Environmental Specifications on page 1 14 2 Is the room too cold or too hot Advise customer...

Page 123: ...t is shorted 13 519 45 The YELLOW thermistor returned a bad reading or ESD corruption 13 520 46 The BLACK heater got too hot 13 522 48 The BLACK heater took too long to reach its setpoint 13 579 42 Th...

Page 124: ...that did not exist 13 006 67 Thermal code tried to command a segment ID that did not exist 13 007 68 Thermal power manager task was expecting initialization message but received other 13 008 60 Therm...

Page 125: ...and then retest b Replace the NVRAM chip 21 000 69 Errors Diagnostic Code Version Mismatch a The diagnostic firmware does not match the engine firmware Update the diagnostic firmware for the system I...

Page 126: ...dure Step Questions and Actions Yes No 1 1 Verify that all the main tray paper path sensor wires are clear of the takeaway rollers 2 Are any wires damaged Replace the wiring harness Go to Step 2 2 1 A...

Page 127: ...to the printhead data partition in NVRAM 34 004 46 An error occurred while accessing the printhead NVRAM hardware for the purpose of initialization The printhead cable may be unplugged Troubleshooting...

Page 128: ...ty on page 4 73 2 Did this correct the problem Complete Go to Step 2 2 1 Inspect pivot plate for cracks 2 Check the drum maintenance cam rollers for damage or improper movement 3 If the pivot plate or...

Page 129: ...37 003 48 PEST Right jetstack disconnect The right jetstack is not drawing the expected power from the supply 37 004 40 PEST Reservoir 0 disconnect Reservoir 0 is not drawing the expected power from t...

Page 130: ...45 Ink Melt 1 37 010 46 Ink Melt 2 37 011 47 Ink Melt 3 37 012 48 Ink Melt 4 2 Did the test pass Go to Step 3 Go to Step 2 2 1 Check the wiring running from the problem component to the printhead 2 Is...

Page 131: ...The test point is located on the power control board below the main board RAM DIMMs 4 Is the power supply within specification Go to Step 2 Go to Step 2 2 1 Unplug the following electronics module con...

Page 132: ...problem to the I O board or its related cabling unplug the I O board connectors Umbilical Right J1 Waste Tray Sense J110 Stripper Solenoid J250 Paper Tray Sense J610Ink load Signal J910 DMU Sense J86...

Page 133: ...er from the supply Troubleshooting Procedure Step Questions and Actions Yes No 1 1 Run the appropriate diagnostic test 37 016 43 Head Maintenance Clutch 37 017 44 Deskew Clutch 37 018 45 Pick Clutch 3...

Page 134: ...ing the expected power from the supply Troubleshooting Procedure Step Questions and Actions Yes No 1 1 Run the Pressure Pump Motor test 2 Did the test pass Replace the electronics module Go to Step 2...

Page 135: ...from the supply 37 033 42 PEST Y axis motor short The Y axis motor is drawing too much power from the supply Troubleshooting Procedure Step Questions and Actions Yes No 1 1 Run the X axis Drive test...

Page 136: ...imit 37 042 42 PEST Power supply 1 8 volt under limit 37 043 43 PEST Power supply 2 5 volt over limit 37 044 44 PEST Power supply 2 5 volt under limit 37 045 45 PEST Power supply 3 3 volt over limit 3...

Page 137: ...supply 15 volt under limit 37 059 41 PEST Power supply 15 volt over limit 37 060 42 PEST Power supply 15 volt under limit 37 061 43 PEST Power supply high switch will not activate 12 15 and 50 volt m...

Page 138: ...rrect the problem Complete Replace the scanner assembly 39 003 41 Scanner Optical Test Failure Troubleshooting Procedures Step Questions and Actions Yes No 1 1 Cycle power to the system to clear 2 Did...

Page 139: ...place the scanner assembly Go to Step 3 3 1 Is the red LED blinking Go to Step 4 Go to Step 6 4 1 Remove the side covers and disconnect both exit module MEP motors 2 Does the red LED come on solid Rep...

Page 140: ...2 Did this correct the problem NOTE You can disconnect the document feeder and the system will still scan from the platen Complete Replace the document feeder assembly 39 012 41 Document Feeder Optic...

Page 141: ...kew Flag B Preheat Flag C Strip Flag D Exit Flag E Tray 1 Width Sensor F Front Door Event G Tray 2 Media Present Sensor H Tray 3 Media Present Sensor J Tray 4 Media Present Sensor K Exit Module L IIT...

Page 142: ...er oiling A2M The deskew flag tripped unexpectedly while the system was picking paper from Tray 2 A2N The deskew flag tripped unexpectedly while the system was picking paper from Tray 3 A2P The deskew...

Page 143: ...ition of the exit rollers and the duplex roller 3 Check the Front Door for obstructions or damage replace the Front Door if necessary 4 Test the operation of the exit roller and the duplex roller usin...

Page 144: ...good condition 6 Run the Deskew Clutch test 7 Run the Paper Path Drive test 8 Replace the pre heater then retest C2C Strip flag unexpected event during mechanical recovery C2D Strip flag unexpected s...

Page 145: ...rectly homed see page 6 8 4 Ensure that the stripper carriage moves freely Run the Stripper Contact test 5 Run the Transfix Drive Slow and Transfix Drive Fast tests C3X Strip flag time out during exit...

Page 146: ...ecovery D3M Exit flag timed out following Tray 2 Pick D3N Exit flag timed out following Tray 3 Pick D3P Exit flag timed out following Tray 4 Pick D3Q Exit flag timed out following Tray 1 Pick D3R Exit...

Page 147: ...ng the drum during a print job F2W The front door open flag unexpectedly tripped while the system was imaging during a print job F2X Front door sensor unexpectedly actuated during exit 1 Ensure the me...

Page 148: ...rm up L2E IIT cover open while in ready state L2F IIT cover open while in a fault state L2G IIT cover open during auto drum maintenance cycle L2H IIT cover open during printhead maintenance cycle L2J...

Page 149: ...motor stalled while the system performed an auto drum maintenance cycle M4H Paper path motor stalled while the system performed printhead maintenance M4J Paper path motor stalled while the system per...

Page 150: ...the system performed an auto drum maintenance cycle N4H Y Axis motor stalled while the system performed printhead maintenance N4J Y Axis motor stalled while the system performed printhead purge N4K Y...

Page 151: ...nning one sheet at a time 4 Run the diagnostic Check Drum Y Axis Encoder test 5 Replace the Pick Assembly and retard roller 6 Run the clean ink smears and check the preheater exit flag for debris 7 Re...

Page 152: ...e system was performing a mechanical recovery T2D The exit door open flag unexpectedly tripped while the system was warming up T2E The exit door open flag unexpectedly tripped while the system was rea...

Page 153: ...debris 6 Replace the drum maintenance unit 7 Replace the transfix roller V2D Tray 2 media size sensor unexpectedly activated during warm up V2E Tray 2 media size sensor unexpectedly activated during...

Page 154: ...ng from Tray 2 W2N Tray 3 media size sensor unexpectedly activated while picking from Tray 3 W2P Tray 3 media size sensor unexpectedly activated while picking from Tray 4 W2Q Tray 3 media size sensor...

Page 155: ...gered unexpectedly while picking from Tray 3 X2P Tray 3 pick flag triggered unexpectedly while picking from Tray 4 X2Q Tray 3 pick flag triggered unexpectedly while picking from Tray 1 X2R Tray 3 pick...

Page 156: ...Tray 3 Pick Shaft test 5 Ensure ground integrity of the system see page 4 73 6 Push up on the nudger roller until it is captured by the actuator arm 7 Run the Pick Clutch test replace the pick clutch...

Page 157: ...nical recovery Z2D Tray 4 pick flag triggered unexpectedly during warm up Z2E Tray 4 pick flag triggered unexpectedly while system ready Z2F Tray 4 pick flag triggered unexpectedly while system in fau...

Page 158: ...y 2 Z3N Tray 4 pick flag sensor timed out while pick from Tray 4 Z3P Tray 4 pick flag sensor timed out while pick from Tray 4 Z3Q Tray 4 pick flag sensor timed out while pick from Tray 1 Z3R Tray 4 pi...

Page 159: ...oubleshooting In this chapter Service Diagnostics Check Menu Activators Definition Tables Electrical Troubleshooting Ensuring Ground Integrity Paper Path and Media Based Problems Operating System and...

Page 160: ...ies are supposed to function Hidden Service Menu The Hidden Service menu provides access to a large group of information pages and functions usable for diagnosing and correcting system malfunctions an...

Page 161: ...Adjust This is for manufacturing or engineering use only Adjust X axis scale This is for manufacturing or engineering use only Drift Compensation This is for manufacturing or engineering use only Hea...

Page 162: ...to run diagnostics under this condition Important Information While Performing Service Diagnostics Heaters and Thermals When entering diagnostics if the printhead temperature is approximately 32o Cel...

Page 163: ...e these tests are duplicated in the hidden Service Diagnostics menu the customer diagnostics are not detailed in this manual Service Diagnostics Control Panel Button Descriptions Button Function BACK...

Page 164: ...agnostic firmware commands the subsystem to perform the built in test and reports the results on the display Each subsystem is tested separately with an electronic reset performed when switching the t...

Page 165: ...ver Open or Not Open Output Tray Full sensor Full or Not Full Error Exercise Elevator Home Sequence Exercises the exit path elevator home position and reports final status Ready Error Exercise Elevato...

Page 166: ...several minutes to complete Test DRAM Tests the scanner subsystem DRAM OK or Fail This operation may take several minutes to complete Test Homing Runs the scanner axis seek home procedure The axis mo...

Page 167: ...Reports the current firmware version Report Status Checks then reports the current status as reported by the DADF unit firmware Ready or Not Ready Lamp ON OFF Warming Up Warmup test not done Test fail...

Page 168: ...OK or Fail There should not be media present to perform this test Exercise Lamp Cycles the DADF lamp on then off The lamp is then left ON OK or Fail The lamp state must be manually observed Reset Doc...

Page 169: ...ows H Open or de actuated L Closed Present Actuated Encoders Monitors each of the non temperature analog sensors Tray 1 Media Width Y Axis Position Media Path Motor Position Process Motor Position Tem...

Page 170: ...olenoid Tray 2 Pick Clutch Tray 3 Pick Clutch Tray 4 Pick Clutch Deskew Clutch Strip Solenoid Head Maintenance Clutch Purge Vent Solenoid 110 V and 220 V Drum Heater Relays All test results toggle ON...

Page 171: ...ues may then be compared with range limits documented in the service manual or using service bulletins on the service website if the values were unavailable at the time of printing Main Menu Print Eng...

Page 172: ...uence The result is an oil print of the contact of the DM unit with the drum about 2 3 of the way down the page Display Fault History A function that displays the current contents of the Fault History...

Page 173: ...ce kit life The diagnostics routines are not designed to address all of these conditions consistently If a test result differs significantly from the typical values defined in the following tables che...

Page 174: ...rage Power watts 15 to 25 Reports the average power following power on Tray 2 Tray 3 Tray 4 Pick Clutch Gathers data on the performance of the pick clutch coil for Trays 2 through 4 The same type of c...

Page 175: ...MFG Only Reports the average power during the constant portion of the profile 2 220 V Coil Min Power watts MFG Only Reports the min power following power off 3 220 V Coil Peak Power Time sec MFG Only...

Page 176: ...or a slipping clutch 3 CCW On average fe 250 to 600 Reports the average effort required to rotate the deskew shaft in the CCW direction at a constant velocity An unusual value could indicate a differe...

Page 177: ...ant velocity A larger value could indicate particles in the gears or non uniform contamination of a roller causing a lump 11 CW Off fe settling time sec 0 01 to 0 20 Reports the time it takes the MP m...

Page 178: ...n the gears or non uniform contamination of a roller causing a lump 5 CCW Off fe setting time sec 0 01to 0 20 Reports the time it takes the MP motor servo system to settle down after the sudden releas...

Page 179: ...ns the media path drive train and engages the Tray 1 pick solenoid on the fly The pick shaft goes through 2 full revolutions while drive requirements are determined R Definition Typical Value Actions...

Page 180: ...riction and or lift plate spring strength 4 Contact average fe MFG Only Reports the average MP fe while the pick roller is contacting the separator pad This value should reflect the coefficient of fri...

Page 181: ...e could indicate looseness in the Tray 2 pick shaft assembly or a slipping clutch 3 On average fe MFG Only Reports the average effort needed to rotate the Tray 2 pick shaft in the pick direction at a...

Page 182: ...locity Power watts 0 to 8 25 0 to 10 Reports the power drawn by the fan while running a constant velocity Should be proportional to the final fan RPM due to the back EMF 2 Constant Velocity Power Ripp...

Page 183: ...rrent during the specified heating interval For heaters with multiple elements in parallel a significantly different value can indicate a partial failure The nominal values could change with operating...

Page 184: ...time from heater power application This value could be more effected than others by cross talk from other heaters and the chassis generally warming Shows the heat dissipation at the thermistor during...

Page 185: ...simplex or duplex paper path to determine leading edge arrival time at each paper path sensor R values have alternate definitions or are unused depending on the pick tray and if simplex or duplex path...

Page 186: ...y Reports the interval from the time the engine software is commanded to start the Tray 1 pick process until the Deskew sensor activates Common 5 Stage Interval us MFG Only Reports the interval from t...

Page 187: ...cal Value Actions Common 0 Tray MFG Only Reports the tray from which the test paper was picked 1 Paper Size MFG Only Reports the size of the picked paper Tray 4 Pick 2 Tray 4 Pick Trailing Edge Interv...

Page 188: ...he paper exit motion Simplex Path 7 Exit Trailing Edge Interval us MFG Only Reports the interval from the time the engine software is commanded to start the duplex pick process until the Exit sensor d...

Page 189: ...s following the passage of the paper trailing edge 5 Preheat Bounce Interval us MFG Only Reports the interval during which the Preheat sensor bounces following the passage of the paper trailing edge 6...

Page 190: ...sensor R values have alternate definitions or are unused depending on the pick tray and if simplex or duplex path was selected R Definition Typical Value Actions 8 Duplex Turnaround Interval us MFG O...

Page 191: ...us MFG Only Reports the interval from the time the engine software is commanded to start the transfix process until the deskew sensor deactivates part way through the paper transfix motion 9 Duplex P...

Page 192: ...the passage of the paper trailing edge during duplex turnaround 8 Duplex Deskew Bounce Interval us MFG Only Reports the interval during which the deskew sensor bounces following the passage of the pa...

Page 193: ...head lock latch engages 5 Lock Engage Peak uin 1570 to 2083 Reports the peak following error at the point the latch engages 6 Down Motion Drive Error uin MFG Only Reports the average following error w...

Page 194: ...rm operational goals R Definition Typical Value Actions 0 Right Stall Power Level watts 4 3 to 10 85 Reports the motor drive electronics stall power An abnormal level may indicate a motor motor drive...

Page 195: ...29 MFG Only Reports the time from the load command to the engine until the drum indicates contact with the pressure roller 1 Loaded average Y axis following error mpts 2600 to 3800 MFG Only Reports th...

Page 196: ...ring the Roll With Both Loaded interval 4 Roller Average Period sec 50 to 1600 Reports the average period of the Y axis following error ripple during the Roll With Both Loaded interval This variation...

Page 197: ...be in degrees but currently units scaling are unverified 4 Post Wipe peak Magnitude pm ticks MFG Only Reports the pm motor following error at the post wipe peak location Tray 2 Tray 3 Tray 4 Lift Pla...

Page 198: ...ween the max and min Cosine Sum average amplitude values 2 Sin Sum Data Offset sin sum units MFG Only Reports average of the max and min Sin Sum average amplitude values 3 Cosine Sum Data Offset cosin...

Page 199: ...Drum Frequency hz MFG Only Reports the current drum frequency 2 Motor FFT Power Ratio none MFG Only Reports the ration of the FFT power amplitude of the motor frequency to the FFT power amplitude of...

Page 200: ...0 to 380 Reports following error ripple during the last half of the second period 4 HAHVN Start Fe Settle time sec 0 08 to 1 0 Reports the time following the start of motion that it takes the followin...

Page 201: ...Y axis Belt Tension This test modifies the y Axis servo loop so that it is unstable and oscillates The oscillation frequency is recorded while the drum is advanced for two revolutions Checks for corre...

Page 202: ...ts out of tolerance mis assembled bent etc causing an incorrect blade to drum gap 2 Engaging Period sec 0 to 0 11 Reports time between stripper solenoid engagement and the point when the reaction of t...

Page 203: ...of variation of the motor following error over the recording interval 1 Motor fe average ticks 0 3 to 0 8 Reports the motor following error average value of the recording interval 2 Motor drive volta...

Page 204: ...r over the recording interval 5 Motor Drive Power Average watts 9 to 13 Reports the motor drive power average value of the recording interval Process Motor This test turns on the process motor and run...

Page 205: ...0 8 to 6 Reports amount of variation of the motor drive power over the recording interval 5 Motor drive power average watts 1 9 to 7 Reports the motor drive power average value of the recording interv...

Page 206: ...rval 3 Motor drive voltage volts MFG Only Reports the motor drive voltage average value of the recording interval 4 Motor drive power ripple watts MFG Only Reports amount of variation of the motor dri...

Page 207: ...aper at tray pick sensor 2 3 4 MFG Only 4 media length top 2 3 4 MFG Only 3 media length bottom 2 3 4 MFG Only 2 Media width top Paper Path Status Continued This test enters the paper path sensors to...

Page 208: ...Reports the current temperature 4 Drum Temp 60o Reports the current temperature 5 Ink Melt 1 Temp 50o Yellow usually off 6 Ink Melt 2 Temp 50o Cyan usually off 7 Ink Melt 3 Temp 50o Magenta usually o...

Page 209: ...printhead then the drop is large and the pressure rises slowly If the volume is small hose pinched plugged near the pump then the drop is minimal and the pressure rises quickly 3 Max Pressure Pumping...

Page 210: ...2 47 6 unregulated Negative 12 Volts volts 13 1 to 12 26 Control Board Voltages 7 DC Power watts 20 to 27 4 8 50 Volts 47 to 52 9 Negative 50 Volts 47 to 52 10 Unregulated Negative 15 Volts 16 5 to 1...

Page 211: ...unts MFG Only Reports the height of the initial peak when starting rotation of the dm drive gear 1 DM Initial FE Peak Time sec MFG Only Reports the time since the start of CCW motion until the peak wa...

Page 212: ...3 4 Scrolling Xerox logo 5 Control panel displays WorkCentre C2424 Power on Self Test 00 04 6 Control panel displays Test Complete Initializing 00 11 7 Power supply fan starts turning 00 20 8 Control...

Page 213: ...Tilt Cam 8005 8007 8008 8009 YES NO If the NVRAM valve cap HT Spring On is set the wiper will move up 100 milli inches to determine if it is in the spring if it is it will use a special algorthm to g...

Page 214: ...ve Head to the Home Print position 7010 Start YA Slew 5003 Rehome XA 6000 RECOVERY ROUTINE Try to recover from Process Motor Stall Home XA 6000 Move XA to Left Side Hard Stop 6000 Move XA to Tilt Posi...

Page 215: ...ates the system is performing the cleaning process 7 The printhead is moved left to the tilt zone where the printhead can tilt back without interference and the media path motor moves the wiper to the...

Page 216: ...in fault conditions the system may reboot up to three times before displaying an error code This is an attempt to correct the problem and reduce the number of unnecessary service calls Following the s...

Page 217: ...ia 1 Is there power at the document feeder Lift the document feeder and verify the document feeder lamp is on and the calibration strip moves into position If so the scanner power supply is operating...

Page 218: ...is no scanhead motion replace the scanner assembly Scanner Lamp Does Not Turn On 1 Is there power to the scanner assembly Lift the document feeder and verify the scanhead moves If so the scanner power...

Page 219: ...Attach system covers j Perform full test of system System Continuously Resets or Resets Unexpectedly a Check the main AC voltage For troubleshooting AC voltages see page 4 72 b Disconnect the network...

Page 220: ...d through the vent holes close to the AC power switch see the illustration on page 4 71 a Inspect the power cord b Verify AC outlet voltage and current capacities are within specifications c If necess...

Page 221: ...steps The I O board needs to be isolated from other systems in the system to be effectively tested b Turn off system and wait 30 seconds for power supply capacitors to discharge Damage to circuits wit...

Page 222: ...apacitors to discharge Damage to circuits within the electronics module may occur if the power supply capacitors are not allowed to fully discharge d Plug in the printhead interface connector J130 to...

Page 223: ...eports Missing Waste Tray 1 Waste tray missing or not fully seated a Fully install waste tray 2 Connector not fully seated a Check I O board connector J110 for proper mating see Plug Jack Locator Tabl...

Page 224: ...test operation d The configuration card enables miscellaneous features in the system 525 Sheet Feeder Does Not Function 1 Thermal safety fuse blown a Power cycle system b The safety fuse is a self re...

Page 225: ...g Unplug the following electronics module connectors see Plug Jack Locator Table on page 10 2 Power Control to I O board J800 Power Control right J400 Printhead data J130 Waveamp signal J790 Power Con...

Page 226: ...steps C and D for each connector c Turn on system and wait for the error code 34 001 43 Check that the three voltage indication LEDs INSIDE the electronics module visible through the vent holes of the...

Page 227: ...ring this step plug in all connectors to system and retest If system is fixed reattach covers to system and perform a full test If no defects are found in this step replace electronics module test sys...

Page 228: ...feeder b Disconnect the scanner assembly Turn the system back on if the LED is still blinking the problem is not with the scanner assembly c Check the exit module MEP board LEDs see Scanner Exit Modul...

Page 229: ...vers and motors Verifying thepower supply involves three steps 1 Checking for proper AC voltage 2 Inspecting the power supply fuses 3 Testing for a shorted motor or solenoid driver which shuts down th...

Page 230: ...is displayed on the control panel Detecting condition of Fuse F2 and F3 1 The drum and preheater connect to F2 2 The printhead and ink loader connect to F3 3 Turn the power switch off and wait for th...

Page 231: ...perational use the diagnostic test Monitor Voltages Ensuring Ground Integrity Intermittent or missing ground connections can result in minor interferences in the system As examples control panel displ...

Page 232: ...on shows the grounding points in the IOT that need to be checked There is also one grounding point in the backframe s2424 069 Transfix Roller Ground Springs I O Board Ground DM Ground Clip X Axis Retu...

Page 233: ...ng the measurement Motor and Solenoid Resistances Motor or Solenoid Resistance Approximate Process motor 4 3 ohms 15 Difficult to measure due to variability at the brush commutator interface Y axis mo...

Page 234: ...he system the size of media being used Ensure that the media guides in the tray are set correctly 6 Inspect the paper for bent torn or folded corners 7 Check to ensure no small pieces of paper are in...

Page 235: ...pecifications on page 1 14 4 Remove all media open and close the document feeder jam access cover then try copying again Preheater and Transfix Jams 1 Remove the preheater and check for and remove any...

Page 236: ...ce drive test 7 Run the transfix fast and transfix slow 8 Run the process motor and media drive motor tests 9 Inspect the gears and mating cam gears for stripped or damaged gear teeth 10 Replace the P...

Page 237: ...mmunication ports can isolate communication problems to the computer network or software Test the communications ports after the system is installed or when the electronics module has been replaced Te...

Page 238: ...been configured for a specific network default to a LOCAL LINK value within the 169 254 xxx xxx range Note To comply with industry standards WorkCentre C2424 systems cannot be manually configured for...

Page 239: ...From the General tab click the Print Test Page button to generate the test print If the test page prints the USB port is functioning normally Network Problems The WorkCentre C2424 system maintains 6...

Page 240: ...apter part number 174 3493 00 Same adapter used to run PC based diagnostic on Phaser 340 360 and Phaser 840 systems To obtain a trace 1 Connect the serial cable to your PC Serial port settings are 19...

Page 241: ...mage Quality Troubleshooting In this chapter Image Quality Problems Overview Isolating a Copy Scan Malfunction to the Scanner DADF Diagnosing IOT Print Engine Print Quality Problems Analyzing Service...

Page 242: ...at has been tested and approved for use in this system The paper should be from an unopened ream that has been acclimated to room temperature If the print quality defect is still present when printing...

Page 243: ...with the customer all work performed Also discuss the need for 90 IPA a cleaning kit and how to properly care for their system Isolating a Copy Scan Malfunction to the Scanner DADF Scanner software c...

Page 244: ...bration on page 6 9 2 Did this correct the problem Complete Go to Step 5 5 1 Replace the document feeder 2 Did this correct the problem Complete Replace the scanner assembly Step Questions and Actions...

Page 245: ...2 Is the skew within specification Complete Go to Step 4 4 1 Perform the Manual DADF to Scanner Calibration on page 6 9 2 Did this correct the problem Complete Replace the document feeder Step Questi...

Page 246: ...ge printed in Step 2 using the document feeder 2 Does the text or image still appear fuzzy Go to Step 4 Go to Step 5 4 1 Perform the Manual DADF to Scanner Calibration on page 6 9 2 Does the text or i...

Page 247: ...just the control panel copy settings NOTE Print the Troubleshooting Print Quality information page from the control panel and review Output Quality and Color Settings section to aid in adjusting copy...

Page 248: ...1 See the Media System Skew Specification IIT IOT on page 1 20 2 Is the skew within specification Complete Go to Step 2 2 1 Perform the Manual DADF to Scanner Calibration on page 6 9 2 Did this corre...

Page 249: ...ust the control panel copy settings NOTE Print the Troubleshooting Print Quality information page from the control panel and review Output Quality and Color Settings section to aid in adjusting copy s...

Page 250: ...the DADF of the embedded page printed in Step 2 2 Does the text or image still appear fuzzy Go to Step 4 Go to Step 5 4 1 Perform the Manual DADF to Scanner Calibration on page 6 9 2 Did this correct...

Page 251: ...Enter 4 Scroll to Troubleshooting Print Quality Page and then press Enter Note The Troubleshooting Print Quality Page includes instructions for printing the Eliminate Light Stripes test print These i...

Page 252: ...ow stripe has discolored jets therefore you would print the yellow solid fill For instructions on printing solid fill test prints see 13 19 Black Red Green Blue Cyan Magenta and Yellow Solid Fills on...

Page 253: ...urn on the system and if necessary repeat Step 1 3 Did this correct the problem Complete Follow the instructions on the Printhead Troubleshooting Checklist Step Questions and Actions Yes No 1 1 Clean...

Page 254: ...heater and exit rollers 3 Reprint test pages Do you still see smudges Go to Step 3 Complete 3 1 Repeat Step 2 up to 3 times if the smears still appear 2 Verify supported media is being used 3 Open a f...

Page 255: ...ver an extended period of time 2 Insert new ink and print a solid fill test print Run the test print until the affected color returns to normal 3 Did this correct the problem Complete Go to Step 4 4 1...

Page 256: ...n the ink could be discolored due to a long period of time without use 2 Did this correct the problem Complete Go to Step 2 2 1 Clean the maintenance kit wiper blade or replace the maintenance kit 2 D...

Page 257: ...ing the paper release blade to see if there is anything touching the drum assembly 2 Reseat any system component interfering or touching the drum assembly 3 Clean the paper release blade 4 Did this co...

Page 258: ...ines appear on the print For information about X Axis Drive problems see White Stripes Pinstripes on page 5 32 2 Did this correct the problem Complete Go to Step 8 8 1 Smears on a duplex print can be...

Page 259: ...de 4 Did this correct the problem Complete Go to Step 2 2 1 Inspect the drum maintenance kit If the defect is a thin line that is glossier than the surrounding area it may be due to a defect on the ma...

Page 260: ...rom the system s control panel 2 Did this correct the problem Complete Go to Step 6 6 1 Force a sheet of thick 65 to 80 lb paper through the paper preheater to buff the paper preheater heating surface...

Page 261: ...tep 2 2 1 Inspect and clean the maintenance kit wiper blade 2 If necessary replace the maintenance kit 3 Did this correct the problem Complete Go to Step 3 3 1 Clean the paper release blade it may be...

Page 262: ...print mode 2 Did this correct the problem Complete Go to Step 3 3 1 This problem can occur after a printhead has been replaced Verify the dot on the printhead roll block is positioned to match the lab...

Page 263: ...ify the printhead is tilted forward against the drum in the proper print position 2 Did this correct the problem Complete Follow the instructions on the On Site Printhead Troubleshooting Checklist on...

Page 264: ...e Y axis encoder is operating normally 2 Is the Y axis encoder working properly Go to Step 3 Replace the drum assembly 3 1 If the bands are uniform or in a corduroy pattern use diagnostics to check th...

Page 265: ...roller ghosting is inherent to the system but will improve with multiple prints 2 Does this correct the problem Complete Go to Step 3 3 1 Inspect and clean the maintenance kit wiper blade 2 If necessa...

Page 266: ...te Go to Step 2 2 1 Run service diagnostics to check the temperature of the drum 2 Verify the drum termperature sensor is clean and properly positioned 3 Did this correct the problem Complete Go to St...

Page 267: ...e motion of the X axis and verify there is nothing interfering such as a poorly dressed cable or screw 2 Replace any defective parts 3 Did this correct the problem Complete Go to Step 3 3 1 Use servic...

Page 268: ...ce unit to drum maintenance shaft to drum fan ground clip 3 Did this correct the problem Complete Go to Step 3 3 1 Run pages through the printer to clean the drum by using the Remove Print Smears rout...

Page 269: ...Complete Go to Step 3 3 1 Poor drum oiling can cause the image transfer to be incomplete on one side of the page 4 1 Use service diagnostics to verify the drum maintenance cam roller and pivot plate a...

Page 270: ...nostics verify the paper preheater temperature is within normal operating range 2 Replace the paper preheater if necessary Complete Replace the transfix load assembly and transfix load arm Step Questi...

Page 271: ...order preheater electronics module Step Questions and Actions Yes No 1 1 Repeating defects that occur every 11 6 cm 4 58 in are caused by the transfix roller 2 Clean the transfix roller The defect do...

Page 272: ...or more information 2 Are the pinstripes apparent on the test prints Go to Step 2 Complete The problem is not with the print engine 2 1 Verify the X axis motion is operating correctly and that poorly...

Page 273: ...ons Yes No 1 1 Verify the media is supported for this system 2 Print from an unopened fresh ream of paper 3 Try a higher quality or heavier media type 4 Did this correct the problem Complete Go to Ste...

Page 274: ...y 4 Check the application for the correct image sizing and orientation Poor Ink Adhesion Poor Image Durability Follow these steps if the ink is flaking off the print after the print is complete 1 If a...

Page 275: ...dded to them This tints them green to make them more visible Look for No interlacing is used in this print expect light dark variation between jets Use Look for much lighter colored vertical bands in...

Page 276: ...on the Printhead Troubleshooting Checklist Test Print Examples Continued s2424 093 This is a text print This is a text print This is a text print This is a text print This is a text print This is a te...

Page 277: ...Times Roman ABCDEFGHIJKLMNOPQRSTUVWXYZabcdefghijklmnopqrstuvwxyz1234567890 10 point Times Roman ABCDEFGHIJKLMNOPQRSTUVWXYZabcdefghijklmnopqrstuvwxyz1234567890 8 point Times Roman ABCDEFGHIJKLMNOPQRST...

Page 278: ...the print Uniformity of fill with no scratching Evaluate the print on an overhead projector Some print artifacts visible on the print do not show when projected Likewise some defects do not show unti...

Page 279: ...every 11 63 cm 4 58 in down the length of the page are caused by a defective transfix roller The roller has a soft spot that is not pushing the ink into the paper as well as the rest of the roller If...

Page 280: ...nkling appears in the secondary colors See the blue and green solid fills in the illustration to the right Causes 1 Weak jets or uneven drum heating may cause uneven fills 2 To solve wrinkling try dif...

Page 281: ...r differences between the quality of the characters on the left and right ends of the print A difference indicates the printhead gaps at each end of the printhead are not equal The ends of this system...

Page 282: ...rrect streaking Check the drum temperature sensor for debris build up on the sensor or the sensor is not in proper contact with the drum See the test print Reverse Text 3 If there is poor transfer on...

Page 283: ...termine if the drum or transfix roller have a defect Drum defects do not move in the X position print to print but it does move into the Y position print to print drum defects do not repeat down the p...

Page 284: ...the following formula Skew Spec mm 998 4 width 12 5 1 02 where width is in millimeters To measure margin measure from the magenta frame to the edge of the paper at the midpoint on the top and left edg...

Page 285: ...X Dot Position This print is used by Manufacturing and Engineering 27 Y Dot Position This print is used by Manufacturing and Engineering 28 Chase Pages A blank piece of paper is used to remove contami...

Page 286: ...31 Cleaning Chase Page This page is automatically printed following a purge It is used to flush the jet nozzles of any possible contamination or color mixed jets It can also be printed on its own Tes...

Page 287: ...on Adjustments and Calibrations In this chapter System Alignments and Adjustments Print Engine Component Home Positions and Indicators Manual DADF to Scanner Calibration Jet Substitution Mode Resettin...

Page 288: ...Remove the system covers using the procedures that begin on page 8 8 2 With the swing arm in the unlocked position remove the K clip from the drive shaft and remove the left drive gear If the printhe...

Page 289: ...wiper is all the way to the bottom of its travel and the gears cannot be rotated any further Note Rotating the left and right gears together ensures that the wiper stays parallel and does not pop out...

Page 290: ...vel Head tilt gear disengaged from process drive train arrows on left frame point to each other Printhead tilted forward and disengaged from tilt gear Process drive assembly holes on transfix camshaft...

Page 291: ...Gear When the Printhead Is NOT Installed 1 Manually move the tilt gear located on the inside of the left frame to its disengaged position When disengaged the arrows on the left frame point to each ot...

Page 292: ...of drum maintenance cam shaft and rotate clockwise one revolution If the printhead is engaged manually assist the movement of the printhead There is an audible click when the gear disengages Note The...

Page 293: ...tions 6 7 When the tilt gear is disengaged the two arrows on the left side of the printer are pointing at each other see also the illustration on page 6 5 s2424 016 Drum Printhead Tilt Gear Tilt gear...

Page 294: ...rive frame must align with the holes in the gear The hole in the drum maintenance camshaft gear must align with the arrow on the frame The hole in the transfix camshaft gear aligns with the hole on th...

Page 295: ...procedure see Xerox Supplies on page 9 16 for the part number or use the page that came with the replacement part Starting the Calibration Procedure 1 On the control panel press the System Setup butt...

Page 296: ...3 In the menu select Document Glass Step and then press the Enter button to scan the calibration page 4 When the scan completes check the control panel message If the control panel indicates Success...

Page 297: ...e adjusted to fit against the paper If the page is misaligned the calibration procedure fails 2 In the menu select Document Feeder Step and then press the Enter button to scan the calibration page 3 W...

Page 298: ...ooting and then press the OK button 3 Scroll to Print Quality Problems and then press the OK button 4 Press and hold the Up Arrow button and then press the Back button The Jet Substitution Mode is now...

Page 299: ...blems and then press the OK button 4 Press and hold the Up Arrow button and then press the Back button 5 Scroll to Turn Jet Substitution Mode Off and then press the OK button 6 Print the Eliminate Lig...

Page 300: ...6 14 WorkCentre C2424 Service Manual...

Page 301: ...7 Section Cleaning and Maintenance In this chapter Inspection System Self Maintenance Service Cleaning and Maintenance Procedures Cleaning for Print Quality Problems Maintenance Kit Lubrication...

Page 302: ...crack Belts There are five rubber belts in the system Y axis belt that rotates the drum Two small belts for the exit module exit rollers rotation and lift Two belts on the printhead wiper Inspect the...

Page 303: ...t Smears Transfix Roller Oiling Drum Cleaning Chase Page Printhead Maintenance Cycle Eliminate Light Stripes The printhead maintenance cleaning cycle removes bubbles or foreign matter that cause print...

Page 304: ...ility is enabled 5 sheets of paper go through the simplex paper path and up to 20 sheets go through the duplex paper path 4 The system returns to the Print Quality Problems menu Because of the higher...

Page 305: ...ors appear in prints Ink smears or random streaks appear on the front or back of prints Oily spots appear along the tops of prints Mispicks or multiple picks occur at the media tray Persistent paper j...

Page 306: ...s with the IOT or IIT Also clean the glass platen the CVT window and the pick feed rollers Light Stripes or Missing Colors Problem type Solution Missing or light colored stripes on prints Select the a...

Page 307: ...Pick Roller Cleaning Methods on page 7 7 Paper jamming problems at the front door Clean the transport rollers Paper jamming problems within the exit path Clean the elevator rollers Paper jamming prob...

Page 308: ...2 Peel off a strip of tape Stretch the tape across the table with the sticky side up Fasten it to the table at both ends 3 Remove the roller 4 Roll the roller across the tape to remove the debris from...

Page 309: ...eplaced before continued printing is possible See the installation instructions included with the maintenance kit Note The maintenance kit oil poses no known adverse health effects See the Material Sa...

Page 310: ...These parts are identified in the replacement procedures When lubricating during replacement use the grease approved for the WorkCentre C2424 system The grease part number is 006 7997 00 Caution Plas...

Page 311: ...chapter Overview General Notes on Disassembly Image Input Terminal DADF and Scanner Image Output Terminal Print Engine Ink Loader Assembly Back Frame and Printer Stabilizer Imaging Paper Path Motors G...

Page 312: ...part is simply a reversal of the disassembly Replacement procedures are included where this is not the case and special steps are required Replacement notes are included when they can help ease or sh...

Page 313: ...Always use the correct type and size screw coarse thread brass colored screws into plastic and fine thread silver colored screws into metal Using the wrong screw can damage tapped holes Do not use ex...

Page 314: ...e from the scanner assembly 2 You must depress the locking mechanism 2 on the back hinges to release the document feeder from the scanner assembly 3 Lift straight up on the document feeder to remove N...

Page 315: ...Service Parts Disassembly 8 5 DADF Front Cover PL 1 13 1 Remove 3 screws securing the cover 2 Lift and remove s2424 241...

Page 316: ...open the platen scanhead is not in the home position and cannot be locked 1 Remove the document feeder page 8 4 2 Disconnect the scanner assembly cable from the print engine 3 Place the scanhead in t...

Page 317: ...ontrol panel connector from the scanner assembly 4 Remove the control panel Image Output Terminal Print Engine Note Accessing and removing exterior covers can be done while the document feeder and sca...

Page 318: ...g the document feeder scanner assembly covers and ink loader Videos are located on the WorkCentre C2424 Product Training CD ROM 1 Disconnect all interface cables including the power cord 2 Remove the...

Page 319: ...Service Parts Disassembly 8 9 2 Pry up on the left and right side of the output tray and the two tabs on the bottom to remove the tray from the system s2424 244...

Page 320: ...and unsnap the right and left stay retainers from Tray 1 2 Disconnect and free the wiring from Tray 1 3 Carefully remove the front door tray 1 assembly by releasing the left hinge pin from the printer...

Page 321: ...r 3 Remove one screw on the back of the system securing the right side cover 4 Using a flatblade screwdriver insert the screwdriver into the channel and lift up to release the tab securing the right s...

Page 322: ...vers page 8 11 2 Using a flatblade screwdriver release the tab securing the back cover 3 Remove 2 screws securing the EMI shield 4 Using a flatblade screwdriver release the tab securing the EMI shield...

Page 323: ...nd left sides of the ink loader to release from the system then lift the ink loader assembly clear of the chassis and hold it in position against the rear of the system to allow access to the connecto...

Page 324: ...ingers 3 While keeping the tension with one hand on the spring use your other hand to slide the loosened belt off the pulley Caution This is a strong spring that can cause damage if it slips during re...

Page 325: ...Replacement Notes Note Ensure the spring arm screws are in the right locations and that the arm floats freely Note If replacing the motor remove 3 motor screws to separate the motor from the arm and r...

Page 326: ...low the printhead to cool for 30 minutes before starting the removal procedure Caution Perform the steps in this procedure in the order given to prevent damage to the system 1 Remove the document feed...

Page 327: ...slightly on the printhead to keep it away from the drum surface unlock push down the right and left printhead restraint arms 3 above then slowly allow the spring loaded printhead to tilt forward 5 On...

Page 328: ...8 18 WorkCentre C2424 Service Manual 6 Disconnect the air hose from the purge pump s2424 022 1 2 Bias Spring Hook Purge Pump...

Page 329: ...ly toward the rear of the printer to remove Note Adjust printhead position as required to remove the right restraint Caution The roll block stays hot 10 to 15 minutes after the printer is shut down 8...

Page 330: ...10 Lift the printhead out of its mounting position and place the shaft ends in the cradle notches near the top of the chassis frame 11 Disconnect the data cable from the print head s2424 157 Heater Ca...

Page 331: ...the printhead free of the printer chassis Replacement Notes Caution To avoid damage observe the following order when reinstalling the printhead 1 Ensure that the tilt gear is in the home position page...

Page 332: ...tilted forward in the print position 6 Route the air hose through the frame and connect it to the purge pump 7 Install the Roll Block on the left end of the printhead Shaft The Roll Block must be ori...

Page 333: ...lose proximity to the drum Be careful with the removal tools and the spring to ensure that you do not damage the drum 2 Using your hands a spring hook or pliers remove the X axis bias spring from insi...

Page 334: ...etween the printhead and the drum to protect the drum from damage 2 Using the gears position the wiper blade all the way to the top of its travel 3 On the left side of the printer remove the KL clip a...

Page 335: ...ote Position the wiper so both ends are all the way down following reassembly see Wiper Alignment on page 6 2 Note Make sure the metal portion of the blade is nearest the drum and that the plastic cli...

Page 336: ...ctronics Module Circuit Boards and Cables on page 9 12 slide the board towards the rear and move the board out of the way 4 Loosen 1 screw securing the transfix roller shaft restraint and remove the r...

Page 337: ...ve the lower duplex guide and the white inner simplex guide page 8 44 3 Release the lock on the back of the AC connector and unplug the AC and sensor flag connectors from the bottom of the preheater T...

Page 338: ...Slide the preheater off the shelves and out of the printer as shown by 3 Replacement Note Note The fingers on the inner simplex guide go over the segmented roller First snap the left retainer into pl...

Page 339: ...4 3 To allow removal of the duplex roller remove the left KL clip on the shaft 4 Slide the shaft toward the left 2 to free the right end of the shaft 5 Finally pull the shaft out from the top Once the...

Page 340: ...with solenoid page 8 44 6 Insert a T 20 Torxbit through the slotted hole in the transfix load module on the outside of the plastic arm through the backside of the housing 7 Rotate the screwdriver tow...

Page 341: ...and stripper carriage assembly will be removed as a single part 9 Remove the clevis pins from the left and right sides securing the transfix load arms to the chassis 10 Carefully lift each transfix lo...

Page 342: ...Manual 11 Remove the grounding springs from the transfix load module to avoid bending them 12 Remove 2 screws securing each end of the transfix load module to the chassis s2424 165 Grounding Springs s...

Page 343: ...be 768 grease P N 00679900 in the groove on the end of each transfix load arm before reattaching the spring hooks Note After installing the EMA perform the Wiper Alignment on page 6 2 The printer may...

Page 344: ...module removal procedure page 8 30 2 Remove the process drive gearbox assembly page 8 55 3 Slide the shaft to the right 1 and make sure the bearing slides over to the gear move the shaft down and slig...

Page 345: ...ft to the right Caution The ground plate firmly holds the bushing in place Be careful when pulling out 1 Carefully pry the bushing out of the right ground plane 2 Rotate the left end of the shaft slig...

Page 346: ...clip on the right end of the pivot plate shaft 6 Remove the pivot plate shaft 7 Disconnect the connector from the I O Board connector J860 8 Feed the cable into the printer while sliding the drum mai...

Page 347: ...elt Relieve tension on the belt by pulling the end of the spring arm toward the front of the printer using your fingers See the figure on page 14 then slide the belt off the pulley 6 Remove 3 screws f...

Page 348: ...he transfix load arms and the media release blade carriage assembly can be installed on the drum assembly either before the drum is installed in the printer or after This procedure installs these comp...

Page 349: ...e the transfix load module 11 Insert a T 20 Torxbit through the right side slotted hole in the transfix load module engage the hole on the back of the module and lever the module s spring cam toward t...

Page 350: ...re it with 3 screws Torque the top screw into the labyrinth seal to 20 in lbs and the other two screws into the chassis to 12 in lbs 23 Pass the media release blade solenoid cable through the right si...

Page 351: ...PL 2 7 1 Remove the left cover page 8 11 2 Disconnect the air hose from the purge pressure pump 3 Disconnect the wiring harness from the purge pressure pump 4 Remove 3 screws and remove the purge pre...

Page 352: ...pages 4 thru page 13 2 Right side instructions Remove right front screw Remove the pulley and belt from the elevator roller to access and remove the right rear screw Remove the screw on the right side...

Page 353: ...ath gearbox to access and remove the left front screw see illustration above Remove the left rear and side screws Disconnect the following connectors back frame paper full sensor IIT scanner closed se...

Page 354: ...nd forward to remove Replacement Note Note The fingers on the Inner Simplex Guide go over the segmented roller First snap the left retainer into place then the right Lower Inner Duplex PL 3 2 1 Open t...

Page 355: ...ve the output tray 3 Remove the side covers 4 Open the exit cover and remove the outer duplex guide Upper Duplex Guide with Solenoid PL 3 5 1 Remove the right side cover page 8 11 2 Remove the outer d...

Page 356: ...8 46 WorkCentre C2424 Service Manual 4 Remove the upper duplex guide from the printer s2424 275 Hole for Solenoid Lever Solenoid Lever Upper Duplex Guide...

Page 357: ...ute the solenoid harness through the right side frame when replacing the upper duplex guide Also you must route the guide under the edges of the exit module assembly EMA frame Note Verify that the sol...

Page 358: ...the KL clip from the right end of the shaft 5 Remove the KL clip and bushing from the left end of the shaft Move the take away roller shaft to the left side of the printer to release it from the righ...

Page 359: ...ote The catch is located on the ceiling of the tray cavity about 1 4 of the way across the unit from the right side and about 5 in 12 5 cm back When you pull forward on the catch the roller swings dow...

Page 360: ...t the top and toward the left the grey rollers should be facing you Position the roller back about 2 inches 5 cm in the tray cavity feel for a large plastic clip on the right and the mating gear for t...

Page 361: ...this nut use a new one see replacement note 5 Remove the gear from the shaft 6 Remove the 2 screws holding the media tray lift motor to the printer frame 7 Remove the media tray lift motor from the ou...

Page 362: ...ntre C2424 Product training CD ROM 1 Remove the output paper tray and left side cover page 8 11 2 Disconnect the media path motor deskew clutch pick clutch and Tray 1 pick solenoid wiring harnesses 3...

Page 363: ...media drive gearbox first remove the paper tray Rotate the pick roller shaft until the pick clutch seats and then work upwards rotating the duplex feed rollers until the other shafts seat Ensure that...

Page 364: ...Manual Tray 1 MPT Pick Solenoid PL 4 12 1 Remove the left side cover page 8 11 2 Disconnect the solenoid cable 3 Remove 1 screw from the solenoid and remove the solenoid from the media drive gearbox s...

Page 365: ...rnesses from the gearbox cable restraint 3 If you will be re installing this gearbox pin the gears in position to ensure correct alignment on replacement Caution Replacement gear boxes come with two p...

Page 366: ...lt system is in the home position page 9 11 Be sure you seat the process drive motor with all three screws before torquing the screws to final tightness Torquing the screws individually before seating...

Page 367: ...sconnect the wiring harness 3 Remove 4 screws securing the motor to the chassis and remove the motor Replacement Note Note When reinstalling the X axis motor ensure that the fork extending out from th...

Page 368: ...connecting the sensor wiring harness page 9 15 4 Reach into the waste tray cavity and remove the head tilt compound gear Replacement Notes Note On reassembly the leaf spring on the back side of the ch...

Page 369: ...anner assemblies page 8 4 2 Remove the output tray page 8 8 3 Remove the left and right side covers page 8 11 4 Remove the rear cover and EMI shield page 8 12 5 Disconnect all wiring cables to the pow...

Page 370: ...anner assemblies page 8 4 2 Remove the output tray page 8 8 3 Remove the left and right side covers page 8 11 4 Remove the rear cover and EMI shield page 8 12 5 Disconnect all wiring to the exit modul...

Page 371: ...1 Remove the DADF and scanner assemblies page 8 4 2 Remove the output tray page 8 8 3 Remove the left and right side covers page 8 11 4 Remove the ink loader assembly page 8 13 5 Disconnect the 3 wir...

Page 372: ...4 Service Manual 11 Remove the electronics module Replacement Note Note When replacing the electronics module transfer the Configuration Card NVRAM SODIMM RAM and hard drive to the new module Electron...

Page 373: ...blies page 8 4 2 Remove the output tray page 8 8 3 Remove the left and right side covers page 8 11 4 Remove the scanner power supply and MEP control board page 8 42 5 Remove the Electronics Module pag...

Page 374: ...8 64 WorkCentre C2424 Service Manual s2424 214 Back Frame...

Page 375: ...the wave amp board through the back of the printer Replacement Note Caution Ensure that the ribbon cables are fully and squarely inserted into the ZIF connectors on the wave amp and printhead If the c...

Page 376: ...ight side cover page 8 10 2 Disconnect the wires to the I O Board 3 Remove 2 screws attaching the I O Board to the printer 4 Remove the I O Board Replacement Note Note Ensure the corner of the board i...

Page 377: ...2 Disconnect 3 wires to the drum heater relay board 3 Remove the 2 screws securing the drum heater relay board to the system 4 Remove the drum heater relay board Replacement Note Warning Ensure that...

Page 378: ...the orientation of the NVRAM chip before removing it and use this as a guide for proper replacement 2 Remove the old NVRAM from its socket in the Electronics Module page 1 4 3 Insert the new NVRAM ch...

Page 379: ...9 Section Parts Lists In this chapter Serial Number Format Using the Parts List Xerox Supplies...

Page 380: ...e the modification level of the printer the date of its manufacture and the sequence number of the printer produced on that day The serial number is coded as follows The text S N followed by the seria...

Page 381: ...up of the individual parts called out in parentheses 7 The notation with X Y following a part name indicates an assembly that is made up of components X through Y For example 1 with 2 4 means part 1 c...

Page 382: ...9 4 WorkCentre C2424 Service Manual Covers 4 4 6 3 2 5 2 3 1 7 9 11 s2424 149 22 23 21 20 25 15 16 17 13 14 12 19 18 8 24 26 10 PL 1 11 With 8 12 PL 1 15 With 13 19...

Page 383: ...uded 1 109K01870 12 Upper Housing including platen glass 1 802K87650 13 DADF Front Cover 1 802K87660 14 DADF Upper Cover 1 802K87820 15 Duplex Automatic Document Feeder Assembly includes PL 1 13 1 14...

Page 384: ...9 6 WorkCentre C2424 Service Manual Imaging s2424 193 1 2 3 7 12 13 14 15 16 17 8 11 10 9 4 19 20 21 18 18 5 6...

Page 385: ...80 9 Right Printhead Restraint 1 343167180 10 Transfix Camshaft Assembly 1 384187480 11 Drum Maintenance Camshaft Assembly 1 401100380 12 Stripper Carriage Assembly 1 386735281 13 Transfix Roller 1 02...

Page 386: ...9 8 WorkCentre C2424 Service Manual Paper Path s2424 194 6 7 8 8 9 5 13 17 18 19 16 12 4 2 1 3 15 14 10 11 11 10...

Page 387: ...51113680 7 Exit Module Assembly MEP 1 441224480 8 Spring Carriage 2 809E68760 9 Spring Carriage Roller 4 809E68750 10 Pulley MEP Exit Module 4 020E47770 11 Belt MEP Exit Module 2 023E30530 12 Roller I...

Page 388: ...9 10 WorkCentre C2424 Service Manual Motors Gears Solenoids Clutches Sensors Fans and Backframe 6 8 1 2 9 7 10 12 13 5 4 10 15 14 11 s2424 195 3...

Page 389: ...401096180 5 X Axis Motor Assembly 1 650429400 6 Drum Cooling Fan 1 119641780 7 Gearbox and Motor Process Drive 1 401100080 8 MEP Drive Motor 1 127K53270 9 MEP Elevator Motor 127E14830 10 Tray Lift Mot...

Page 390: ...9 12 WorkCentre C2424 Service Manual Electronics Module Circuit Boards and Cables 7 8 9 10 1 2 6 3 11 5 12 17 14 18 20 4 22 21 15 16 23 s2424 196 19 13 24...

Page 391: ...NVRAM 1 156476800 10 Configuration Card Programmed 1 537E65920 11 Cable ZIF Wave Amp Drive 1 174448680 12 Cable Right Side Power Control 1 174446680 13 I O Board 1 671529180 14 Cable Combined Right 1...

Page 392: ...9 14 WorkCentre C2424 Service Manual Sensors and Flags Actuators s2424 197 2 3 4 5 6 7 8 9 10 11 1...

Page 393: ...9645580 3 Engine Exit Flag 1 137E11880 4 Drum Temperature Sensor Assembly 1 119643080 5 Exit Module MEP Sensor Assembly 1 119648180 6 Waste Tray Sensor optical 1 119648780 7 Sensor Assembly Paper Tray...

Page 394: ...M4 x 32 partial thread flanged hex 5 each M4 x 12 taptite flanged 5 each ASMO clip lift motor 2 each E ring bent M6 5 mm 5 each Bushing 6 mm 2 each Cable Restraint 2 each Frame Replace Screw silver bl...

Page 395: ...ndard Capacity Maintenance Kit WorkCentre C2424 108R00656 Extended Capacity Maintenance Kit WorkCentre C2424 108R00657 Genuine Xerox Solid Ink 8400 Black 3 sticks 108R00663 Genuine Xerox Solid Ink 840...

Page 396: ...an 650K24040 Overlay Kit Spanish 650K24050 Overlay Kit Dutch 650K24060 Overlay Kit Swedish 650K24070 Overlay Kit Brazilian Portuguese 650K24080 Overlay Kit Russian 650K24300 Service Manual 604E13990 S...

Page 397: ...ring Diagrams In this chapter Scanner DADF Functional Diagrams Main Block Wiring Diagram Right Side Wiring Diagram Left Side Wiring Diagram Inside Front Wiring Diagram Inside Top Wiring Diagram Electr...

Page 398: ...Main Power Control J3AC J2 Scanner Power Supply Cooling Fan J2 Scanner Power Supply Image Processor Controller Board J2 J2 Scanner Power Supply MEP Board CN1 J1 J2 Scanner Bridge Board Image Processo...

Page 399: ...Main ECB Transport motor negative J390 34 Power Control ECB Main ECB 8 Main tray elevator plate 2 Main tray pick clutch 2 MPT Solenoid 3 Deskew Clutch 2 Purge pump 6 Main fan 2 Media motor and encoder...

Page 400: ...0 Ethernet RCV XMT ribbon cable I O ECB J840 J720 2 Pre Heat ECB Paper pre heater J820 4 Power Control ECB Hard Drive ECB J390 J840 I O ECB Ethernet RCV XMT ribbon cable J800 J860 Pre heat ECB I O ECB...

Page 401: ...mage Processing Controller 1 Existing Printer Front Panel NOT INSTALLED USB Image Processor Scanner Control Panel FP Interface FP Interface Scanner Part of Print Engine Printer IP Controller Board PCI...

Page 402: ...Drum Temp Thermistor 14 2 14 80 6 2 34 2 2 2 3 14 2 5 Hard Drive 7 DMU Life i Button 6 MPT Solenoid 8 HCF Connector Transport Motor 8 2 3 3 3 2 HCF Module 3 10 8 8 HCF Connector 11 30 14 30 Vss Vpp 8...

Page 403: ...B Deskew Entry Sense Opto Waste Tray Opto Main Tray Paper Height Opto Main Tray Paper Out Opto Process Home Optional 5 2 10 3 16 7 3 3 3 NOTE The numbers shown at the circuitboard perimeters are for t...

Page 404: ...nd MEP Exit Module Board s2424 277 Exit Module Board Scanner Assembly Power Supply Board MEP Serial Communication 5 24V Serial In Door Sensors 24 Volts Motor Power Elevator Drive on MEP MEP Sensors AC...

Page 405: ...ness Pass Through Wiring Harness Pass Through 37016 4x HM Clutch J680 13067 4x J870 13067 4x J860 Maintenance Kit Missing J400 Drum Heater J600 Add Paper Tray J250 37020 4x Strip Solenoid J110 Waste T...

Page 406: ...gram Continued The lines indicate which connectors you should look at for the Pest codes The Pest codes are displayed on the control panel 13387 4x 37027 4x X Motor Signal Cable Routes to Bottom of Ch...

Page 407: ...r the Pest codes The Pest codes are displayed on the control panel s2424 202 37023 4x Purge Valve 37022 4x Purge Motor 37013 4x Electric Fan J280 37032 4x Y Motor J790 37062 4x Head VSS J390 37034 4x...

Page 408: ...onnectors you should look at for the Pest codes The Pest codes are displayed on the control panel 37034 3x MP Motor 37017 4x Deskew Clutch 37019 4x Pick Solenoid 37018 4x Pick Clutch Ground Clip MEP E...

Page 409: ...ndicate which connectors you should look at for the Pest codes The Pest codes are displayed on the control panel s2424 204 37036 4x Process Motor 37008 4x Preheat Power AC Connector J860 13131 41 Sens...

Page 410: ...ate which connectors you should look at for the Pest codes The Pest codes are displayed on the control panel MEP Serial Communication Door Sensors 24 Volts s2424 205 37010 4x Ink 1 Heater J180 34062 4...

Page 411: ...ued The lines indicate which connectors you should look at for the Pest codes The Pest codes are displayed on the control panel s2424 206 Heater Cable Cable Restraint Out of Ink J180 32064 4x J140 370...

Page 412: ...bon Connector Data Cable USB Port Config Card Ethernet Port Heater Cable Connector Ink Load Power Connector Power to Preheater and Drum Power to Scanner Assembly Power Supply Service Port Right Umbili...

Page 413: ...A Appendix Appendix Contents Control Panel Menu Map Media Margin Specification Table Paper Weight Equivalence Table On Site Printhead Troubleshooting Checklist...

Page 414: ...Setup Enter Back Lighten Darken Stop Start Clear ClearAll Reduce Enlarge PaperSupply Ready to Copy Paper Supply Reduce Enlarge Lighten Darken Original Size Edge Erase Margin Shift Auto Center Book Cop...

Page 415: ...onstration Print Mode Demonstration CMYK Sampler Pages RGB Sampler Pages Model Printer Name Print Server IP Address Serial Activation Date Serial Total Impressions Color Impressions Black Impressions...

Page 416: ...ecurity Startup Page Auto Clear Timeout Power Saver Timeout Date and Time Intelligent Ready Default Service Color Copy Password Print Job Interrupt Metric Defaults Reset System Controls Paper Source 2...

Page 417: ...5 5 166 240 10 Envelope 104 775 241 3 5 15 94 775 211 3 C5 Envelope 162 229 5 20 157 189 DL Envelope 110 220 5 20 100 180 Statement 139 7 215 9 5 5 129 7 205 9 A5 148 210 5 5 138 200 Monarch Envelope...

Page 418: ...3 24 29 35 39 64 20 50b 28 34 42 46 75 21 54 30 36 44 49 80 24 60b 33 41 50 55 90 27 68 37 45 55 61 100 28 70b 39 49 58 65 105 29 74 41 50 61 68 110 32 80b 44 55 67 74 120 36 90 50 62 75 83 135 0 18 3...

Page 419: ...plete Value or Result What to look for Step 1 Do you suspect or have evidence of use of generic ink YES NO Circle one 1a Did the customer state that they have used generic ink in this printhead YES NO...

Page 420: ...59 46 13 261 48 13 323 47 13 325 49 is displayed or a PEST error code 37 002 47 37 003 48 37 004 40 or 37 005 41 perform the following steps 3c Inspect and reseat the printhead interface cable gray ri...

Page 421: ...the waste tray 9b Select Eliminate Light Stripes from the printer front panel and run one cleaning cycle 9c Remove the waste tray and examine how much ink was purged A single purge should resemble the...

Page 422: ...or code x This Printhead Troubleshooting Checklist filled out x Inventory control Green Tag filled out x Sample prints that clearly show the observed print quality defect not applicable for printheads...

Page 423: ...covers 9 5 color mode button 1 9 communication port testing 4 79 compound gear head tilt parts list motors and fans 9 11 configuration card electronics module 1 6 8 62 parts list circuit boards 9 13 p...

Page 424: ...aft 2 40 Duplex Automatic Document Feeder guidelines 1 17 duplex paper path check menu 4 32 duplex printing theory 2 20 duplex roller removal 8 29 duplex roller parts list paper path 9 9 E electric cl...

Page 425: ...ate service menu 4 3 head maintenance clutch check menu 4 15 head serial number service menu 4 3 head tilt compound gear removal 8 58 head tilt gear 6 5 head version service menu 4 3 head to drum adju...

Page 426: ...heory 2 24 2 42 Media Exit Path MEP 2 17 media jams 7 7 media margin specifications A 5 media path faults 3 34 media path motor check menu 4 47 media release blade 8 26 media release blade removal 8 2...

Page 427: ...ans 9 11 pick feed motor check menu 4 48 pivot plate 2 37 plug and jack locator 10 2 POST Error Codes 3 5 power control board 2 12 power control cable parts list circuit boards 9 13 Power Cord Parts L...

Page 428: ...right side cover removal 8 11 roll block 8 19 8 22 roller exit idler parts list 9 9 Routine 1 7 Routine Maintenance Items diagram 1 7 Runtime Log 4 81 S Safety electrical components 1 viii hazards 1...

Page 429: ...31 tilt drive check menu 4 39 tilt gear 2 33 Tools List 9 17 total satisfaction guarantee 1 iv 1 vi Transfix and exit functions 2 40 transfix arm assembly parts list imaging 9 7 transfix camshaft asse...

Page 430: ...side wiring 10 11 main wiring 10 6 right side wiring 10 9 scanner DADF 10 5 wrinkling 5 33 X x axis bias spring 8 17 8 23 bias spring hook parts list 9 7 bias spring parts list 9 7 motor assembly part...

Page 431: ......

Page 432: ...604E13990...

Reviews: