background image

SSuuppppoorrtteedd C

Cuussttoom

m PPaappeerr SSiizzeess
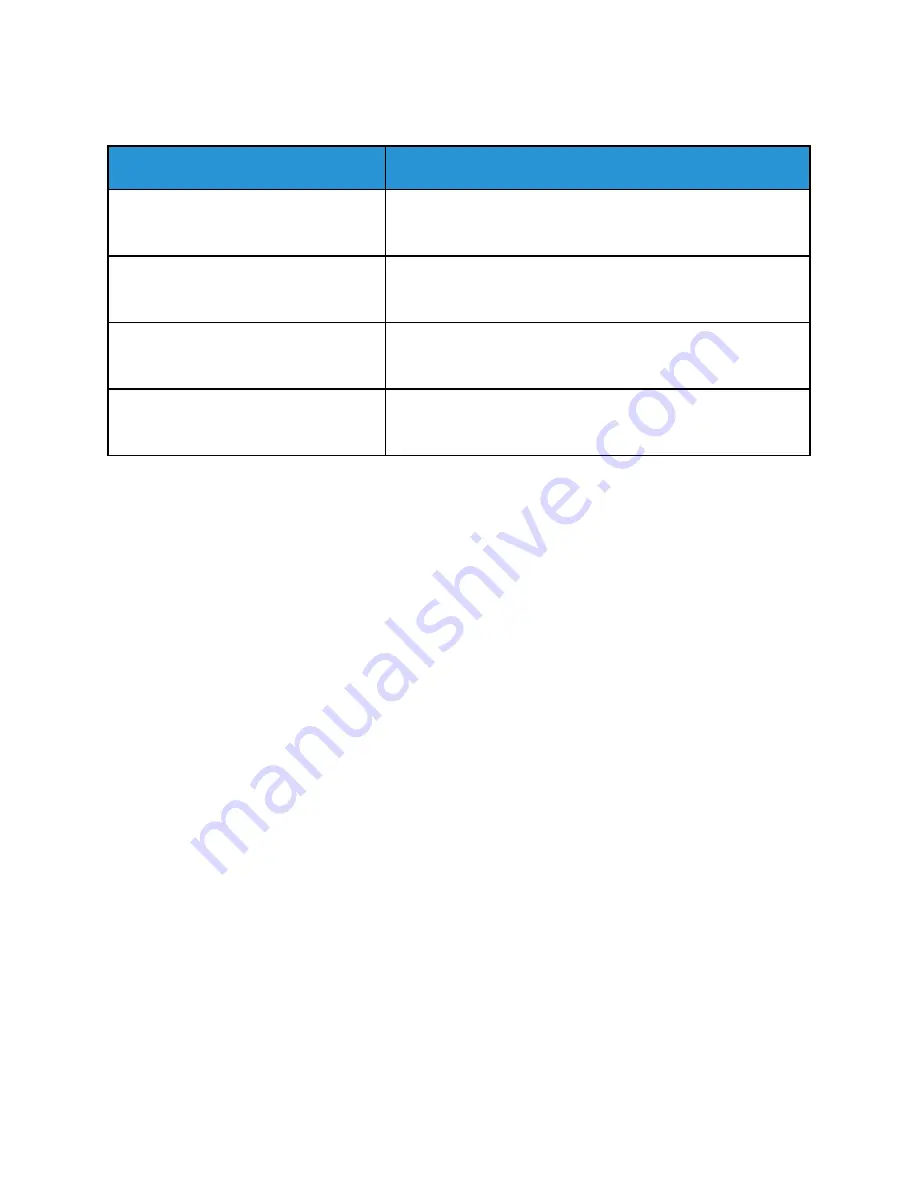
Tray Number

Paper Sizes

Tray 1

Minimum: 148 x 210 mm (5.8 x 8.3 in.)

Maximum: 216 x 356 mm (8.5 x 14 in.)

Tray 2

Minimum: 148 x 210 mm (5.8 x 8.3 in.)

Maximum: 216 x 356 mm (8.5 x 14 in.)

Bypass Tray

Minimum: 76.2 x 127 mm (3 x 5 in.)

Maximum: 216 x 356 mm (8.5 x 14 in.)

2-Sided Printing

Minimum: 148 x 210 mm (5.8 x 8.3 in.)

Maximum: 216 x 356 mm (8.5 x 14 in.)

C

Caarrddssttoocckk

You can print Cardstock up to 220 g/m

2

from any tray. For types and weights of supported Cardstock

for 1-Sided printing, refer to

Supported Paper Types and Weights

. For types and weights of supported

Cardstock for 2-Sided printing, refer to

Supported Paper Types and Weights for Automatic 2-Sided

Printing

.

Follow the guidelines for printing on glossy cardstock:

• Do not open sealed packages of glossy cardstock until you are ready to load the paper into the

printer.

• Leave glossy cardstock in the original wrapper, and leave the packages in the shipping carton until

ready to use.

• Remove all other paper from the tray before loading glossy cardstock.

• Load only the amount of glossy cardstock you are planning to use. When you are finished

printing, remove the glossy cardstock in the tray . Replace unused cardstock in the original
wrapper and seal.

• Rotate stock frequently. Long periods of storage in extreme conditions can cause glossy cardstock

to curl and jam in the printer.

• In the print driver software, select the desired glossy cardstock type or select the tray loaded with

the desired paper.

154

Xerox

®

VersaLink

®

C405 Color Multifunction Printer

User Guide

Paper and Media

Summary of Contents for VersaLink C405dn

Page 1: ...Version 1 4 October 2019 702P05813 Xerox VersaLink C405 Color Multifunction Printer User Guide...

Page 2: ...M and AIX are registered trademarks of International Business Machines Corporation in the United States and or other countries McAfee ePolicy Orchestrator and McAfee ePO are trademarks or registered t...

Page 3: ...ew 22 Duplex Automatic Document Feeder 23 Internal Parts 25 Rear View 26 Control Panel 27 Power Options 29 Powering On the Printer or Exiting Low Power or Sleep Mode 29 Restarting Placing in Sleep Mod...

Page 4: ...Devices 54 More Information 56 3 Customize and Personalize 57 Customize and Personalize Overview 58 Customizing or Personalizing the Home Screen 59 To hide or show an App on the Home screen 59 To rea...

Page 5: ...Overview 98 Sending a Scanned Image in an Email 98 Previewing and Building Jobs 100 Scan To 102 Scan To Overview 102 Scanning to an Email Address 102 Scanning to a USB Flash Drive 103 Scanning to a U...

Page 6: ...ality 140 Image Options 140 Image Shift 141 Color Adjustments 141 Printing Mirror Images 142 Printing Multiple Pages to a Single Sheet 142 Printing Booklets 142 Using Special Pages 143 Printing Waterm...

Page 7: ...Scan Color Consistency Procedure 185 Adjusting Paper Registration 185 Supplies 188 Consumables 188 Routine Maintenance Items 188 Ordering Supplies 188 Toner Cartridges 189 Recycling Supplies 190 Mana...

Page 8: ...tion about Your Printer 227 A Specifications 229 Printer Configurations and Options 230 Available Configurations 230 Standard Features 230 Options and Upgrades 231 Physical Specifications 232 Weights...

Page 9: ...ountries 247 Fax Regulations 248 United States 248 Canada 249 European Union 250 New Zealand 251 South Africa 251 Safety Certification 252 Material Safety Data Sheets 253 C Recycling and Disposal 255...

Page 10: ...10 Xerox VersaLink C405 Color Multifunction Printer User Guide Table of Contents...

Page 11: ...ety 13 Operational Safety 15 Maintenance Safety 17 Printer Symbols 18 Environmental Health and Safety Contact Information 20 Your printer and the recommended supplies have been designed and tested to...

Page 12: ...ation and certification and compliance with electromagnetic regulations and established environmental standards The safety and environment testing and performance of this product have been verified us...

Page 13: ...rd from the electrical outlet 3 Call an authorized service representative P Po ow we er r C Co or rd d Use the power cord supplied with your printer Plug the power cord directly into a properly ground...

Page 14: ...O Of ff f If any of the following conditions occur power off the printer immediately and disconnect the power cord from the electrical outlet Contact an authorized Xerox service representative to cor...

Page 15: ...t push or move the device with all the paper trays extended O Oz zo on ne e R Re elle ea as se e This printer produces ozone during normal operation The amount of ozone produced is dependent on copy v...

Page 16: ...reach of children Never throw toner toner cartridges drum cartridges or waste cartridges into an open flame When handling cartridges for example toner and such avoid skin or eye contact Eye contact ca...

Page 17: ...supplies recycling programs go to www xerox com recycling WARNING Do not use aerosol cleaners Aerosol cleaners can cause explosions or fires when used on electromechanical equipment When installing th...

Page 18: ...aution Caution Indicates a mandatory action to take in order to avoid damage to the property Caution To avoid damage to the property be careful not to spill toner when handling the waste cartridge Do...

Page 19: ...not use transparencies or overhead projector sheets Do not reload paper previously printed on or used Do not copy money revenue stamps or postage stamps For details about all the printer symbols that...

Page 20: ...upplies contact United States and Canada 1 800 ASK XEROX 1 800 275 9376 Europe EHS Europe xerox com For product safety information in the United States and Canada go to www xerox com environment For p...

Page 21: ...ng Started This chapter contains Parts of the Printer 22 Power Options 29 Accessing the Printer 31 Introduction to Apps 32 Information Pages 33 The Embedded Web Server 35 Installation and Setup 38 Con...

Page 22: ...s Tray 3 Front Door 4 USB Memory Port 5 Card Reader Bay 6 Control Panel 7 Single Pass Duplex Automatic Document Feeder 8 Output Tray 9 Right Side Door 10 Optional 550 Sheet Feeder Tray 2 22 Xerox Vers...

Page 23: ...um me en nt t F Fe ee ed de er r 1 Document Feeder Cover 2 Paper Guides 3 Single Pass Duplex Automatic Document Feeder 4 Document Output Tray 5 Document Output Tray Extension Xerox VersaLink C405 Col...

Page 24: ...hat they fit against the original documents Insert paper in the duplex automatic document feeder only when ink on the paper is dry Do not load original documents above the MAX fill line D Do oc cu um...

Page 25: ...nt Door 2 Toner Cartridges 3 Document Glass 4 Document Cover 5 Single Pass Duplex Automatic Document Feeder 6 Waste Cartridge Lock 7 Drum Cartridges 8 Waste Cartridge Xerox VersaLink C405 Color Multif...

Page 26: ...r 4 Power Connector 5 Rear Door 6 Left Side Cover 7 Phone Line Connector 8 Fax Line Connector 9 Wireless Network Adapter Port Cover 10 USB Port Type B 11 Ethernet Port 12 FDI Connector 26 Xerox VersaL...

Page 27: ...lso supports the power saver modes and blinks to indicate the power status of the printer Item Name Description 1 NFC Area Near Field Communication NFC is a technology that enables devices to communic...

Page 28: ...ks blue once slowly for a copy or print job initiated at the control panel Blinks blue twice slowly for fax or print job received from the network Blinks blue rapidly while the printer is powering up...

Page 29: ...iin ng g L Lo ow w P Po ow we er r o or r S Slle ee ep p M Mo od de e To power on the printer or to exit Low Power mode or Sleep mode press the Power Wake button Note The Power Wake button is the only...

Page 30: ...in Sleep Mode touch Sleep In Sleep Mode the touch screen goes dark and the Power Wake button flashes To power off the printer touch Power Off If the printer does not respond to a single press of the P...

Page 31: ...VLC405docs 5 Touch OK Note To access each password protected service enter the User Name and password S Sm ma ar rt t C Ca ar rd d When a Common Access Card system is installed on your Xerox device a...

Page 32: ...n Some Apps are installed as standard but hidden the first time you use the device When you log in the Apps configured for your personal account appear on the control panel You can download more Apps...

Page 33: ...that are available on the printer PCL Font List The PCL Font List provides a printout of all PCL fonts that are available on the printer Demonstration Print Demonstration Print provides a demonstrati...

Page 34: ...ray information and more P Pr riin nt tiin ng g t th he e C Co on nf fiig gu ur ra at tiio on n R Re ep po or rt t 1 At the printer control panel press the Home button 2 Touch Device About Information...

Page 35: ...uration Report Note To view the TCP IP address on the control panel wait until the printer has been on for 2 minutes If the TCP IP address is 0 0 0 0 or begins with 169 it indicates a network connecti...

Page 36: ...405docs D Do ow wn nllo oa ad diin ng g t th he e C Co on nf fiig gu ur ra at tiio on n R Re ep po or rt t f fr ro om m t th he e E Em mb be ed dd de ed d W We eb b S Se er rv ve er r From the Embedde...

Page 37: ...when you are connected remotely to the device click the Lock Device Control Panel option Note If a local user attempts to access the control panel while the device control panel is locked the control...

Page 38: ...bedded Web Server For more information refer to the System Administrator Guide at www xerox com office VLC405docs S Se elle ec ct tiin ng g a a L Lo oc ca at tiio on n f fo or r t th he e P Pr riin nt...

Page 39: ...able to connect the printer to the network You cannot connect the printer directly to the computer via Ethernet A connection through a router or network switch is required An Ethernet network can be u...

Page 40: ...iin ng g t to o a a W Wiir re elle es ss s N Ne et tw wo or rk k A wireless local area network WLAN provides the means to connect 2 or more devices in a LAN without a physical connection The printer c...

Page 41: ...wireless networking is enabled and configured the adapter is able to connect to a wireless network To install the Wireless Network Adapter 1 Power off the printer 2 To remove the Wireless Network Adap...

Page 42: ...led remove it only as needed and as directed in the Wireless Network Adapter removal instructions For details refer to Removing the Wireless Network Adapter 5 Power on the printer 6 Configure the Wi F...

Page 43: ...ter then away from the printer 4 Reach into the printer and lift the release lever Grasp the Wireless Network Adapter with your other hand and carefully pull it away from the printer Caution Do not us...

Page 44: ...s the port cover against the back of the printer until the cover latches into place 6 Place the left side cover into position then slide it toward the front of the printer 7 To tighten the cover turn...

Page 45: ...nistrator Guide at www xerox com office VLC405docs C Co on nn ne ec ct tiin ng g t to o a a W Wii F Fii N Ne et tw wo or rk k a at t t th he e C Co on nt tr ro oll P Pa an ne ell To connect to a Wi Fi...

Page 46: ...up with a Push Button Connection PBC select PBC f Touch OK C Co on nf fiig gu ur riin ng g t th he e P Pr riim ma ar ry y N Ne et tw wo or rk k a at t t th he e C Co on nt tr ro oll P Pa an ne ell You...

Page 47: ...our Mobile Device To connect with Wi Fi Direct follow the directions provided with your mobile device C Co on nn ne ec ct tiin ng g t to o a a T Te elle ep ph ho on ne e L Liin ne e WARNING To reduce...

Page 48: ...affic across subnets The Mac OS device must be Mac OS 10 7 or later AirPrint enabled printers work with all models of iPad iPhone 3GS or later and iPod touch 3rd generation or later running the latest...

Page 49: ...er 2 In the Embedded Web Server click Home Connectivity 3 For Mobile Printing click Google Cloud Print 4 To enable Google Cloud Print click the Enable toggle button 5 Click OK 6 Restart the printer th...

Page 50: ...opriate drive on your computer If the installer does not start automatically navigate to the drive and double click the Setup exe installer file Note If the Software and Documentation disc is not avai...

Page 51: ...g g t th he e D Dr riiv ve er rs s a an nd d U Ut tiilliit tiie es s f fo or r M Ma ac ciin nt to os sh h O OS S X X 1 Insert the Software and Documentation disc into the appropriate drive on your com...

Page 52: ...ding the Printer by Specifying the IP Address To add the printer by specifying the IP address 1 From the computer Applications folder or from the dock open System Preferences 2 Click Printers Scanners...

Page 53: ...nse agreement click Continue then click Agree 7 To accept the current installation location click Install or select another location for the installation files then click Install 8 Enter your password...

Page 54: ...0 Click Add I In ns st ta alllliin ng g D Dr riiv ve er rs s a an nd d U Ut tiilliit tiie es s f fo or r U UN NI IX X a an nd d L Liin nu ux x For more information on installing print drivers and util...

Page 55: ...rinter 4 In the list of available devices select the one you want to use then click Next 5 If the printer you want to use does not appear in the list click The printer that I want is not listed 6 Sele...

Page 56: ...mation for your printer including online technical support Online Support Assistant and print driver downloads www xerox com office VLC405support Information Pages Print from the control panel For det...

Page 57: ...ion Printer User Guide 57 3 Customize and Personalize This chapter contains Customize and Personalize Overview 58 Customizing or Personalizing the Home Screen 59 Customizing or Personalizing the Apps...

Page 58: ...the device you can personalize the device to meet specific user needs You can configure your personal Home page to hide or show only the apps you use You can tailor each feature list to your job requ...

Page 59: ...installed App a For the desired App touch X b Touch Done 5 Verify that only the desired Apps are displayed on the Home screen T To o r re ea ar rr ra an ng ge e A Ap pp ps s o on n t th he e H Ho om...

Page 60: ...gnify a feature is visible the Eye icon appears with no line across it 6 To reorder the menu features touch and drag the features into the appropriate order 7 To save the current configuration touch D...

Page 61: ...feature D De elle et tiin ng g a a S Sa av ve ed d P Pr re es se et t To delete a saved preset 1 At the printer control panel press the Home button 2 Touch the app required 3 Scroll to the bottom the...

Page 62: ...rom your User Account To remove all personalizations from your User Account 1 At your computer open a Web browser In the address field type the IP address of the printer then press Enter or Return 2 I...

Page 63: ...job settings in the 1 Touch App For copy jobs you can change the copy quantity for each job Start Immediately Use this option to start the job without reviewing the settings 10 Touch Next 11 If you se...

Page 64: ...Touch the option required Personal My Home Screen Only Use this option to display the 1 Touch App on your Home screen only when you are logged in to your user account Public Public Home Screen Use th...

Page 65: ...tings If the quantity is displayed for Copy jobs update the number of copies as required Touch Start If the Start Immediately option was selected during 1 Touch App setup the device starts automatical...

Page 66: ...66 Xerox VersaLink C405 Color Multifunction Printer User Guide Customize and Personalize...

Page 67: ...There are standard apps already installed and displayed on the Homescreen There are also apps that are installed as standard but are hidden when your device is used for the first time For more inform...

Page 68: ...cc co ou un nt t With an App Gallery account you have direct access to all the available Apps for your device An App Gallery account allows you to view and acquire Apps install Apps on your device and...

Page 69: ...pd da at tiin ng g a an n A Ap pp p f fr ro om m t th he e X Xe er ro ox x A Ap pp p G Ga alllle er ry y Xerox Apps add extend or customize the functionality of your device You can use the Xerox App...

Page 70: ...ypad then touch Enter 4 Enter your Password using the touch screen keypad then touch Enter 5 Touch Log In The Xerox App Gallery appears 6 Touch the App required then touch Update The License Agreement...

Page 71: ...e Use this option to check for software updates and configure update settings Notifications Use the Notifications option to see details of current alerts or faults on the device A History button displ...

Page 72: ...ol panel You can customize the alerts that appear on the control panel and configure email alert notifications To check the supplies status and set up alerts using the Embedded Web Server refer to the...

Page 73: ...eset the counters A page is counted as one side of a sheet of paper For example a sheet of paper that is printed on two sides counts as two impressions To view the Billing and Usage Counters 1 At the...

Page 74: ...the printer to factory defaults 1 At the printer control panel press the Home button 2 Touch Device Resets Reset to Factory Defaults 3 At the prompt touch Reset 4 When the process is complete the pri...

Page 75: ...or r E Ed diit tiin ng g C Co on nt ta ac ct ts s iin n t th he e A Ad dd dr re es ss s B Bo oo ok k a at t t th he e C Co on nt tr ro oll P Pa an ne ell Adding Contacts in the Address Book at the Con...

Page 76: ...up Name then enter a name using the touch screen keypad Touch Enter 5 To add group members touch Add Member 6 To add a contact name from the Favorites or Contacts menu select a contact 7 To add more g...

Page 77: ...e Star icon 7 To save the contact click OK Editing or Deleting Contacts in the Address Book in the Embedded Web Server To edit or delete contacts 1 At your computer open a Web browser In the address f...

Page 78: ...ps for each member d To save the changes click OK 6 To remove the selected group from the Address Book click Delete At the prompt click Delete A Ad dv va an nc ce ed d S Se et tt tiin ng gs s The Adva...

Page 79: ...ake the contact a Global Favorite click the Global Favorite Star icon 4 To mark a contact as a Favorite for email fax or a scan to destination for each feature click the Star icon 5 To remove a contac...

Page 80: ...pps Creating Personal Favorites To create a Personal Favorite 1 At the printer control panel press the Home button 2 Touch Login then enter a valid login name and password 3 Load the original document...

Page 81: ...d original documents touch 2 Sided Scanning then select an option 8 Adjust the job settings as needed For details about available features refer to Apps Features 9 Touch Send or Scan 10 If you are sca...

Page 82: ...Embedded Web Server click Log In then click on your user account If required enter your password and click Log In 3 To access your User Profile click on your User Account name shown in the top right c...

Page 83: ...more information refer to Printing Special Job Types P Pa au us siin ng g t th he e P Pr riin nt t J Jo ob b w wiit th h t th he e O Op pt tiio on n t to o D De elle et te e I It t 1 At the printer c...

Page 84: ...s required The job resumes automatically when the required resources are available If the job does not print automatically touch Resume To delete the print job touch Delete At the prompt touch Delete...

Page 85: ...o the Home screen press the Home button P Pe er rs so on na all P Pr riin nt t Personal Print allows you to store a document in the printer then print it from the control panel Note The Personal Print...

Page 86: ...folder named after the user ID associated with the print job A Sample Set job does not use a passcode Any user can print or delete a Sample Set job A Sample Set prints one copy of a job to allow you t...

Page 87: ...ress Enter or Return 2 In the Embedded Web Server click Jobs 3 Click the job name 4 Do one of the following To pause the print job click Pause To resume the print job click Resume To delete the print...

Page 88: ...as Presets for future jobs The list of features can be customized and some features could be hidden from view when the app is installed To view all available features and to find out more about custo...

Page 89: ...copies entered touch the Xbutton then enter the required quantity 5 If scanning from 2 sided original documents touch 2 Sided then select an option 6 Adjust copy settings as needed For details about...

Page 90: ...ntrol panel press the Home button 2 Touch Copy 3 Touch Saturation 4 To adjust the saturation move the slider 5 Touch OK Adding Color Effects 1 At the printer control panel press the Home button 2 Touc...

Page 91: ...t one of the following options Right then Down This option prints the images across the page row by row Down then Right This option prints the images down the page column by column Note The Image Orde...

Page 92: ...default setting Auto Center This option centers the image on the page Snap to Edge This option shifts the image to the edge of the document Select one of the image position options Mirror Side 1 This...

Page 93: ...cans only one side of the original image and produces 1 sided output files 2 Sided Original This option scans both sides of the original image 2 Sided Rotate Side 2 This option scans both sides of the...

Page 94: ...specify different amounts to erase from the edges Select an erase option Mirror Edges This option allows you to set the Edge Erase for Side 1 and matches the Side 2 Edge Erase accordingly To adjust th...

Page 95: ...location then touch Page Number b Enter the starting page number c To adjust which pages contain the selected annotation touch Apply To then select All Pages or All Pages Except First d Touch OK 5 To...

Page 96: ...then touch OK d Touch Number of Digits then select the required option e To adjust which pages contain the selected annotation touch Apply To then select the required option f Touch OK 8 To change th...

Page 97: ...For information about all the app features and available settings refer to Apps Features C Co op py yiin ng g a an n I ID D C Ca ar rd d To copy an ID card 1 At the printer control panel press the Ho...

Page 98: ...gs as Presets for future jobs The list of features can be customized and some features could be hidden from view when the app is installed To view all available features and to find out more about cus...

Page 99: ...inst the document originals 4 Touch Email 5 Enter recipients To enter the email address manually into the To field type the address using the touch screen keypad Touch Enter To select a contact or gro...

Page 100: ...ld a job divide your job into segments of 50 or fewer pages After all the segments are scanned and previewed the job is processed and sent as a single job Note If the Preview option is hidden from vie...

Page 101: ...he following To scan more original documents continue scanning your original documents using the same input area After scanning scroll to the end of the preview images then touch the Plus icon Continu...

Page 102: ...res and to find out more about customizing the Scan To App refer to Customizing or Personalizing the Feature List For information about all the App features and available settings refer to Apps Featur...

Page 103: ...the scanned file on a USB Flash drive The Scan to USB function produces scans in jpg pdf pdf a xps and tif file formats Note If the device is in Power Saver mode before proceeding with the USB scan to...

Page 104: ...LDAP directory first ensure that the home folder locations are defined for each user If you want to scan to a shared folder on the network create a shared folder on your network with read and write ac...

Page 105: ...nal document on the document glass or into the duplex automatic document feeder 2 At the printer control panel press the Home button 3 Touch Scan to Desktop 4 To select a destination touch the compute...

Page 106: ...on n a a N Ne et tw wo or rk k C Co om mp pu ut te er r Before you can use the printer as a scanner on a network do these steps Create a shared folder on your computer hard drive Access the Embedded...

Page 107: ...ick the Plus icon then enter the following information Nickname Enter the name that you want to appear in the Address Book Type Select the network connection type IP Address Port Host Name Port or IPv...

Page 108: ...a document from the automatic document feeder a prompt does not appear 11 To return to the Home screen press the Home button S Sc ca an nn niin ng g I Im ma ag ge es s iin nt to o a an n A Ap pp pllii...

Page 109: ...for photographs choose Photo The default settings for scanning a document or photo appear automatically 6 Adjust scanning options as needed 7 To view how your document appears when scanned click Previ...

Page 110: ...printer scans a preview of the image Note The preview feature is available only for documents loaded on the document glass 7 To resize the frame select the corner points then move them 8 For most scan...

Page 111: ...ut area for each segment Scan all segments using the document glass or scan all segments using the automatic document feeder 4 Touch the app required 5 Select the job settings 6 Touch Preview 7 If you...

Page 112: ...ttings include optional features that you can use to configure the printer for faxing Note Not all options listed are supported on all printers Some options apply only to a specific printer model conf...

Page 113: ...ter Note To insert a pause as needed touch the Special Characters icon then touch Dial Pause To enter longer pauses touch Dial Pause multiple times To select a contact or group from the Address Book t...

Page 114: ...5docs To specify the time to send your fax 1 At the printer control panel press the Home button 2 Touch Fax 3 To add a recipient fax number use the touch screen keypad or to add a contact from the Add...

Page 115: ...mments 6 Touch OK Adding Predefined Comments To add a predefined comment 1 At the printer control panel press the Home button 2 Touch Device Apps Fax 3 Touch Cover Sheet Comments 4 Select a Not in Use...

Page 116: ...ment then enter a filename 9 To change the file format for attachments touch the current format extension then select a new format Note The default file format is pdf 10 To save the settings touch OK...

Page 117: ...ument from the automatic document feeder a prompt does not appear 7 To return to the Home screen press the Home button P Po olllliin ng g a a R Re em mo ot te e F Fa ax x M Ma ac ch hiin ne e Fax Poll...

Page 118: ...es from the list or search for a contact using the search bar d To add the selected contacts to the Fax Recipients list click the Down Arrow e Click OK f To add more recipients repeat this procedure 7...

Page 119: ...lass for single pages or for paper that cannot be fed using the duplex automatic document feeder Lift the automatic document feeder then place the original document face down in the upper left corner...

Page 120: ...put area After scanning scroll to the end of the preview images then touch the Plus icon Continue this procedure until you have scanned all the original documents To process the job and send the scann...

Page 121: ...system or print driver type For details refer to the System Administrator Guide at www xerox com office VLC405docs You can adjust settings for individual server fax jobs save settings as Presets for f...

Page 122: ...ouch Server Fax 5 Enter recipients To enter a recipient fax number use the touch screen keypad then touch Enter Note To insert a pause as needed touch the Special Characters icon then touch Dial Pause...

Page 123: ...ww xerox com office VLC405docs To specify the time to send your server fax 1 At the printer control panel press the Home button 2 Touch Server Fax 3 To add a recipient fax number use the touch screen...

Page 124: ...paper guides so that they fit against the documents For jobs containing more than 50 original documents divide the documents into segments of 50 or fewer pages Load segment one into the duplex automa...

Page 125: ...ported 1 Insert the USB Flash drive into the USB memory port on the printer 2 At the USB Drive has been detected screen touch Print from USB Note If this feature does not appear enable the feature or...

Page 126: ...tor Guide at www xerox com office VLC405docs 3 Add files using the Browse USB screen To print a group of print ready files for the USB drive or folder touch the Select All icon Verify that your files...

Page 127: ...pGallery P Pr riin nt tiin ng g w wiit th h t th he e P Pr riin nt tB By yX Xe er ro ox x A Ap pp p 1 Send an email with an attachment containing a supported file type to Print printbyxerox com First...

Page 128: ...128 Xerox VersaLink C405 Color Multifunction Printer User Guide Xerox Apps...

Page 129: ...Xerox VersaLink C405 Color Multifunction Printer User Guide 129 5 Printing This chapter contains Printing Overview 130 Selecting Printing Options 131 Printing Features 137 Using Custom Paper Sizes 147...

Page 130: ...3 Access the print settings in your software application For most software applications press CTRL P for Windows or CMD P for Macintosh 4 Select your printer 5 To access the print driver settings For...

Page 131: ...indow From there you can select by topic or use the search field to enter the topic or function for which you need information W Wiin nd do ow ws s P Pr riin nt tiin ng g O Op pt tiio on ns s S Se ell...

Page 132: ...ng g D De ef fa au ullt ts s iin n W Wiin nd do ow ws s f fo or r a a S Sh ha ar re ed d N Ne et tw wo or rk k P Pr riin nt te er r 1 Navigate to the list of printers on your computer For Windows Ser...

Page 133: ...sh h You can define and save a set of options so that you can apply them to future print jobs To save a set of printing options 1 With the document open in your application click File Print 2 Select...

Page 134: ...t driver for your printer model and operating system click the print driver name 7 To begin the download read the End User License Agreement then click Accept The file automatically downloads to the d...

Page 135: ...py the PPD file into the CUPS ppd Xerox folder on your workstation If you are unsure of the location of the folder use the Find command to locate the PPD files 3 Follow the instructions that are inclu...

Page 136: ...5 Tap Print P Pr riin nt tiin ng g f fr ro om m a a M MO OP PR RI IA A E En na ab blle ed d M Mo ob biille e D De ev viic ce e MOPRIA is a software feature that enables users to print from mobile dev...

Page 137: ...Home screen press the Home button V Viie ew wiin ng g P Pr riin nt tiin ng g o or r D De elle et tiin ng g J Jo ob bs s 1 At the printer control panel press the Home button 2 To view a list of active...

Page 138: ...ur re e P Pr riin nt t J Jo ob b 1 In your software application access the print settings For most software applications press CTRL P for Windows or CMD P for Macintosh 2 Select your printer then open...

Page 139: ...ces or enlarges the original document to match the selected output paper size For Windows the scale options are on the Printing Options tab in the Paper field For Macintosh the scale options are in th...

Page 140: ...the paper The images print to allow binding on the short edge of the paper The following illustrations show the result for documents with portrait and landscape orientations respectively Note 2 Sided...

Page 141: ...e image on the page You can shift the printed image along the X and Y axes of each sheet of paper C Co ollo or r A Ad dj ju us st tm me en nt ts s Use Color Adjustments to adjust particular characteri...

Page 142: ...6 9 or 16 pages per side select Pages Per Sheet on the Pages Per Sheet Page Layout tab For Windows Page Layout is on the Document Options tab For Macintosh in the Print window Layout is on the Preview...

Page 143: ...a document You can also use heavyweight paper for the first and last pages of a report You can use any applicable paper tray as the source for printing cover pages Select one of these options for prin...

Page 144: ...es printed 2 sided on regular paper You can use exception pages to print the job In the Add Exceptions window you can set the characteristics of the exception pages and select the alternate paper sour...

Page 145: ...of the watermark Select the scaling option that specifies the size of the picture in relation to the original image Use the arrows to scale the image in increments of 1 To define the angle of the ima...

Page 146: ...riin nt tiin ng g B Ba an nn ne er r P Pa ag ge es s To enable or disable Banner Pages contact your system administrator or see the System Administrator Guide at www xerox com office VLC405docs S Se e...

Page 147: ...on n C Cu us st to om m S Siiz ze e P Pa ap pe er r f fr ro om m a a M Ma ac ciin nt to os sh h C Co om mp pu ut te er r 1 Load the custom size paper 2 In the application click File Print 3 From the...

Page 148: ...ight and width of the new custom paper size 6 Click the arrow for the Non Printable Area field then select the printer from the list Or for User Defined margins set the top bottom right and left margi...

Page 149: ...Xerox VersaLink C405 Color Multifunction Printer User Guide 149 6 Paper and Media This chapter contains Supported Paper 150 Loading Paper 155 Printing on Special Paper 162...

Page 150: ...he maximum fill line in the tray Adjust the paper guides to fit the paper size Fan paper before loading it in the paper tray If excessive jams occur use paper or other approved media from a new packag...

Page 151: ...particularly damaging to paper Reduce the exposure of paper to strong lights for long periods of time Maintain constant temperatures and relative humidity Avoid storing paper in attics kitchens garag...

Page 152: ...rd Sizes North American Standard Sizes All Trays A4 210 x 297 mm 8 3 x 11 7 in A5 148 x 210 mm 5 8 x 8 3 in 215 x 315 mm 8 5 x 12 4 in Legal 216 x 356 mm 8 5 x 14 in Folio 216 x 330 mm 8 5 x 13 in Let...

Page 153: ...in Legal 216 x 356 mm 8 5 x 14 in Letter 216 x 279 mm 8 5 x 11 in Folio 216 x 330 mm 8 5 x 13 in Executive 184 x 267 mm 7 25 x 10 5 in 203 x 254 mm 8 x 10 in S Su up pp po or rt te ed d P Pa ap pe er...

Page 154: ...Weights for Automatic 2 Sided Printing Follow the guidelines for printing on glossy cardstock Do not open sealed packages of glossy cardstock until you are ready to load the paper into the printer Le...

Page 155: ...etails on how to change the paper setting when loading paper in trays 1 and 2 refer to Loading Paper in Trays 1 and 2 For details on how to change the paper setting when loading paper in the bypass tr...

Page 156: ...the tray with the print side face up Load hole punched paper with the holes to the left For 1 sided printing load letterhead paper face up with the top of the paper toward the back of the tray For 2...

Page 157: ...elect a new setting When you are finished touch OK 8 To change a paper tray to Dedicated mode a At the printer control panel press the Home button b Touch Device Paper Trays c In the Paper Trays menu...

Page 158: ...small quantity jobs that use special media To load paper in the bypass tray 1 Open the bypass tray If the bypass tray is loaded with paper already remove any paper that is a different size or type 2 P...

Page 159: ...e ready to use it 5 Load the paper in the tray Load hole punched paper with the holes to the left For 1 sided printing load letterhead or pre printed paper face up with the top edge going into the pri...

Page 160: ...r Trays c In the Paper Trays menu touch the bypass tray icon To select a paper or envelope size touch the current size setting then select a size To select a paper type touch the current paper type th...

Page 161: ...he tray slightly then pull it out 3 Configure the tray To compress the tray for shorter paper hold the back of the tray with one hand With the other hand press the release latch at the front of the tr...

Page 162: ...f you do not get the desired results try another envelope brand Maintain constant temperatures and relative humidity Store unused envelopes in their packaging to avoid excess moisture and dryness whic...

Page 163: ...Open the bypass tray 2 Move the width guides to the edges of the tray Note If you do not load envelopes in the bypass tray right after they have been removed from the packaging they can bulge Flatten...

Page 164: ...r DL envelopes do one of the following If the envelopes wrinkle try another option Insert envelopes with the short edge going into the printer flaps down and flaps to the right Insert envelopes with t...

Page 165: ...er Insert envelopes with the print side up flaps closed and down and going into the printer Note For envelopes to print correctly when you load envelopes with the flaps open in the print driver set th...

Page 166: ...o not use dry gum labels Print only on one side of the sheet of labels Use full sheet labels only Store unused labels flat in their original packaging Leave the label sheets inside the original packag...

Page 167: ...n If you are not prompted change the paper settings a At the printer control panel press the Home button b Touch Device Paper Trays c In the Paper Trays menu touch the bypass tray icon To select a pap...

Page 168: ...168 Xerox VersaLink C405 Color Multifunction Printer User Guide Paper and Media...

Page 169: ...Multifunction Printer User Guide 169 7 Maintenance This chapter contains General Precautions 170 Cleaning the Printer 171 Adjustments and Maintenance Procedures 184 Supplies 188 Managing the Printer...

Page 170: ...the documentation supplied with your printer Caution When cleaning your printer do not use organic or strong chemical solvents or aerosol cleaners Do not pour fluids directly into any area Use supplie...

Page 171: ...ergent could enter the printer through a gap and cause problems Never use cleaning agents other than water or mild detergent C Clle ea an niin ng g t th he e S Sc ca an nn ne er r To ensure optimum pr...

Page 172: ...n and dry Note For best results use Xerox Glass Cleaner to remove marks and streaks 5 Wipe the white underside of the document cover until it is clean and dry 6 Close the document cover 172 Xerox Vers...

Page 173: ...and wait 40 minutes for the fuser to cool Try to remove the jam after the printer has cooled If you spill any toner in the printer remove the toner using a moist cloth Never use a vacuum cleaner to r...

Page 174: ...u can If some toner remains on your clothes use cool water not hot to rinse off the toner If toner gets on your skin wash it off with cool water and a mild soap If you get toner in your eyes wash it o...

Page 175: ...cartridge then pull it out To prevent toner spills keep the openings of the cartridge facing up Note Be careful not to spill toner when handling the waste cartridge After removing the waste cartridge...

Page 176: ...te cartridge on its side 3 Clean the laser lenses a Remove the cleaning rod from inside of the printer b Insert the cleaning rod into one of the four cleaning holes until it stops then move the rod in...

Page 177: ...ation 4 Insert the waste cartridge Note If the waste cartridge does not fit into place properly ensure that the cleaning rod is inserted fully a To lock the waste cartridge rotate the waste cartridge...

Page 178: ...If the print or color density is too light missing or the background is foggy clean the density sensor To clean the color toner density sensor 1 Power off the printer 2 Push down on the rear door rele...

Page 179: ...a Open the right side door b To unlock the waste cartridge rotate the waste cartridge lever 90 degrees counterclockwise Xerox VersaLink C405 Color Multifunction Printer User Guide 179 Maintenance...

Page 180: ...o spill toner when handling the waste cartridge After removing the waste cartridge do not touch the area shown in the illustration d Place the removed waste cartridge on a level surface Caution To avo...

Page 181: ...e transfer belt then pull to remove it from the printer c At the rear of the printer use a dry cotton swab to clean the color toner density sensor d At the front of the printer reinsert the transfer b...

Page 182: ...waste cartridge does not fit into place properly ensure that the cleaning rod is inserted fully a To lock the waste cartridge rotate the waste cartridge lock lever 90 degrees clockwise 182 Xerox Vers...

Page 183: ...b Close the right side door 6 Close the rear door Xerox VersaLink C405 Color Multifunction Printer User Guide 183 Maintenance...

Page 184: ...Home button P Pe er rf fo or rm miin ng g a a C Co ollo or r C Ca alliib br ra at tiio on n 1 At the printer control panel press the Home button 2 Touch Device Support Color Calibration 3 To select a...

Page 185: ...ce the top bottom left and right margins exactly where you want You can specify the image position on both the front and back sides of the paper for each installed paper tray V Ve er riif fy yiin ng g...

Page 186: ...office VLC405docs 3 Touch Device Support Image Position 4 To adjust registration select the source paper tray a Touch Paper Supply b Touch the desired tray 5 Using the chart printed in Verifying Pape...

Page 187: ...values repeat the previous steps 9 Print another sample page then repeat the process until you complete the registration corrections 10 To return to the Home screen press the Home button Xerox VersaL...

Page 188: ...te em ms s Routine maintenance items are printer parts that have a limited life and require periodic replacement Replacements can be parts or kits Routine maintenance items are typically customer rep...

Page 189: ...Information Pages 3 Touch Supplies Usage Report 4 To return to the Home screen press the Home button T To on ne er r C Ca ar rt tr riid dg ge es s G Ge en ne er ra all P Pr re ec ca au ut tiio on ns s...

Page 190: ...idge Out of Toner The toner cartridge is empty Replace the toner cartridge with a new one R Re ec cy yc clliin ng g S Su up pp plliie es s For more information on the Xerox supplies recycling program...

Page 191: ...ion refer to the System Administrator Guide at www xerox com office VLC405docs To view the billing information for your printer 1 At the printer control panel press the Home button 2 Touch Device Bill...

Page 192: ...re not fixed to the printer securely they can fall to the ground and cause injury Follow these instructions when moving the printer 1 Power off the printer then disconnect the power cord and other cab...

Page 193: ...toner cartridges to prevent toner from spilling Caution Failure to repackage the printer properly for shipment can result in damage not covered by the Xerox Warranty Service Agreement or Total Satisf...

Page 194: ...194 Xerox VersaLink C405 Color Multifunction Printer User Guide Maintenance...

Page 195: ...405 Color Multifunction Printer User Guide 195 8 Troubleshooting This chapter contains General Troubleshooting 196 Paper Jams 201 Print Quality Problems 216 Copy and Scan Problems 223 Fax Problems 224...

Page 196: ...outlet connected to the printer Plug another electrical appliance into the outlet then check if it operates properly Try a different outlet The printer is connected to an outlet with a voltage or freq...

Page 197: ...paper in the appropriate tray At the printer control panel specify the correct paper size type and color The paper settings for the print job do not match any paper loaded in the paper trays at the p...

Page 198: ...er is installed and properly configured For more information refer to Connecting to a Wired Network P Pr riin nt tiin ng g T Ta ak ke es s T To oo o L Lo on ng g Probable Causes Solutions The printer...

Page 199: ...xerox com office VLC405support Note To have the print driver select the tray set the tray used as the paper source to Auto Selection Enabled A Au ut to om ma at tiic c 2 2 S Siid de ed d P Pr riin nt...

Page 200: ...he table or shelf on which it is located If the paper lift plate at the back of the tray is not locked down replace the tray C Co on nd de en ns sa at tiio on n h ha as s F Fo or rm me ed d I In ns si...

Page 201: ...an permanently damage the printer The following illustration shows where paper jams can occur along the paper path 1 Tray 2 2 Single Pass Duplex Automatic Document FeederFuser 3 Fuser 4 Bypass Tray 5...

Page 202: ...guide that is not properly adjusted can cause poor print quality misfeeds skewed prints and printer damage After loading the tray at the control panel select the correct paper type and size When prin...

Page 203: ...aper is jammed in the Single Pass Duplex Automatic Document Feeder open the Document Cover then remove any jammed paper 3 Close the Document Cover then reload the document in the Single Pass Duplex Au...

Page 204: ...ve the error that appears on the control panel clear all paper from the paper path 1 Remove any paper from the Bypass Tray 2 Grasp both sides of the Bypass Tray then pull it straight out of the printe...

Page 205: ...nter 5 Remove the jammed paper 6 Insert Tray 1 into the printer then push it in all the way Note If the tray is extended for legal size paper the tray protrudes when it is inserted into the printer Xe...

Page 206: ...t a new setting When finished touch OK 9 To return to the Home screen press the Home button C Clle ea ar riin ng g P Pa ap pe er r J Ja am ms s f fr ro om m t th he e T Tr ra ay y 1 1 A Ar re ea a To...

Page 207: ...Tray 1 until it stops 4 To remove the tray lift the front of it slightly then pull it out of the printer 5 Remove the jammed paper Xerox VersaLink C405 Color Multifunction Printer User Guide 207 Troub...

Page 208: ...Insert the Bypass Tray completely into the printer 9 When paper trays are set to Fully Adjustable you are prompted to verify or change the paper settings To confirm the same paper size type or color t...

Page 209: ...control panel clear all paper from the paper path 1 Pull out Tray 2 until it stops 2 To remove the tray lift the front of it slightly then pull it out of the printer 3 Remove any crumpled paper from t...

Page 210: ...trays are set to Fully Adjustable you are prompted to verify or change the paper settings To confirm the same paper size type or color touch OK To select a new paper size type or color touch the curr...

Page 211: ...appears on the control panel clear all paper from the paper path 1 Push down on the rear door release and pull open the door 2 If paper is jammed in the Fuser raise both green levers to open the Fuser...

Page 212: ...er from the back of the printer 5 Close the paper guide on the Fuser 6 Lower the green levers to their original position 7 Close the rear door 212 Xerox VersaLink C405 Color Multifunction Printer User...

Page 213: ...lean lint free cloth moistened with water wipe the feed rollers until they are clean For details refer to Cleaning the Printer Tray is loaded with mixed paper Load the tray with only one type and size...

Page 214: ...rled or pulled away from the backing sheet Envelopes are loaded incorrectly You can print envelopes from the Bypass Tray or Tray 1 For more information refer to Envelopes Envelopes are wrinkling The h...

Page 215: ...hickness or type For more information refer to Supported Paper Types and Weights for Automatic 2 Sided Printing Paper is loaded in the wrong tray Ensure that paper is loaded into the correct tray For...

Page 216: ...are used Composite black is the default setting on most printers C Co on nt tr ro olllliin ng g P Pr riin nt t Q Qu ua alliit ty y Various factors can affect the quality of the output of your printer...

Page 217: ...r more information refer to Paper Storage Guidelines S So ollv viin ng g P Pr riin nt t Q Qu ua alliit ty y P Pr ro ob blle em ms s When the print quality is poor select the closest symptom from the f...

Page 218: ...r details refer to Supported Paper The paper type is heavier or thicker than the paper type selection Ensure that the proper paper is loaded in the paper tray Choose a heavier paper type at the contro...

Page 219: ...rted Paper There is debris on the rollers Wipe the feed rollers with a clean damp cloth to remove debris from the rollers Note Do not touch the transfer roller or the exposed end of the transfer belt...

Page 220: ...ary For details refer to Consumables The paper is impeded in the paper path Remove any paper or debris from the paper path Ensure that the trays are pushed in all the way Ensure that the rear cover is...

Page 221: ...or lines running through all colors Paper or debris is dragging the bottom of the transfer belt Remove the paper or debris from the printer For assistance go to the Xerox Support website at www xerox...

Page 222: ...Print the Repeating Defects pages At the control panel touch Device Support Support Pages Repeating Defects 2 To determine the cause measure the distance between the print defects 28 mm 1 1 in Drum C...

Page 223: ...fer to Cleaning the Scanner Spots present in copies made from the document glass There is debris on the document glass When scanning the debris creates a spot on the image Clean all glass surfaces wit...

Page 224: ...ent correctly The document glass is dirty Clean the document glass The text in the document is too light Adjust the resolution There is a problem with the telephone connection Verify that the telephon...

Page 225: ...existing job to complete This increases available memory The received fax size is reduced The paper supply in the printer does not match the document size sent Confirm the original size of the documen...

Page 226: ...hese reports include the Demonstration Print page and the Error History report that can assist you in troubleshooting certain problems The Demonstration Print page prints an image to show print qualit...

Page 227: ...or rm ma at tiio on n a ab bo ou ut t Y Yo ou ur r P Pr riin nt te er r To obtain more information about your printer refer to More Information Xerox VersaLink C405 Color Multifunction Printer User Gu...

Page 228: ...228 Xerox VersaLink C405 Color Multifunction Printer User Guide Troubleshooting...

Page 229: ...function Printer User Guide 229 A Specifications This appendix contains Printer Configurations and Options 230 Physical Specifications 232 Environmental Specifications 236 Electrical Specifications 23...

Page 230: ...ard mode 600 x 600 x 1 bit dpi Enhanced mode 600 x 600 x 8 bit dpi Paper Capacity Bypass Tray Tray 1 Optional 550 Sheet Feeder Output Tray 150 sheets 550 sheets 550 sheets 250 sheets Maximum print siz...

Page 231: ...CD touch screen with home and power wake buttons Connectivity 2 x USB 2 0 Type A USB 3 0 Type B Ethernet 10BASE T 100BASE TX 1000BASE T Wireless network connectivity with an IEEE802 11 n g b compliant...

Page 232: ...on with Optional 550 Sheet Feeder Width 432 mm 17 in 432 mm 17 in Depth 540 mm 21 3 in 540 mm 21 3 in Height 599 mm 23 6 in 737 mm 29 in Weight 32 7 kg 72 lbs 35 25 kg 77 7 lbs S St ta an nd da ar rd...

Page 233: ...ot ta all S Sp pa ac ce e R Re eq qu uiir re em me en nt ts s Standard Configuration Configuration with Optional 550 Sheet Feeder Width 932 mm 36 7 in 932 mm 36 7 in Depth 1540 mm 60 6 in 1540 mm 60...

Page 234: ...q qu uiir re em me en nt ts s C Clle ea ar ra an nc ce e R Re eq qu uiir re em me en nt ts s f fo or r B Ba as se e C Co on nf fiig gu ur ra at tiio on n 234 Xerox VersaLink C405 Color Multifunction P...

Page 235: ...ar ra an nc ce e R Re eq qu uiir re em me en nt ts s f fo or r O Op pt tiio on na all 5 55 50 0 S Sh he ee et t F Fe ee ed de er r Xerox VersaLink C405 Color Multifunction Printer User Guide 235 Speci...

Page 236: ...idity Range 10 85 Optimal Humidity Range 20 70 relative humidity at 28 C 82 F Note Under extreme environmental conditions such as 10 C and 85 relative humidity printing defects can occur due to conden...

Page 237: ...we er r C Co on ns su um mp pt tiio on n Sleep mode 4 W Low Power mode 19 5 W Standby 82 W Continuous printing 705 W R Re ec cy yc clliin ng g S Su up pp plliie es s If you want to return used suppli...

Page 238: ...ack and white printing Several factors affect print speed Print mode The fastest print mode is Standard Paper size Letter 8 5 x 11 in prints slightly faster than A4 210 x 297 mm Larger sizes reduce pr...

Page 239: ...C405 Color Multifunction Printer User Guide 239 B Regulatory Information This appendix contains Basic Regulations 240 Copy Regulations 245 Fax Regulations 248 Safety Certification 252 Material Safety...

Page 240: ...r relocate the receiving antenna Increase the separation between the equipment and receiver Connect the equipment into an outlet on a circuit different from that to which the receiver is connected Con...

Page 241: ...gy efficiency In scope products are Household and Office equipment that meet the following criteria Standard monochrome format products with a maximum speed less than 66 A4 images per minute Standard...

Page 242: ...mode then to Sleep mode In these modes to enable reduced power consumption only essential functions remain active The device takes longer to produce the first print after it exits the Power Saver mod...

Page 243: ...mental impacts EcoLogo is a voluntary multi attribute and lifecycle based environmental certification This certification indicates that a product has undergone rigorous scientific testing exhaustive a...

Page 244: ...irements specified in FCC Part 15 Industry Canada RSS 210 and European Council Directive 2014 53 EU Radio Frequency RF output power of this device will not exceed 20 dBm in either frequency band Opera...

Page 245: ...may be done provided the reproduction of the document is performed for lawful purposes Postage Stamps canceled or uncanceled For philatelic purposes Postage Stamps may be photographed provided the re...

Page 246: ...information about these provisions contact the Copyright Office Library of Congress Washington D C 20559 Ask for Circular R21 C Ca an na ad da a Parliament by stature has forbidden the reproduction o...

Page 247: ...o liability is assumed for its completeness or accuracy In case of doubt consult your solicitor O Ot th he er r C Co ou un nt tr riie es s Copying certain documents may be illegal in your country Pena...

Page 248: ...adopted by the ACTA A compliant telephone cord and modular plug is provided with this product It connects to a compatible modular jack that is also compliant See installation instructions for details...

Page 249: ...public utility commission public service commission or corporation commission for information Your office could have specially wired alarm equipment connected to the telephone line Make sure that the...

Page 250: ...chtenstein Slovenia Finland Lithuania Spain France Luxembourg Sweden Germany Malta United Kingdom If you have problems with your product contact your local Xerox representative This product can be con...

Page 251: ...ause a false answer condition If you encounter such problems do not contact the Telecom Faults Service 6 DTMF tones dialing is the preferred method because it is faster than pulse decadic dialing and...

Page 252: ...derwriters Laboratories Inc US Canada UL 60950 1 2nd Edition 2014 10 14 CAN CSA C22 2 No 60950 1 07 2nd Edition 2014 10 Underwriters Laboratories Inc Europe IEC 60950 1 2005 A1 2009 A2 2013 EN 60950 1...

Page 253: ...your printer go to North America www xerox com msds European Union www xerox com environment_europe For the Customer Support Center phone numbers go to www xerox com office worldcontacts Xerox VersaL...

Page 254: ...254 Xerox VersaLink C405 Color Multifunction Printer User Guide Regulatory Information...

Page 255: ...Xerox VersaLink C405 Color Multifunction Printer User Guide 255 C Recycling and Disposal This appendix contains All Countries 256 North America 257 European Union 258 Other Countries 260...

Page 256: ...y consistent with global regulations applicable at the time that the product was placed on the market For recycling and disposal information contact your local authorities Perchlorate Material This pr...

Page 257: ...ASK XEROX to determine if this Xerox product is part of the program For more information about Xerox environmental programs visit www xerox com environment or for recycling and disposal information c...

Page 258: ...e Please contact your local disposal authority for information In some member states when you purchase new equipment your local retailer may be required to take back your old equipment free of charge...

Page 259: ...waste disposal service or the point of sale where you purchased the items Penalties may be applicable for incorrect disposal of this waste in accordance with national legislation B Bu us siin ne es ss...

Page 260: ...Other Countries Please contact your local waste management authority to request disposal guidance 260 Xerox VersaLink C405 Color Multifunction Printer User Guide Recycling and Disposal...

Page 261: ...Xerox VersaLink C405 Color Multifunction Printer User Guide 261 D Apps Features...

Page 262: ...and black before printing your copy Color Effects For a color original document you can adjust the color of the copy using preset color effects For example you can adjust colors to be brighter or coo...

Page 263: ...1 2 3 4 5 6 1 2 3 4 5 6 Reduce Enlarge You can reduce the image to as little as 25 of its original size or enlarge it as much as 400 Original Type The printer optimizes the image quality of the copie...

Page 264: ...ce the desired output Image Shift Image Shift allows you to modify the location of the image on the page You can shift the printed image along the X and Y axes of each sheet of paper Auto Background S...

Page 265: ...different tray The cover can be blank or printed Note This function is available only on printers with an optional Productivity Kit installed Annotations You can add Annotations such as page numbers...

Page 266: ...ltiple copies This feature is useful for complex or high volume jobs After you print and inspect the test copy you can choose to print or cancel the remaining copies Quantity Use this option to enter...

Page 267: ...an email From Use the From option to specify the originator of the email Reply To Use the Reply To option to include an email address you want the recipient to reply to This option is useful if you w...

Page 268: ...ook Faxing feature to scan images from books magazines or other bound documents for faxing Starting Rate Select the highest starting rate to transmit the fax unless the destination for the fax you are...

Page 269: ...can delay the sending of your fax job for up to 24 hours Priority Send Use Priority Send to identify urgent faxes Priority faxes are sent first Manual Send You can use the Manual Send feature to enab...

Page 270: ...270 Xerox VersaLink C405 Color Multifunction Printer User Guide Apps Features...

Page 271: ......

Page 272: ......

Reviews: