background image

2.6 Print After Checking Printing Result - Sample Print 

35

2.6

Print After Checking Printing Result - 
Sample Print

When the hard disk (optional) has been installed, you can use the sample print feature.

Important
• The hard disk may be damaged and erase important data saved in the hard disk. We recommend you 

back up your data.

About Sample Print

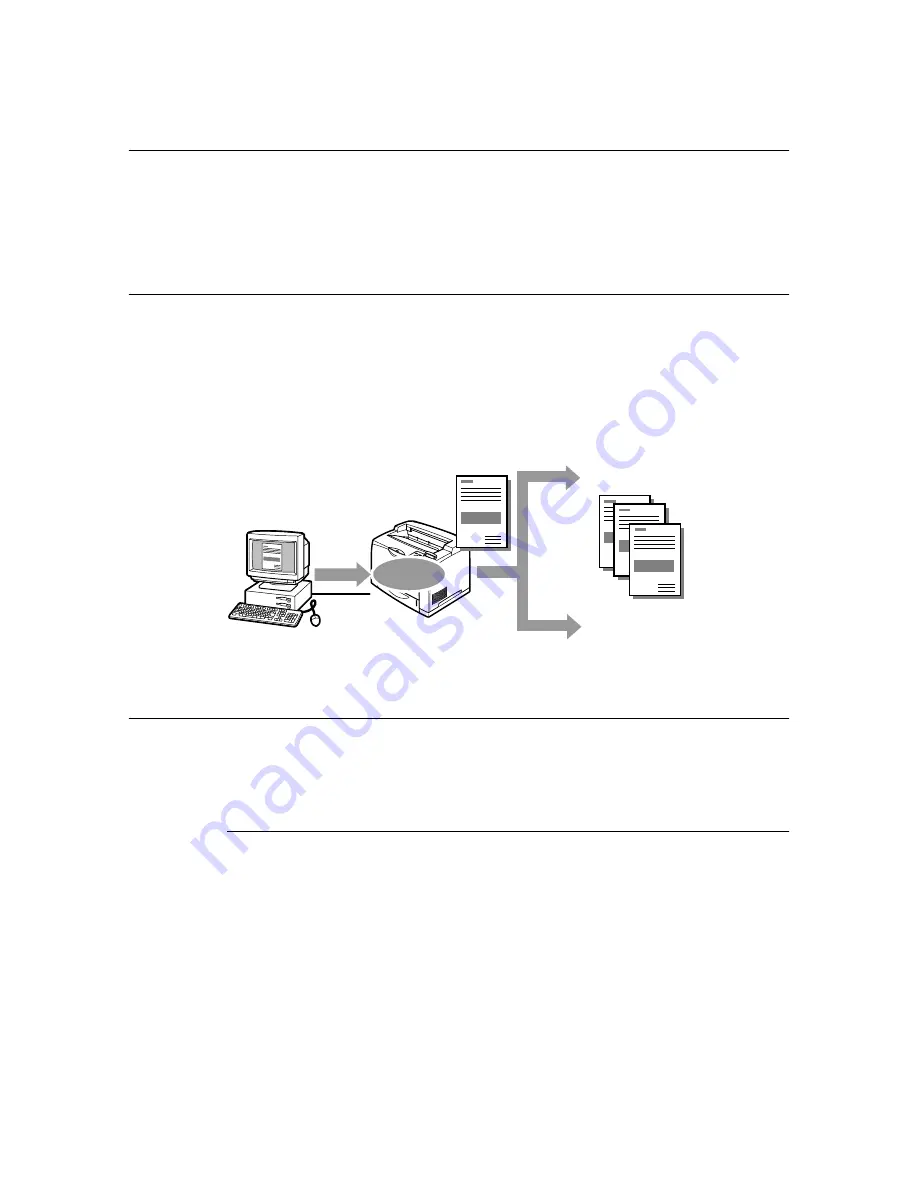
Sample Print is a feature that allows you to store the print data of multiple copies in the hard 
disk (optional), print out only the first set to check the print result and if satisfactory, print the 
remaining copies from the control panel.

Note
• Sample print data that has become redundant can be deleted using the control panel. For details, refer 

to “At the Control Panel” (P. 34).

Configuring Sample Print

The procedure to configure Sample Print is as follows.
First of all, carry out the sample print settings at the computer and send data to the printer 
for printing. Then, carry out the output procedure at the printer to output the print data.

At the Computer

This section explains the procedure using WordPad on Windows XP as an example. 

Note
• The way to display the printer properties dialog box differs according to the application software. Refer to 

the manual of your respective application software.

1.

From the [File] menu, select [Print].

2.

Select this printer as the printer to be used and click [Preferences]. 

3.

On the [Basic] tab, specify at least 2 for [Copies].

Send 

data

Store in 

printer

Print only one document

If result is 
OK

If result is 
not OK

Stop printing using the 
control panel

Print out remaining sets 
using the control panel

Summary of Contents for DocuPrint 305

Page 1: ...DocuPrint 205 255 305 User Guide...

Page 2: ...d All product brand names are trademarks or registered trademarks of the respective holders Xerox The Document Company and the stylized X are registered trademarks of Xerox Corporation All Xerox and F...

Page 3: ...d a number of programs to lessen the burden on the environment For example we have totally eliminated ozone depleting chlorofluorocarbons from our manufacturing facilities We are committed to leadersh...

Page 4: ...on on operations or features Refer to Indicates reference sources 3 The following conventions are used in this guide Refer to xxx The cross reference is within this guide Refer to xxx The cross refere...

Page 5: ...panel menu items and daily care in detail This PDF file is included in the CD ROM bundled with this printer Network Print Environment User Guide PDF Explains how to set the printer for the network en...

Page 6: ...nting on Envelopes 23 2 3 Printing on Transparencies 25 Loading Transparencies 25 Printing on Transparencies 25 2 4 Printing on Custom Size Paper Long Paper 27 Loading Custom Size Paper 27 Setting Cus...

Page 7: ...5 Network Related Troubles 120 Using TCP IP 120 Using CentreWare Internet Services 121 5 6 Mail Related Troubles 123 6 Daily Care 124 6 1 Replacing the Drum Toner Cartridge 124 6 2 Printing Reports Li...

Page 8: ...151 Upgrading the Firmware Version of This Printer 151 A 5 Output Size and Memory Capacity 152 A 6 Precautions and Limitations 154 Precautions and Limitations of This Printer 154 TIFF File Format 156...

Page 9: ...ing Paper Printing Reports Lists 2 Setting the Printer Environment SQ 18 Supported Environment Setting IP Address Setting Printer Configurations via CentreWare Internet Services Installing the Printer...

Page 10: ...This product has a power saving feature which switches the machine to the low power mode automatically if the machine is on and not operated for a certain period of time In this mode the machine stops...

Page 11: ...les of items that may be illegal to copy or print in your country Currency Banknotes and checks Bank and government bonds and securities Passports and identification cards Copyright material or tradem...

Page 12: ...tray for DocuPrint 255 305 7 Paper size label For the paper size label to indicate the paper size in the paper tray 8 Power switch Switches the power of the printer on and off Pressing the switch to t...

Page 13: ...ables 2 sided printing When paper is jammed inside the duplex unit it is described as cover C 5 Rear output tray lever When the rear tray optional has been installed the paper output location can be s...

Page 14: ...r and the photosensitive drum 3 Cover A Open this when replacing the drum toner cartridge and removing jammed paper 4 Fuser unit Fixes the toner on the paper Do not touch this when using the printer a...

Page 15: ...achine is in the power saver mode 7 Cancel Job button Press to cancel printing 8 Online button Press to enter the offline status When in the offline status the machine cannot receive data or process p...

Page 16: ...status Print Screen The Print screen appears when the printer is printing or waiting for data The following contents are shown on the screen Menu Screen Screen for configuring settings related to the...

Page 17: ...ter is ready for printing Ready to print will be displayed Important If error message is displayed refer to Message List Alphabetical Order P 111 on how to fix it Switching Off the Power Important Do...

Page 18: ...ge the settings refer to Example Changing the Low Power Sleep Mode Settings P 68 When the lower power mode and sleep mode are both enabled the sleep mode setting is given priority For example when 15...

Page 19: ...r icon at the bottom right of the taskbar in Windows From the displayed window click the document name that you wish to delete and press the Delete key Checking Status of Print Data Checking in Window...

Page 20: ...ou change the settings here they will not be reflected on the printer itself Note When using this feature you have to activate the SNMP port default Enable on the printer using the control panel For W...

Page 21: ...ne Help for the printer driver Important If the paper tray information is not correct change the setting on the Options tab of the printer driver before printing For details about how to configure set...

Page 22: ...ray P 59 1 When loading Commercial 10 pull the paper tray until A4 size Load the envelopes in the portrait orientation so that the flaps are turned to the right side 2 Slide the length guide and right...

Page 23: ...inting on Envelopes To print on envelopes display the Tray Output tab and Basic tab This section explains the procedure using WordPad on Windows XP as an example Note The way to display the printer pr...

Page 24: ...have configured tray 1 as bypass tray on the Options tab of the printer properties dialog box Tray 1 Bypass and Bypass Settings can be selected 6 Click the Basic tab 7 From Paper Size select the size...

Page 25: ...to be printed facing up Load transparencies a few at a time 2 Slide the paper guides to the size of the transparencies 3 Set the paper size indicator to the size of the transparencies Printing on Tran...

Page 26: ...ay 1 Bypass from Paper Source click Bypass Settings to display the Bypass Settings dialog box and then select Transparency from Paper Type Bypass Tray Note If you have configured tray 1 as bypass tray...

Page 27: ...procedure below 1 Pull the paper tray to its maximum Note Pull the extendable part out to its maximum A3 size For details on the procedure to extend the paper tray refer to 3 2 Loading Paper P 59 2 Lo...

Page 28: ...h the back edges curled up as shown in the diagram 1 Important Curl up the back edges of the long paper in as far a position as possible from the paper entry point Doing it too near to the paper entry...

Page 29: ...t the rights can only check the contents When configuring the Custom Paper Size dialog box in Windows NT 4 0 Windows 2000 Windows XP Windows Server 2003 settings of other printers on the computer will...

Page 30: ...ecessary repeat steps 5 to 7 to define another custom size 9 Click OK 10 When you have configured custom sizes for trays 1 to 4 using the control panel click Get Information from Printer on the Option...

Page 31: ...g box and then select the paper type from Paper Type Bypass Tray Note If you have configured tray 1 as bypass tray on the Options tab of the printer properties dialog box Tray 1 Bypass and Bypass Sett...

Page 32: ...after printing For details refer to At the Control Panel P 34 To delete all secure print data that has become redundant refer to Init Del Data P 94 If Disable is selected for the setting of Secure Pr...

Page 33: ...ect either Enter Document Name or Auto Retrieve If Enter Document Name is selected specify a document name in Document Name using up to 12 characters If Auto Retrieve is selected the name of the docum...

Page 34: ...or button until the required document is selected and then press the button 7 After printing press the or button to delete or save the document and then press the button 8 Press the Eject Set button P...

Page 35: ...to At the Control Panel P 34 Configuring Sample Print The procedure to configure Sample Print is as follows First of all carry out the sample print settings at the computer and send data to the print...

Page 36: ...ct either Enter Document Name or Auto Retrieve If Enter Document Name is selected specify a document name in Document Name using up to 12 characters If Auto Retrieve is selected the name of the docume...

Page 37: ...button until the required document is selected and then press the button 5 Press the or button to print or delete the saved document and then press the button 6 Press the Eject Set button The document...

Page 38: ...me the specification of time will be undone and printing will start once the power is switched on again Do not switch off the power of the printer when using the delayed print feature Note The time th...

Page 39: ...nt dialog box to start printing Printing will start at the specified time Canceling Delayed Print Use the control panel to cancel Delayed Print or to print without waiting for the specified time 1 Pre...

Page 40: ...dditional memory optional Using PostScript Feature When the PostScript software kit optional has been installed you can use the PostScript feature to send PDF file to the printer directly for printing...

Page 41: ...ng Macintosh Environment Note The PostScript software kit optional is required to use the EtherTalk port Installing ContentsBridge Utility Copy the ContentsBridge exe file Windows from the Software Pa...

Page 42: ...l be the option specified on the common menu of the control panel 2 Sided Print 1 Sided Print Select this to print on one side of the paper Long Edge Flip Select this to print on both sides of the pap...

Page 43: ...nt either enter the path of the PDF file to be printed or click Browse to specify the target file 4 Click Print 5 Configure the settings of the various items 6 In the PDF File Print dialog box click O...

Page 44: ...the PDF File Print dialog box click Print Settings 1 If there is no need to set print settings click OK in the Print Settings Confirmation dialog box 2 The print data will be sent to the printer Selec...

Page 45: ...ng Mac OS X v10 2 6 as an example 1 Drag and drop the PDF file to be printed over the ContentsBridge icon The Print PDF dialog box appears 2 Click Select Printer 3 Select this printer in the displayed...

Page 46: ...dialog box click OK The print data will be sent to the printer At this point in time a dialog box appears if a password has been set for the PDF file Enter the password set for the PDF file and click...

Page 47: ...control panel will become disabled Also if the number of copies is not specified by lpr command it will be treated as one copy When using lpr command to print PDF file you have to use the control pane...

Page 48: ...cording to the PDF setting on the control panel For details on the print features of the PDF file in this machine refer to 2 8 Direct Printing of PDF File P 40 For details on the format of the TIFF fi...

Page 49: ...the Online Help for CentreWare Internet Services Print features that are not configured here will operate according to the following settings made on the printer receiving the data TIFF file The logic...

Page 50: ...il Printing Important The hard disk may be damaged and erase important data saved in the hard disk We recommend you back up your data Environment Settings for E mail Printing To use the E mail Printin...

Page 51: ...il Address Set the internet service administrator s e mail address Up to 128 alphanumeric characters can be entered including the ASCII characters for at mark full stop hyphen and _ underscore Machine...

Page 52: ...in the POP3 server 1 to 120 minutes 10 minutes POP User Name Set the user name for connecting to POP3 server Only 1 user can be specified Up to 64 alphanumeric characters can be entered including the...

Page 53: ...ail contents Specify text as the format of e mail content in your mail software Note If the extension of the attached file is not tif or pdf it may not be printed correctly Maximum 31 documents can be...

Page 54: ...Internet Provider and Using E mail Features In the case where a flat rate contract with the internet provider exists and the user is not always connected to the network a telephone charge will incur e...

Page 55: ...o ensure printing is correctly done select the correct paper size paper type and paper tray The printed image may fade due to moisture such as water rain or vapor For details contact our Customer Supp...

Page 56: ...ution and general office use XEROX 4200DP 20 lb Plain Medium weight paper for internal distribution and general office use RX80 80 g m2 Plain Medium weight paper for internal distribution and general...

Page 57: ...heavyweight not listed in the table contact our Customer Support Center or your dealers Refer to 2 Printing P 21 on how to print on transparencies or envelopes Paper name Weight Paper type Paper char...

Page 58: ...pulp paper or fibrous paper If acid paper is used the characters might appear fuzzy Replace it with alkaline paper Envelopes that are not flat or have metal fasteners Labels that do not fully cover t...

Page 59: ...surface and remove the lid 2 If the base plate of the paper tray is raised push it down 3 When loading paper that is larger than A4 size slide the left and right lock tabs outwards to unlock them If...

Page 60: ...cause paper jams Note For details about loading envelopes and long paper refer to 2 2 Printing on Envelopes P 22 and 2 4 Printing on Custom Size Paper Long Paper P 27 8 Close the lid of the paper tra...

Page 61: ...ndicator on the bypass tray with the size and orientation of the paper you are loading 3 Important When paper larger than A4 in size is loaded on the bypass tray be sure to pull out the extension outp...

Page 62: ...e automatic tray selection an error message prompting for replenishment of paper will be displayed You can configure the printer not to display this message but to automatically select a nearest or la...

Page 63: ...g custom size paper in the bypass tray optional it is not necessary to specify the size on the control panel To return to standard paper size settings select Auto in step 6 below This printer will aut...

Page 64: ...types that can be loaded Usable Paper P 55 Setting on the Control Panel 1 Press the Menu button to display the Menu screen 2 Press the or button until Admin Menu is displayed then press the button 3 P...

Page 65: ...all print modes The mode menu is the menu from which you can set the specific items for each print mode The common menu has the following structure Common menu Menu items Items Candidate value The fo...

Page 66: ...to print and check the internal data of this printer such as the emulation mode settings system settings error history job history font information and the total count of outputs Refer to 6 2 Printing...

Page 67: ...e the change process is completed the factory defaults will be displayed Press the Eject Set button to confirm the value Ready to print 1 To display the menu screen press the Menu button at the print...

Page 68: ...rk Port 4 Press the or button until System Settings is displayed Admin Menu System Settings 5 Press the button System Settings Alert Tone 6 Press the or button until Low Power Mode is displayed System...

Page 69: ...ode and is displayed Low Power Timer 15 Mins 15 Press the button to return to Low Power Timer System Settings Low Power Timer 16 Press the button to display Sleep Mode System Settings Sleep Mode 17 Pr...

Page 70: ...ins 23 Press the or button to set the transitional time to the sleep mode The available setting values range from 5 to 30 minutes in increments of 1 minute Sleep Mode Timer 30 Mins 24 Press the Eject...

Page 71: ...Software Pack CD ROM bundled with this printer PDF Makes settings for printing PDF file by sending it directly to a printer In Process Mode select whether to use PDF Bridge or the PostScript feature w...

Page 72: ...High Quality Selecting this decreases printing speed but prints images at high quality High Speed Select this to print documents at high speed Password No 1 2 3 and 4 of 4 are available refer to P 95...

Page 73: ...Select this to print the pages on both sides of the paper and arranged like a booklet according to the page structure of a PDF file However booklet printing may not be available depending on the page...

Page 74: ...onal Tray 4 optional lowest priority If paper of the same size is loaded in multiple trays in different directions paper loaded in landscape direction will be used first Tray 3 and Tray 4 will not be...

Page 75: ...cing The default is 10 00 You can specify a value between 6 00 and 24 00 in increments of 0 01 Form Lines Specifies the form line the number of lines per form The default is 64 You can specify a value...

Page 76: ...fied data type PS is displayed when the PostScript software kit optional is installed PJL 2 refer to P 95 This printer supports PJL commands that are independent from any printer languages The PJL com...

Page 77: ...TIFF Select this to process the data received from the computer as the specified data type Note PS is displayed only when the PostScript software kit optional is installed PJL 2 refer to P 95 This pr...

Page 78: ...the LPD port is available Note To enable the LPD port the IP address must be specified Important If the memory is running out when the port is enabled the port may be disabled automatically In this ca...

Page 79: ...IPX SPX Note When using TCP IP both the IP addresses of a computer and the printer are required Print Mode 1 refer to P 95 Specifies the print data process method printer language to be used Auto def...

Page 80: ...ethod printer language to be used Auto default Select this to make the printer automatically detect the printer language being used in the data received from a computer and perform printing based on t...

Page 81: ...required for printing using a printer driver In this menu specify whether to enable or disable the PJL commands sent from a computer PJL commands allow you to specify the printer language to be used f...

Page 82: ...ng out you need to disable the port s you are not using or change the memory allocation from Allocate Memory Print Mode 1 refer to P 95 Specifies the print data process method printer language to be u...

Page 83: ...is case you need to disable the port s you are not using or change the memory allocation from Allocate Memory Print Mode 1 refer to P 95 Sets the print data process method printer language to be used...

Page 84: ...Enable which means the SNMP port is available Important If the memory is running out when the port is enabled the port may be disabled automatically In this case you need to disable the port s you are...

Page 85: ...have set the correct values Set the address only when you have to explicitly specify the gateway address You do not need to set the address if the gateway address can be set automatically InternetSer...

Page 86: ...n if you do not want to receive print jobs from non registered IP addresses The default is Off Note Even if On is selected it becomes invalid when all the registered IP addresses are 000 000 000 000 I...

Page 87: ...in increments of 1 minute The default is Off Low Power Mode The low power mode is a feature that reduces the printer s power consumption by automatically decreasing the temperature of the fuser after...

Page 88: ...orts lists on 1 side or 2 sides of the paper when the 2 sided printing function is available in the printer 1 Sided default 2 Sided Print Area Specfies whether to expand the printable area The default...

Page 89: ...tinue Print Select this not to stop printing even when the drum toner cartridge needs replacing Note that continuous printing after the replacement time has passed may affect the print image quality a...

Page 90: ...be displayed for Customs 1 to 5 Plain Recycled Heavyweight 1 Heavyweight 2 Custom 1 to Custom 5 Select the priority of each paper type from Not Selected and 1 to 9 You can specify the same priority fo...

Page 91: ...opies each set of document is output with its position shifted per set Offset Per Job Select this to output the document with its position shifted per job Off Select this if you do not want to perform...

Page 92: ...ly Note The memory allocation settings except the print page buffer setting are available in the control panel and CentreWare Internet Services The print page buffer is the area in which the actual pr...

Page 93: ...tScript software kit optional is installed LPD Spool SMB Spool Off default Select this if you do not want to perform spool processing When the LPD or SMB data from a computer is being processed data f...

Page 94: ...st P 96 for details NVM Select this to initialize the NV memory The NV memory is a nonvolatile memory that stores the printer settings even after power off Initializing the NV memory will revert the v...

Page 95: ...or an unsupported printer language the data will be deleted 2 If a printer language that is not installed in this printer is specified by PJL commands the data will be deleted 3 When you are changing...

Page 96: ...atch Tray 6 Rear Tray 7 Bypass Tray indicates default value Display Close the Menu screen Menu button Switch between the menu levels button moves one level downwards or button moves one level upwards...

Page 97: ...4 3 Menu List 97 Continued from previous page Continued on next page...

Page 98: ...98 4 Settings on the Control Panel Continued from previous page...

Page 99: ...4 3 Menu List 99 From P 97 From P 97...

Page 100: ...100 4 Settings on the Control Panel From P 97...

Page 101: ...If paper is torn check for any remaining torn pieces of paper Open Cover B For DocuPrint 255 305 raise the lever as shown below to open cover 1 After opening cover B hold the part marked with and open...

Page 102: ...se cover A first before returning the tray to its original position If you continue to print with the offset catch tray folded this may cause a paper jam Always use the printer with the tray open Insi...

Page 103: ...e When two levels of the optional tray have been installed and an A5 size length 148 5 mm paper is jammed at the rear of the tray module hold both edges of the paper with your hands and pull it out Af...

Page 104: ...b History Report Probable causes of trouble are that the printer computer you are using server or other hardware is not correctly set for the network environment you are using or a printer restriction...

Page 105: ...page buffer Install the additional memory optional to increase the memory Refer to Print Mode Page Print Mode Online Help for the printer driver Print page buffer Allocate Memory P 92 Print job sent...

Page 106: ...essed In this case subsequent print data received after the Eject Set button is pressed will be recognized as a new job The data will be printed after the offline mode has been canceled Furthermore it...

Page 107: ...icture postcards Clean the feed roll Refer to Cleaning the Feed Roll P 141 Papers are fed at more than 1 sheet Multiple feeding of papers may occur before the sheets of paper loaded in the tray are us...

Page 108: ...tab of the printer driver Refer to Online Help for the printer driver Levers on both sides of the fuser unit are raised Open cover B of this printer and push down the levers at both ends of the fuser...

Page 109: ...inted Multiple sheets of paper are fed simultaneously Fan the paper well and reload the paper Refer to 3 2 Loading Paper P 59 The drum toner cartridge is defective damaged or there is no more toner in...

Page 110: ...inted clearly The type of transparency or envelope loaded cannot be used in this printer Load the correct type of paper Refer to Usable Paper P 55 Check that the paper type on the printer driver or th...

Page 111: ...xx and whose paper type is XXXX left in the tray Load paper whose size and orientation is xxxx and whose paper type is XXXX into the tray Refer to Loading Paper in a Paper Tray P 59 All data Canceling...

Page 112: ...opriate procedures Refer to List of Error Codes P 115 Incorrect paper type Reselect Set to Print Stop to Cancel Paper of the type specified under Specify Paper Type in the printer driver is not loaded...

Page 113: ...the message Ready to print is displayed This also indicates that the printer is warming up to forcedly output the print data remaining in the printer The printer cannot receive any print data from the...

Page 114: ...ess Ready to print Repl Drum Toner The drum toner cartridge needs to be replaced Prepare a new drum toner cartridge You can still print about another 100 pages even when this message is displayed Read...

Page 115: ...printer is storing the secure delayed print jobs The printer can receive print data from a computer during processing Waiting for data xxxx The printer is waiting for data to come The printer can rec...

Page 116: ...nt page buffer Use one of the following methods to fix the error When High Resolution is selected for Print Mode set it to Standard Select On for Page Print Mode in the Detailed Settings tab for PCL X...

Page 117: ...as splitting the print data or printing one copy at a time for multiple copies Also increase the free space by deleting unnecessary data in the hard disk optional 016 749 PJL command syntax error det...

Page 118: ...parameters like selecting to print on custom size paper and setting Auto for Paper Source on the printer driver and Auto for Paper Size in trays 1 to 4 on the control panel Check the print parameters...

Page 119: ...failure in banner sheet feeding tray Restore the banner sheet feeding tray to its normal status Or change the banner sheet feeding tray at the control panel Refer to System Settings P 86 116 780 E mai...

Page 120: ...s from the File Menu of the printer icon and then select Port Settings from the Details tab Check the IP address displayed on the FX TCP IP Direct Print Utility Port Setup dialog box against the IP ad...

Page 121: ...ferent from that of the computer Check the selected transport protocol Select the same transport protocol as that of the computer Symptom Reason Action Cannot be connected to CentreWare Internet Servi...

Page 122: ...ue is entered it will be automatically changed to a value within the range Clicking the Apply New Settings button prompts messages such as no data or the server has returned invalid or unrecognizable...

Page 123: ...refer to the Online Help for the CentreWare Internet Services Are the SMTP server and POP server working correctly Check with your network administrator During E mail Printing the attached PDF file wa...

Page 124: ...g a new drum toner cartridge check the product code listed in Appendix A 2 Optional Accessories and Consumables P 148 Caution on Handling the Drum Toner Cartridge When handling the drum toner cartridg...

Page 125: ...Take the new drum toner cartridge out of the packaging box and shake it 7 to 8 times as shown in the diagram Important If the toner is not evenly spread out the print quality may be reduced Also if y...

Page 126: ...e is loaded securely in place After opening cover A remove any dust or stains inside the printer with a dry clean cloth 6 Close cover A securely Important If the offset catch tray is folded as in step...

Page 127: ...obs with error are printed in the Job Status column For details on the error description refer to List of Error Codes P 115 Error History Report Prints information of up to the latest 50 errors that o...

Page 128: ...nts a list of PCL forms Domain List Prints a list of permitted domains that have been configured PostScript Fonts List Prints a list of PostScript fonts when the PostScript software kit optional has b...

Page 129: ...at Print Language is displayed and press the button Press the or button until the desired list is displayed then press the button 4 Press the Eject Set button The selected report list will be printed...

Page 130: ...min respectively You must change the default password upon use Settings for CentreWare Internet Services This section explains the environment and settings required for using CentreWare Internet Servi...

Page 131: ...r web browser For CentreWare Internet Services to work properly the following settings must be configured on the web browser For Netscape Communicator Settings that enable JavaScript are selected To c...

Page 132: ...default port number after the address The port number can be changed under Properties Protocol Settings HTTP of the CentreWare Internet Services When connecting to CentreWare Internet Services from th...

Page 133: ...he right of IP Filter and click the Edit button Note Enter the user name and password if requested and click OK 4 Specify the IP address permitted for TCP IP connection in Permitted IP Address 5 Speci...

Page 134: ...r account Types of information Description Job Completion Notifies the status of print jobs completed canceled or confirm from the computer This is only used for the PCL printer driver Regular Notice...

Page 135: ...from the File menu 3 Click Printer Settings on the General tab The Printer Settings dialog box appears 4 Click the Detailed Settings tab Item Item to be configured Description Machine Details Administ...

Page 136: ...136 6 Daily Care 5 Select the Notify Job End by E mail check box 6 Enter the e mail address for notification in E mail Address 7 Click OK 6 5...

Page 137: ...the Print Meter Report Print Results From the Print Meter Report The following items are printed on the Print Meter Report The following items are printed for every job owner Note You can initialize t...

Page 138: ...utton The Print Meter Report is printed 5 Press the Menu button when printing has completed Initializing Print Meter Data 1 Press the Menu button to display the Menu screen 2 Press the or button until...

Page 139: ...to a live machine s interior can cause electric shock Cleaning the Exterior Clean the exterior of the printer about once a month Wipe the parts with a wet but well wrung soft cloth Then wipe with anot...

Page 140: ...d area found on or near the heat roller You can get burnt If a sheet of paper is wrapped around the heat roller do not try to remove it by yourself to avoid injuries or burns Doing so can cause injuri...

Page 141: ...ll set in the paper tray Follow this procedure also when cleaning the feed rolls inside of the printer and the tray module Note The feed roll is a regular replacement part Feed roll Inside of printer...

Page 142: ...the shaft of the paper tray 3 3 Wipe the rubber parts with a wet but well wrung soft cloth 4 Turn the short tab of the feed roll to the right and slowly push it onto the shaft of the paper tray By al...

Page 143: ...n how to uninstall the optional accessories refer to the each manual that is bundled with each accessory 1 Press the power switch of this printer to the position to switch off the power 2 Remove all c...

Page 144: ...heets min 3 4 DocuPrint 305 1 sided print 30 6 sheets min 2 2 sided print 21 4 sheets min 3 4 1 The print speed may decrease due to paper type such as postcard transparency or envelope size and printi...

Page 145: ...bels heavyweight 2 157 216 g m2 Bypass tray optional Plain paper recycled paper 60 90 g m2 transparencies for monochrome printing heavyweight 1 90 135 g m2 such as envelopes labels Japanese official p...

Page 146: ...100Base TX 10Base T Bi directional parallel IEEE1284 B USB Full Speed Serial 25 pin Supported protocol Centro Compatible Nibble ECP Ethernet Network protocol TCP IP IPX SPX NetBEUI UDP IP Network serv...

Page 147: ...cations 147 Printable Area Weight including drum toner cartridge DocuPrint 205 21 6 kg DocuPrint 255 305 23 6 kg Item Contents Top edge 4 mm Left 4 mm Bottom edge 4 mm Right 4 mm Unprintable area Prin...

Page 148: ...aded up to 550 sheets of standard paper P paper When combined with the A3 universal tray 250 you can install up to two levels of paper tray Duplex unit EL300304 Can handle 2 sided printing The additio...

Page 149: ...consumables with the packaging box standing on end Before using the consumables maintenance products do not open the packaging and avoid storing them in the following locations Locations with high tem...

Page 150: ...inted continuously using A4 size paper As the lifespan differs according to factors such as the print contents paper size paper type environment used and the frequency of switching on off the power to...

Page 151: ...rinter driver Note The address URL of the download service page of our company is as follows http www fxap com sg suppdrv jsp For details on the latest printer driver features refer to the Online Help...

Page 152: ...wn in the table are factory defaults Required memory capacity differs according to the protocol activation status and receive buffer size PCL Printer Driver Memory capacity 1 sided print Unit MB Memor...

Page 153: ...192 192 A4 192 192 192 192 B4 192 192 192 192 A3 192 192 192 192 Custom 192 192 192 192 Long paper 305 900 mm 192 192 192 192 High Resolution A5 192 192 192 192 B5 192 192 192 192 A4 192 192 192 192 B...

Page 154: ...nd SMB folders Secure Sample Delayed Print documents and their logs will not be deleted When Print Result Is Different From the Settings The print result may differ in the following ways from the sett...

Page 155: ...A4 A5 A5 1 B4 B5 B5 11 17 1 Legal 14 8 5 14 Legal 13 8 5 13 1 Letter 8 5 11 1 Letter 8 5 11 7 25 10 5 7 25 10 5 COM 10 envelope 1 5 5 8 5 1 5 5 8 5 1 Monarch envelope 1 Monarch envelope 1 C5 envelope...

Page 156: ...LZW 5 PackBits 32773 BlackIsZero Uncompressed 1 G3 FAX 3 G4 FAX 4 LZW 5 PackBits 32773 4 WhiteIsZero Uncompressed 1 BlackIsZero Uncompressed 1 8 WhiteIsZero Uncompressed 1 LZW 5 JPEG 6 JPEG 7 PackBit...

Page 157: ...ssed 1 LZW 5 JPEG 6 JPEG 7 PackBits 32773 YCbCr 6 Uncompressed 1 LZW 5 JPEG 6 JPEG 7 PackBits 32773 ITULAB 10 Uncompressed 1 LZW 5 JPEG 6 JPEG 7 PackBits 32773 BitPer Sample Photometric Interpretation...

Page 158: ...Standard Baudrate 9600bps Stop Bit 1bit Parity Not Available Xon Xoff Control On DTR Control Fix High when the host computer is Windows Example when printing the print job that includes binary data s...

Page 159: ...e Ports tab to confirm the port that is specified when installation is set then click Configure Port 5 Set each item Bit Sec Select the value of Baudrate that is set on the printer Data bit Select 8 P...

Page 160: ...uter as well as send information such as print status from the printer to the computer Browser Software to display and view at your computer information on the Internet Typical browsers include Netsca...

Page 161: ...a 1 m2 sheet of paper Gradation The smoothness between colors It is expressed in gradation value by the number of steps of gradation and the greater the value the smoother it is HTTP A protocol used t...

Page 162: ...u Consisting of the PCL HP GL and HP GL 2 emulation modes the mode menu is a menu for setting the conditions pertaining to each emulation mode Multiple Up A feature to print multiple pages on a piece...

Page 163: ...d on Printer driver Software that converts data created by application software to data that can be interpreted by the printer Protocol An agreed upon format for transmitting data between multiple dev...

Page 164: ...l that is used in various products from personal to large computers USB Abbreviation of Universal Serial Bus a data transmission method between the computer and peripherals It supports the Hot Plug fe...

Page 165: ...mables 149 types of consumables 149 ContentsBridge Utility 40 control panel 12 15 65 control panel setting changing menu settings 67 description of menu items 71 menu list 96 cover A 14 101 cover B 14...

Page 166: ...sult Sample Print 35 print at a specified time 38 print confidential document 32 Print Meter 94 137 Print Meter Report 127 print the job history report automatically Auto Job History 88 printable area...

Page 167: ...Index 167 U upgrade firmware 151 latest printer driver 151 UPnP 84 USB 82 W WINS server settings 85...

Page 168: ...Address z About the Guide Other comments After completing this form detach and send it to the address below Please use your own envelope and postage stamp Thank you for your cooperation Fuji Xerox Co...

Page 169: ...DocuPrint 205 255 305 User Guide Human Interface Design Development Document Products Supply Company Fuji Xerox Co Ltd ME3208E2 1 Edition 1 Copyright 2003 by Fuji Xerox Co Ltd...

Reviews: