PROCEDURE
1
Stop the engine.
2
If not all turbochargers are defective, isolate the defective turbocharger from the exhaust
gas system and from the scavenge air system.
NOTE:
This step is only applicable for an engine with more than one turbocharger, ie
one ore two turbochargers are serviceable.
2.1
Lock the rotor of the defective turbocharger (refer to the turbocharger manual).
2.2
Remove the expansion joint (007,
) between the defective turbocharger
and the exhaust manifold.
2.3
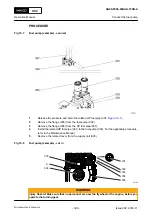
Install the covers 94653A and 94653B (001 and 002).
2.4
Remove the expansion joint (005) between the defective turbocharger air outlet
and the diffusor.
2.5
Install the covers 94653C and 94653D (003 and 004).
NOTE:
You only have to install the covers (003), if the turbochargers are
connected to a suction duct.
Fig 10-9
Not all turbochargers are defective (example)
Legend
001
Cover 94653A
005
Expansion joint
002
Cover 94653B
006
Turbocharger
003
Cover 94653C
007
Expansion joint
004
Cover 94653D
3
If all turbochargers are defective, isolate the defective turbochargers from the scavenge
air system.
NOTE:
This step is applicable for an engine with one, two, or three turbochargers, ie no
turbocharger is serviceable.
3.1
Lock the rotor of the defective turbochargers (refer to the turbocharger manual).
3.2
Remove the expansion joint (005,
turbochargers air outlet and the diffusor.
3.3
Install the covers 94653C (001).
NOTE:
You only have to install the covers (001), if the turbochargers are
connected to a suction duct.
3.4
Open the covers (003 and 004) on the scavenge air receiver.
3.5
Set to ON the auxiliary blowers.
X52
AA00-6500-00AAA-662A-A
Operation Manual
Temporary isolate a defective turbocharger
Winterthur Gas & Diesel Ltd.
- 403 -
Issue 002 2018-11


