


APPENDIX B: Working with Partitions
Your alarm system is equipped with an integrated partitioning feature that can divide your alarm system into three
distinct areas identified as Partition 1 through 3. A partition can be armed or disarmed regardless of the status of the
other partitions within the system. Partitioning can be used in installations where shared security systems are more
practical, such as a home office or warehouse building. When partitioned, each zone, each user code and many of your
system's features can be assigned to Partition 1 to 3. Each user code is assigned with the list of partitions it is allowed
to control in order to limit access of users to certain partitions.
When partitioning is enabled, menu displays are changed to incorporate the partition feature and also each device, user, and
proximity tag has additional partitions menu, where it is assigned to certain partitions and excluded from others.
Note:
When Partition Mode is disabled, all zones, user codes, and features of the control panel will operate as in a
regular unit. When partition mode is enabled, all zones, user codes, and features of the control panel are
automatically assigned to Partition 1.
B1. User Interface and Operation
Refer to the KP-250 PG2 User's Guide, APPENDIX B. PARTITIONING for a detailed description of the user interface
(Arming/Disarming, siren behavior, show function, etc.).
B2. Common Areas
When partitions cross over, the area common to the partitions must be assigned a zone. This common zone is assigned
to multiple partitions and can be crossed by all users that are assigned to the partitions.
There may be more than one common area in an installation depending on the layout of the property. A common area is
not the same as a partition; it cannot be armed / disarmed directly. Common areas are created when you assign a zone
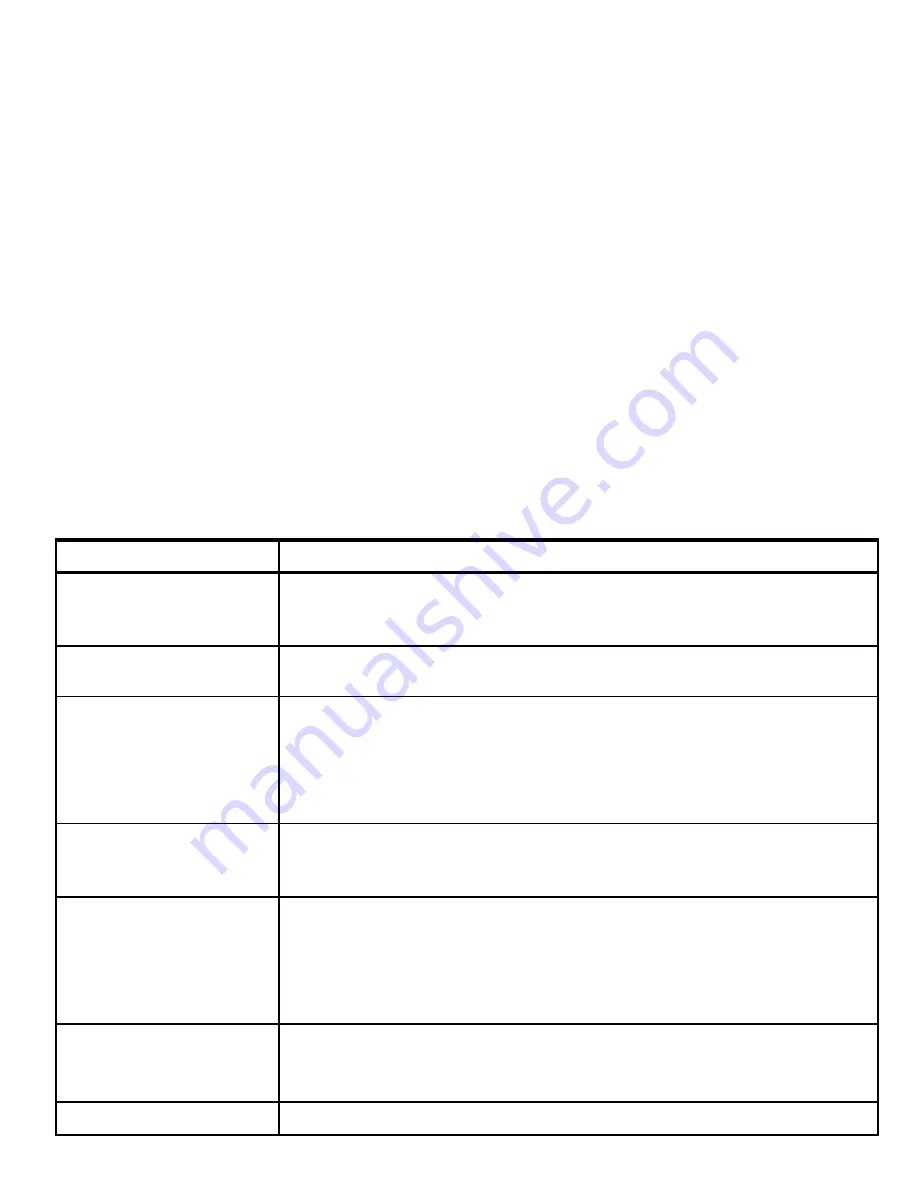
or zones to 2 or 3 partitions. Table A1 summarizes the behavior of the different zone types in a common area.
Table A1 – Common Area Definitions
Common area zone types
Definition
Perimeter
•
Acts as defined only after the last assigned partition is armed AWAY or HOME.
•
In case that one of the partitions is disarmed, an alarm initiated from this zone is
ignored for all assigned partitions.
Delay zones
•
Delay zones will not trigger an entry delay unless all assigned partitions are armed. It
is, therefore, not recommended to define delay zones as common areas.
Perimeter access
(Perimeter follower)
•
Act as defined only after the last assigned partition is armed AWAY or HOME.
•
In case that one of the partitions is disarmed, an alarm initiated from this zone is
ignored for all assigned partitions.
•
In case that one of the common area assigned partitions is in a delay state (and
the other partitions are armed), the alarm will behave as a perimeter follower for
this partition only. The event will be ignored for other assigned armed partitions.
Interior
•
Acts as defined only after the last assigned partition is armed AWAY.
•
In case that one of the partitions is disarmed or armed HOME, an alarm initiated
from this zone is ignored for all assigned partitions.
Interior access
(Interior follower)
•
Acts as defined only after the last assigned partition is armed AWAY.
•
In case that one of the partitions is disarmed or armed HOME, an alarm initiated
from this zone is ignored for all assigned partitions.
•
In case that one of the common area assigned partitions is in a delay state (and
the other partitions are armed), the alarm will behave as an interior follower for this
partition only. The event will be ignored for other assigned armed partitions.
Home E/E
(Home/Delay)
•
Acts as a Perimeter-Follower type when all assigned partitions are armed AWAY.
•
Acts as a Delay type when at least one of the assigned partitions is armed HOME.
•
Will be ignored when at least one of the assigned partitions is disarmed.
Emergency; Fire; Flood;
•
Always armed.
92
D-306919 KP-250 PG2 Installer’s Guide


