


ProStar325 Service Manual
110
Publication date 8 May 2003
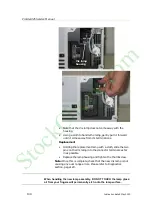
•
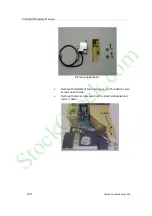
Remove the two padding pieces as shown below and fit the two
spacers provided in the upgrade kit over the exposed screw
holes.
•
Fit the Vis lamp housing on top of the spacers and fit the two
hex cap screws that come with the upgrade kit. Leave the screws
Remove these two
pieces
StockCheck.com
Summary of Contents for ProStar 325 UV-Vis
Page 9: ...ProStar325 Service Manual Publication date 8 May 2003 9 S t o c k C h e c k c o m ...
Page 19: ...ProStar325 Service Manual Publication date 8 May 2003 19 S t o c k C h e c k c o m ...
Page 34: ...ProStar325 Service Manual 34 Publication date 8 May 2003 S t o c k C h e c k c o m ...
Page 71: ...ProStar325 Service Manual Publication date 8 May 2003 71 S t o c k C h e c k c o m ...
Page 72: ...ProStar325 Service Manual 72 Publication date 8 May 2003 S t o c k C h e c k c o m ...
Page 118: ...ProStar325 Service Manual 118 Publication date 8 May 2003 S t o c k C h e c k c o m ...
Page 149: ...ProStar325 Service Manual Publication date 8 May 2003 149 S t o c k C h e c k c o m ...


