Section 9
—
Glue-Pattern-Edit Menu (Standard)
MCP-25/MS
Valco Cincinnati
9-9
MC051 (July 2002)
Automatic Gluing Function
This function is available beginning with the March,
2001 release of the software. Automatic gluing uses a
scanner to measure the tab length of every box in
order to calculate where to apply the glue. With this
function, operators do not need to make adjustments
on a job change. Additionally, automatic gluing helps
avoid machine contamination when glue patterns are
not set up correctly or when there are problems with
the die cut of the tab.
When the glue inspection is used, the operator must
start a “Measure Function” when changing to a new
job. This is required to recalculate the glue length for
the inspection CPU. From that point forward, the
inspection will verify each glue line with this length.
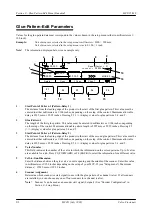
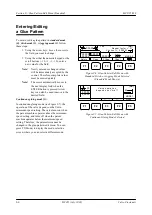
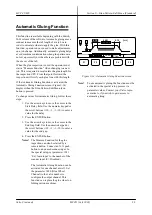
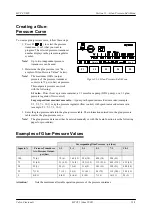
If the Automatic Gluing Function is activated, the
Automatic Gluing Function screen (Figure 9-14)
displays when the Glue-Pattern-Edit Menu Icon
button is pressed.
To change values for Automatic Gluing, follow these
steps:
1. Use the arrow keys to move the cursor to the
Start Delay field. Use the numeric keypad or
the scroll buttons (+10, +1, -1, -10) to enter a
value for the delay.
2. Press the ENTER button.
3. Use the arrow keys to move the cursor to the
End Gap field. Use the numeric keypad or
the scroll buttons (+10, +1, -1, -10) to enter a
value for the end gap.
4. Press the ENTER button.
Notes!
The Measure Function for the glue
inspection can also be started by a
remote button. Connect an N.O. push
button to an unused scanner input. In
the special setup, set parameter 1031
‘Ext. learn input’ to the number of the
scanner input (0 = Disabled).
The Automatic Gluing Function can be
activated for one channel as well. Set
the parameter 1050 (Glue Wheel
Channel) to the valve number to
configure the output channel. This
function can replace the glue wheel on
folding carton machines.
Figure 9-14. Automatic Gluing Function screen
Note!
To use automatic gluing, the function must be
activated in the special setup process via
parameter values. Contact your Valco repre-
sentative to if you wish to gain access to
automatic gluing.
F1
F2
F3
F4
F5
1
1
00.01
0.10
0.10
[Inch]
^ Chan. Chan.
v
Summary of Contents for MCP-25/MS
Page 1: ...MCP 25 MS Control Manual Number MC051 Release Date June 2004 ...
Page 25: ......
Page 27: ......
Page 28: ......
Page 29: ...3 4 5 1 2 2 4 5 3 1 ...
Page 30: ......
Page 31: ......
Page 33: ...4 8 12 11 10 9 6 7 5 3 2 1 ...
Page 34: ...3 7 9 10 8 5 6 4 1 2 1 4 3 2 ...
Page 35: ...1 3 4 2 ...
Page 36: ...7 9 10 8 3 5 6 4 1 2 ...
Page 37: ...SHD NPN 5 4 3 24V Low Level Detector 0V 1 2 ...
Page 38: ......
Page 39: ......
Page 40: ......
Page 41: ......
Page 42: ......
Page 43: ...3 4 5 6 2 3 1 5 6 4 1 2 ...
Page 44: ......
Page 45: ......
Page 46: ......
Page 47: ......
Page 48: ......
Page 49: ...RODUCT 7 10 9 8 3 5 6 4 1 2 8 10 9 2 5 7 6 3 4 1 ...
Page 50: ......
Page 51: ......
Page 52: ...6 8 10 9 7 1 3 5 4 2 ...
Page 53: ......
Page 54: ......
Page 55: ...6 8 10 9 7 1 3 5 4 2 ...
Page 56: ...VA LC O CI NCIN NA TI INC 513 87 4 6550 5 13 87 4 6550 VALC O C INCIN NATI INC ...
Page 57: ......
Page 58: ......
Page 59: ......
Page 60: ......
Page 61: ......
Page 62: ......
Page 87: ......
Page 99: ...F1 F2 F3 F4 F5 ...

