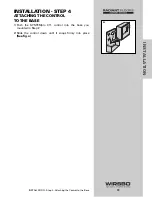


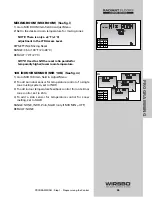


INSTALLATION - STEP 8
COMPLETING THE INSTALLATION
Once you have successfully tested all of the wiring and found
that everything is operational, you are ready to complete the
installation.
1) Make sure all power to the devices and terminal blocks is
off, and remove any remaining jumpers from the terminals
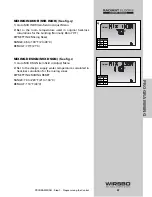
2) Reconnect the terminal blocks to the control by carefully
aligning them with their respective headers on the control
3) Push the terminal blocks into the headers — they should
snap firmly into place
(See fig. a)
4) Install supplied safety dividers between unpowered sensor
inputs and powered or 120 VAC wiring chambers
5) Apply power to the control
NOTE:
The operation of the control on power up is
described in the Control Function Overview section
of this manual (page 58).
Cleaning The Control
• Moisten cloth with water and wring out prior to wiping control
• Do not use solvents or cleaning solutions on the control
33
INST
ALLA
TION
INSTALLATION - Step 8 - Completing the Installation
N
6
L
7
Power
8
9
10
Boil
P3
Boil Dem
Pmp P7
a
Summary of Contents for SYSTEMpro 311
Page 1: ...SYSTEMpro 311 Installation Manual...
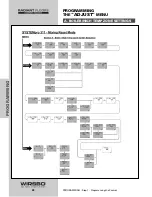
Page 90: ...88 APPENDIX II APPENDIX II SYSTEMpro 311 Menu Tree...
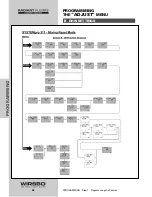
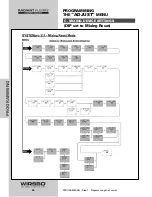
Page 91: ...89 APPENDIX II APPENDIX II SYSTEMpro 311 Menu Tree...
Page 92: ...90 APPENDIX III APPENDIX III Application Drawings...
Page 93: ...91 APPENDIX III APPENDIX III Application Drawings...
Page 94: ...92 APPENDIX III APPENDIX III Application Drawings...
Page 95: ...93 APPENDIX III APPENDIX III Application Drawings...
Page 96: ...94 APPENDIX III APPENDIX III Application Drawings...
Page 97: ...95 APPENDIX III APPENDIX III Application Drawings...
Page 98: ...96 APPENDIX III APPENDIX III Application Drawings...
Page 99: ...97 APPENDIX III APPENDIX III Application Drawings...
Page 106: ......