INSTALLATION - STEP 7
TESTING THE WIRING
NOTE:
The following tests are to be performed
using standard testing practices and procedures.
They should only be carried out by properly
trained and experienced installers.
Things to note
before you start ANY testing:
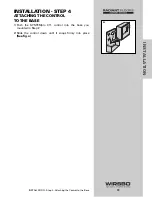
• Before supplying power for testing, each terminal block
must be unplugged from its header on the control
• To remove the terminal block, pull straight down from
the control
(See fig. a)
• The following tests should only be carried out by
properly trained and experienced installers
• When testing, use standard testing practices and
procedures
• To properly test wiring and sensors, a good quality
electrical test meter capable of reading at least 0 – 300
VAC and at least 0 – 2,000,000 Ohms is essential
Test the Sensors
To test the sensors, the actual temperature at each sensor
location must be measured.
A good quality test meter capable of measuring up to 5,000 k
Ω
(1 k
Ω
= 1000
Ω
) is required to measure the sensor resistance.
In addition to this, the actual temperature must be measured
with either a good quality digital thermometer, or if a
thermometer is not available, a second sensor can be placed
alongside the one to be tested and the readings compared.
First measure the temperature using the thermometer and
then measure the resistance of the sensor at the control. The
wires from the sensor must not be connected to the control
while the test is performed. Using the chart on the previous
page, estimate the temperature measured by the sensor. The
sensor and thermometer readings should be close. If the test
meter reads a very high resistance, there may be a broken
wire, a poor wiring connection or a defective sensor. If the
resistance is very low, the wiring may be shorted, there may
be moisture in the sensor or the sensor may be defective. To
test for a defective sensor, measure the resistance directly at
the sensor location.
Do not apply voltage to a sensor at any time as damage
to the sensor may result.
29
INST
ALLA
TION
INSTALLATION - Step 7 - Testing the Wiring
N
6
L
7
Power
8
9
10
Boil
P3
Boil Dem
Pmp P7
a
Summary of Contents for SYSTEMpro 311
Page 1: ...SYSTEMpro 311 Installation Manual...
Page 90: ...88 APPENDIX II APPENDIX II SYSTEMpro 311 Menu Tree...
Page 91: ...89 APPENDIX II APPENDIX II SYSTEMpro 311 Menu Tree...
Page 92: ...90 APPENDIX III APPENDIX III Application Drawings...
Page 93: ...91 APPENDIX III APPENDIX III Application Drawings...
Page 94: ...92 APPENDIX III APPENDIX III Application Drawings...
Page 95: ...93 APPENDIX III APPENDIX III Application Drawings...
Page 96: ...94 APPENDIX III APPENDIX III Application Drawings...
Page 97: ...95 APPENDIX III APPENDIX III Application Drawings...
Page 98: ...96 APPENDIX III APPENDIX III Application Drawings...
Page 99: ...97 APPENDIX III APPENDIX III Application Drawings...
Page 106: ......


