


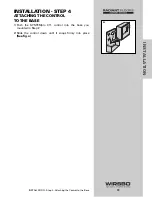


The control can also be mounted on a standard
DIN rail.
(See fig. i)
First remove the control from its base and then, using the
hooks and spring clip on the back of the control (ordered
separately), mount it onto the DIN rail. This will be a
popular option for those who prefer to mount the control
inside a larger electrical panel.
The wiring can enter the bottom or the back of the
enclosure. Knock-outs provided in the base allow the
wiring to be run in conduit up to the enclosure. The base
also has holes that line up with the mounting holes of
most common electrical boxes.
17
INST
ALLA
TION
INSTALLATION - Step 2 - The Control Base
i
Summary of Contents for SYSTEMpro 311
Page 1: ...SYSTEMpro 311 Installation Manual...
Page 90: ...88 APPENDIX II APPENDIX II SYSTEMpro 311 Menu Tree...
Page 91: ...89 APPENDIX II APPENDIX II SYSTEMpro 311 Menu Tree...
Page 92: ...90 APPENDIX III APPENDIX III Application Drawings...
Page 93: ...91 APPENDIX III APPENDIX III Application Drawings...
Page 94: ...92 APPENDIX III APPENDIX III Application Drawings...
Page 95: ...93 APPENDIX III APPENDIX III Application Drawings...
Page 96: ...94 APPENDIX III APPENDIX III Application Drawings...
Page 97: ...95 APPENDIX III APPENDIX III Application Drawings...
Page 98: ...96 APPENDIX III APPENDIX III Application Drawings...
Page 99: ...97 APPENDIX III APPENDIX III Application Drawings...
Page 106: ......