138
Installation Manual
• Do not install the unit in a machinery factory or a chemical plant, where a toxic gas containing acid, alkali, an organic
solvent, or paint, or a gas containing a corrosive substance is generated. Gas poisoning or a fire may result.
• Do not install in a location where flammable gas may leaks are possible. If the gas leak and accumulate around the
unit, it may ignite and cause a fire.
• Install the unit so that the air discharge is located at least 1.5 m from the nearest fire alarm. Otherwise, when a fire
occurs, the fire alarm may be late to detect it, or may not detect it at all.
Installation
• Transport it by the truck or the forklift. Transport it by six people or more when the person transports it temporarily.
The waist etc. might be hurt when not following it.
• When transporting the Air to Air Heat Exchanger with DX Coil Unit, wear shoes with additional protective toe caps,
protective gloves, and other protective clothing.
• When transporting the Air to Air Heat Exchanger with DX Coil Unit, do not take hold of the bands around the packing
carton. You may injure yourself if the bands should break.
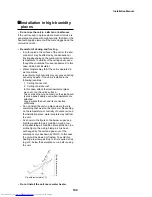
• When the Air to Air Heat Exchanger with DX Coil Unit is to be suspended, the designated hanging bolts (M12) and
nuts (M12) must be used
• Install the Air to Air Heat Exchanger with DX Coil Unit at enough strong place to withstand the weight of the unit. If
the strength is not enough, the unit may fall down resulting in injury
• Follow the instructions in the Installation Manual to install the Air to Air Heat Exchanger with DX Coil Unit. Failure to
follow these instructions may cause the product to fall down or topple over or give rise to noise, vibration, water
leakage, etc.
• Wear protective gloves and safety work clothing during installation, servicing and removal.
• Do not touch the aluminum fin of the Air to Air Heat Exchanger with DX Coil Unit or outdoor unit. You may injure
yourself if you do so. If the fin must be touched for some reason, first put on protective gloves and safety work
clothing, and then proceed.
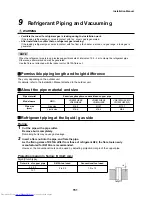
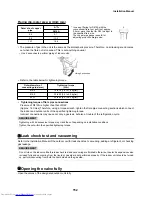
• Tighten the flare nut with a torque wrench in the specified manner. Excessive tighten of the flare nut may cause a
crack in the flare nut after a long period, which may result in refrigerant leakage.
• When working at heights, put a sign in place so that no-one will approach the work location, before proceeding with
the work. Parts and other objects may fall from above, possibly injuring a person below.
• Before starting to install the Air to Air Heat Exchanger with DX Coil Unit, read carefully through the Installation
Manual, and follow its instructions to install the Air to Air Heat Exchanger with DX Coil Unit.
• Only a qualified installer (*1) or qualified service person (*1) is allowed to install the Air to Air Heat Exchanger with
DX Coil Unit. If the Air to Air Heat Exchanger with DX Coil Unit is installed by an unqualified individual, a fire, electric
shocks, injury, water leakage, noise and / or vibration may result.
• Upon completion of the installation work, check for the insulation resistance. Then conduct a test run to check that
the Air to Air Heat Exchanger with DX Coil Unit is operating properly.
• After the work has finished, be sure to use an insulation tester set (500 V Megger) to check the resistance is 1 M
or more between the charge section and the non-charge metal section (Earth section). If the resistance value is low,
a disaster such as a leak or electric shock is caused at user's side.
• Before starting to install the Air to Air Heat Exchanger with DX Coil Unit, read carefully through the Installation
Manual, and follow its instructions to install the Air to Air Heat Exchanger with DX Coil Unit.
• Follow the instructions in the Installation Manual to install the Air to Air Heat Exchanger with DX Coil Unit. Failure to
follow these instructions may cause the product to fall down or topple over or give rise to noise, vibration, water
leakage, etc.
• Before operating the Air to Air Heat Exchanger with DX Coil Unit after having completed the work, check that the
electrical control cover, inspection cover and maintenance cover are closed, and set the circuit breaker to the ON
position. You may receive an electric shock if the power is turned on without first conducting these checks.
• Install the unit in the prescribed manner for protection against strong wind and earthquake. Incorrect installation may
result in the unit falling down, or other accidents.
• Attach an anti bird net or the like to the outside air intake. Remove any foreign object such as a nest; otherwise, an
oxygen shortage may occur in the room.
• Leave ample space between the outside air intake and the outlet for combustion gas. Otherwise, an oxygen shortage
may occur in the room.
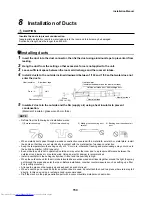
• When metallic ducts pass through a wooden construction covered with a metal lath, wire lath, or metal plate, install
the ducts so that they are not electrically in contact with the metal parts of wooden construction. If a short circuit
occurs, a fire may result.
• Use the supplied or specified parts for installation. Otherwise, the unit falling down, water leakage, an electric shock,
or a fire may result.
• Perform anti-freezing work if the installation place is subject to freezing. Otherwise, the solenoid valve or pipes are
damaged and water leakage may result.
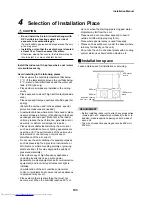
• Do not install the unit in a place where the outside temperature (especially around the unit or the air grill) falls below
0 °C. Otherwise, water in the pipes, in the humidifying element, or in the solenoid valve freezes and a breakdown or
water leakage may result.
• If the ducts pass through a fire protection zone, use a noncombustible duct and install a fire damper. The flame may
spread when a fire occurs.
Summary of Contents for MD-VNK802HEXE
Page 120: ...118 11Owner s Manual Excerpt ...
Page 137: ...135 12Installation Manual Excerpt ...

