


Chapter 4
Maintaining the Sun Fire X2100 M2 Server
4-41
5. When the CPU is fully seated in the socket, close the CPU cover.
The CPU cover might not align correctly with the chip, after it is installed. If this
happens open the cover, and push it slightly to the side to better align it with the
chip, and reclose the cover.
6. Rotate the socket release lever down until it snaps into place, securing the CPU in
the socket.
7. Use the syringe to apply approximately 0.1 ML/CC of thermal grease in a circular
pattern to the top of the CPU.
8. Gently distribute the thermal grease and remove any excess so that only an
extremely thin, uniform layer remains. If any voids or crevices appear that could
lead to air pockets, reapply the grease until you achieve a thin but compact
consistency.
9. Use an alcohol pad to remove all thermal grease from the bottom of the heatsink.
10. Inspect the heatsink for dust and lint. Clean if necessary.
11. Carefully position the heatsink on the CPU, aligning it with the mounting posts
to reduce movement after it makes initial contact with the layer of thermal grease.
Caution –
If the heatsink is moved too much during its installation, the layer of
thermal grease may become uneven, leading to component damage.
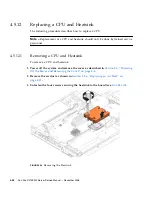
12. Fasten the four screws attaching the heatsink to the motherboard. See
FIGURE 4-35
.
13. Replace the air duct. See
Section 4.5.6, “Replacing an Air Duct” on page 4-22
.
Summary of Contents for Sun Fire X2100 M2
Page 46: ...3 20 Sun Fire X2100 M2 Server Service Manual December 2006 ...
Page 94: ...4 48 Sun Fire X2100 M2 Server Service Manual December 2006 ...
Page 98: ...A 4 Sun Fire X2100 M2 Server Service Manual December 2006 ...
Page 123: ...Appendix C Installing the Server Into a Rack With Optional Slide Rails C 15 ...
Page 124: ...C 16 Sun Fire X2100 M2 Server Service Manual December 2006 ...
Page 128: ...Index 4 Sun Fire X2100 M2 Server Service Manual December 2006 ...