


Appendix C
Installing the Server Into a Rack With Optional Slide Rails
C-7
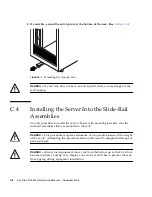
1. Push the slide rails into the slide-rail assemblies in the rack as far as possible.
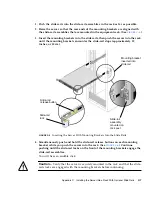
2. Raise the server so that the rear ends of the mounting brackets are aligned with
the slide-rail assemblies that are mounted in the equipment rack. (See
FIGURE C-6
.)
3. Insert the mounting brackets into the slide rails, then push the server into the rack
until the mounting brackets encounter the slide-rail stops (approximately 12
inches, or 30 cm).
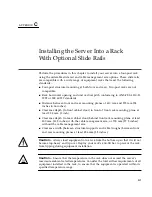
FIGURE C-6
Inserting the Server With Mounting Brackets Into the Slide Rails
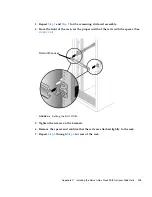
4. Simultaneously push and hold the slide-rail release buttons on each mounting
bracket while you push the server into the rack. (See
FIGURE C-6
.) Continue
pushing until the slide-rail locks on the front of the mounting brackets engage the
slide-rail assemblies.
You will hear an audible click.
Caution –
Verify that the server is securely mounted in the rack and that the slide-
rails locks are engaged with the mounting brackets before continuing.
Mounting bracket
inserted into
slide rail
Slide-rail
release button
Slide-rail
assembly
mounted on
rack post
Slide-rail
lock
Summary of Contents for Sun Fire X2100 M2
Page 46: ...3 20 Sun Fire X2100 M2 Server Service Manual December 2006 ...
Page 94: ...4 48 Sun Fire X2100 M2 Server Service Manual December 2006 ...
Page 98: ...A 4 Sun Fire X2100 M2 Server Service Manual December 2006 ...
Page 123: ...Appendix C Installing the Server Into a Rack With Optional Slide Rails C 15 ...
Page 124: ...C 16 Sun Fire X2100 M2 Server Service Manual December 2006 ...
Page 128: ...Index 4 Sun Fire X2100 M2 Server Service Manual December 2006 ...


