52
53
06.11.2020
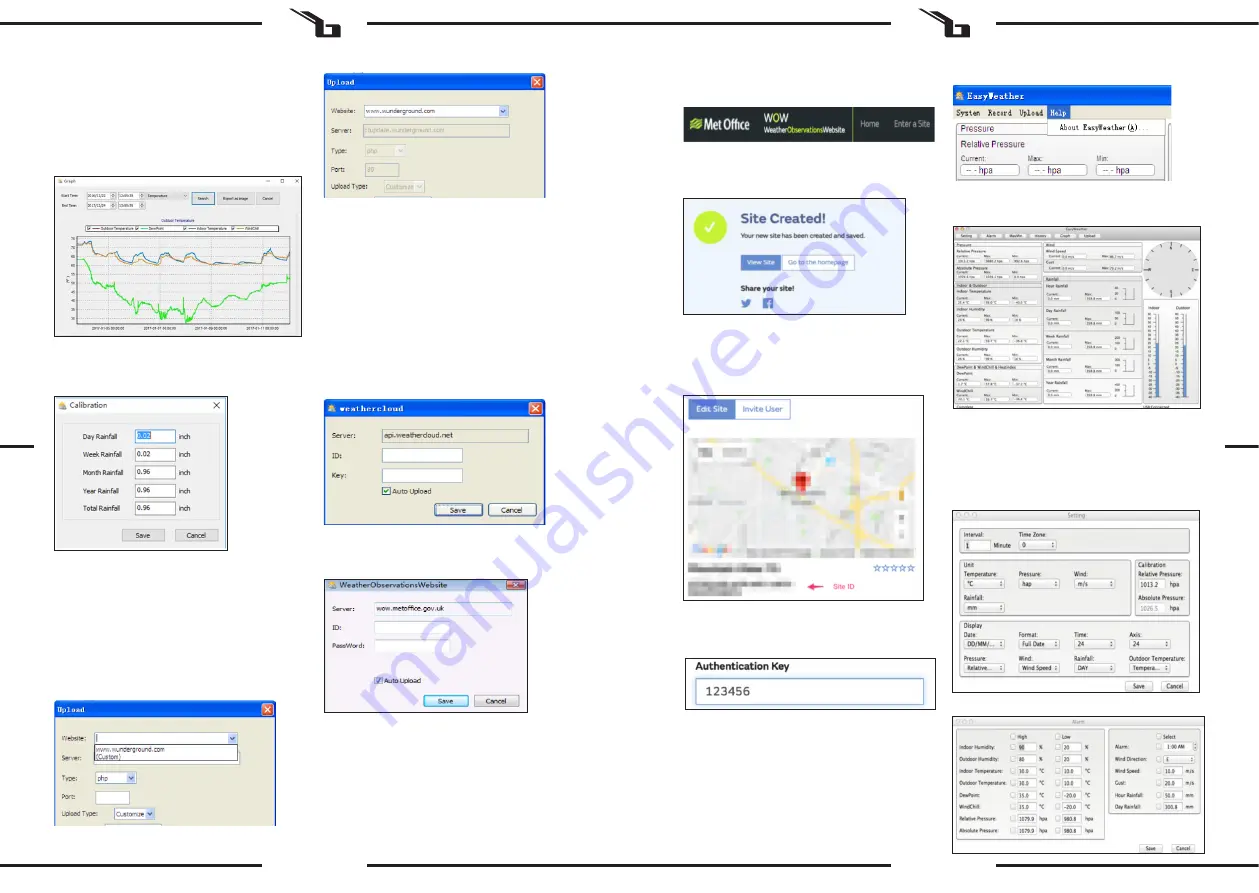
In this section, you can see the historical data shown in
graph format for easier observation.
c)
Click calibration button - enter the calibration menu
5.4. UPLOAD OPTION
Note: This feature is only available in EasyWeather Version
8.3 or greater. To upload weather data to the internet from
EasyWeather, select Upload from the menu bar.
Upload to WeatherUnderground.com
Select Upload | WeatherUnderground from the menu bar.
The user can upload data to the website. www.
wundergound.com or their own website. If the user chooses
www.wundergound.com, he or she doesn’t need to set the
server, server type and port. If the user chooses custom, he
or she needs to set the server, server type and port.
To upload data to Wunderground.com, you must first
register on the Wunderground.com website. Registration
is free.
1.
Visit http://www.wunderground.com/ and select Join
if you do not have an account.
2.
Once registered with Wunderground.com you will
need to sign up your station. To get started visit:
http://www.wunderground.com/weatherstation/
setup.asp
3.
Enter your Station ID and password into the ID
and Password fields provided in the EasyWeather
software, and select the Auto Upload checkbox.
Please Note: Make sure you enter the ID in all
capitals, and the password exactly as you chose it,
both fields are case sensitive.
Upload to WeatherCloud
Upload your weather data to WeatherObservationWebsite
(WOW)
Select Upload | WeatherObservationWebsite from the
menu bar.
To upload data to wow.metoffice.gov.uk, you must first
register on the wow.metoffice.gov.uk website. Registration
is free. Once you are logged in you will need to create a
new WOW site. “Sites” are the means by which WOW
organizes weather data you contribute. Basically, WOW
builds a personal web site for your weather station. To allow
data uploading, you will need two items associated with
the web site: Site ID: This is an arbitrary number that is used
to distinguish your site from another. This number appears
(in brackets) next to or underneath the name of your site
on the site information page, for example: 6a571450-df53-
e611-9401-0003ff5987fd
You will be presented with a form where you give your
station’s location and some other settings related to how
you wish the site to operate. After you complete the setup,
you should see:
If you want to start a new weather history record, press
the “Clear Data” button to clear the database; all history
weather data will be deleted (if you want to keep a backup
history file before deleting all weather data, you can make
a copy of the “EasyWeather.mdb” file into another folder or
just rename the “EasyWeather.mdb” file, such as “Jan-07.
dat”, for future reference.)
b)
Click Graph button - enter the Graph menu
Authentication Key: This is a 6-digit number that is used
to ensure data is coming from you and not another user.
Begin setting up a new site by clicking “Enter a Site”:
Make sure you are (still) logged into the WOW site. Login
as necessary. Now click on “My Sites” in the navigation bar
at the top. If you have only 1 site, you will now be shown
its page. If you have multiple sites, you will have to choose
the correct one first. On this page, you will find the site ID
just below the map:
You will also need to establish a unique 6-digit PIN code
that you should keep secret. This is the “Authentication
Key.” Set up this number by clicking “Edit Site” and fill it
with a 6-digit number of your choice:
You will need both the “Site ID” and “Authentication Key” to
set up the upload configuration for WOW in the Weather
Server. In your mobile application, navigate to the “Device
List” page and tap the device you want to configure WOW
for. You will then be shown the “wunderground.com”
configuration. Please ignore and tap “Next” to see the
“Weathercloud” configuration. Please press “Next” one
more time and you will now be on the screen where you
will configure WOW. On this screen you will fill out “Station
ID” with the WOW “Site ID” value, and “Station Key” with
the WOW “Authentication Key” you created. Press “Save”
to finalise the configuration.
Help option
Click About EasyWeather button - enter the About menu.
5.5. “EASYWEATHER” SOFTWARE ON MAC OS
The functions of MAC OS are the same as the Windows
version. Once the device is connected to your MAC PC by
USB cable, you can set settings and alarms for all weather
parameters here. You can view the Max/Min record and all
history records. History records can be exported as Excel or
PDF files as well.
a)
Settings
b)
Alarms
EN
EN


