background image

Patchbay Wiring

The DC2020 Patchbay is an 8-module wide panel which provides patching for up
to 40 inputs, master functions and a maximum of 120 tie lines.

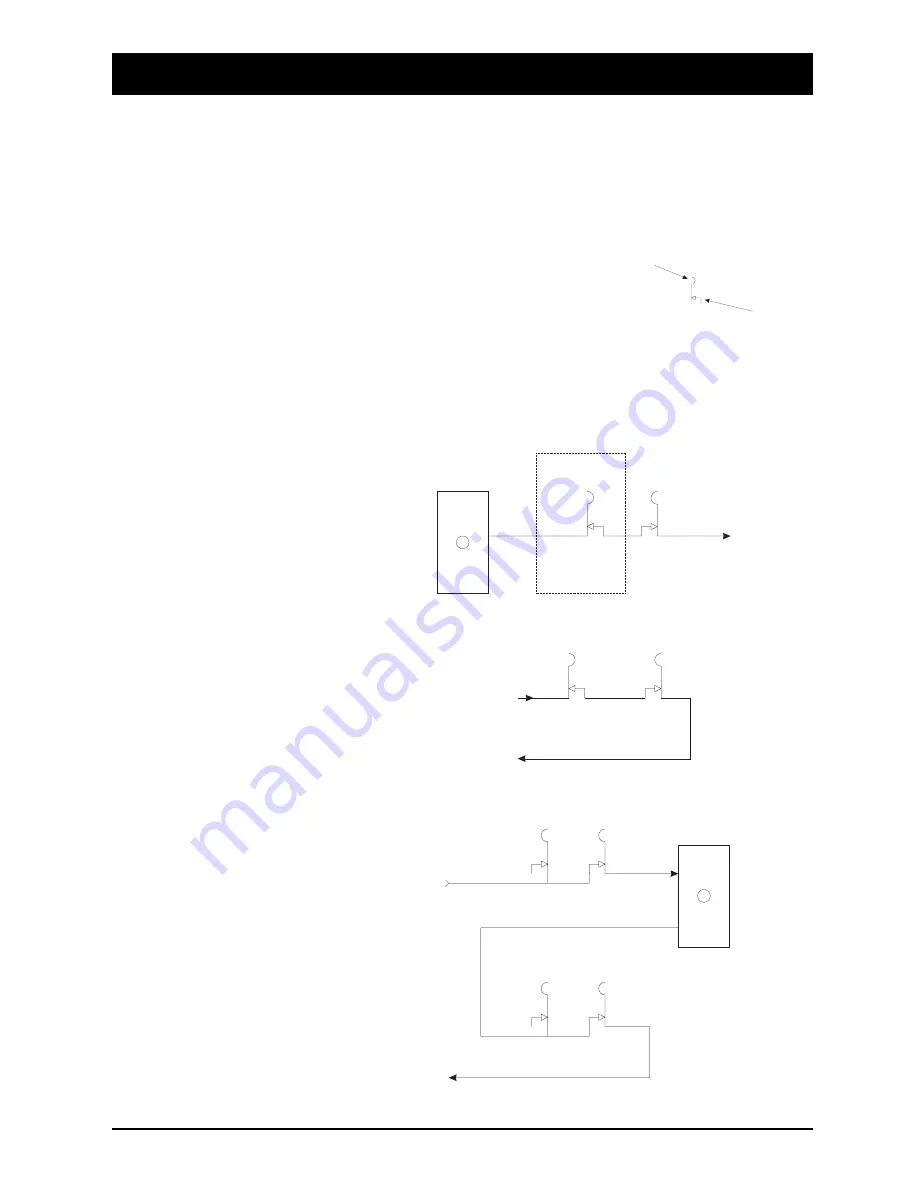
The following simplified diagrams show how the Bantam-type sockets are wired.
The complete list of EDAC plug connections is given in Chapter 2.

The diagram on the right shows the 
convention used in drawing the
sockets.

Line Inputs 1-24

Bantam-Type Socket

Break Contact

(Disconnects when plug is inserted)

Non-break Contact

(Makes contact with inserted plug)

Tape Send
EDAC N

From Channel
Output n

To Monitor
Input n

CH OUT

n

TP RET

n

TP SND

n

MON IN

n

Line Inputs
EDAC

To Line

Input n

on console

Line Input n
Normalling

Line-normalling

Patchcard,

located just above

the tie lines

LINE IN

n

To Insert

Return Amp.

From Insert

Send Amp.

INS SND

n

INS RET

n

Input Channel 1-24

n

DC2020 Patchbay

4.41

Summary of Contents for DC 2020

Page 1: ...SOUNDCRAFT USER GUIDE...

Page 2: ...his manual may be reproduced stored in a retrieval system or transmitted in any form or by any means electronic electrical mechanical optical chemical including photocopying and recording for any purp...

Page 3: ...g the MAC or PC Emulation Software 2 10 Patchbay EDAC Pin Identification Chart and Pinouts 2 11 Block Diagrams 3 1 Functional Descriptions 4 1 Mono Inputs 4 3 Mono Input 4 4 Group Stereo Input 4 11 Gr...

Page 4: ...4 62 Alphanumeric Keypad 4 64 Channel List 4 65 Channel Solo In Place Safe 4 66 Default Mode On Stop 4 67 Default Settings 4 68 Edit Midi Events 4 69 Glideback 4 70 Group Assignments 4 71 Meterbridge...

Page 5: ...111 Automated Mixing 4 113 Starting The Automation 4 114 Automated Mixing 4 115 Cue Points 4 116 Automated Fader and Switch Modes 4 117 Using Control Groups 4 120 Moving the Tape 4 122 Mixing a New Ti...

Page 6: ...iv DC2020...

Page 7: ...Introduction DC2020 Introduction 1 1...

Page 8: ...ctions Tape Machine transport functions A 4 band semi parametric EQ which is splittable and switchable between chan nel and monitor paths Four Stereo Returns with a 2 band EQ Four Stereo Groups Four A...

Page 9: ...it away from the control room Good Housekeeping We strongly recommend that you take regular backups of your hard disk This is done by selecting the appropriate backup option from one of the following...

Page 10: ...craft and postage must be prepaid 4 This warranty shall only be available if a the Equipment has been properly installed in accordance with instructions con tained in Soundcraft s manual and b the End...

Page 11: ...Installation DC2020 Installation 2 1...

Page 12: ...kgs 88kgs 96kgs 176lbs 176lbs 194lbs 194lbs 212lbs 66 46 53 87 66 46 79 04 79 04 91 62 24 ch 24ch Patchbay 32ch 40ch 32ch Patchbay 40ch Patchbay 987 29mm 38 87 836 75mm 32 94 11 30 9 0 m m 4 48 2 1 2...

Page 13: ...Assembling The Console Stand DC2020 Installation 2 3...

Page 14: ...se At all times avoid applying excessive force to any knobs switches or connectors Power Supplies cables Always make sure that thepower supply unit PSU has been set to thesame voltage as the mains sup...

Page 15: ...able between 10dBu and 20dBu The maximum input level is 30dBu The main outputs of the console stereo mix groups wedge and mix and group insert sends are balanced at a nominal level of 4dBu with a maxi...

Page 16: ...rth reference for each piece of equipment B Install separate mains outlets for the audio equipment and feed these independently from any other equipment C Avoid locating mains distribution boxes near...

Page 17: ...ext page MICROPHONE INPUTS 1 4 A Gauge Stereo Jack Plug used as balanced input Line Inputs Stereo Inputs Tape Inputs 2 Trk Inputs Group Inserts and SMPTE Timecode In 1 4 A Gauge Stereo Jack Plug used...

Page 18: ...e the next page for details of the cable required Port 3 conforms to EIA RS 422A It is used to connect to Sony 9 pin connectors see Appendix A for details D Type Connectors BNC Connector DIN Connector...

Page 19: ...020 to either a MAC or a PC to provide touch screen emulation In either case you will need to make or obtain a suitable connecting lead The connections required are shown in the diagrams below DC2020...

Page 20: ...indows 1 Run Microsoft Windows 2 Run File Manager 3 Insert the floppy disk RX3026 into drive A 4 Using File Manager copy dcfw exe from drive A to your hard disk 5 While in File Manager drag the dcfw e...

Page 21: ...chbay EDAC Pin Identification Chart and Pinouts A KK NN D A CW DB F A CW DB F A CW DB F A CW DB F A CW DB F A CW DB F A KK NN D A KK NN D A KK NN D A KK NN D A KK NN D A KK NN D DC2020 Installation 2...

Page 22: ...TSND 5 X GND Y GND Z TSND 8 a TSND 5 b GND c TRET 8 d TRET 8 e GND f GND h GND j GND k TRET 4 l TRET 4 m GND n TSND 1 p TSND 4 r GND s GND t TSND 1 u TSND 4 v GND w GND x TRET 1 y TRET 1 z TRET 3 AA...

Page 23: ...D 13 X GND Y GND Z TSND 16 a TSND 13 b GND c TRET 16 d TRET 16 e GND f GND h GND j GND k TRET 12 l TRET 12 m GND n TSND 9 p TSND 12 r GND s GND t TSND 9 u TSND 12 v GND w GND x TRET 9 y TRET 9 Z TRET...

Page 24: ...21 X GND Y GND Z TSND 24 a TSND 21 b GND c TRET 24 d TRET 24 e GND f GND h GND j GND k TRET 20 l TRET 20 m GND n TSND 17 p TSND 20 r GND s GND t TSND 17 u TSND 20 v GND w GND x TRET 17 y TRET 17 z TRE...

Page 25: ...29 X GND Y GND Z TSND 32 a TSND 29 b GND c TRET 32 d TRET 32 e GND f GND h GND j GND k TRET 28 l TRET 28 m GND n TSND 25 p TSND 28 r GND s GND t TSND 25 u TSND 28 v GND w GND x TRET 25 y TRET 25 z TRE...

Page 26: ...V TSND 40 W TSND 37 X GND Y GND Z TSND 40 a TSND 37 b GND c TRET 40 d TRET 40 e GND f GND h GND j GND k TRET 36 l TRET 36 m GND n TSND 33 p TSND 36 r GND s GND t TSND 33 u TSND 36 v GND w GND x TRET...

Page 27: ...4 X GND Y GND Z STL 2 a STR 4 b GND c STR 2 d STR 2 e GND f GND h GND j GND k AUX 1 l AUX 1 m GND n FB 1 p AUX 2 r GND s GND t FB 1 u AUX 2 v GND w GND x FB 2 y FB 2 z AUX 3 AA AUX 3 BB GND CC SPHL D...

Page 28: ...GND Z 2TASL a 2TAR b GND c 2TASR d 2TASR e GND f GND h GND j GND k CRML l CRML m GND n SSPL p CRMR r GND s GND t SSPL u CRMR v GND w GND x SSPR y SSPR z 2TBL AA 2TBL BB GND CC ALTL DD 2TBR EE GND FF G...

Page 29: ...ND AT LINE18 AU LINE18 AV GND AW GND AX GND AY GND AZ GND BA GND BB GND BC GND BD GND BE GND BF GND BH GND BJ LINE7 BK LINE7 BL GND BM GND BN GND BP LINE19 BR LINE19 BS LINE8 BT LINE8 BU GND BV GND BW...

Page 30: ...AT T LINE18 AU T LINE18 AV GND AW GND AX GND AY GND AZ GND BA GND BB GND BC GND BD GND BE GND BF GND BH GND BJ T LINE7 BK T LINE7 BL GND BM GND BN GND BP T LINE19 BR T LINE19 BS T LINE8 BT T LINE8 BU...

Page 31: ...ND AT T LINE42 AU T LINE42 AV GND AW GND AX GND AY GND AZ GND BA GND BB GND BC GND BD GND BE GND BF GND BH GND BJ T LINE31 BK T LINE31 BL GND BM GND BN GND BP T LINE43 BR T LINE43 BS T LINE32 BT T LIN...

Page 32: ...ND AT T LINE66 AU T LINE66 AV GND AW GND AX GND AY GND AZ GND BA GND BB GND BC GND BD GND BE GND BF GND BH GND BJ T LINE55 BK T LINE55 BL GND BM GND BN GND BP T LINE67 BR T LINE67 BS T LINE56 BT T LIN...

Page 33: ...ND AT T LINE90 AU T LINE90 AV GND AW GND AX GND AY GND AZ GND BA GND BB GND BC GND BD GND BE GND BF GND BH GND BJ T LINE79 BK T LINE79 BL GND BM GND BN GND BP T LINE91 BR T LINE91 BS T LINE80 BT T LIN...

Page 34: ...T LINE114 AU T LINE114 AV GND AW GND AX GND AY GND AZ GND BA GND BB GND BC GND BD GND BE GND BF GND BH GND BJ T LINE103 BK T LINE103 BL GND BM GND BN GND BP T LINE115 BR T LINE115 BS T LINE104 BT T LI...

Page 35: ...Block Diagrams DC2020 Block Diagrams 3 1...

Page 36: ...Mono Input 3 2 DC2020 Block Diagrams...

Page 37: ...Stereo Input Groups DC2020 Block Diagrams 3 3...

Page 38: ...Aux Master 3 4 DC2020 Block Diagrams...

Page 39: ...Studio Foldback and Oscillator Talkback DC2020 Block Diagrams 3 5...

Page 40: ...Mix and Control Room Monitor 3 6 DC2020 Block Diagrams...

Page 41: ...Functional Descriptions DC2020 Functional Descriptions 4 1...

Page 42: ...4 2 DC2020 Functional Descriptions...

Page 43: ...Mono Inputs DC2020 Mono Inputs 4 3...

Page 44: ...cessible on the underside of the console between nominal levels of 4dBu and 10dBV 6 The Tape Return Trim control has a gain range of 10dB 7 The Monitor Source switch MON SRC selects either the Tape Re...

Page 45: ...N switch when the switch is depressed the HF LF EQ is placed in the Monitor signal path The second part is the HI MID LO MID EQ This consists of two bell response equalisers Each of these may be set o...

Page 46: ...ntrols the ON LED green the Arm LED amber and switches the signal from the Aux3 level control to the Aux3 bus The green ON LED glows when the channel s Aux3 signal is being fed to the Aux3 bus Foldbac...

Page 47: ...even numbered Groups carry the Right image The Group buses may be used to route the signal from one input channel to the tape send of a different channel 35 The stereo image may also be connected to...

Page 48: ...tor CUT switch is a soft switch i e this switch provides an input to the Automation The Automation in turn controls the Cut circuit and also the Monitor CUT and Arm LEDs 46 The SEL switch is a soft sw...

Page 49: ...The Solo System The Solo System works in two ways Solo In Solo mode the SIP LED on the Master Panel will be off the Solo switches on both the Channel and Monitor sections behave as Pre fade Listens i...

Page 50: ...see the Patchbay section of this chapter and the EDAC connector pin lists in chapter2 for details Line Input 3 pole Jack Tip Hot in phase signal Ring Cold out of phase signal Sleeve Ground Insert Tip...

Page 51: ...Group Stereo Input DC2020 Group Stereo Input 4 11...

Page 52: ...rmally feeds the MIXL and MIXR buses via the MIX switch the output of the Balance control is switched over to a pair of Group buses when the MIX switch is depressed the Group buses are identified on t...

Page 53: ...s controlled by the Automation in response to the soft CUT switch The adjacent LED illumi nated when the CUT is active The post cut signal is fed to its appropriate Group Return bus The eight Group Re...

Page 54: ...Inserts Tip Return Ring Send Sleeve Ground Group Outputs 3 pole Jack The Group outputs are ground compensated This provides a very effective way of optimising noise immunity without the complexity of...

Page 55: ...Auxiliary Master DC2020 Auxiliary Master 4 15...

Page 56: ...L AFL system 6 The CUT switch is a soft switch i e this switch provides an input to the Automation The Automation in turn controls the electronic Cut circuit which is post pot The Automation also cont...

Page 57: ...Patchbay Only Aux OUT 1 to AUX OUT 4 3 pole Jack The Aux outputs are ground compensated This provides a very effective way of optimising noise immunity without the complexity of balanced outputs Grou...

Page 58: ...4 18 DC2020 Auxiliary Master...

Page 59: ...Studio Outputs FB Masters DC2020 Studio Outputs FB Masters 4 19...

Page 60: ...is depressed then the FB1 signal is only sent to the Left channel whilst the FB2 signal is only sent to the Right channel 5 These signals are then passed through the STUDIO PHNS level control When th...

Page 61: ...he CH MON switch is also depressed Note The Foldback Master panel mixes the signals from all of the Input Modules and the Stereo Input Modules The relative level of each depends upon the setting of th...

Page 62: ...has an unbalanced input connect the ive cold signal to the ground at the destination not at the output of the console FB1 Tip Hot in phase signal Ring Cold ground sense Sleeve Ground FB2 Tip Hot in ph...

Page 63: ...Oscillator Talkback Panel DC2020 Oscillator Talkback Panel 4 23...

Page 64: ...lkback The Talkback system includes the Slate Oscillator the nominal frequency of the tape oscillator is 25Hz 6 The GAIN pot controls the amplification of the inbuilt mic Talkback Ampli fier 7 The inb...

Page 65: ...io Phones are attenuated by 20dB nominal and the talkback signal from the in built mic is added to the attenuated signal The Control room phones speakers signals are also attenuated by a nominal 20dB...

Page 66: ...4 26 DC2020 Oscillator Talkback Panel...

Page 67: ...Control Groups DC2020 Control Groups 4 27...

Page 68: ...assigned channels after they have been pressed Monitor 4 Pressing the SOLO switch will put all of the Monitors of theMono Inputs which are assigned to this particular Control Group into Solo mode the...

Page 69: ...edFaders and Switches are currently in unless the mode of an assigned channel has been changed independently There are separate LEDs for Faders and Switches The modes are indicated as follows RD WR Ma...

Page 70: ...4 30 DC2020 Control Groups...

Page 71: ...Stereo Master DC2020 Stereo Master 4 31...

Page 72: ...sole is in Solo In Place mode The SIP switch toggles the SIP mode on and off 2 The SOLO AFL LED indicates if any signal is Soloed either PFL or SIP or if any signal is AFL d 3 The SOLO PFL CLR switch...

Page 73: ...Mix on The WR Write and RD Read LEDs indicate which mode the selected switches are currently in The modes are indicated as follows RD WR Manual OFF OFF Read ON OFF Armed ON ON Write OFF ON 7 The FDR...

Page 74: ...ing Cold out of phase signal Sleeve Ground Mix Out Right 3 pole Jack Tip Hot in phase signal Ring Cold out of phase signal Sleeve Ground Mix Insert Left 3 pole Jack Tip Return Ring Send Sleeve Ground...

Page 75: ...Control room Phones and Speakers DC2020 Control room Phones and Speakers 4 35...

Page 76: ...olo PFL AFL signals It provides a cut and boost of 10dB Control room Source 2 The Control room source selection is controlled by the 2TA 2TB and MIX switches 3 The signal level available at the Phones...

Page 77: ...nity without the complexity of balanced outputs Ground compensated outputs cancel the effects of variation in ground potential between the mixer and other equipment which would otherwise show up as hu...

Page 78: ...4 38 DC2020 Control room Phones and Speakers...

Page 79: ...Patchbay DC2020 Patchbay 4 39...

Page 80: ...Patchbay Fascia pbface eps 4 40 DC2020 Patchbay...

Page 81: ...shows the convention used in drawing the sockets Line Inputs 1 24 Bantam Type Socket Break Contact Disconnects when plug is inserted Non break Contact Makes contact with inserted plug Tape Send EDAC...

Page 82: ...RET n TP SND n MON IN n To Line Input n Note Line Inputs 25 to 40 appear on their associated input patchcard only they do not have a normalling patchcard LINE IN n To Insert Return Amp From Insert Se...

Page 83: ...From Group Send Amp SND n RET Group Inserts From Group Output n GROUP OUTPUT n Group Outputs From SMPTE Sender To SMPTE Reader SMPTE OUT on back of console SMPTE IN on back of console SMPTE OUT on pat...

Page 84: ...uts STE IN on EDAC STEREO INPUTS n L or R To Stereo Input on Console Aux Output From Console AUX OUTPUT n AUX OUTPUT ON EDAC Aux Outputs Foldback Output From Console FOLDBACK O Ps n F B OUTPUT ON EDAC...

Page 85: ...DIO PHONES OUTPUT ON EDAC Studio Phones Outputs Studio Speakers Output From Console STUDIO SPEAKERS L or R STUDIO SPEAKERS OUTPUT ON EDAC Studio Speakers Outputs Mix and 2 Trk Outputs on EDAC From Mix...

Page 86: ...n Console 2 TRK A or B L or R 2 Track Returns C room Output From Console Alternative Speaker Output From Console C ROOM OUTPUT L or R ALT OUTPUT L or R CRM OUTPUT ON EDAC ALT OUTPUT ON EDAC Control Ro...

Page 87: ...Automation Guide DC2020 Automation Guide 4 47...

Page 88: ...4 48 DC2020 Automation Guide...

Page 89: ...Introduction DC2020 Introduction 4 49...

Page 90: ...consists of 76800 individual pixels arranged as 320 columns by 240 rows To the right of the Screen there is a small thumbwheel This adjusts the contrast of the screen for optimum viewing characteristi...

Page 91: ...selected then the tape will stop at the Cue point Note AUTOPLAY only operates when a locate button has been used If a cue point is selected via the touch screen the tape will move to the selected loc...

Page 92: ...ENABLE is selected tracks may be individually enabled by pressing the SEL switch located next to the fader Individual tracks on the tape machine may be record enabled by using the appropriate switche...

Page 93: ...snapshot you press and hold the STORE button and then press the MODE SNAP button To recall the snapshot you press the MODE SNAP button The GROUP ASSIGN button takes you to the GROUP ASSIGN page When t...

Page 94: ...4 54 DC2020 Introduction...

Page 95: ...Project Management DC2020 Project Management 4 55...

Page 96: ...alled later The directory system is accessed and displayed via the touch screen but as each screen page only shows one level of the system at a time it is not easy at first to visualise the structure...

Page 97: ...een which moves you upwards one more level to the User Page Press the Studio touch pad on the screen to take you up finally to the Studio Page which is the top level in the directory system The Studio...

Page 98: ...level down on the Directory system which is the Project page The Project page The Project page displays a list of all the Titles available in the currently selected Project and with a new console fro...

Page 99: ...Mix list is exited by selecting the required mix using the jog wheel or side arrows on the screen in the same way as for the other directory pages Selecting a mix returns you to the Mix page with the...

Page 100: ...4 60 DC2020 Project Management...

Page 101: ...The Automation Pages DC2020 The Automation Pages 4 61...

Page 102: ...is as follows The hierarchy is based on the directory structure of the disk drive The directory structure has a top level which holds Studio Information This directory contains other directories one...

Page 103: ...stem was powered down Note when the console is powered on for the first time the system creates a default path of USER0 PROJECT0 TITLE0 This allows you to begin mixing immediately When a page is selec...

Page 104: ...the wheel Special Keys Shift Press to make the next letter pressed an upper case letter or to select the symbols above the numbers Lck This is a letter shift lock Delete This deletes the character at...

Page 105: ...be entered against the Channel in question Touch pads Insert Pressing this inserts a new line into the Channel List Delete Pressing this deletes the current line in the Channel List Blank Channel Pres...

Page 106: ...s the Safe status of all of the Channels Clear all safe Pressing this clears the Safe status of all of the Channels Monitor SIP Safe Pressing this takes you to the Monitor SIP Safe page Stereo Inputs...

Page 107: ...e to Read or Armed as these are modes where the existing mix data will be played back This reduces the chance of accidentally overwriting a mix which is approaching perfection Global Status These Touc...

Page 108: ...e demands of the application The figure in the Fader Gain touch pad may be set to a value from 0 to 4095 The higher this figure is the faster the faders will move Values below 300 are not recommended...

Page 109: ...Event type selected To change the event type press the Event type field You will be presented with a list of options Touch Pads Test This transmits the currently displayed event This is useful for tes...

Page 110: ...imum is 99 1 8 9 16 17 24 25 32 These Touch pads are interactive with the range of channels which is being displayed They are used to change the range of inputs for which settings are displayed on the...

Page 111: ...n LED on the Mono Input will glow In addition the small square on the screen which represents the Monitor will be displayed in reverse video Touch pads Select Group 1 2 3 4 Pressing these allows you t...

Page 112: ...all PFLs are cleared the meters will switch back to Mix The STE GRP Meters may be switched to follow the Stereo Inputs or the Stereo Groups outputs by using the Stereo Inputs or the Groups Touch pads...

Page 113: ...into the existing list all the timecodes from the cue list The Midi Event associated with these timecodes will be No Events You may edit these if you wish Playback ON Playback OFF This toggles betwee...

Page 114: ...ws you to edit the timecode value of the Midi Event which is displayed in the Cursor Line Delete Event This deletes the Midi Event which is displayed in the Cursor Line Display Names Display Events To...

Page 115: ...DO Touch pads Title Config This takes you to the Title Configuration Page Project This takes you to the Project page Mix List This takes you to the Mix List page New Mix This prepares a new Mix number...

Page 116: ...ime information into the Cue which is on the Cursor Line You may also use the Jog Wheel to change the time information frame by frame Delete Cue This deletes the Cue which is in the Cursor Line Title...

Page 117: ...g this field whilst it is in the Cursor Line takes you to the Alphanumeric Keypad page Sample Rate Touching this field whilst it is in the Cursor Line takes you to the Alphanumeric Keypad page Client...

Page 118: ...s prints the Mix Information to the parallel port Track List This takes you to the Track List page Channel List This takes you to the Channel List page OK This returns you to the Mix List page 4 78 DC...

Page 119: ...e This takes you to the Mix page Display Date Size This toggles between displaying Name Number of the Mix and Date Time the Mix was saved plus its size in kBytes Edit Mix This takes you to the Alphanu...

Page 120: ...Delete Mix This deletes the Mix in the Cursor Line Title Utilities Pressing this takes you to the Title Utilities page 4 80 DC2020 The Automation Pages...

Page 121: ...s by using these Set all safe Pressing this sets the Safe status of all of the Monitors Clear all safe Pressing this clears the Safe status of all of the Monitors Channel SIP Safe Pressing this takes...

Page 122: ...tilities page Note When On line mixing you cannot scroll the timecode back once you have made a change to the mix i e once you have touched a fader which is in ARMED mode put a fader or switch into WR...

Page 123: ...and shows that presets are available Presets A preset stores the state of all the automated functions i e Monitor faders Monitor cuts Channel cuts Aux1 ON OFF Aux3 ON OFF Stereo cuts Group cuts It doe...

Page 124: ...Utilities page For instance someone working with film video could set up a preset to co incide with the start of each scene Press Pad Labelled PLAYBACK ON Screen will Change As Shown Below The list of...

Page 125: ...listed in sequential order prior to being played back against Timecode PLAYBACK ON Mode Playback ON Playback OFF This pad is used to toggle the playback mode When the pad is labelled PLAYBACK ON the p...

Page 126: ...t will be labelled Stored Preset and will be placed at the end of the list The new presets will also be ascribed the current timecode value which is displayed on the meterbridge Edit Name This will al...

Page 127: ...between Hours Minutes Seconds Frames Spinning the jog wheel either increments or decrements the timecode by a unit defined by the position of the symbol i e Hours Minutes Seconds or Frames Delete Pres...

Page 128: ...Preset e g 1 1 1 2 10 3 70 7 3rd Level Preset e g 1 1 1 1 2 3 10 5 6 If the user repeatedly inserts presets the maximum allowable will be 10 within each reference no i e 1 10 2 3 10 If there is room i...

Page 129: ...n page User This returns you to the User page Mix Page This takes you to the most recently used Mix Page The current content of the Cursor Line is irrelevant Protect Title This protects the Project in...

Page 130: ...list It will be in the form Title 0001 The actual number will be the next available one in sequence Delete Title This deletes the Title in the Cursor Line Project Utilities Pressing this takes you to...

Page 131: ...e that has been spent on the Project in question The fields show from left to right Days Hours Mins Secs The example on the screen above therefore shows 11 hours 18 mins and 25 seconds The elapsed tim...

Page 132: ...dy formatted and you will have the option to continue or not Copy Floppy This allows you to make a backup copy of a floppy disk You will be prompted to insert the Source disk or to cancel Assuming tha...

Page 133: ...l Numbered pads You may enable disable individual Channels by using these Enable All This enables every Channel Disable All This disables every Channel OK This returns you to the Mix page Note Record...

Page 134: ...ill swap over It may be helpful to think of the pad itself as representing the physical input strip and the number in it as representing the track number on the tape machine Reset Mappings This resets...

Page 135: ...he other one The numbers in the two pads in question will swap over It may be helpful to think of the pad itself as representing the physical input strip and the number in it as representing stored mo...

Page 136: ...imecode Generator This takes you to the Timecode Generator Page Solos This takes you to the Monitor Solo in place page You may also access the Channel Solo in place page and the Group Stereo Safe page...

Page 137: ...ut safe Set all Pressing this sets the Safe status of all four Stereo Inputs Clear all Pressing this clears the Safe status of all four Stereo Inputs Channel SIP Safe Pressing this takes you to the Ch...

Page 138: ...tches which are in Write mode will have their settings at which they happen to be when the tape machine is stopped overwritten to the end of the Mix The touch pad field automatically cancels to OFF af...

Page 139: ...x Page Pressing this takes you to the most recently used Mix Page Protect User Pressing this protects the User from being deleted A P on the right hand side of the Cursor Line indicates that protectio...

Page 140: ...n this is in the Cursor Line and you press the Cursor Line the Tape Machine Select panel is presented Time The current Time is displayed and may be edited Date The current Date is displayed and may be...

Page 141: ...e You will be warned if the disk is already formatted and you will have the option to continue or not Copy Floppy This allows you to make a backup copy of a floppy disk You will be prompted to insert...

Page 142: ...ppears as follows Touch pads The Touch pads allow you to define which switches will be selected when the Tape Machine stops Global Modes Pressing this takes you to the Default Mode On Stop page Exit T...

Page 143: ...s which you may scroll through Touching the cursor line will then insert the machine displayed in the cursor lineinto thetouch pad in question on the Tape Machine Selection page This procedure may be...

Page 144: ...tor Frame Rate This allows you to change the frame rate of the timecode which will be generated when you press Run Start This is the start time of the generator Press this pad to edit the value with t...

Page 145: ...Locate Post roll time You may also use the Jog Wheel to change the time information frame by frame If AUTO RETURN is selected on the Control Panel the tape machine will play the tape to the position...

Page 146: ...Control Panel will automatically go into Review Mode this is indicated by the PREVIEW LED flashing The Review function will then play the tape between the Drop in minus Drop in pre roll and the Drop...

Page 147: ...y This allows you to make a backup copy of a floppy disk You will be prompted to insert the Source disk or to cancel Assuming that you insert a source disk and press Continue the contents of the disk...

Page 148: ...be entered against the Track in question Touch pads Insert Pressing this inserts a new line into the Track List Delete Pressing this deletes the current line in the Track List Blank Channel Pressing...

Page 149: ...being deleted A P on the right hand side of the Cursor Line indicates that protection is in place A indicates that a Title or Mix in that project is protected and therefore the Project cannot be dele...

Page 150: ...rrently saved in any of the titles in the User directory Password This field is used to enter a User password If this is done the User s Projects Titles and Mixes will not be usable without entering t...

Page 151: ...ted and you will have the option to continue or not Copy Floppy This allows you to make a backup copy of a floppy disk You will be prompted to insert the Source disk or to cancel Assuming that you ins...

Page 152: ...4 112 DC2020 The Automation Pages...

Page 153: ...Automated Mixing DC2020 Automated Mixing 4 113...

Page 154: ...from the floppy disk into RAM and will then run it If you hold down the Setup button within approximately 5 seconds of power on the program will also becopied to the hard disk and the previous versio...

Page 155: ...rol Panel the amber LED next to the button will glow to indicate that Automated Mixing is on At this point you have the choice of starting a new mix pass or of editing an existing one if any exist at...

Page 156: ...ed from a position before the start of verse 1 Now suppose that you wanted to start again with a new mix mix 2 This time you run the whole tape and put in more Cue Points and edit one of the old ones...

Page 157: ...indicated as follows RD WR Manual OFF OFF Read ON OFF Armed ON ON Write OFF ON When timecode is running and mixing is selected it is not possible to change mode to Manual The Faders are touch sensiti...

Page 158: ...diagram shows the effect of moving a fader which is in armed mode The top trace shows the Fader s movement during the first Mix The second trace shows what happens if the Fader is in Armed mode during...

Page 159: ...econd change is more difficult because you are moving the event backwards in time i e later If the switch were to remain in Armed mode the old transition would still be replayed all you could do would...

Page 160: ...switches on individual Mono Inputs However any subsequent changes made from theControl Group switcheswill over rideindividual changes The WR Write and RD Read LEDs indicate which mode the Fader and S...

Page 161: ...Example 3 Suppose again that you put the Control Group s fader back to the 0dB position Also suppose that the Mono Input Monitor fader is in Write or Armed mode and that you move it individually to sa...

Page 162: ...then touching the Cursor Line The four Cue Point Markers may also be used The markers are LOCATE0 LOCATE1 Drop In and Drop Out These are assigned by locating the required Cue Point in the Cursor Line...

Page 163: ...en to the mix pass Note that as soon as you press PLAY the ABORT LED will start to flash this indicates than new fader switch data is being stored If you wish to discard this Mix Pass press the ABORT...

Page 164: ...s when the tape stops Do the first run through New Mix Pass 01 The first new mix pass Run mix1 and do changes Untitled Mix Pass 02 The edited version of 01 Run mix2 and do changes Untitled Mix Pass 03...

Page 165: ...x number remember that the next Mix Number is only assigned when the tape stops at the end of a Mix Pass After positioning the tape to the correct place press Start You will then have a New Mix Pass w...

Page 166: ...selection It is deselected by pressing the RECORD ENABLE button again The Drop n and Drop Out points become active when RECORD ENABLE is selected i e the enabled tracks on the tape machine will drop...

Page 167: ...n Preview mode When you want to record press Record Enable on the next pass the Armed tracks will drop in to record at the Drop in point After recording the final pass will automatically switch to Rev...

Page 168: ...4 128 DC2020 Automated Mixing...

Page 169: ...Specifications DC2020 Specifications 5 1...

Page 170: ...nput unity gain Greater than 55dB Crosstalk All measurements at 1kHz Input Channel Muting Greater than 95dB Input Channel Fader isolation Greater than 70dB Mix Routing isolation Greater than 90dB Grou...

Page 171: ...Control Room Outputs 21dBu into 600 ohms Headphone Output 20dBu into 600 ohms 50mW into 8 ohms Input Output Levels Mic Input Sensitivity XLR 10dBu to 60dBu Line Input Sensitivity 1 4 jack 10dBu to 40...

Page 172: ...5 4 DC2020 Specifications...

Page 173: ...Notes For Machine Control for Software Release 7 05 DC2020 Appendix A A 1...

Page 174: ...achine Control MTC Midi Machine Control LTC S M P T E MMC Open Loop MTC LTC Timecode Master LTC LTC Timecode Slave LTC Akai DR4 LTC MTC Alesis ADAT AI 2 Alesis BRC MTC Sony 9 Pin Compatible Machines w...

Page 175: ...machine should support tally messages i e feedback from the tape machine of its status If this is not provided the console tries to interpret any timecode being sent to produce these tally messages i...

Page 176: ...sole MIDI machine control MTC This allows the DC2020 to work with a tape machine which can be controlled using the generic MIDI Machine Control MMC protocol and which also sends the timecode as MIDI T...

Page 177: ...ut of the Tape Machine Connect MIDI cables from the Tape Machine MIDI Controller to the DC2020 MIDI IN Other Notes Closed loop system required LTC timecode Slave The Automation slaves to incoming SMPT...

Page 178: ...face Board optional Transport Controls All supported except record Locate To Timecode Supported Record Enable Rehearse Not supported by the DR4 Jog Shuttle Not supported by the DR4 Setup Notes See the...

Page 179: ...arameters should be set up on the AI 2 Menus Menu Submenu Option Control Mode Auto MIDI MTC ON REFERENCE Input IntFix REFERENCE GEN Play Wind REFERENCE GEN STILL ON The following diagram shows how to...

Page 180: ...the MIDI UTIL button on the BRC to select page 1 on the LCD display 1 MIDI Echo OFF Use the keys to select option to OFF Select page 8 8 Output Rew FF SMPTE MTC ON Use the keys to select option to ON...

Page 181: ...panel of the G24 to set up the parameters on the synchroniser card Hold down RCL while held down press STO Type 60 use to change to SIO MIDI Press STO Hold down RCL while held down press STO Type 63...

Page 182: ...ed Record Enable Rehearse Supported Possible problem with old Fostex exclusive messages on machines earlier than rom revision 1 4 Jog Shuttle Not supported by Fostex R series machines Setup Notes Reme...

Page 183: ...ata Using the Remote Local Button select both modes RED and GREEN LED on Press Home button to access the main menu Using the Next button select main menu 3 Press F3 to select TCFrame If the Tape is st...

Page 184: ...ollowing pages will appear on the Touch screen Note to access these psges you must exit SETUP and then access RECORD ENABLE via the TITLE CONFIG page Record Track Enable This Machine Has No Record Tra...

Page 185: ...te text in a black pad The Insert and Assemble touch pads are mutually exclusive and they may both be off ATR Record Enable Disable all OK Insert Audio CH 1 Audio CH 2 Audio Tracks Assemble Timecode V...

Page 186: ...ble Transport Controls Supported Locate to Timecode Supported Record Enable Rehearse Not supported by DC2020 Jog Shuttle Supported Setup Notes The Sony 9p machine must be set to remote 9 pin remote SM...

Page 187: ...figuration the DC2020 sends all transport command to the Sony video machine but sends record command and the track record enables to the Tascam DA 88 Additional Hardware Required SY 88 Card fitted to...

Page 188: ...pes must be formatted before use this puts ABS time onto the tape You may set the DA 88 to output timecode using the ABS time or you may put a timecode signal on the tape in addition to the ABS time a...

Page 189: ...this puts ABS time onto the tape SY 88 Switch S1 2 MIDI 9 PIN set to MIDI 0 You may set the DA 88 to output timecode using the ABS time or you may put a timecode signal on the tape in addition to the...

Page 190: ...ch S1 2 MIDI 9 PIN set to 9 PIN 1 You may set the DA 88 to output timecode using the ABS time or you may put a timecode signal on the tape in addition to the ABS time and use that instead Care must be...

Reviews: