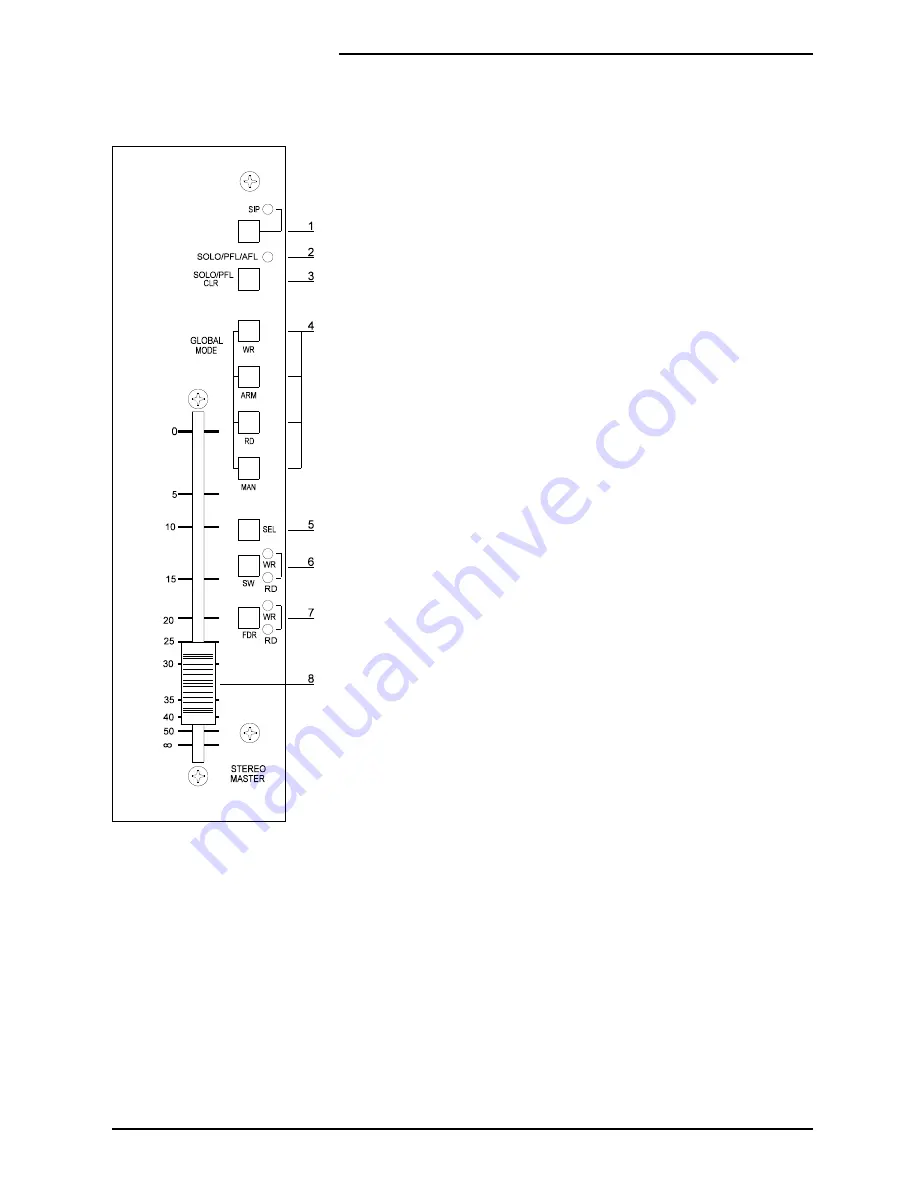
Press and hold the SEL switch on the Stereo Master panel, then press whichever
Cut switches on the panels listed above which you wish to select. The amber LED
associated with each selected CUT switch will illuminate to indicate that the switch
is selected.
To de-select a switch, press and hold SEL on the Master panel and press the CUT
switch which you want to de-select. Its amber LED will go out.
6
The SW switch controls the mode of those switches, on the master panel, which
have been selected by the SEL switch.
Pressing the SW switch causes the mode to be cycled through in the following
sequence: Manual, Read, Armed and Write. Note that Manual Mode is not available
whilst the Tape is running with Mix on.
The WR (Write) and RD (Read) LEDs indicate which mode the selected switches
are currently in. The modes are indicated as follows:
RD
WR
Manual:
OFF
OFF
Read:
ON
OFF
Armed:
ON
ON
Write:
OFF
ON
7
The FDR switch controls the mode of the Master Fader.
Pressing the FDR switch causes the mode to be cycled through in the following
sequence: Manual, Read, Armed and Write. Note that Manual Mode is not available
whilst the Tape is running with Mix on.
The WR (Write) and RD (Read) LEDs indicate which mode the Master Fader is
currently in. The modes are indicated as follows:
RD
WR
Manual:
OFF
OFF
Read:
ON
OFF
Armed:
ON
ON
Write:
OFF
ON
Fader
8
The automated Master Fader controls the level of the main mix outputs.
Meters
The Meters can be switched, via the Meterbridge Set-up Page, to follow the Main
Mix or the Control-room outputs. Its current setting is indicated by the MIX and
C/RM LEDs
DC2020 Stereo Master
4.33
Summary of Contents for DC 2020
Page 1: ...SOUNDCRAFT USER GUIDE...
Page 6: ...iv DC2020...
Page 7: ...Introduction DC2020 Introduction 1 1...
Page 11: ...Installation DC2020 Installation 2 1...
Page 13: ...Assembling The Console Stand DC2020 Installation 2 3...
Page 35: ...Block Diagrams DC2020 Block Diagrams 3 1...
Page 36: ...Mono Input 3 2 DC2020 Block Diagrams...
Page 37: ...Stereo Input Groups DC2020 Block Diagrams 3 3...
Page 38: ...Aux Master 3 4 DC2020 Block Diagrams...
Page 39: ...Studio Foldback and Oscillator Talkback DC2020 Block Diagrams 3 5...
Page 40: ...Mix and Control Room Monitor 3 6 DC2020 Block Diagrams...
Page 41: ...Functional Descriptions DC2020 Functional Descriptions 4 1...
Page 42: ...4 2 DC2020 Functional Descriptions...
Page 43: ...Mono Inputs DC2020 Mono Inputs 4 3...
Page 51: ...Group Stereo Input DC2020 Group Stereo Input 4 11...
Page 55: ...Auxiliary Master DC2020 Auxiliary Master 4 15...
Page 58: ...4 18 DC2020 Auxiliary Master...
Page 59: ...Studio Outputs FB Masters DC2020 Studio Outputs FB Masters 4 19...
Page 63: ...Oscillator Talkback Panel DC2020 Oscillator Talkback Panel 4 23...
Page 66: ...4 26 DC2020 Oscillator Talkback Panel...
Page 67: ...Control Groups DC2020 Control Groups 4 27...
Page 70: ...4 30 DC2020 Control Groups...
Page 71: ...Stereo Master DC2020 Stereo Master 4 31...
Page 75: ...Control room Phones and Speakers DC2020 Control room Phones and Speakers 4 35...
Page 78: ...4 38 DC2020 Control room Phones and Speakers...
Page 79: ...Patchbay DC2020 Patchbay 4 39...
Page 80: ...Patchbay Fascia pbface eps 4 40 DC2020 Patchbay...
Page 87: ...Automation Guide DC2020 Automation Guide 4 47...
Page 88: ...4 48 DC2020 Automation Guide...
Page 89: ...Introduction DC2020 Introduction 4 49...
Page 94: ...4 54 DC2020 Introduction...
Page 95: ...Project Management DC2020 Project Management 4 55...
Page 100: ...4 60 DC2020 Project Management...
Page 101: ...The Automation Pages DC2020 The Automation Pages 4 61...
Page 152: ...4 112 DC2020 The Automation Pages...
Page 153: ...Automated Mixing DC2020 Automated Mixing 4 113...
Page 168: ...4 128 DC2020 Automated Mixing...
Page 169: ...Specifications DC2020 Specifications 5 1...
Page 172: ...5 4 DC2020 Specifications...
Page 173: ...Notes For Machine Control for Software Release 7 05 DC2020 Appendix A A 1...


