


42
007-4382-002
3: Using TPM
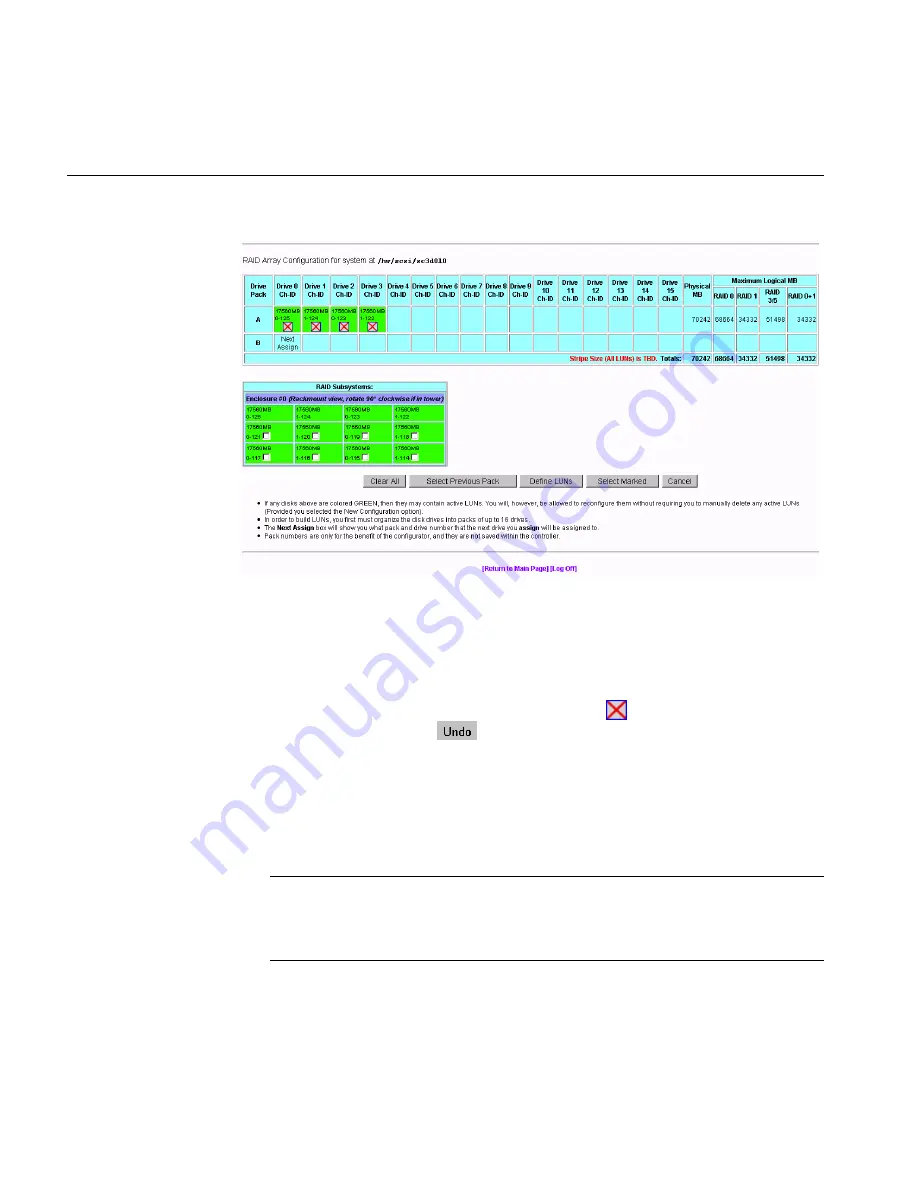
Figure 3-8
Drives Assigned Into Pack A (7.01 and Later Firmware)
Figure 3-7 and Figure 3-8 show that four drives have been assigned into drive pack
A, which could become a RAID set. Every time a set of drives is assigned, the table
cell labeled
Next Assign
moves to the next row down, where a new drive pack can
be created.
2. To remove a drive from a pack, click the undo box
(for 7.01 and later firmware)
or click the
Undo
button
(for 6.14 firmware), and the remaining drives in the
pack shift to the left, while the removed drive reappears with a cleared checkbox in
the RAID Subsystem table. Use the
Select Previous Pack
button to reconfigure the
drive arrangement in an earlier drive pack.
Nothing is saved for several more screens, and you may cancel at any time by
pressing the
Cancel
button. Use the
Clear All
button to deassign all drives from the
drive packs.
Note:
You do not have to allocate all the drives to packs (or LUNs). If you choose not
to configure certain drives, they may be used at any time when you click
Add
LUN(s)
or
Expand LUN
(see Figure 3-5), if the characteristics of the LUN qualify for
expansion.
Summary of Contents for TP9100
Page 1: ...TPM Installation Instructions and User s Guide for TP9100 007 4382 002 ...
Page 4: ......
Page 8: ......
Page 14: ......
Page 60: ...44 007 4382 002 3 Using TPM Figure 3 10 All Drive Packs Created 7 01 and Later Firmware ...
Page 65: ...Configuration Functions 007 4382 002 49 Figure 3 15 All LUNs Defined 6 14 Firmware ...
Page 87: ...Configuration Functions 007 4382 002 71 Figure 3 40 Initialization Progress 6 14 Firmware ...
Page 164: ......
Page 176: ......
Page 182: ......


