


160
SICAM Q80 7KG8080
Power Quality Recorder SICAM Q80 7KG8080, System manual
E50417-H1076-C420-A2, Release 12.01.2015
The division of the dialog also reflects the basic structure of an ASCII-file.
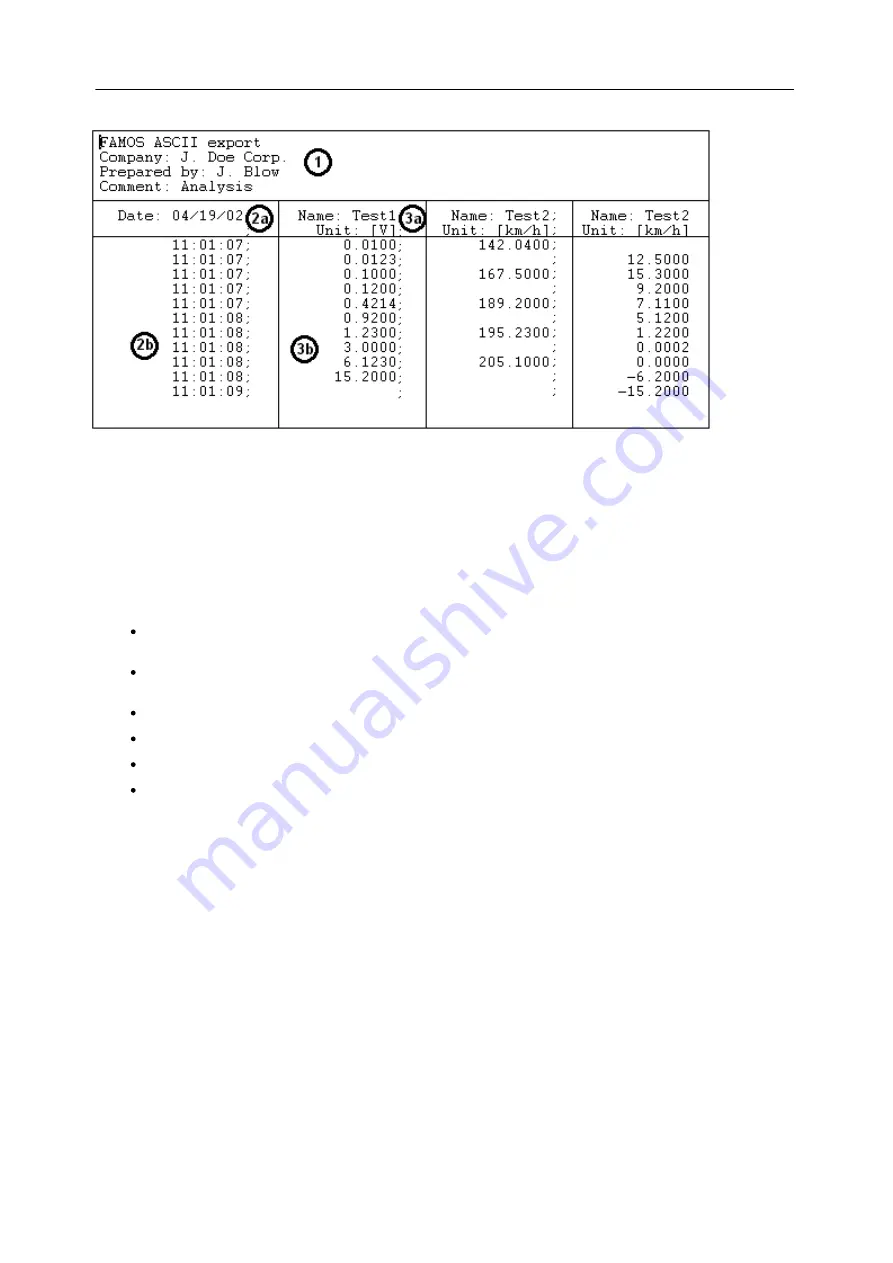
Example of an ASCII-file with 2 data sets
In general, it consists of a file header [1], which can contain a permanent text and/or general information. Next, the
data set readings follow in adjacent columns [2], [3]. Each column, in turn, can have its own column header [2a], [3a],
which can feature indications of the column contents, such as channel name, sampling rate, comments or similar
things. Below the column header, the actual numerical values appear [2b], [3b]. The individual columns are separated
by a defined separator; in this example, by a semicolon.
There is also a distinction between scaling columns [2] and readings columns [3]. A scaling column returns the scaling
(e.g. the time axis) for all readings columns to its right. In the case of multi-column files, one scaling column at left can
be valid for all subsequent readings columns, or each data set can come with its own scaling column, as illustrated in
the example.
This basic structure determines what specifications are necessary for describing such a format.
The index card
"General"
covers global settings such as column separators and the decimal character to
use with numbers, along with export template specifications.
The index card
"Data"
describes the structure of a readings column, including column header, column width
and numerical format.
Analogously, the index card
"Scaling"
controls the arrangement and format of the scaling column(s).
The index card
"File header"
defines the introductory text at the beginning of a file.
Under
"Miscellaneous"
, further options mainly affecting only special data types can be found.
"Preview"
enables you to see in advance how the format as currently defined is applied to sample data sets.
Once you have made all settings necessary, you can save the export template definitions to a file by hitting the
"Save"
button.
This file is stored in the default definitions folder. It bears the export template's name, plus the extension "
.aet
". If the
"Save file"-dialog is opened, the definitions folder is searched and all export templates found are added to the format
selection list.
The button
"Close"
exits the dialog. If you have made changes previously, a prompt appears asking you to confirm
that the template changes are to be saved.