background image

User Manual 


                36 


The supported media for the copying function is as below. 

Manufacturer Manufacturer 

Imation(Exhortation 16X) 

Imation(Exhortation 16X) 

Sony(Exhortation 16X) 

Sony(Exhortation 16X) 

Mitsubishi(Exhortation 16X) 

Mitsubishi(Exhortation 16X) 

DVD-R 

TDK(Exhortation 16X) 

CD-R 

TDK(Exhortation 16X) 


5.3.2 RE4 


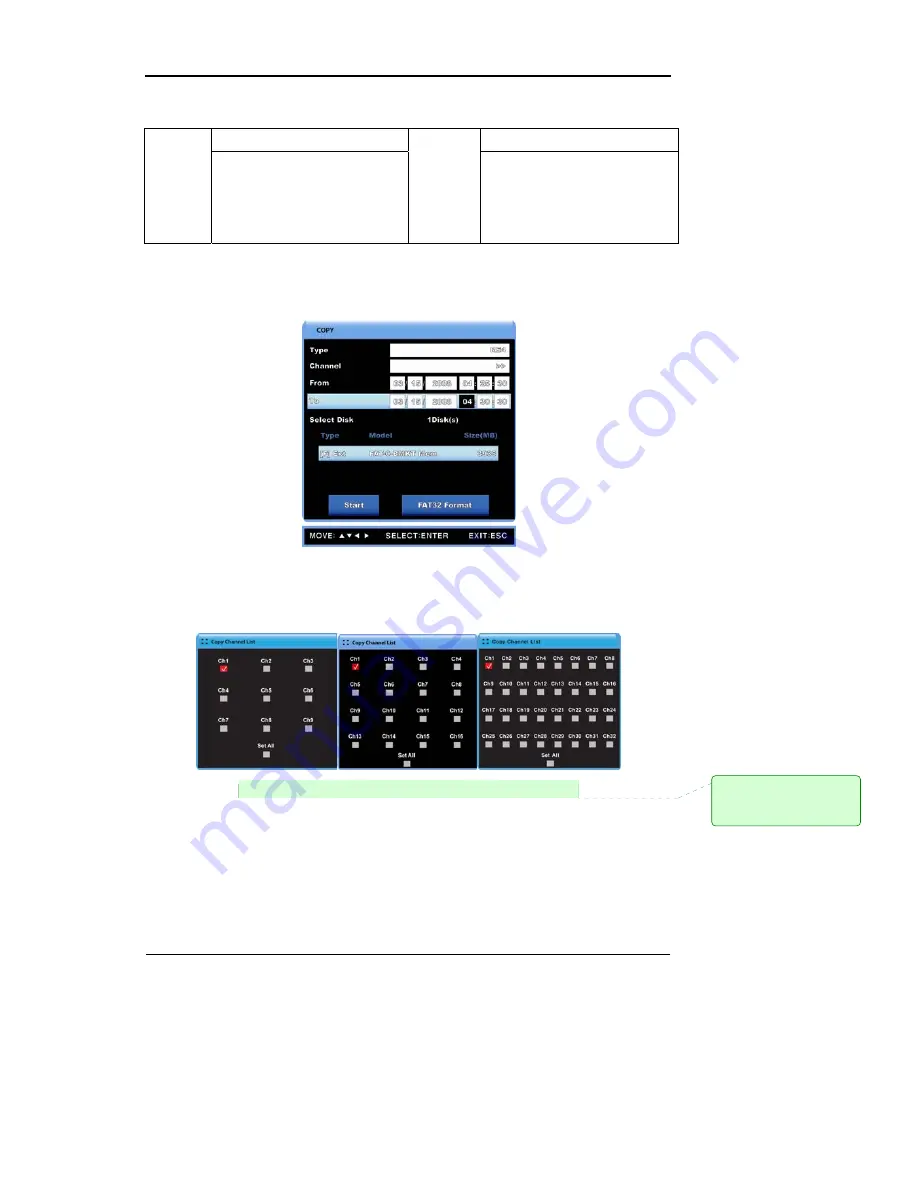
The recorded data can be copied to HDDs and USB memory sticks. The copied data can be 

accessed with Mini-Players and Network Mangers. Select the channel and press [ENTER] or 

left-click to prompt a channel list as shown below.   


[SVR-960/945]      [SVR-1680/1660/1645]     [SVR-3200] 

Type 

: Select the RE4 using the up/down buttons or the mouse wheel. 

Channel List 

: To pop up the channel list, press [ENTER] on or left-click the window 

background. 

Selecting 

Channel 

: Select one or all 16 channels. Once the entry has been selected, use 

the up/down buttons or the mouse wheel to adjust. 

From 

: Input the beginning date and time of the recording. Use the up/down 

메모

 [kdh1]: 

국문에


따라


이미지


추가


필요


Summary of Contents for SVR-1680

Page 1: ...User Manual 0 ...

Page 2: ...this product and does not delegate any right to a third party to take any responsibility on its behalf Product warranty does not cover cases of accidents negligence alteration misuse or abuse In addition no warranty is offered for any attachments or parts not supplied by the manufacturer The warranty period for this product will be for 2 years from the date of purchase The following cases are not ...

Page 3: ...roduct and an amateur installation might cause fire electric shock and defect All installation operations should be performed by the agency you purchased this product from This manual is authored SVR 1680 SVR 1660 according to firmware version 1 0 8 SVR 1645 SVR 960 SVR 945 according to firmware version 1 1 4 Content of this manual can differ by Firmware or Software upgrade and standard and appear...

Page 4: ...u 18 3 5 Factory setting 18 Chapter 4 Monitoring 24 4 1 Main Screen 24 4 2 Single image in full screen 24 4 3 Multi Screen 24 4 4 User Sequence 24 4 4 1 Basic System Mode 25 4 4 2 User Sequence Mode 25 4 5 Event Screen 26 4 6 Screen Zoom 27 4 7 Pause Live screen 27 4 8 PTZ Control 27 4 8 1 Pan Tilt 28 4 8 2 Zoom Focus 28 4 8 3 Load Preset 29 4 8 4 Save Preset 29 4 8 5 Auxiliary On 29 4 8 6 Auxilia...

Page 5: ...etup 39 6 2 System Time Setup 39 6 2 1 Configuring System Time 40 6 3 Camera Setup 41 6 3 1 Configuring Camera Setup 42 6 4 Quick Recording Setup Quick Setup 43 6 4 1 Configuring Quick Recording Setup 44 6 5 Recording Schedule Setup 44 6 5 1 All Channels 45 6 5 2 Individual Channels 45 6 6 Configuring Event Recording 46 6 6 1 Event Source Setup 46 6 6 2 Configuring Event Recording for All Channels...

Page 6: ...dule 72 6 10 5 Special Time 73 6 11 Exit 74 Chapter 7 Web Viewer 76 7 1 System Requirements 76 7 2 LOGIN 76 7 3 Connection User setup 77 7 4 Supported Browser 78 7 5 Monitor 78 7 5 1 Screen Partition Image Movement 78 7 5 2 Moving Playback 79 7 5 3 Channel On Off 79 7 5 4 Sensor indication 80 7 5 5 Relay operation 80 7 5 6 Microphone use 80 7 5 7 Event Data 81 7 5 8 Video Recording Video Storage 8...

Page 7: ...e Recording 84 7 6 3 Print 84 7 6 4 Move to Web Monitor 84 7 6 5 Channel On Off 85 7 6 6 Recording Duration Recording Size Check 85 7 6 7 Calendar Search 85 7 6 8 Playback Toolbar 85 Trouble Shooting 87 Compatible HDD List 89 Compatible Media List 89 Specification 89 Dimensions 93 ...

Page 8: ...ts on the product Doing so may cause a malfunction 9 Do not use in areas where inflammable substances such as propane gas or gasoline or high amount of dust is present Doing so may cause an explosion or fire 9 Do not touch the power line with a wet hand Doing so may cause an electric shock 9 Do not insert a hand into the opening of the DVD Doing so may cause an injury 9 Make sure conductive materi...

Page 9: ...During use 9 Make sure the product is not exposed to concussions or shaking during usage or movement 9 Do not move throw or expose to excessive physical concussion during usage 9 Installing additional unapproved hard disk drives may result in abnormal operation Inquire at the agency of purchase before installing additional hard disk drives 9 Product warranty will not cover malfunctions due to addi...

Page 10: ...is product should not be disposed of with other household waste at the end of their working life Where marked the chemical symbols Hg Cd or Pb indicate that the battery contains mercury cadmium or lead above the reference levels in EC Directive 2006 66 If batteries are not properly disposed of these substances can cause harm to human health or the environment To protect natural resources and to pr...

Page 11: ... digital video recording and playback device to record image and video input from 32 16 9 channels to its built in hard disk The buttons on the front of the unit as well as the mouse and GUI allow easy setup and operation The Samsung SVR series of digital video recorders DVRs provide additional safety and security to banks apartment buildings and complexes government offices as well as other publi...

Page 12: ...ting recording sequence up to five seconds prior to an event Also the COVERT feature concealment of visual data is implemented to protect the user s privacy High quality real time MPEG 4 recording Three screen resolution levels for improved control over data size Multi recording function for manual and schedule events Simultaneous recording playback backup networking operation capacity Easily acce...

Page 13: ... Shuttle Full frame playback available in SVR 3200 1680 1660 only Data Storage A hard disk is included in the product for the purpose of data storage If the user desires the recorded data can be stored to DVD R CD R or USB A built in hard disk has been provided as a basic supply item Multiple portable data storage media are supported DVD R CD R and USB Refer to the appendix on the back of the manu...

Page 14: ... search and playback scheduling functions Support 10 100Mbps Ethernet xDSL Multiple DVR connection Others User friendly GUI and mouse interface Simplified firmware upgrades with USB Visual data recording and backup to USB Supports PTZ control SPEED DOME and PRESET function Multilingual support Korean English Italian Spanish Japanese etc Single remote controller to control 16 DVRs Chapter 3 Product...

Page 15: ...he menu and adjust the playback speed and direction Shuttle controls PTZ The SVR 960 945 does not support Jog Shuttle REC lamp Lit when recording HDD lamp Lit when HDD is working NETWORK lamp Lit when network is connected EVENT lamp Lit when an event is detected COPY lamp Indicates copying operation 4 PLAY lamp Lit when copying 5 Power button Turns on or off the device 6 REC button Starts or stops...

Page 16: ...on The Escape button navigates up the menu tree and closes dialog windows 17 PLAY ENTER Start playback or select an item on the menu 18 REW Navigates or selects in the menu or for playback changes the reverse playback speed 19 FFW Navigates or selects in the menu or for playback changes the forward playback speed 20 PAUSE Navigates or selects in the menu or for playback pauses live or recorded vid...

Page 17: ...DIO IN RCA RCA audio jack for RCA input 6 AUDIO OUT Audio jack for speaker output 7 GROUND Ground terminal between DVR and external device 8 ETHERNET Ethernet port for network connections RJ 45 9 STORAGE External storage connection port Function not supported in the current version Only available in the SVR 3200 1680 1660 models 10 eSATA Connection terminal for external eSATA HDD or HDD for backup...

Page 18: ...ENSOR IN Connection terminal for sensor input 16 AUDIO IN D SUB Connection terminal for audio output D SUB 17 D I O Connection terminal for DIGITAL IN OUT Refer to detailed description for installation use from Install Manual 3 3 OSD MENU structure The menu structure is as shown below For detailed instructions for configuration please refer to Chapter 4 5 and 6 ...

Page 19: ...the function menu can be executed in full screen mode The function menu structure is as shown below 3 5 Factory setting To restore factory setting go to System System Restore Factory Setting A pop up window saying Warning The system will be reset Continue with restoring factory default will appear Select Yes and press Enter to restore factory default Factory Default Quick Setup Schedule Recording ...

Page 20: ... Idle Time 5 PTZ Port None Screen Address 0 Monitor Number Main Monitor Monitor 1 Switch to Event Screen Off Covert Channel All Uncheck User Sequence All Not Set SEQ Dwell Time 5 sec Multi Mode 4E Ch 1 3 5 7 VGA Mode 800x600 56Hz Monitor Info Level Uncheck remote controller ID Record Setup Audio Channel Ch 1 Recording Off Gain 0 Sync Video Channel Ch 1 Audio Mix Mix On Record Record No Video Off M...

Page 21: ...olution CIF Special Time No Rec Schedule Event Recording Off Channel Number Type Sensor Off MD Off Text Off Macro Standard Speed 8 fps Quality Q3 Resolution CIF Pre Event 1 Event Post Event 5 Event Setup Sensor All N O MD All Sensitivity 1 Event Area Set All Recording Off Sync Text With Ch 1 Device Manual Seek Header Off Header 1 Header1 Header 2 Header2 Text Delimiter 0D0A ...

Page 22: ...set Sensor1 Not Set System Event Source Uncheck All System Event System Event Method Uncheck All Communication Type Ethernet DHCP Off IP addr Current IP Net Mask Current NM Gateway Current GW DNS1 0 0 0 0 Additional DNS 0 0 0 0 Port 4000 Network Band Width Limit Mbps 0 0 User ID guest Password xDSL Status Disconnected Interval Off Server www samsungipolis com ID None Password None DDNS Status Not ...

Page 23: ...it 1 Serial Data Bit 8 System Setup Remote Controller ID Off DVR ID 1 DVR Alias DVR0 Playback Deinterlace On Language English Firmware Update Load Save Configuration Default System System Log Repeat Record Mode On Warning Lever 45 Block Playback No Block Disk Manager Disk Disk Status User Password Off Password Re Enter Admin Password Off Password Security Re Enter ...

Page 24: ...Enable Remote Relay Enable Weekday Start Mon Weekday End Fri Day Start 09 00 Time Schedule Day End 18 00 Zone 1 00 00 00 00 Zone 2 00 00 00 00 Zone 3 00 00 00 00 Zone 4 00 00 00 00 Special Time Exception Days Save Save Do not save ...

Page 25: ... the desired channel partition Press MULTI button or left click again to return to the partition screen 4 3 Multi Screen To see several channels simultaneously press MULTI button or left click Division Mode in the function menu and select the desired partition mode Pressing MULTI will cycle the partition mode 4A 4B 4C 4E 9A 9B 10A 16 SVR 960 945 support 4A 4B 4C 4E 9A and 9B partition modes 4 4 Us...

Page 26: ...r Screen Setup and press ENTER button or left click Select SEQ Dwell Time and assign the desired value ranging from 1 to 60 When set to Off user sequence view function will not operate User sequence mode can be accessed by pressing AUTO button from every partition mode Press AUTO button once again to exit from user sequence mode 4 4 2 User Sequence Mode Press AUTO button or click from the function...

Page 27: ...n may be set to pop up automatically in case of an event trigger The pop up screen s frequency setting may be set in Switch to Event Screen under Monitor In cases of multiple event triggers in multiple channels the partition mode determined by the number of such channels will be used to display them For example if events were triggered in three separate channels they will be displayed in the 4 par...

Page 28: ...area To return to the previous screen press Enter or left click the background 4 7 Pause Live screen Both live visual feed and data playback can be paused momentarily Press PAUSE to pause visual feed Press PAUSE button again to return to visual feed 4 8 PTZ Control If a PTZ controller has been connected to the DVR and the necessary protocols have been set in Serial menu real time manipulation of P...

Page 29: ...com KRE KODICOM Nuvico NUVICO Go to the channel that needs to be manipulated Press PTZ button or click in the function with the mouse PTZ menu Pan Tilt Zoom Focus Load Preset Save Preset will appear Select the menu option to be edited and press ENTER or left click 4 8 1 Pan Tilt Used to utilize panning and tilting simultaneously with real time feed Select Pan Tilt from PTZ mode Use the left right ...

Page 30: ...oring mode Select the desired Aux option using the up down direction buttons or the mouse wheel Select On and press ENTER or left click to activate Total 16 Aux functions are available 4 8 6 Auxiliary Off Used to deactivate special PTZ device functions from real time monitoring mode Select the desired Aux option using the up down direction buttons or the mouse wheel Select Off and press ENTER or l...

Page 31: ...direction at 1x speed default value Playing visual data in nine channels will limit the frame rate to 2 fps Therefore the total frame rate of the nine channels will add up to 18 fps With a single channel the frame rate will be limited to 30 fps Pressing PLAY from a monitor partition mode will play the data from 16 or 9 channels 5 1 2 Playback Functions PLAY Plays the data at 1x speed Press PLAY or...

Page 32: ...W during a playback will display the frame before the current screen To return to regular playback mode press PLAY 1 2 REWIND Click in the function menu to play data at x1 2 speed in the forward direction 1 2 FORWARD Click in the function menu to play data at x1 2 speed in the backward direction 5 2 Search This menu is used to search data by time or event log and play them Four options are provide...

Page 33: ...play the storage status of the first 16 channels on Monitor1 and the remaining 16 in Monitor2 Year Select the year to be searched from with the mouse wheel Month Select the month to be searched from with the mouse wheel Selecting Date From the calendar select the day to be searched from and press ENTER When using mouse the time range can be selected with the mouse wheel Selecting Time Select the r...

Page 34: ...e to search from Use the directional buttons to move to the parameter to adjust and press up down When using mouse click the parameter and use the wheel to adjust date and time Search End Time Input the ending date and time to search from Use the directional buttons to move to the parameter to adjust and press up down When using mouse click the parameter and use the wheel to adjust date and time E...

Page 35: ...e view Selecting Search will produce 16 thumbnails starting from the starting date and time according to the interval period To return to the previous screen press FUNC on the front side of the console or use the mouse wheel Image Selection Clicking a search result thumbnail play the data with date and time associated with it Press ENTER or left click to start playback 5 3 Copy Use this menu to co...

Page 36: ...use the up down buttons or the mouse wheel to adjust From Input the beginning date and time of the recording Use the up down buttons on the front side of the console or the mouse wheel to adjust To Input the ending date and time of the recording Use the up down buttons on the front side of the console or the mouse wheel to adjust Selecting Disk Select the medium to copy Press ENTER on Select Disk ...

Page 37: ...d data can be accessed with Mini Players and Network Mangers Select the channel and press ENTER or left click to prompt a channel list as shown below SVR 960 945 SVR 1680 1660 1645 SVR 3200 Type Select the RE4 using the up down buttons or the mouse wheel Channel List To pop up the channel list press ENTER on or left click the window background Selecting Channel Select one or all 16 channels Once t...

Page 38: ...ng Incompletely copied data may fail to play correctly on PC 5 3 3 AVI This function copies a section of a channel and uses USB memories and HDDs Type Select AVI using the up down buttons or the mouse wheel Channel Select the channel to be copied using the up down buttons or the mouse wheel From Input the beginning date and time of the recording Use the left right buttons to move between parameter...

Page 39: ...ect the medium Start Start copying Press ENTER or left click to start copying FAT32 Format Format unformatted USB memory devices and HDDs as FAT32 Press ENTER or left click to start formatting If the PC fails to play the file please install the latest integrated codec pack and try again ...

Page 40: ... to their individual entries for detailed explanation 6 2 System Time Setup Before recording the system time must be set up It is critical that the system time is synchronized with the local time as it may affect data preservation It is not recommended to change the system time during a recording operation The default time zone for the product is UTC 00 00 Dublin ...

Page 41: ...heel The menu will cycle through the time zones To return to the previous menu press ESC on the front side of the console or right click This method will apply the same throughout the OSD menus Daylight Saving Time The system time zone will determine this menu In other words this option will only be enabled if the selected time zone uses DST The product has been programmed to synchronize DST setti...

Page 42: ...the cameras connected to the product With the Camera Setup menu Name Status Color BW Auto Control Brightness Contrast and Partial PTZ settings can be configured For detailed information on each of the settings please refer to the items below The product is not able to use both NTSC and PAL at once For example it is not possible to use NTSC cameras for channels 1 to 5 and PAL cameras for channels 6...

Page 43: ...racter with the directional buttons Once selected press ENTER to input the character To delete an input character press Í to move back Press Î to place a space between characters 6 3 1 2 Channel Usage Camera usage may be set to either On or Off After pressing ENTER use the left right buttons or the mouse wheel to choose between On and Off To improve recording and network monitoring speed set unuse...

Page 44: ... to select the home preset position and idle time duration 6 3 1 6 2 PTZ Port This menu is only relevant for cameras supporting the PTZ Pan Tilt Zoom feature After pressing ENTER use the left right buttons or the mouse wheel to select the PTZ port of the channel 6 3 1 6 3 Address This menu is only relevant for cameras supporting the PTZ Pan Tilt Zoom feature After pressing ENTER use the up down bu...

Page 45: ...nly be configured if Recording Schedule is set to Custom How to Check for Recording Operation Once the schedule event has been successfully configured the REC LED on the front side of the console will light up Also the save status will be tagged with S displaying that all channels are being recorded normally 6 5 Recording Schedule Setup This menu is used to configure recording operations per chann...

Page 46: ...here are five levels under this option No Rec Low Standard High Custom Custom setting can be assigned with user defined speed quality and resolution Resolution There are 3 options total CIF HALF D1 The resolution value assigned in this menu is applied to both manual recording and event recording operations CIF 352x240 HALF HALF D1 704x240 D1 704x480 Timed Recording This menu is used to assign diff...

Page 47: ...event recording the relevant settings must be enabled under the Record Setup menu Once the recording conditions have been set Event Recording under Record Setup must be set to On Also before configuring event recording Event Source must be configured However Digital Input event recording differs from the others in that it requires Macro to be set to above Low also to activate 6 6 1 Event Source Se...

Page 48: ...etection sensitivity Min 1 2 3 4 5 6 7 8 9 10 Max 6 6 1 3 Text Setup This menu is used to configure text events for the purpose of event recording and the text must set up in Event Setup under the OSD menu Recording Text event recording events may be set to On or Off 6 6 2 Configuring Event Recording for All Channels It is possible to apply the same settings for all analog channels throughout ...

Page 49: ...nnel Event Source There are 16 event sources for sensor event 9 for SVR 960 945 1 for motion detection and 1 for text Check the corresponding box to enable sensor event sources Check the box to enable the motion detection and text event sources Macro There are 5 options total No Rec Low Standard High Custom All options aside Custom have preset Speed and Quality assigned to them ...

Page 50: ...Event under Manual Pre Event determines how far back the recording will begin at the moment of button input and Post Event determines for how long the recording will continue Recording Camera Num It can select recording channels with relevant setup and all each channel selection are possible Macro There are 5 options total No Rec Low Standard High Custom All options aside Custom have preset Speed ...

Page 51: ...nable audio recording and storage When set to No only the live visual feed will be accompanied by audio input When set to Yes the playback data will also be accompanied by audio input Gain Adjust the volume with and Sync Video Channel This option determines to which channel the audio recording will be synchronized with This is only relevant for recordings audio output with live visual feed will be...

Page 52: ... channel the audio data assigned to that channel will play regardless of which channel is being viewed 6 7 3 Record No Video This menu configures whether or not a video recording with errors or that has been tempered with will be saved For example if set to Off the data from a channel without visual input will not be saved 6 8 Monitor Setup To display visual data on the monitor it must be set up b...

Page 53: ...up screen will remain on the monitor for an indefinite time To disable Keep mode press any channel button If Ch 1 pops up due to an event trigger and Ch 2 pops up as well before Ch 1 pop up expires both channels will be displayed in a 4 partition screen mode This will also reset the hold timer of all pop up screens Covert Channel A channel can be concealed from live visual feed with the Covert Cha...

Page 54: ...de Three resolution modes are available for VGA monitors 800x600 1024x768 and 1280x1024 Info Level Information level determines the level of information to be displayed on visual feed For a live visual feed the available options are Time Channel Name Event Recording Status HDD RC ID and Text For playback the available options are Time Command Channel Name Event Text Display and Covert Level 6 9 Ev...

Page 55: ...tions are Apply to All and Disengage All If Channel is set to individual channels the available options are Apply to All Disengage All and Custom Select Area Select Area is used to define the section where motion detection function will focus on for individual channels The screen is divided into 22x15 in NTSC and 22x18 in PAL The MD area must contain more than one square The default value for this...

Page 56: ...s supported by the product and therefore their headers do not need to be checked for However for protocols not natively supported by the DVR the header of the text data must be checked to recognize the data This parameter seeks the beginning and the ending points of digital information Header placed in the beginning contains the information regarding the nature of the piece of data By recognizing ...

Page 57: ...s in external devices may prevent the correct number of lines from being recognized please consult their respective agencies before installation 6 9 3 D I O D I O is the port capable of simultaneous digital input and output operations and support up to 12 parallel operations D I O Channel Input Output This option can be set to one of the D I O operation channels When an input signal is picked up w...

Page 58: ...tection or Text This configuration may be applied to all events E Mail Address When an e mail is sent by an event trigger this is the address the message is mailed to Input the e mail address of the person receiving the messages The address format must be xxx xxx xxx Only alphanumerical characters are accepted Sender Address This address is only necessary the E Mail option is used The format must ...

Page 59: ...s connected to the LAN may share public IPs when connected to the Internet In other words all hosts connected to LAN receives temporary public IPs from the DHCP servers If the LAN system possesses a DHCP server and an active DHCP menu the DHCP will allot public IPs on the DVRs DHCP is only available for LAN environments with an active DHCP server Usually medium to large LANs have active DHCP serve...

Page 60: ... is unreachable or unstable Port Port is used to register to SWR and to connect with Network Manager and Web viwer The default port setting is 4000 When using a PPPoE modem or a HUB this setting may need to be reconfigured Bandwidth Limit Mbps This option sets the uploading speed limit data exportation capability in other words Usually no changes are required for this option Consult the network ad...

Page 61: ...vice connects to the ISP In such a case the user may not be able to find out the DVR s IP address By registering a DVR with a dynamic IP address to a DDNS server the DVR s IP may be identified by connecting to the DDNS server To register a dynamic IP address to a DDNS follow the instructions shown below DDNS Registration procedure 1 Sign up at iPOLiS homepage The homepage URL is www samsungipolis ...

Page 62: ...User Manual 61 SIGN UP page check ID availability 2 Register the product after sign up Log on to iPOLiS website Product List If you didn t register products there are no list ...

Page 63: ...User Manual 62 Product Registration Check ID availability Information regarding the registered products may be reviewed from the list 3 Configure the product for DDNS ...

Page 64: ...nfigurations to the DVR for DDNS connection 4 The connection status of product can be checked on the product list The Product list will display status On for the connected device VIEW See the log in page of selected product Edit Delete Edit Delete the selected product will prompt password confirmation dialogue Once the product has been registered its ID domain may not be changed When the product s...

Page 65: ...e the server address to be registered The address of the SWR is www samsungipolis com ID Use the ID for the DDNS login Password Use the password for the DDNS login Status The DVR s registration status is indicated Not Registered means that the DVR is not registered to the DDNS Date Time OK means that the DVR has been registered to the DDNS 6 9 8 NTP NTP Network Time Protocol is used to synchronize...

Page 66: ...in the local or public network NTP Local Server IP If the NTP Service Location is set to Local NTP Local Server IP will be set to Enable It determines the IP of the NTP server In a local network the IP of the NTP server or the DVR acting as the server is used Interval min Sets the interval period between synchronization If NTP Mode is set to Client Sync with NTP must be set to On 6 9 9 Serial The ...

Page 67: ... DVR Interface This menu is used to configure the type of interface to be used COM1 and COM3 are fixed to RS 232C COM2 is fixed to RS 422 485 and COM4 is fixed to RS 485 Baud rate Parity Stop bit Data bit Synchronize with the configuration values of the external device connected to the DVR 6 10 System Setup 6 10 1 Setup ...

Page 68: ...ion must be set to Full D1 for this option to be activated If set to On image instabilities in paused Full D1 images will decrease Language OSD menus support multiple languages Select the desired device language Firmware Update Save the firmware updater for USB in a USB device and connect it to the DVR Select Firmware Update from the System menu and press ENTER When a confirmation dialogue window ...

Page 69: ...be reviewed to examine HDD power and system alarm behaviors 6 10 2 Disk Setup The following instructions explain how to install internal or external hard disks and how to remove or format them as well Repeat Record Mode When there is no more space within the HDD to store data the DVR will automatically rewrite over the oldest data in the HDD Warning Level When the total disk availability of all me...

Page 70: ...ages the HDDs status bad sectors size disk usage etc Disk Status Use Disk Status to view the HDD s temperature and status Type Displays the location and type of the disk Int A Internal A HDD Int B Internal B HDD Ext External HDD Model Displays the HDD s model name Bad Sector Displays the presence of bad sectors of the HDD When no bad sector is detected this option will be set to 0 Bad sectors in u...

Page 71: ...ill prompt the following notice Warning The disk will be disabled Select Yes to disable the HDD A status message saying Disk has been disabled will appear to the bottom of the screen The HDD has been disabled Select No at the warning message to continue HDD usage 6 10 3 Security There are two types of DVR users such as administrator and user and there is no limit to use the DVR for the administrat...

Page 72: ...nly Same method is applied upto user10 Admin Password Default administrator password is 11111111 and it is changeable 8digits are required User Password Default password for user1 is 11111111 and 22222222 for user2 Default password for the user10 is 00000000 In case of 16channel DVR button10 is used as there is no relevant number button for 0 Changing password When the user wants to change the pas...

Page 73: ...rd is completed Using authority Password is identified and usable When the function to use is executed password window pops up Select the user and type the relevant password Now the user has the authority to use the function 6 10 4 Time Schedule This menu is used to define weekday day weekday night weekend day and weekend night by configuring the date and time ...

Page 74: ...ytime Hours outside the range are considered to be night 6 10 5 Special Time Up to four special times may be configured Also each time range Weekday day weekday night weekend day weekend nigth may contain own special times For example the special time function may be used to specify lunch breaks and meetings and assign special events for them Use this function to define regular special time ranges...

Page 75: ... Configures the duration of the exception starting from the start date and time Profile Profile allows the exception recordings to save as regular recordings It may be set to Weekday Day Weekday Night Weekend Day and Weekend Night No Rec No Recording WDD Recording as Weekday Day WDN Recording as Weekday Night WED Recording as Weekend Day WEN Recording as Weekend Night 6 11 Exit This menu is used t...

Page 76: ... save the changes to the DVR configuration and exit the menu When a dialogue window appears select Yes to save the changes and exit and select No to exit without saving Do not Save Select this to exit the menu without saving any changes ...

Page 77: ... Display Resolution 1280 x 1024 with 32bit color or higher HDD 1GB or higher OS Windows XP Professional Window Vista Business Others DirectX 9 0 or higher 7 2 LOGIN Use the IP address and port assigned to the product to access the Web Viewer Log in page The URL to access the page will be similar to http 192 168 1 100 4000 If the port value has been changed from the default value of 4000 use the ch...

Page 78: ...uration Tool Up to 1 administrator and 10 regular user IDs and passwords may be issued For security purposes the administrator and regular passwords must be distinct Uncheck the usage box of unused user accounts as well The illustration above displays Network Manager Configuration Tool after user IDs and passwords have been changed ...

Page 79: ...at the login page For computers without ActiveX Web Viewer will install ActiveX to allow Web Viewer s functions to work as intended Please close all programs related to Network Manager before installing Web Viewer Failure to do so may result in malfunction 7 5 Monitor Once provided with the correct ID and password combination Web Viewer will automatically move to the monitoring page The monitoring...

Page 80: ...partition screen double click the monitoring area once again In a partition mode the placement of screens may be moved around To move Ch 3 to where Ch 6 currently is drag and drop the partition corresponding to Ch 3 over Ch 6 to switch their places 7 5 2 Moving Playback Click the Playback button shown above to move to the playback page 7 5 3 Channel On Off Channel On Off buttons are located to the...

Page 81: ...emain blue Deactivated sensor icons are sensors not supported by the DVR model 7 5 5 Relay operation The product s Relay can be set to On or Off Clicking a relay button will set the corresponding relay to On and change the button s color from blue to orange Deactivated relay buttons are relays not supported by the DVR model Relay actions require a specific authority level Consult the manual on how...

Page 82: ... video may be recorded in this manner If a Quick Recording operation is executed the duration of the recording will be displayed on the visual Selecting Rec Stop while recording will conclude the recording operation A dialogue window regarding the file location will be prompted and the user may save the file in any desired directory The recording will save as a re4 file which can be played in NETW...

Page 83: ... to change its position faster Zoom Focus Control Placing the cursor at the left and right sides of the screen will reveal the zoom and focus slide bars A camera unit supporting Area Zoom In will also support the Zoom Zero button Use the slide bar to the left to zoom in and out and the right slide bar to control focus PTZ Home If a preset position is configured right click during PTZ mode and sele...

Page 84: ... to the left of the screen will disconnect the visual connection and fade to black To reconnect the channel click the off channel button again 7 6 Playback Recorded data can be reviewed in the playback mode Only users with HDD access may use this mode The playback mode uses 16 Partition screens and supports searches by time calendar and cycle Also paused streams may be printed or saved as bmp imag...

Page 85: ...rding A frame from a playback can be saved as a bmp image file Click the channel to capture and click Save A Save Image dialogue window will pop up A brief memo on the image can be saved with it Click OK to prompt save location window 7 6 3 Print Printing a channel is similar to capturing a frame Click the channel to print and click Print Type the relevant memo and click OK to print the image The ...

Page 86: ...days without recordings are gray and deactivated To review the recording select the date and time of the recording and click to play the recording from the specified timeframe Clicking Go To will display the timeframe of 24 hours beginning from the date and time specified above at the bottom left Click 24h to adjust the timeframe 7 6 8 Playback Toolbar Displays the recording duration Shifts throug...

Page 87: ...User Manual 86 Toggles DirectX usage If enabled the video will be drawn with DirectDraw and improve the quality depending on the PC s specification Controls the volume ...

Page 88: ...era s power supply z Check the camera s input status z Check the DVR s input port z Check the Activity setting under the Screen menu z Check the Covert setting under the Monitor menu 4 The video won t record z Check for the HDD connection status from Disk Manager z Check the Recording settings 5 The recordings won t play z Check the Recording settings z Check the button activity 6 Images are too d...

Page 89: ...not run properly 10 Cases to contact purchasing agency If the following cases occur immediately cease the product operation shut off the power supply and take the console to the purchasing agency for repair z The product malfunctions during operation Ex Strange noise smell smoke etc z The power cable or the connector has been damaged z The product has been flooded z The product has been spilled on...

Page 90: ...mation Exhortation 16X Imation Exhortation 16X Sony Exhortation 16X Sony Exhortation 16X Specification Item Description Display Video Inputs SVR 3200 32 composite video 0 5 2 Vpp 75 ohm automatic termination SVR 1680 1660 1645 16 composite video 0 5 2 Vpp 75 ohm automatic termination SVR 960 945 9 composite video 0 5 2 Vpp 75 ohm automatic termination Resolution 704x480 NTSC Live Frame rate SVR 32...

Page 91: ... 352x288 Mode Manual Schedule Event Emergency Overwrite modes Continuous Pre Event Up to 5 sec Post Event Up to 60 sec Search Playback Search mode Date time Event Calendar Thumbnail Bookmark Text Exclusive viewer Frame rate 480 fps D1 NTSC 400 fps D1 PAL Playback function REW FWD Frame advance control keys and jog shuttle Network Transmission speed SVR 3200 1680 16 Mbps SVR 1660 1645 960 945 9 Mbp...

Page 92: ...osite Monitor2 4 SVR 3200 1680 Menu Event Pop up Covert Display Switching Sport SVR 1660 1645 960 945 event Pop up Display switching 1 Vp p 75 ohm Loop Outputs SVR 3200 None SVR 1680 1660 1645 16 Output 1 Vpp 75 ohm SVR 960 945 9 Output 1 Vpp 75 ohm Audio Inputs SVR 3200 1680 1660 1645 16 input 30k ohm SVR 960 945 9 input Output 1 line 100k ohm Compression ADPCM Sampling rate 16 kHz Alarm Inputs S...

Page 93: ...Auto ranging Power consumption Max 65 W with 1x HDD Max 88 W with 2x HDD Max 90 W with 4x HDD Environmental Operating Temperature 5 C to 40 C 32 F to 104 F Operating Humidity 0 RH to 60 RH Mechanical Dimensions W x H x D 445 x 88 x 388 mm 17 5 x 3 5 x 15 3 in SVR 945 300 x 88 x 302 mm 118 11 x 34 65 x 130 7 in Weight 1x hard disks Approx 10 kg 22 1 lb SVR 945 5 kg 11 Ib Rack mount kit For mounting...

Page 94: ...User Manual 93 Dimensions SVR 3200 SVR 1680 SVR 1660 SVR 1645 ...

Page 95: ...User Manual 94 SVR 960 ...

Page 96: ...User Manual 95 SVR 945 ...

Page 97: ...User Manual 96 ...

Reviews: