1
.18
Getting Started
9. The display on the front panel still shows ‘CARTRIDGES NONE
CHANGED.’ Press Menu to find ‘RIGHT CARTRIDGE.’
10. Press Option repeatedly to select the appropriate item for the black
or photo cartridge you installed. The following options are available:
• NEW STD BLACK – select for a new standard black cartridge.
• NEW HIGH BLACK – select for a new high yield black cartridge.
• OLD BLACK – select for the black cartridge you have used.
• NEW PHOTO – select for a new photo cartridge.
• OLD PHOTO – select for the photo cartridge you have used.
11. Press Menu, and ‘LEFT CARTRIDGE’ appears.
12. Press Option repeatedly to select the appropriate item for the color
cartridge you installed. The following options are available:
• NEW STD COLOR – select for a new standard color cartridge.
• NEW HIGH COLOR – select for a new high yield color cartridge.
• OLD COLOR – select for the color cartridge you have used.
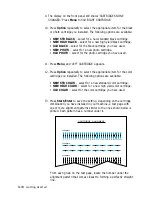
13. Press Start/Enter to save the setting. Depending on the cartridge
combination you have installed in your machine, a test page with
one or more alignment patterns similar to the ones shown below is
printed. Each pattern has a number under it.
0
ALIGNMENT A
CARTRIDGE ALIGNMENT
ALIGNMENT B
1
2
3
4
5
6
7
8
9 10 11 12 13 14 15 16 17 18 19 20 21 22 23 24 25 26 27 28 29 30
0
ALIGNMENT C
1
2
3
4
5
6
7
8
9 10 11 12 13 14 15 16 17 18 19 20 21 22 23 24 25 26 27 28 29 30
0
1
2
3
4
5
6
7
8
9
10
11
12
13
14
15
From each group on the test page, locate the number under the
alignment pattern that comes closest to forming a perfectly straight
line.

