


&
&
Convenient Functions
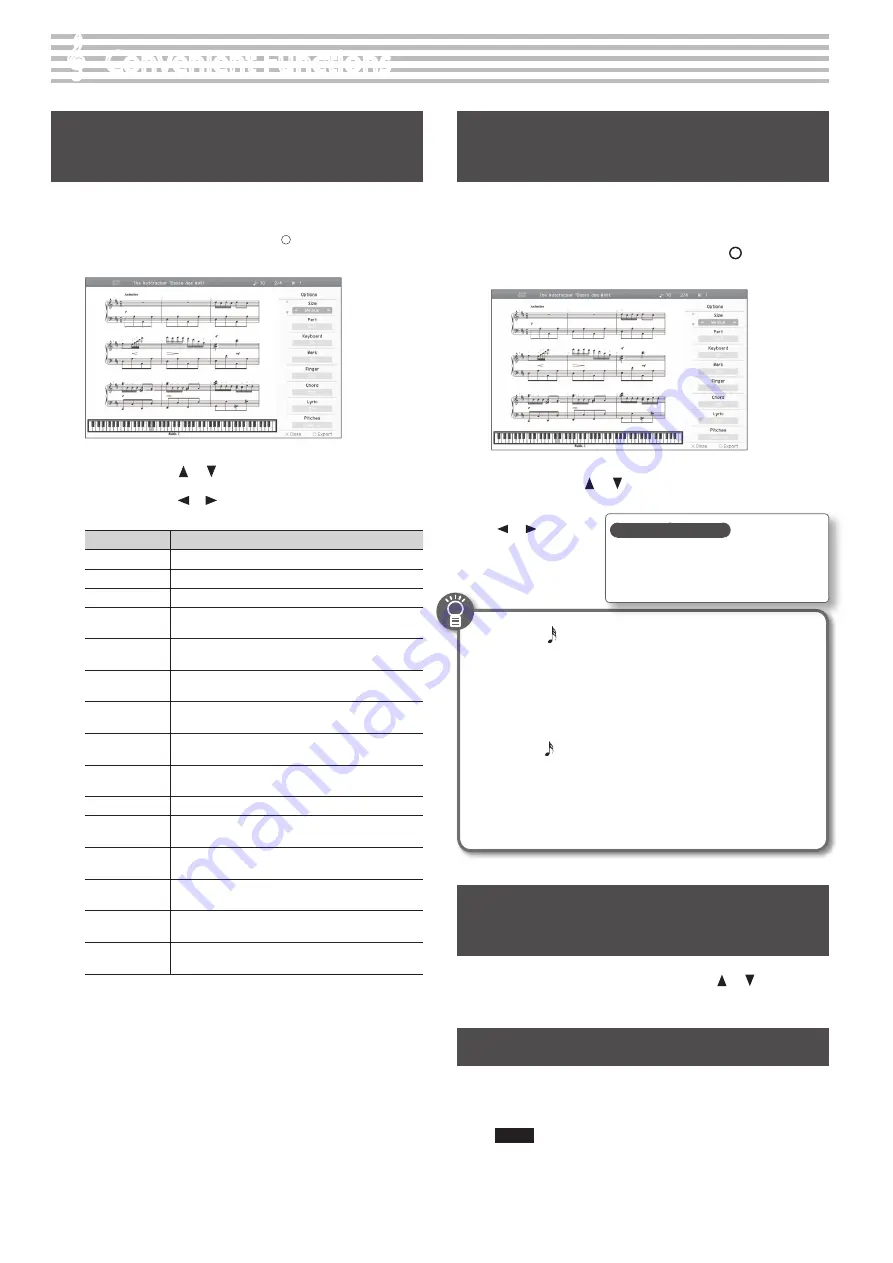
Changing the Notation Screen
Settings
You can change the parts shown in the notation screen, and specify
how they will be displayed.
1.
In the notation screen, press the [ ] button .
The notation setup screen will appear.
2.
Use the cursor [
] [
] buttons to select an item .
3.
Use the cursor [
] [
] buttons to change the setting .
Item
Explanation
Size
Specifies the size of the notation display.
Part
Specifies the part to be shown as notation.
Keyboard
If this is “On,” a keyboard is shown below the notation.
Mark
If this is “On,” performance marks are shown when you
play back song data that contains performance marks.
Finger
If this is “On,” fingering numbers are shown when you
play back song data that contains fingering numbers.
Chord
If this is “On,” chord names are shown when you play
back song data that contains chord data.
Lyric
If this is “On,” lyrics are shown when you play back song
data that contains song lyric data.
Pitches
Specify how note names are displayed when the
notation screen is expanded.
Auto Sync
If this is “On,” the notation will be shown in synchroniza-
tion with the performance.
Key
Display the notation in the specified key.
Clef R
Specifies the clef of the notation shown for the
right-hand part.
Clef L
Specifies the clef of the notation shown for the left-hand
part.
Upper Part
Specifies the part for which notation will be shown as
the upper part.
Lower Part
Specifies the part for which notation will be shown as
the lower part.
Resolution
Changes the screen display and lesson grading
standard.
Changing the Screen Display and Lesson
Grading Standard (Resolution)
You can change the minimum note value that is shown in the
screen and the standard by which Visual Lesson and Medal
Collection will be graded.
1.
In the notation display screen, press the [ ] button to
access the Options screen .
2.
Use the cursor [
] [
] buttons to select “Resolution .”
3.
Use the cursor
[ ] [ ] buttons
to choose either
“32nd note” “16th
note .”
32nd note
This setting is ideal when viewing songs that include 32nd
notes.
The grading standard for Visual Lesson and Medal Collection
will also be 32nd notes. Since this setting requires you to
play with accurate timing, it allows advanced lessons.
16th note
This setting is ideal when viewing songs in which 16th notes
are the smallest note value.
The grading standard for Visual Lesson and Medal Collection
will also be 16th notes.
Changing the Number of Measures
Displayed
1.
In the notation screen, use the cursor [
] [
] buttons to
change the setting .
Saving Notation Data in BMP Format
The notation displayed by the HPi-50e can be saved to a separately
sold USB flash drive as image data. You can use this saved image
data on your computer.
NOTE
• You cannot save copyrighted song data.
• Copyright law prohibits the unauthorized use of exported
notation for any purpose other than personal enjoyment.
• For details on how note names are shown in the BMP output,
refer to “Changing the Notation Screen Settings” (p. 50).
Saving your settings
The HPi-50e’s settings will revert to the
default values when you turn off the power,
but you can save them as described in “Stor-
ing Your Settings (memory backup)” (p. 12).
50


