


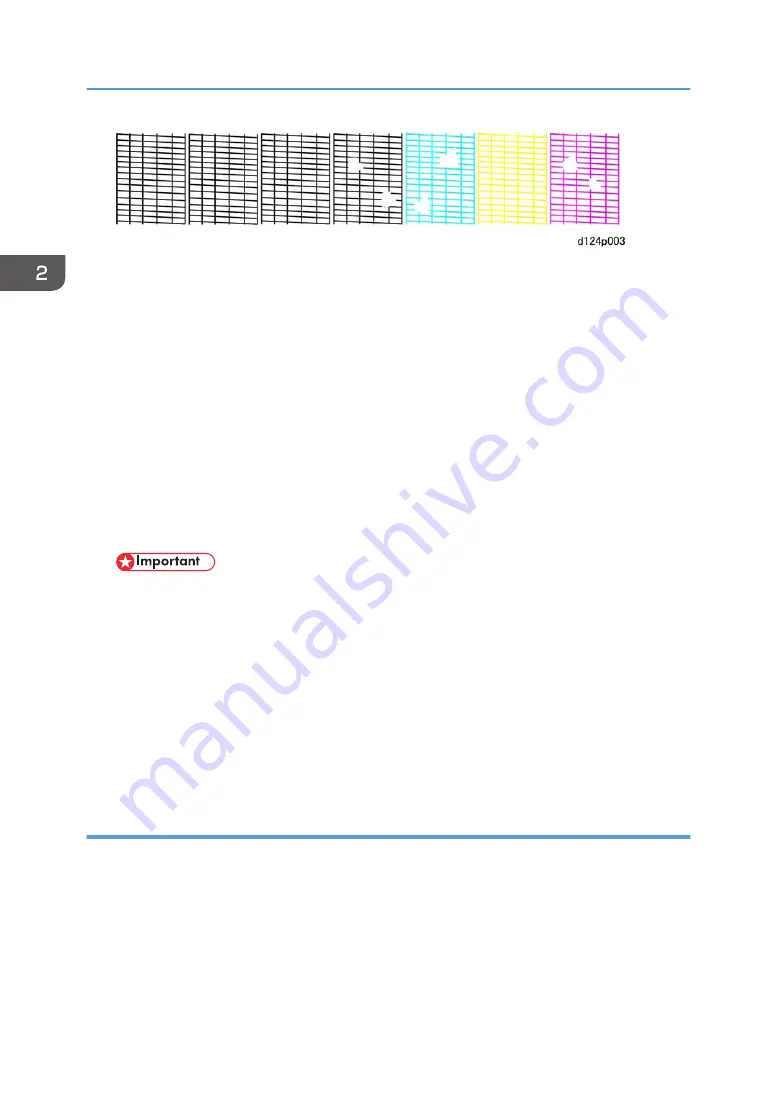
• If any of the lines are broken, identify the patterns where the broken lines exist, and then clean
the print heads. (See below.)
5. Press [User Tools] on the operation panel.
6. Touch [Maintenance] > [Clean Print-heads]
7. Select the print head(s) to clean then touch [Start], and then follow the prompts to complete the
cleaning.
8. Print another Nozzle Check Pattern, and then check the results.
• If the patterns have no broken lines, you have finished.
• If there are still broken lines in one or more of the patterns, clean the print heads again, and
then print another Nozzle Check Pattern.
• If lines still exist after the third cleaning and Nozzle Check Pattern printing, touch [Exit], and
then flush the print heads.
• Flushing the print heads consumes a large amount of ink.
• Never execute print head flushing until you have executed print head cleaning at least 3
times.
9. Touch [Flush Print-heads].
10. Follow the prompts to complete print head flushing.
11. Print another Nozzle Check Pattern.
• If the patterns have no broken lines, you have finished.
• If there are still broken lines in the patterns, go to the next section.
When Printing Cannot Be Restored
Do this procedure if three cleanings and one flushing have failed to produce an unbroken Nozzle
Check Pattern.
1. Make sure that the ambient temperature and humidity are within the acceptable range:
• Temperature Range: 10°C to 27°C (50 °F to 81°F)
• Humidity Range: 15% to 80% Rh
2. Clean the print heads again, and then print another Nozzle Check Pattern.
2. Installation
130
Summary of Contents for Mo-C1
Page 1: ...Model Mo C1 Machine Code D124 Field Service Manual November 2012...
Page 2: ......
Page 32: ...30...
Page 192: ...3 Preventive Maintenance 190...
Page 225: ...2 On the right disconnect the torque limiter plate x2 3 Remove the plate Common Procedures 223...
Page 257: ...5 Separate the bracket and the switches 6 Disconnect the switches x2 Scanner 255...
Page 263: ...2 Remove the center plate 3 On the right side A remove leaf plate B x1 Scanner 261...
Page 313: ...2 Remove the sensor x4 3 Disconnect the sensor x1 Reinstallation Roll Units 311...
Page 350: ...1 Disconnect the pre registration sensor x1 x1 x1 x4 4 Replacement and Adjustment 348...
Page 364: ...4 Replacement and Adjustment 362...
Page 379: ...2 Disconnect the sensor x1 3 Separate the bracket and sensor x4 Reinstallation Sub Scan 377...
Page 381: ...3 Separate the motor and bracket x4 Sub Scan 379...
Page 387: ...3 Remove the front cover x2 4 Remove the left cover of the carriage unit x1 Carriage Unit 385...
Page 469: ...2 Remove the ink cartridges 3 Disconnect the ink supply unit frame x3 Ink Supply 467...
Page 529: ...Switches 527...
Page 560: ...4 Replacement and Adjustment 558...
Page 594: ...5 System Maintenance Reference 592...
Page 608: ...SC300 Not Used There are no Group 300 service codes for this machine 6 Troubleshooting 606...
Page 628: ...SC700 Not Used There are no Group 700 service codes for this machine 6 Troubleshooting 626...
Page 660: ...Make sure bold was selected in the application 6 Troubleshooting 658...
Page 695: ...No Rating FU1 Break capacity 50V 16ADC Rated current 0 63A Fuses 693...
Page 696: ...6 Troubleshooting 694...
Page 700: ...MEMO 698...
Page 701: ...MEMO 699...
Page 702: ...MEMO 700 EN...
Page 703: ...Model Mo C1 Machine Code D124 Appendices October 2012...
Page 704: ......
Page 706: ...2...
Page 1051: ...MEMO 347...
Page 1052: ...MEMO 348 EN...