Ricoh BizWorkz 106 Operation Manual Download Page 277

53

USER MAINTENANCE

6. USER MAIN-

TENANCE

4

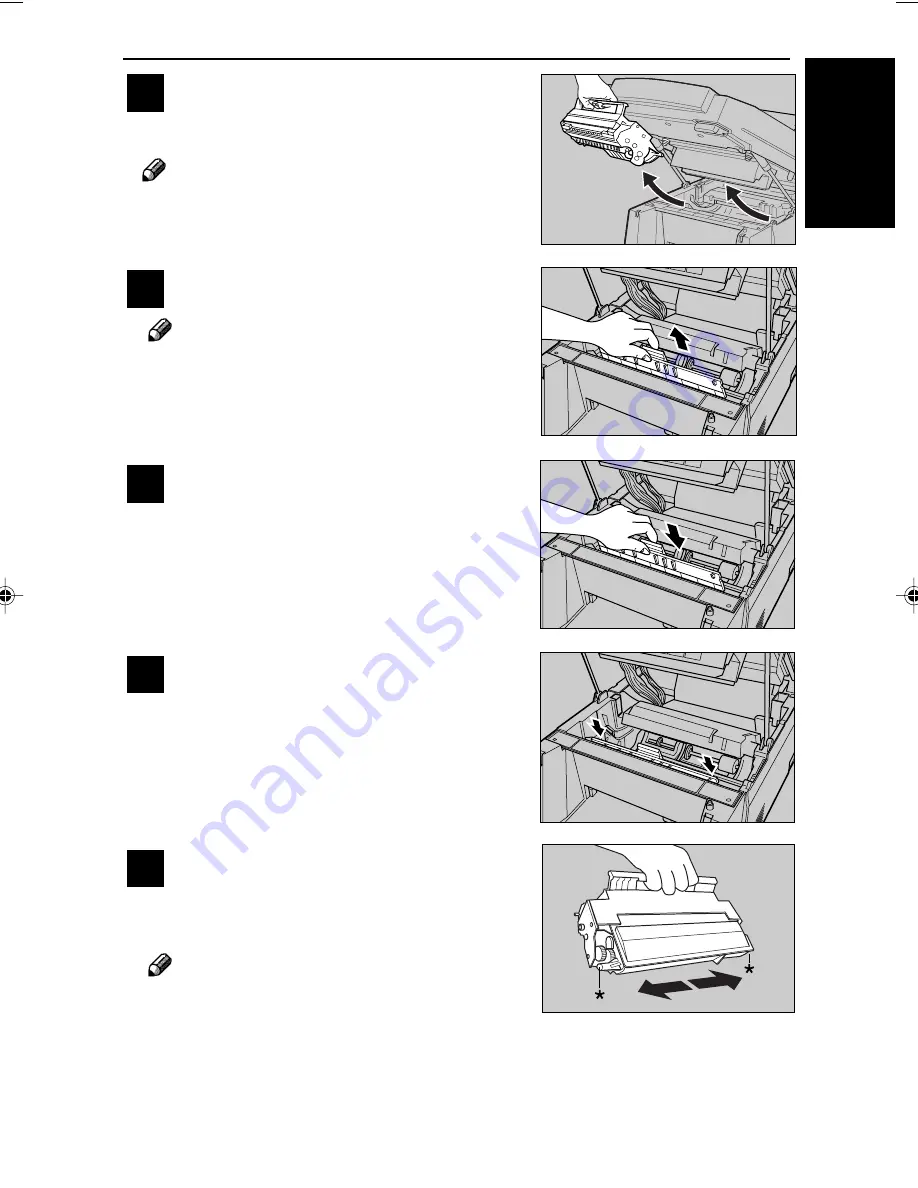
Remove the old cleaning pad.


 Note

Be sure to grasp the green handle when re-
moving the cleaning pad.

5

Insert the new cleaning pad into place
by grasping the green handle.

6

Press down gently but firmly on both
sides of the pad to make sure that it is
inserted as far as it can go.
Do not forget to install the cleaning
pad whenever you install a new toner
cassette.

7

Prepare the new toner cassette. Hold-
ing the toner cassette by its handle, gen-
tly shake it side to side 5 or 6 times to
evenly distribute the toner inside.


 Note

Be sure to hold the toner cassette by its handle.

3

Hold the toner cassette by its handle and
pull it out.

 Note

Keep the toner cassette horizontal to avoid
spilling the toner.

Summary of Contents for BizWorkz 106

Page 1: ...y Road ong Kong 2862 2888 A PACIFIC Road he Heeren 38855 830 5888 s for 20D BLACK o ku Tokyo Operation Manual Operation Manual Read this manual carefully before you use this product and keep it handy...

Page 2: ...eers are therefore directed to return all chassis and laser subsys en replacement of the optical subsystem is required do not appear in the following pages Check the type of your ma l rks 106 y diffe...

Page 3: ...s a situation that requires you take care The symbol means you MUST NOT carry out this operation This example means Do not take apart The symbol means you MUST perform this operation This example mean...

Page 4: ...serious eye damage When the machine needs to be checked adjusted or repaired contact your service representative Do not take apart or attempt any modifications to this machine There is a risk of fire...

Page 5: ...from the socket grip the plug to avoid damaging the cord and causing fire or electric shock If you use the machine in a confined space make sure there is a continuous air turnover Do not reuse staple...

Page 6: ...product was designed to reduce the environmental impact associated with printing equipment by means of energy saving features such as Low Power mode Low Power Mode This machine automatically lowers it...

Page 7: ...necting the Telephone Line and Optional Telephone Handset 8 Turning On the Machine 9 2 GETTING ACQUAINTED Paper and Other Media 10 Loading Paper 11 Loading Plain Paper into the Upper Paper Tray 11 Loa...

Page 8: ...bers 30 Entering Letters Symbols and Spaces 30 Deleting Characters and Moving the Cursor 31 Setting up 32 Please Read This First 32 Connecting to the Telephone Line 32 Storing your Own Name TTI 33 Set...

Page 9: ...Dialling with On Hook 51 Remote Change 51 Storing Fax and Telephone Numbers 53 Quick Dials 53 Storing Quick Dials 54 Editing Quick Dials 55 Clearing Quick Dials 57 Name Dials 58 Storing Name Dials 58...

Page 10: ...Output 78 Sorting Copying 78 6 TROUBLESHOOTING General 80 Printing and Copying 80 Printing 81 Copying and Faxing 82 Scanning 83 Error Messages 84 When the Receive File Indicator is Lit 87 Clearing a...

Page 11: ...98 Customising Default Settings with the User Parameters 99 Changing the User Parameters 99 User Parameter Switch Summary 100 Function List 103 Selecting the Language 104 Economy Mode 105 Changing the...

Page 12: ...ling the machine Upper paper tray Holds up to 100 sheets of plain paper Original guide Guides the original correctly into the machine Make sure your original fits under this guide Power switch Turns t...

Page 13: ...ess panel Second Additional Printer port You can connect a second printer to this port Computer port Connect your computer here SIMM cover Open this cover when you want to install a SIMM and expand me...

Page 14: ...copying or begin sending or receiving a fax Operation Panel 6 6 6 6 6 Stop key Press this key to interrupt the current operation and return the machine to the standby state To reset printer mode hold...

Page 15: ...ct Auto Image Density to let the machine choose a suitable setting D D D D D Check Display indicator Blinks to alert you to read a message on the display E E E E E Busy indicator Lights during a fax o...

Page 16: ...y operation mode these keys have different uses Quick Dials see page 53 M M M M M Reception Mode key Press to choose whether the machine should answer all calls automatically Choosing the Reception Mo...

Page 17: ...NERAL DESCRIPTION Printing Q Q Q Q Q Second Printer key Press this key to select between printing to this machine indicator off and printing to a second printer connected to the machine indicator on O...

Page 18: ...xvi This page is intentionally blank...

Page 19: ...e or tilted surface If it topples over it could cause injury If you use the machine in a confined space make sure there is a continuous air turnover Location Environment Acceptable Recommended Tempera...

Page 20: ...out of the reach of chil dren Important Be sure to hold the starter toner cassette by its handle Note Keep the vinyl bag for later repackaging when necessary 3 Holding the starter toner cassette by i...

Page 21: ...ide along the guides inside the machine Note Be sure to hold the starter toner cassette by its handle 6 To close the front unit press down firmly but gently on both sides of it until the front unit cl...

Page 22: ...ace Installing the Upper Paper Tray 1 Look at the rear of the machine and note the locations of the slots for in sertion of the upper paper tray on both sides 2 To install the upper paper tray press d...

Page 23: ...5 SETTING UP 1 SETTING UP Preparing the Output Tray 1 Pull out the output tray extension as shown...

Page 24: ...g one end of the provided parallel cable into the lower port on the side of the machine and secure it in place as shown in the illustration Note The machine must be connected to a computer for printin...

Page 25: ...the ADF is in the lower position copies prints and incoming faxes are delivered face up at the lower output slot Sheets stack in reverse order Position B When the ADF is in the upper position prints a...

Page 26: ...et at the rear of the machine 2 Connect the other end of the line cable to your telephone line wall socket If you have the optional telephone hand set now do the following 3 Plug the telephone handset...

Page 27: ...o the power source described on the inside of the front cover Avoid multi wiring Do not damage break or make any modifications to the power cable Do not place heavy objects on it pull it hard or bend...

Page 28: ...13 p 11 Letter 81 2 11 Letter 81 2 11 p 11 Legal 81 2 14 Legal 81 2 14 p 11 C5 Envelope 162mm 229mm C5 Env p 13 15 C6 Envelope 114mm 162mm C6 Env p 13 15 DL Envelope 110mm 162mm DL Env p 13 15 Transp...

Page 29: ...tray can cause misfeeds Loading Plain Paper into the Upper Paper Tray 1 Fan the stack of paper to make sure that all pages are free and are not sticking together The upper paper tray holds up to 100...

Page 30: ...dis play press If the paper feed unit option page 17 is installed you can also select its paper size at this time Registered A4 Tray guide OK OK Tip If the paper feed unit option is not installed and...

Page 31: ...per in the upper paper tray 2 Open the small size paper feed access panel on the back of the machine by unlatching it as shown in the illustra tion Opening the small panel makes it easy to handle smal...

Page 32: ...5 Tray guide OK OK Important Be sure to specify the paper size again before copying printing or receiving faxes onto A4 or Letter size paper If you do not you will not be able to receive faxes Functio...

Page 33: ...with adhesive on the flaps because heat generated during the printing process can cause the adhe sive to melt and get on rollers Refer to the paper select operation on page 14 Loading Transparencies L...

Page 34: ...computer is turned off before making the con nection Connecting to a Second Printer 1 Turn off both the machine and your sec ond printer 2 Connect one end of a parallel interface cable to your second...

Page 35: ...m the power socket before installing the paper feed unit 1 Remove all the packing tapes from the paper feed unit and pull the paper tray out of the unit 2 After removing all tapes and cardboard from i...

Page 36: ...ON When lifting the machine make sure your hands are at the locations indicated by in the illustration This protects against pinching your fingers between the machine and paper feed unit This illustra...

Page 37: ...plain paper 80 g m2 or 20 lb can be inserted into the pa per tray as shown in the illustration Make sure that the top of the stack is not higher than the limit mark on the side fence Note Make sure th...

Page 38: ...in on both sides of the side guide slide it to the correct position for the desired paper size Specifying the Paper Size After you install the paper feed unit option you can select between the upper p...

Page 39: ...play depends on the paper source you last used If Upper Tray appears press or to display the Lower Tray message before proceeding with step 4 A4 4 Press Installing the Paper Size Indicator 1 Remove th...

Page 40: ...UAINTED Selecting the Paper Source 100 U 01 100 L 01 1 Press until the desired pa per source appears Theupperpapertrayisselectedwhen U is on the display and the paper feed unit is selected when L is o...

Page 41: ...to install an 8MB 16MB or 32MB SIMM Note The following are the required specifications for a SIMM used with this machine 72 pin 60ns Extend Date Out EDO parity non parity Important Make sure you touch...

Page 42: ...it down into the slot Gently rock it back and forth until you hear it snap into place Important Make sure the SIMM board is oriented cor rectly when you insert it into the slot 6 Make sure the hooks o...

Page 43: ...provided for both Windows 95 98 and Windows 3 1 but the scanning feature requires Windows 95 98 Setting up Before you can start printing and scanning you need to the following if you have not done so...

Page 44: ...k images under the directory named 3 1 on the CD ROM to floppy disks Then insert the first floppy disk into your floppy disk drive and run install exe Note You cannnot install from CD ROM under Window...

Page 45: ...on dpi 600 600 600 300 600 Graphics Resolution High High High High High Halftone Screening Screening Screening Screening Dithering Job Settings True Type Mode Name Configuration Device Configuration F...

Page 46: ...rn it off Refer to page 15 for details on connecting a second printer Printing to the Second Printer 1 Press The Second Printer indicator lights Important Whenever you change printers be sure to also...

Page 47: ...the fax feature to suit your needs Switching between Fax Operation and Copy Operation Mode This machine has two modes fax operation mode and copy operation mode You can still receive fax messages when...

Page 48: ...678 Entering Pauses and Tones in Fax Numbers see page 42 Entering Letters Symbols and Spaces When the display asks you enter a name you can use the numeric keypad to enter characters and symbols To en...

Page 49: ...e printed correctly on lists and reports Deleting Characters and Moving the Cursor When entering names and storing numbers To delete the character to the left of the cursor press Note If the cursor is...

Page 50: ...e Daylight Saving Time see page 39 The volume of sounds the machine makes see page 65 If you wish to share the line with a telephone handset you may need to change the reception mode Choosing a Recept...

Page 51: ...racters long Entering Characters on the Operation Panel see page xii 29 If you do not want this identification printed on faxes you send see Page Header on page 67 1 Press 2 Press 3 Press 4 Press 5 En...

Page 52: ...using tone or pulse dial If you are unsure of what this should be please consult your line provider If your machine is behind a PABX you should also provide the following details The PABX number that...

Page 53: ...l tone on the numeric keypad e g enter 0 You can enter 0 or a value between 01 and 99 00 is not possible Note When changing an existing setting press to clear it then enter the new number 10 Press 11...

Page 54: ...This will appear on the other party s display during communication and be printed on their and your own reports Note In some locales you cannot store your own fax number If the other party is using A...

Page 55: ...far left position then press The display opposite will appear Press to clear the setting or press to cancel this operation 6 Press Note Do not carry out any operations while Reg istered appears on the...

Page 56: ...h 05O K Month 02O K Year 00O K Time 01 13 O K Year 99O K Setting the Date and Time This is printed on reports to help you keep track of machine usage If you make a mistake when entering a value press...

Page 57: ...on the display 12 Do one of the following Enter another function number Press to return to standby mode Turning Summer Time Daylight Saving Time on off This feature is useful if local custom requires...

Page 58: ...s see page 58 Redialling a Number see page 43 Entering Pauses and Tones in Fax Numbers see page 42 1 Check that the standby display is shown If the display is blank press any key to exit Economy mode...

Page 59: ...text Text Fine Detail text Photo1 Photographs Photo2 Mixed text and photographs To select the Resolution Photo setting 76 5 Dial the fax number in one of the fol lowing ways On the numeric keypad E g...

Page 60: ...tering Pauses and Tones in Fax Numbers You can enter pauses and tones when dialling or store them in Quick Dial and Name Dial numbers Quick Dials see page 53 Name Dials see page 58 Entering Pauses In...

Page 61: ...pad 1 Make sure the machine is in fax opera tion mode 2 Set your document 3 Press 4 Press 5 Continue the standard procedure for sending a fax Automatic Redial If the machine cannot connect to the othe...

Page 62: ...cancel a fax transmission while dialling or during transmission press the Stop key and remove your document Trans canceled Note Once a connection has been established and transmission has begun you ca...

Page 63: ...TEL mode automatically TEL Mode In this mode the machine does not answer incoming calls automatically The machine will continue ringing until you pick up the handset option or start fax reception manu...

Page 64: ...essary then go to step 2 2 Press and replace the handset The machine will start receiving the message Screening out Unwanted Faxes with Authorized Reception This feature lets you screen out unwanted i...

Page 65: ...s are stored in Quick Di als or Name Dials 3 Make sure that you have sent at least one message to all the Specified Senders using their Name Dials or Quick Dials After one message has been sent the Sp...

Page 66: ...display 7 Do one of the following Enter another function number Press to return to standby mode Recep canceled Cancelling Reception of a Fax If for some reason you want to cancel reception of fax whi...

Page 67: ...inue your conversation as usual Faxing During a Telephone Call You can also have the machine take over the line and send or receive a fax message at the end of your telephone call This is useful when...

Page 68: ...f the other party then continue from step 5 below Sending a Fax during a Telephone Call Connecting 3 Make sure the machine is in fax opera tion mode set your document and ad just any scan settings as...

Page 69: ...If you hear a voice answer pick up the external handset press again and continue your conversation Note To cancel the call press 5 Replace the handset when you have fin ished the call Remote Change If...

Page 70: ...he Remote Change digit E g press 8 Press The display opposite will flash briefly on the display and then the function menu will reappear Note Do not turn off the machine while Please wait or Registere...

Page 71: ...a fax number directly on the numeric keypad just press the Quick Dial key the number is stored in If you store a number in a Quick Dial you can also give it a name up to 10 characters long If you pre...

Page 72: ...g 123456789 Prt Help List 1 Press 2 Press 3 Press 4 Press 5 To select a Quick Dial press a Quick Dial key E g press toselectQuickdial Note To print a list of currently stored Quick Dials press Then pr...

Page 73: ...s shown on the op eration panel display 10 Do one of the following To store another Quick Dial go back to step 5 Toreturntostandbymode press twice To access another function press then enter a functio...

Page 74: ...6789 B XYZ 6 Press twice then press Note To clear the Lefrmost digit press Then press 7 Press 8 Edit the name stored in this Quick Dial E g Press To move the cursor press or 9 Press Note Do not turn o...

Page 75: ...y you wish to delete E g press toselectQuickdial 6 Press Note If you do not wish to clear this Quick Dial press twice to return to standby mode 7 Press 8 Press twice to return to standby mode Prt Help...

Page 76: ...dentical first letters and step through them to find the one you want when dialling You can store up to 25 Name Dials Note You cannot store two Name Dials with the same name To check which Name Dials...

Page 77: ...e wait or Registered is shown on the op eration panel display If a Name Dial with the same name is al ready stored Name exists will flash on the display Enter a different name 10 Do one of the followi...

Page 78: ...er the first letter of the Name Dial label E g press If Name Dial you are looking for does not ap pear keep pressing the key until it does E g press again Note You can also search through Name Dials t...

Page 79: ...ect letter Marty Main Off Dialling with Name Dials Instead of dialling the number on the numeric keypad do the following in fax operation mode How to Send a Fax see page 40 1 Make sure the machine is...

Page 80: ...hine s Own name TTI identification Transmission list of recent fax transmissions from this machine Reception list of recent fax messages received by this machine Date and Time when the communication t...

Page 81: ...x number Quick Dial list of Quick Dial labels and numbers Name Dial list of Name Dial labels and numbers 1 Press 2 Press 3 Press 4 Press 5 Press Transmission Result Report By default this report is tu...

Page 82: ...ommunication lasted Reason for error Power Failure Report If power is lost while sending a message receiving a message or while a message has been stored in memory when the Receive File indicator is l...

Page 83: ...nt RX the sound of a fax being received On Hook sounds made when using the On Hook feature Dialling tones you hear after pressing Start Buzzer warning beep e g when cover is opened and the sound made...

Page 84: ...is shown on the op eration panel display 8 Do one of the following Enter another function number Press to return to standby mode Sending Faxes Over Unreliable Lines Slow 4800bps If you experience pro...

Page 85: ...what is wrong The service technician can also use this feature to change some of your machine s settings if you request it For this feature to work you must turn it on before the service technician st...

Page 86: ...wish to change appears on the display E g press once 6 Press 7 Press or to adjust the change 8 Press The display opposite will flash briefly on the display and then the function menu will reappear No...

Page 87: ...cover is securely closed before using it 1 Fan the stack of originals Never try to place more than 10 sheets of plain pa per onto the ADF 2 Straighten up all four sides of the stack by tapping them o...

Page 88: ...document guide into the ADF Note Insert your stack of originals into the ADF until it stops If you do not push it right in the machine will not detect the stack 5 Make sure the upper tray extension i...

Page 89: ...ness 0 05mm to 0 2mm 0 002 to 0 08 Weight 60 to 90 g m2 16lb to 24lb Clear markings Markings on the originals must be clear to be read correctly Uniform page size All pages should be the same size Pag...

Page 90: ...s a chance it is not set correctly in the ADF Reset your document and try again 3 Press to perform the copy opera tion Note During the copy operation the display shows the number of copies printed so...

Page 91: ...refully insert the document stack face down into the ADF 2 Press until the desired size ra tio appears The sizes change in the fol lowing order 100 93 87 82 50 71 A4 A5 3 Press to perform the copy ope...

Page 92: ...insert the document stack face down into the ADF 2 Press until the desired size ratio appears The sizes change in the fol lowing order 100 115 122 200 141 A5 A4 3 Press to perform the copy opera tion...

Page 93: ...want You can change the zoom factor in increments of 1 To Use Zoom 1 Carefully insert the document stack face down into the ADF 2 Press decrease or increase until the desired size ratio appears 3 Pre...

Page 94: ...matches your original Setting Use for Text Fine Copying text Photo1 Copying photographs Photo2 Copying mixed text and photographs Note If the memory size of your machine is 4MB the machine automatica...

Page 95: ...he document stack face down into the ADF 3 Press to perform the copy opera tion Note After copying finishes press to clear any settings 2 Press the Density key to select the im age density Select Ligh...

Page 96: ...the copy operation The number of originals that can be scanned at one time depends on how much memory you have installed Refer to page 23 for de tails on increasing memory capacity Sort Copying 1 Care...

Page 97: ...9 COPYING 5 COPYING 3 When you press to start the copy operation all of the originals on the ADF are scanned into memory before they are printed Note After copying finishes press to clear any settings...

Page 98: ...he paper turn the ma chine off and then back on Af ter machine initialization is complete load the paper back into the machine Use a SIMM with the required specifications Page p 9 p 23 p 23 p 9 P 23 C...

Page 99: ...nt on both sides of the paper Printing onto loosely stacked envelopes Misfeeding of the envelope flap Toner is distributed un evenly in the toner cassette Heat damage to the toner cassette caused by t...

Page 100: ...t specified The power is off The machine is not con nected to the telephone line The Dial Mode settings are not correct Remedy Set the original correctly Straighten out the original s Insert the origi...

Page 101: ...eration panel before pressing the Remote Change digit If the machine is busy dialling Re mote Change is not available Status Cannot send faxes Cannot receive faxes Even when you press the Remote Chang...

Page 102: ...copy job is in progress set the copy quantity again Prepare a toner cassette for re placement Correctly load the toner cassette into the machine If a copy job is in progress set the copy quantity agai...

Page 103: ...or occurred during transmission or the other line was busy Ifpowerwaslostduringthe dialing or connecting phases of transmission or in fax transmission standby mode this message will appear when you ne...

Page 104: ...ith the initial letter you se lected Possible machine defect There is a problem with your machine Press to cancel the trans mission In some locales if this number was stored in a Name Dial Quick Dial...

Page 105: ...problem Turning off the power will erase any message stored in memory To print the page out check the display and rectify the problem e g paper has run out When the problem is resolved the page will...

Page 106: ...a screwdriver or tweezers as this may damage the unit Note If Clear Paper is still displayed after you clear the jam there may be paper jammed in another part of the machine Check all areas described...

Page 107: ...cedure Clearing a Micffeed in the Optional Paper Feed Unit see page 90 If toxner gets on your hands wash them immediately 5 Install the toner cassette into the ma chine Note Besuretoholdthetonercasset...

Page 108: ...Failure to do so can result in damage to the original 2 Pull out the misfed original 3 Close the ADF cover and make sure it locks securely into place Important If copying was in progress be sure to s...

Page 109: ...Not Feed If paper has completely stopped feeding check using the following proce dure 1 Remove all paper 2 1 Raise the document trap 2 Lift up the tabs located on the sides of the machine and open the...

Page 110: ...ght where the toner cassette was set forward 5 Install the toner cassette into the ma chine 6 Close the front unit When the front unit is closed the mo tor will start running When the sound of the mot...

Page 111: ...93 7 USER MAIN TENANCE 7 USER MAINTENANCE Daily Maintenance Clean with a damp cloth and wipe dry Note Turn off the machine before cleaning ADF Lower output slot Output bin...

Page 112: ...assette WARNING Do not incinerate used toner or toner containers Toner dust might ignite when exposed to an open flame Dispose of the used toner cassettes according to local regulations for plastics T...

Page 113: ...to make sure that it is inserted as far as it can go Do not forget to install the cleaning pad whenever you install a new toner cassette 7 Prepare the new toner cassette Hold ing the toner cassette by...

Page 114: ...sure to hold the toner cassette by its handle 10 To close the front unit press down firmly but gently on both sides of it un til the top unit closes and clicks securely into place Note Background gray...

Page 115: ...ns store paper in a vinyl bag Do not store paper where it will be exposed to heat Store on a flat surface Use older stock first Do not lay heavy objects on paper Keep open reams of paper in the packag...

Page 116: ...ist Print this list to get a quick guide to frequently used fax features Prt Help List OK Press Start 1 While the machine is not performing any other operation press 2 Press 3 Press to print the Help...

Page 117: ...suit your requirements They are four User Parameter Switches numbered 00 to 03 Each switch has 8 adjustable bits which can set to either 0 or 1 7654 3210 bit number Switch number 00 0000 1011 bit valu...

Page 118: ...p Function to return to standby mode SWITCH 00 1 2 Explanation Width scanned when faxing a document Display Original left on glass Warningwhenscan ning from the ADF and an original is left on the expo...

Page 119: ...default in some locales If you turn this func tion off some parts of the printed image may be lost SWITCH 01 Default Copy Yes Auto Text STD Bit 7 6 5 4 3 2 1 0 Explanation Copy Fax Operation mode hom...

Page 120: ...mode When Toner Saving is turned on the machine prints using less toner Use this mode if you wish to save on toner and do not mind lighter prints Default 600dpi Off Bit 7 6 5 4 3 2 1 0 Available Setti...

Page 121: ...12 Dial Mode 34 13 Quick Dial Print Dial List 53 14 Name Dial 58 15 Language 104 16 Own name TTI 33 17 Own Fax No 36 21 Authorized Reception 47 22 Slow 4800bps 66 31 Adjust Volume 65 32 Remote Change...

Page 122: ...Selecting the Language 1 Press 2 Press 3 Press and press or until the desired language appears 4 Press Note Do not turn off the machine while Regis tered is displayed If you do not press the setting i...

Page 123: ...n panel is pressed When paper is set in or removed from the upper paper tray When the tray of the paper feed unit option is pulled out or pushed back into the machine When the front unit is opened Whe...

Page 124: ...0 Hz Power Consumption Max 640 W Printing Average 230 W Copying Average 250 W Stand by Average 75 W PC Scan Average 75 W Sending Faxes Average 75 W Receving Faxes Average 230 W Economy Mode 15 W Opera...

Page 125: ...SWC Incised 901 SWC Incised 901 Italic SWC Incised 901 Bold SWC Fixed Pitch 810 Courier Roman SWC Fixed Pitch 810 Courier Bold SWC Fixed Pitch 810 Courier Italic SWC Fixed Pitch 810 Courier Bold Ital...

Page 126: ...nvelopes Transparencies Label paper Paper Weight 60 to 90 g m2 16 to 24 lb Original Types Exposure glass Sheet Book ADF Up to 10 pages of 80g m2 20lb Plain paper Maximum Original Size Legal LG 8 1 2 1...

Page 127: ...Corner guides 17 19 D Daily maintenance 93 Date and time 38 Density key xiii Dial mode 34 Display xii Document guides x Document output tray xi Installing 4 E Economy mode 105 Economy mode Clear modes...

Page 128: ...i paper size Changing 20 Specifying upper 13 15 Specifying lower 19 Paper size indicator 17 19 Paper feed unit 17 Pause Redial key xiv PC Interface indicator xiii Photo1 76 Photo2 76 Platen cover x Po...

Page 129: ...Memory key xiii Sounds 65 Specifications 106 Start key xii Stop key xii Storing your own fax number 36 Storage 97 Summer time 39 T TEL LINE xi 32 Tel mode 45 Telephone call 50 Text fine 76 Toner cass...

Page 130: ...INDEX 112 EE G025...

Page 131: ...Operation Manual al carefully before you use this product and keep ture reference For safety please follow the is manual...

Page 132: ...in the field by a qualified Customer Engineer The laser chassis is not repairable in the field Customer engineers are therefore directed to return all chassis and laser subsys tems to the factory or...

Page 133: ...this machine uses the following symbols for the main switch a means POWER ON b means POWER OFF The Product complies with the requirements of the EMC Directive 89 336 EEC and the Low Voltage Directive...

Page 134: ...ause serious injury or even death CAUTION Ignoring this caution could cause injury or damage to property Symbol examples The d d d d d symbol means a situation that requires you take care The m symbol...

Page 135: ...seri ous eye damage When the machine needs to be checked adjusted or re paired contact your service representative Do not take apart or attempt any modifications to this machine There is a risk of fir...

Page 136: ...from the socket grip the plug to avoid damaging the cord and causing fire or electric shock If you use the machine in a confined space make sure there is a continuous air turnover Do not reuse staple...

Page 137: ...rinting equipment by means of energy saving features such as Low Power mode Low Power Mode This machine automatically lowers its power consumption 15 minutes after the last printing job has been compl...

Page 138: ...NG ACQUAINTED Paper and Other Media 9 Loading Paper 10 To load plain paper into the upper paper tray 10 To load small size paper 12 Loading Other Media 14 To load envelopes 14 To load transparencies 1...

Page 139: ...29 Reduction and Enlargement 30 To set the reduction factor 30 To set the enlargement factor 31 Zoom In 1 Increments 32 To use zoom 32 Adjusting Copy Image 33 To select the resolution photo setting 33...

Page 140: ...TECHNICAL REFERENCE Printing the Help List 54 Selecting the Language 55 Selecting 300 dpi or 600 dpi 56 Economy Mode 58 Changing the Economy Mode 58 Selecting Toner Save Mode 59 8 SPECIFICATIONS 60 In...

Page 141: ...o this port Computer port Connect your computer here SIMM cover Open this cover when you want to install a SIMM and expand memory Platen cover Lift this cover to access the exposure glass when you wan...

Page 142: ...to fit the size of the paper you are feeding Original Guide Guides the original correctly into the machine Set the original so it is under this guide Top unit Upper paper tray Exposure glass Operatio...

Page 143: ...ce an image during copying Available reduction ratios are 50 71 82 87 and 93 Operation Panel 5 Enlarge Press this key to enlarge an image during copying Available enlargement ratios are 115 122 141 an...

Page 144: ...s to tune the preset reduction and enlargement factors to the exact value you want D Help Function Press this key and then input a function number to perform various settings and list printing functio...

Page 145: ......

Page 146: ...t could cause injury If you use the machine in a confined space make sure there is a continuous air turnover Location Conditions Optimum Recommended Temperature 10 to 35 C 50 to 95 F 15 to 25 C 59 to...

Page 147: ...l dren Important Be sure to hold the starter toner cassette by its handle Note Keep the vinyl bag for later repackaging when necessary 3 Holding the starter toner cassette by its handle gently shake i...

Page 148: ...close the top unit press down firmly but gently on both sides of it until the top unit closes and clicks securely into place Note Background gray cast is sometimes evident just after installing a new...

Page 149: ...of the holes for in sertion of the upper paper tray on both sides 2 To install the upper paper tray press down on both sides of the tray making sure that it is inserted as far as it will go Note Pape...

Page 150: ...NG UP 1 SETTING UP Other Settings for Type 2 To remove the protective sheet 1 Open the ADF cover 1 and then re move the protective sheet 2 2 Close the ADF cover and make sure it locks securely into pl...

Page 151: ...the document output tray should fit 2 Insert the pin at one side of the tray by gently bending the document tray until it fits in the insert hole 3 Make sure the small pieces of plastic film curl upwa...

Page 152: ...uter is turned off before making the connection 1 Plug one end of the your printer cable into the lower port on the side of the machine and secure it in place as shown in the illustration Note The mac...

Page 153: ...damage break or make any modifications to the power cord Do not place heavy objects on it pull it hard or bend it more than necessary These actions could cause an electric shock or fire Do not plug o...

Page 154: ...51 2 p 10 81 2 13 81 2 13 p 10 8 101 2 8 101 2 p 10 Legal 81 2 14 Legal 81 2 14 p 10 A5 210mm 148mm A5 p 12 C5 Envelope 162mm 229mm C5 Env p 12 14 C6 Envelope 114mm 162mm C6 Env p 12 14 DL Envelope 11...

Page 155: ...misfeeds To load plain paper into the upper paper tray 1 Fan the stack of paper to make sure that all pages are free and are not sticking together The upper paper tray holds up to 100 sheets of plain...

Page 156: ...pears 8 After pressing press or until the desired size ap pears The sizes change in the follow ing order A4 A5 81 4 13 Legal 81 2 14 Letter 81 2 11 8 101 2 81 2 13 81 2 51 2 9 When the correct paper s...

Page 157: ...in the upper paper tray 2 Open the small panel on the back of the machine by unlatching it as shown in the illustration Opening the small panel makes it easy to handle small size paper 3 Set paper int...

Page 158: ...er size 7 Press Tray guide OK appears 8 After pressing press or until the desired size ap pears The sizes change in the follow ing order A5 C5 Env DL Env C6 Env 9 When the correct paper size is on the...

Page 159: ...flaps because heat generated during the printing process can cause the adhe sive to melt and get on rollers Note Refer to the paper select operation on page 13 To load transparencies Load only one tr...

Page 160: ...h of key Note Make sure that the power of your computer is turned off before making the con nection To connect to a second printer 1 Turn off both the machine and your sec ond printer 2 Connect one en...

Page 161: ...wer socket before installing the paper feed unit 1 Remove all the packing tapes from the paper feed unit and pull the paper tray out of the unit 2 After removing all tapes and cardboard from inside of...

Page 162: ...he bottom of the machine properly CAUTION When lifting the machine make sure your hands are at the locations indicated by in the illustration This protects against pinching your fingers between the ma...

Page 163: ...80 g m2 or 20 lb can be inserted into the pa per tray as shown in the illustration Make sure that the top of the stack is not higher than the limit mark on the side fence Note Make sure the leading c...

Page 164: ...e guide slide it to the correct position for the desired paper size To specify the paper size After you install the paper feed unit option you can select between the upper paper tray and the paper fee...

Page 165: ...select the paper source 100 U 01 100 L 01 Note Refer to page 10 for details on using the upper paper tray Note The actual message that appears on the machine s display depends on the paper source you...

Page 166: ...to install 8MB 16MB or 32MB SIMM Note The following are the required specifications for a SIMM used with this machine 72 pin 60ns Extend Date Out EDO parity non parity Important Make sure you touch so...

Page 167: ...d insert it down into the slot Gently rock it back and forth until you hear it snap into place Important Make sure the SIMM board is oriented cor rectly when you insert it into the slot 6 Make sure th...

Page 168: ...under Connecting to a computer p 7 and Load ing Paper p 10 before trying to perform the following procedures To install the printer driver under Windows 95 1 If the New Hardware Found window is open...

Page 169: ...INSTALL replacing X with the name of the drive from which you are installing and then click OK Follow the instructions that appear on your computer screen Note that installation takes a few minutes A...

Page 170: ...600 300 600 Graphics Resolution High High High High High Halftone Screening Screening Screening Screening Dithering Job Settings True Type Mode Name Configuration Device Configuration Feeder Toner Sav...

Page 171: ...de to Off Note Refer to page 15 for details on connecting a second printer To print to the second printer 1 Press The Second Printer indicator lights Important Whenever you change printers be sure to...

Page 172: ...he scale For Type 2 Users When the original is smaller than the paper you are copying to place a second sheet of paper that is larger than the paper you are copying to on top of the original when you...

Page 173: ...3 Press to perform the copy opera tion Note During the copy operation the display shows the number of copies printed so far and that to be printed For example 02 10 appears while the second copy of a...

Page 174: ...k should be no more than 30mm 1 18 1 Lift the platen cover 2 Open to the page you want to copy and lay the page face down on the exposure glass Be sure to align one of the cor ners of the page with th...

Page 175: ...he original face down at the arrow mark on the scale 2 Close the platen cover 3 2 Press until the desired size ra tio appears The sizes change in the fol lowing order 100 93 87 82 50 71 A4 A5 3 Press...

Page 176: ...en cover 3 2 Press until the desired size ra tio appears The sizes change in the fol lowing order 100 115 122 200 141 A5 A4 3 Press to perform the copy op eration Note Press to clear the setting after...

Page 177: ...factor in increments of 1 To use zoom 1 Lift the platen cover 1 Place the original face down at the arrow mark on the scale 2 Close the platen cover 3 2 Press decrease or increase until the desired s...

Page 178: ...display to indicate the current setting 1 3 2 4 Press to perform the copy op eration Note Press to clear the setting after copying The following describes when you should use each setting Setting Use...

Page 179: ...ce down at the arrow mark on the scale 2 Close the platen cover 3 3 Press to perform the copy op eration Note Press to clear the setting after copying 2 Press the Density key to select the im age dens...

Page 180: ...re than 10 sheets of plain pa per onto the ADF 2 Straighten up all four sides of the stack by tapping them on a desk or table top 3 Place the stack of originals face down on the ADF and slide the docu...

Page 181: ...the originals must be clear to be read correctly Uniform page size All pages should be the same size Page condition Avoid using originals that are bent curled damaged or stapled and originals printed...

Page 182: ...g the copy operation The number of originals that can be scanned at one time depends on how much memory you have installed Refer to page 21 for de tails on increasing memory capacity To turn sorting o...

Page 183: ...38 COPYING 3 When you press to start the copy operation all of the originals on the ADF are scanned into memory before they are printed Note Press to clear the setting after copying...

Page 184: ...aper turn the ma chine off and then back on Af ter machine initialization is complete load the paper back into the machine Use a SIMM with the required specifications Page p 8 p 21 p 21 p 8 P 21 Cause...

Page 185: ...sides of the paper Printing on an envelope that is too thick Misfeeding of the envelope flap Toner is distributed un evenly in the toner cassette Heat damage to the toner cassette caused by turning o...

Page 186: ...ad is not in stalled Copyingtosmall sizepaper with the Type 2 machine Different size original and copy paper Non white original back ground Dirty platen cover or expo sure glass Dirty ADF transport pa...

Page 187: ...to turn off the machine before calling Remedy Close the top unit Load paper and set the copy quantityagainduringacopyjob Prepare a toner cassette for re placement Correctly load the toner cassette int...

Page 188: ...section because it could be very not Important Hold a misfed sheet with both hands and slowly pull it out Do not use a tool such as a screwdriver or tweezers as this may damage the unit Type 1 1 Pull...

Page 189: ...ear the misfeed using this procedure use the procedure on page 47 instead Sometimes toner may get on your hands 5 Install the toner cassette into the ma chine Note Be sure to hold the toner cassette b...

Page 190: ...Area 1 or 2 1 Pull the top release lever 1 and open the top unit 2 2 Pull out the toner cassette Note Be sure to hold the toner cassette by its handle Keep the toner cassette horizontal to avoid spill...

Page 191: ...ear the misfeed using this procedure use the procedure on page 47 instead Sometimes toner may get on your hands 5 Install the toner cassette into the ma chine Note Be sure to hold the toner cassette b...

Page 192: ...result in damage to the original 2 Pull out the misfed original 3 Close the ADF cover and make sure it locks securely into place Important Make sure to specify the desired copy quantity again Paper fe...

Page 193: ...he misfed paper 3 Slide the paper tray back into the paper feed unit until it locks into place Tip If you cannot find a remedy for unexpected printout results here check the printer driver s online he...

Page 194: ...MAIN TENANCE 6 USER MAINTENANCE Daily Maintenance Clean with a damp cloth and wipe dry Note Turn off the machine before cleaning Exposure glass Platen cover Type 2 Exposure glass ADF Platen cover Plat...

Page 195: ...ens the life of a toner cassette WARNING Do not incinerate used toner or toner containers Toner dust might ignite when exposed to an open flame Dispose of the used toner cassettes according to local r...

Page 196: ...ake sure that it is inserted as far as it can go Do not forget to install the cleaning pad whenever you install a new toner cassette 7 Prepare the new toner cassette Hold ing the toner cassette by its...

Page 197: ...e sure to hold the toner cassette by its handle 10 To close the top unit press down firmly but gently on both sides of it until the top unit closes and clicks securely into place Note Background gray...

Page 198: ...ns store paper in a vinyl bag Do not store paper where it will be exposed to heat Store on a flat surface Use older stock first Do not lay heavy objects on paper Keep open reams of paper in the packag...

Page 199: ...can print out the help list Prt Help List OK Press Start 1 While the machine is not performing any other operation press The message Prt Help List appears 2 Press Press Start appears 3 Press to print...

Page 200: ...until 2 Language appears The messages change in the following order 1 Tray Pap Size 3 User Param 2 Language 3 Press and press or until the desired language appears The languages change in the followi...

Page 201: ...2 Press or until 3 User Param appears The messages change in the following order 1 Tray Pap Size 3 User Param 2 Language 3 Press and press to move the flashing block cursor until it appears in the pos...

Page 202: ...e wait Registered 5 Press Please wait then Reg istered appears Note To cancel this change press or instead of Please wait and Not Registered appear on the display Do not turn off the machine while Ple...

Page 203: ...peration panel is off Note During the Economy Mode the heater turns back on in the following cases when any key on the operation panel is pressed when the platen cover is opened when paper is set in o...

Page 204: ...l it appears in one of the positions shown in the illustration to the right Note The bits other than the one highlighted in the illustration are unrelated to this setting 4 Press to change the bit set...

Page 205: ...Memory 4MB Expandableto8MB 16MBor32MB EDO SIMM 60 ns 72 pin Dimensions 297mm 352mm 576mm H W D 11 70 13 87 22 69 H W D Weight 15 5 kg 34 18 lb 8 SPECIFICATIONS General Specifications Type 1 Type 2 Po...

Page 206: ...Swiss 742 SWC Swiss 742 Italic SWC Swiss 742 Bold SWC Swiss 742 Bold Italic SWC Swiss 742 Condensed SWC Swiss 742 Condensed Italic SWC Swiss 742 Condensed Bold SWC Swiss 742 Condensed Bold Italic SWC...

Page 207: ...opy Reduction and Enlargement 50 71 82 87 93 115 122 141 200 Paper Media Types Plain paper Envelopes Transparencies Label paper Paper Weight 60 to 90 g m2 16 to 24 lb Original Types Exposure glass Typ...

Page 208: ...Installing 6 E Economy Mode 58 Economy Mode Clear Modes key xi Enlarge x Enlargement 30 envelopes 14 Exposure glass viii ix Extend tray viii ix F Front guide 16 19 Front paper support 16 H Help List 5...

Page 209: ...Scanner lock viii ix Unlocking 3 Second Printer Additional Printer port viii ix Second Printer Additional Printer x Connecting 15 Using 26 Side guide 16 19 SIMM cover viii ix SIMM 21 Small size paper...

Page 210: ......

Page 211: ...lease follow the instructions in this manual RICOH CORPORATION CALLING FOR SERVICE For service in the United States call 1 800 RICOH38 1 800 742 6438 A A S A Mar 12 14 ona 93 295 7600 A SpA allurgia 1...

Page 212: ...quipment generates uses and can radiate radio frequency energy and if not installed and used in accordance with the instructions may cause harmful interference to radio communications However there is...

Page 213: ...s a situation that requires you take care The symbol means you MUST NOT carry out this operation This example means Do not take apart The symbol means you MUST perform this operation This example mean...

Page 214: ...serious eye damage When the machine needs to be checked adjusted or repaired contact your service representative Do not take apart or attempt any modifications to this machine There is a risk of fire...

Page 215: ...from the socket grip the plug to avoid damaging the cord and causing fire or electric shock If you use the machine in a confined space make sure there is a continuous air turnover Do not reuse staple...

Page 216: ...uct was designed to reduce the environmental impact associated with printing equipment by means of energy saving features such as Low Power mode Low Power Mode This machine automatically lowers its po...

Page 217: ...mputer 7 Turning On the Machine 8 2 GETTING ACQUAINTED Paper and Other Media 9 Loading Paper 10 To load plain paper into the upper paper tray 10 To load small size paper 12 Loading Other Media 14 To l...

Page 218: ...on factor 30 To set the enlargement factor 31 Zoom In 1 Increments 32 To use zoom 32 Adjusting the Copy Image 33 To select the resolution photo setting 33 To adjust the image density 33 Setting an Ori...

Page 219: ...TECHNICAL REFERENCE Printing the Help List 56 Selecting the Language 57 Selecting 300 dpi or 600 dpi 58 Economy Mode 60 Changing the Economy Mode 60 Selecting Toner Save Mode 61 8 SPECIFICATIONS 62 In...

Page 220: ...a second printer to this port Computer port Connect your computer here SIMM cover Open this cover when you want to install a SIMM and expand memory Platen cover Lift this cover to access the exposure...

Page 221: ...ument guides Slide the left guide to fit the size of the paper you are feeding Original guide Guides the original correctly into the machine Make sure your original fits under this guide Top unit Uppe...

Page 222: ...uction ratios are 50 65 77 93 and LGL LTR Operation Panel 5 Enlarge Press this key to enlarge an image during copying Available enlargement ratios are 121 129 155 200 and LTR LGL 6 Paper Select Press...

Page 223: ...press these keys to fine tune the preset reduction and enlargement ratios Also use to select function settings and navigate the function menus D Help Function Press this key and then input a function...

Page 224: ...xii...

Page 225: ...ould cause injury If you use the machine in a confined space make sure there is a continuous air turnover Location Environment Acceptable Recommended Temperature 10 to 35 C 50 to 95 F 15 to 25 C 59 to...

Page 226: ...l dren Important Be sure to hold the starter toner cassette by its handle Note Keep the vinyl bag for later repackaging when necessary 3 Holding the starter toner cassette by its handle gently shake i...

Page 227: ...close the top unit press down firmly but gently on both sides of it until the top unit closes and clicks securely into place Note Background gray cast is sometimes evident just after installing a new...

Page 228: ...of the slots for in sertion of the upper paper tray on both sides 2 To install the upper paper tray press down on both sides of the tray making sure that it is inserted as far as it will go Note Pape...

Page 229: ...he protective sheet 2 2 Close the ADF cover and make sure it locks securely into place 1 2 To install the document output tray 1 Look at the rear of the machine to con firm where the document output t...

Page 230: ...e small pieces of plastic film curl upwards as shown Important The original will not be delivered properly if the films are not set as shown To pull out the output tray extension 1 To pull out the out...

Page 231: ...on 1 Plug one end of the your parallel cable into the lower port on the side of the machine and secure it in place as shown in the illustration Note The machine must be connected to a com puter for pr...

Page 232: ...damage break or make any modifications to the power cable Do not place heavy objects on it pull it hard or bend it more than necessary These actions could cause an electric shock or fire Do not plug...

Page 233: ...p 11 Legal 81 2 14 Legal 81 2 14 p 11 A4 210mm 297mm A4 p 11 A5 148mm 210mm A5 p 11 F4 81 4 13 81 4 13 p 11 Executive Exec 71 4 x 101 2 p 13 15 COM 10 Com 10 41 8 x 91 2 p 13 15 Monarch Mon 37 8 x 71...

Page 234: ...ause misfeeds To load plain paper into the upper paper tray 1 Fan the stack of paper to make sure that all pages are free and are not sticking together The upper paper tray holds up to 100 sheets of p...

Page 235: ...the desired size ap pears 9 When the correct paper size is on the display press If the paper feed unit option page 17 is installed you can also select its paper size at this time Note Registered Lett...

Page 236: ...in the upper paper tray 2 Open the small panel on the back of the machine by unlatching it as shown in the illustration Opening the small panel makes it easy to handle small size paper 3 Set paper int...

Page 237: ...ss or until the desired size appears 9 When the correct paper size is on the display press Registered 51 2 81 2 Tray guide OK OK Tip If the paper feed unit option is not installed you can press in pla...

Page 238: ...flaps because heat generated during the printing process can cause the adhe sive to melt and get on rollers Note Refer to the paper select operation on page 14 To load transparencies Load only one tr...

Page 239: ...h of key Note Make sure that the power of your computer is turned off before making the con nection To connect to a second printer 1 Turn off both the machine and your sec ond printer 2 Connect one en...

Page 240: ...the power socket before installing the paper feed unit 1 Remove all the packing tapes from the paper feed unit and pull the paper tray out of the unit 2 After removing all tapes and cardboard from ins...

Page 241: ...he bottom of the machine properly CAUTION When lifting the machine make sure your hands are at the locations indicated by in the illustration This protects against pinching your fingers between the ma...

Page 242: ...80 g m2 or 20 lb can be inserted into the pa per tray as shown in the illustration Make sure that the top of the stack is not higher than the limit mark on the side fence Note Make sure the leading c...

Page 243: ...per size 2 Squeezing in on both sides of the side guide slide it to the correct position for the desired paper size To specify the paper size After you install the paper feed unit option you can selec...

Page 244: ...0 for details on using the upper paper tray Note The actual message that appears on the machine s display depends on the paper source you last used If Upper Tray appears press or to display the Lower...

Page 245: ...to install 8MB 16MB or 32MB SIMM Note The following are the required specifications for a SIMM used with this machine 72 pin 60ns Extend Date Out EDO parity non parity Important Make sure you touch so...

Page 246: ...d insert it down into the slot Gently rock it back and forth until you hear it snap into place Important Make sure the SIMM board is oriented cor rectly when you insert it into the slot 6 Make sure th...

Page 247: ...provided for both Windows 95 98 and Windows 3 1 but the scanning feature requires Windows 95 98 Setting up Before you can start printing and scanning you need to the following if you have not done so...

Page 248: ...sk images under the directory named 3 1 on the CD ROM to floppy disks Then insert the first floppy disk into your floppy disk drive and run install exe Note You cannot install from CD ROM under Window...

Page 249: ...on dpi 600 600 600 300 600 Graphics Resolution High High High High High Halftone Screening Screening Screening Screening Dithering Job Settings True Type Mode Name Configuration Device Configuration F...

Page 250: ...you turn it off Note Connecting a second printer see page 15 To print to the second printer 1 Press The Second Printer indicator lights Important Whenever you change printers be sure to also change t...

Page 251: ...n the scale For Type 2 Users When the original is smaller than the paper you are copying to place a second sheet of paper that is larger than the paper you are copying to on top of the original when y...

Page 252: ...3 Press to perform the copy opera tion Note During the copy operation the display shows the number of copies printed so far and that to be printed For example 02 10 appears while the second copy of a...

Page 253: ...k should be no more than 30mm 1 18 1 Lift the platen cover 2 Open to the page you want to copy and lay the page face down on the exposure glass Be sure to align one of the cor ners of the page with th...

Page 254: ...the platen cover 0 Place the original face down at the arrow mark on the scale a Close the platen cover I Reduce Press 0 until the desired size ra tio appears The sizes change in the fol lowing order...

Page 255: ...n the scale 0 Close the platen cover 0 Press Enlarge 0 until the desired sizera tio appears Thesizeschangein the fol lowing order Press 121 4 129 155 LTR LGL c 200 J Start Oto perform the copy op erat...

Page 256: ...factor in increments of 1 To use zoom 1 Lift the platen cover 1 Place the original face down at the arrow mark on the scale 2 Close the platen cover 3 2 Press decrease or increase until the desired s...

Page 257: ...he display to indicate the current setting 1 3 2 4 Press to perform the copy op eration Note Press to clear the setting after copying The following describes when you should use each setting Setting U...

Page 258: ...l face down at the arrow mark on the scale 2 Close the platen cover 3 3 Press to perform the copy op eration Note Press to clear the setting after copying 2 Press the Density key to select the im age...

Page 259: ...re than 10 sheets of plain pa per onto the ADF 2 Straighten up all four sides of the stack by tapping them on a desk or table top 3 Place the stack of originals face down on the ADF and slide the docu...

Page 260: ...correctly Uniform page size All pages should be the same size Page condition Avoid using originals that are bent curled damaged or stapled and originals printed on coated paper carbon paper or photog...

Page 261: ...before starting the copy operation The number of originals that can be scanned at one time depends on how much memory you have installed Upgrading Memory see page 21 To turn sorting on and off 1 Set t...

Page 262: ...38 COPYING 3 When you press to start the copy operation all of the originals on the ADF are scanned into memory before they are printed Note Press to clear the setting after copying...

Page 263: ...s Remove the paper turn the ma chine off and then back on Af ter machine initialization is complete load the paper back into the machine Use a SIMM with the required specifications Page p 8 p 21 p 21...

Page 264: ...sides of the paper Printing onto loosely stacked envelopes Misfeeding of the envelope flap Toner is distributed un evenly in the toner cassette Heat damage to the toner cassette caused by turning off...

Page 265: ...ginal and copy paper Non white original back ground Dirty platen cover or expo sure glass Dirty ADF transport path Low contrast original Copying in Text Fine Mode The correct paper size is not specifi...

Page 266: ...dy Close the top unit If a copy job isinprogress setthecopyquan tity again Load paper If a copy job is in progress set the copy quantity again Prepare a toner cassette for re placement Correctly load...

Page 267: ...press If you need to printbigsortcopyjobs increase memory capacity Unlockthescannerlock turnthe machine off and then back on Turn power off and then back on again p 21 37 p 3 p 8 If you have a problem...

Page 268: ...cause it could be very hot Important Hold a misfed sheet with both hands and slowly pull it out Do not use a tool such as a screwdriver or tweezers as this may damage the unit Type 1 1 Pull the top re...

Page 269: ...on page 47 instead Sometimes toner may get on your hands 5 Install the toner cassette into the ma chine Note Be sure to hold the toner cassette by its handle Keep the toner cassette horizontal to avoi...

Page 270: ...2 1 Pull the top release lever 1 and open the top unit 2 2 Pull out the toner cassette Note Be sure to hold the toner cassette by its handle Keep the toner cassette horizontal to avoid spilling the to...

Page 271: ...sfeed using this procedure use the procedure on page 47 instead Sometimes toner may get on your hands 5 Install the toner cassette into the ma chine Note Be sure to hold the toner cassette by its hand...

Page 272: ...e original 2 Pull out the misfed original 3 Close the ADF cover and make sure it locks securely into place Important If copying was in progress be sure to specify the desired copy quantity again Paper...

Page 273: ...ee page 16 Tip If you cannot find a remedy for unexpected printout results here check the printer driver s online help for other useful information When paper will not feed If paper has completely sto...

Page 274: ...p inside on the right where the toner cassette was set forward 5 Install the toner cassette into the ma chine 6 Close the top unit When the top unit is closed the motor will start running When the sou...

Page 275: ...MAIN TENANCE 6 USER MAINTENANCE Daily Maintenance Clean with a damp cloth and wipe dry Note Turn off the machine before cleaning Exposure glass Platen cover Type 2 Exposure glass ADF Platen cover Plat...

Page 276: ...en the life of a toner cassette WARNING Do not incinerate used toner or toner containers Toner dust might ignite when exposed to an open flame Dispose of the used toner cassettes according to local re...

Page 277: ...make sure that it is inserted as far as it can go Do not forget to install the cleaning pad whenever you install a new toner cassette 7 Prepare the new toner cassette Hold ing the toner cassette by i...

Page 278: ...e sure to hold the toner cassette by its handle 10 To close the top unit press down firmly but gently on both sides of it until the top unit closes and clicks securely into place Note Background gray...

Page 279: ...ns store paper in a vinyl bag Do not store paper where it will be exposed to heat Store on a flat surface Use older stock first Do not lay heavy objects on paper Keep open reams of paper in the packag...

Page 280: ...List You can print out the help list Prt Help List OK Press Start 1 While the machine is not performing any other operation press The message Prt Help List appears 2 Press 3 Press to print the Help L...

Page 281: ...e The language for the display can be selected from the following 1 Press 2 Press or until 2 Language appears 3 Press and press or until the desired language appears 4 Press Note Do not carry out any...

Page 282: ...1 Press 2 Press or until 3 User Param appears The messages change in the following order 3 Press and press to move the flashing block cursor until it appears in the position shown in the illustration...

Page 283: ...CHNICAL REFERENCE Please wait Registered 5 Press Note To cancel this change press or instead of Please wait and Not Registered appear on the display Do not carry out any operations while Registered ap...

Page 284: ...heater turns back on in the following cases when any key on the operation panel is pressed when the platen cover is opened when paper is set in or removed from the upper paper tray Type 2 when the tr...

Page 285: ...ntil it appears in one of the positions shown in the illustration to the right Note The bits other than the one highlighted in the illustration are unrelated to this setting 4 Press to change the bit...

Page 286: ...2 20 lb 50 sheets Memory 4MB Expandableto8MB 16MBor32MB EDO SIMM 60 ns 72 pin Dimensions 297mm 352mm 576mm H W D 11 70 13 87 22 69 H W D Weight 15 5 kg 34 18 lb 8 SPECIFICATIONS General Specifications...

Page 287: ...SWC Incised 901 SWC Incised 901 Italic SWC Incised 901 Bold SWC Fixed Pitch 810 Courier Roman SWC Fixed Pitch 810 Courier Bold SWC Fixed Pitch 810 Courier Italic SWC Fixed Pitch 810 Courier Bold Ital...

Page 288: ...nlargement 50 65 77 93 LGL LTR 121 129 155 200 LTR LGL Paper Media Types Plain paper Envelopes Transparencies Label paper Paper Weight 60 to 90 g m2 16 to 24 lb Original Types Exposure glass Type 1 Ty...

Page 289: ...Installing 6 E Economy Mode 60 Economy Mode Clear Modes key xi Enlarge x Enlargement 30 envelopes 14 Exposure glass viii ix Extend tray viii ix F Front guide 16 19 Front paper support 16 H Help List 5...

Page 290: ...i Scanner lock viii ix Unlocking 3 Second Printer Additional Printer port viii ix Second Printer Additional Printer x Connecting 15 Using 26 Side guide 16 19 SIMM cover viii ix SIMM 21 Small size pap...

Page 291: ...Road ong Kong 2862 2888 A PACIFIC Road he Heeren 38855 830 5888 s for 20D BLACK to ku Tokyo Operation Manual Operation Manual Read this manual carefully before you use this product and keep it handy...

Page 292: ...eers are therefore directed to return all chassis and laser subsys en replacement of the optical subsystem is required do not appear in the following pages Check the type of your ma l rks 706 y diffe...

Page 293: ...s a situation that requires you take care The symbol means you MUST NOT carry out this operation This example means Do not take apart The symbol means you MUST perform this operation This example mean...

Page 294: ...serious eye damage When the machine needs to be checked adjusted or repaired contact your service representative Do not take apart or attempt any modifications to this machine There is a risk of fire...

Page 295: ...from the socket grip the plug to avoid damaging the cord and causing fire or electric shock If you use the machine in a confined space make sure there is a continuous air turnover Do not reuse staple...

Page 296: ...product was designed to reduce the environmental impact associated with printing equipment by means of energy saving features such as Low Power mode Low Power Mode This machine automatically lowers it...

Page 297: ...ing to a Computer 7 Connecting the Telephone Line and Optional Telephone Handset 8 Turning On the Machine 9 2 GETTING ACQUAINTED Paper and Other Media 10 Loading Paper 11 Loading Plain Paper into the...

Page 298: ...the Operation Panel 30 Entering Numbers 30 Entering Letters Symbols and Spaces 30 Deleting Characters and Moving the Cursor 31 Setting up 32 Please Read This First 32 Connecting to the Telephone Line...

Page 299: ...toring the Line while Dialling with On Hook 52 Remote Change 52 Storing Fax and Telephone Numbers 54 Quick Dials 54 Storing Quick Dials 55 Editing Quick Dials 56 Clearing Quick Dials 58 Name Dials 59...

Page 300: ...inal on the ADF 78 Sorting Output 80 Sorting Copying 80 6 TROUBLESHOOTING General 82 Printing and Copying 82 Printing 83 Copying and Faxing 84 Scanning 86 Error Messages 86 When the Receive File Indic...

Page 301: ...1 Customising Default Settings with the User Parameters 102 Changing the User Parameters 102 User Parameter Switch Summary 103 Function List 106 Selecting the Language 107 Economy Mode 108 Changing th...

Page 302: ...per you are feeding Original guide Guides the original correctly into the machine Make sure your original fits under this guide Exposure glass Place originals on this glass face down Operation panel K...

Page 303: ...g transport Be sure to release this lock before using the machine Second Printer Additional Printer port You can connect a second printer to this port Computer port Connect your computer here SIMM cov...

Page 304: ...copying or begin sending or receiving a fax Operation Panel 6 6 6 6 6 Stop key Press this key to interrupt the current operation and return the machine to the standby state To reset printer mode hold...

Page 305: ...ct Auto Image Density to let the machine choose a suitable setting D D D D D Check Display indicator Blinks to alert you to read a message on the display E E E E E Busy indicator Lights during a fax o...

Page 306: ...y operation mode these keys have different uses Quick Dials see page 54 M M M M M Reception Mode key Press to choose whether the machine should answer all calls automatically Choosing the Reception Mo...

Page 307: ...NERAL DESCRIPTION Printing Q Q Q Q Q Second Printer key Press this key to select between printing to this machine indicator off and printing to a second printer connected to the machine indicator on O...

Page 308: ...xvi This page is intentionally blank...

Page 309: ...ver it could cause injury If you use the machine in a confined space make sure there is a continuous air turnover Location Environment Acceptable Recommended Temperature 10 to 35 C 50 to 95 F 15 to 25...

Page 310: ...l dren Important Be sure to hold the starter toner cassette by its handle Note Keep the vinyl bag for later repackaging when necessary 3 Holding the starter toner cassette by its handle gently shake i...

Page 311: ...r cas sette slide along the guides inside the machine Note Be sure to hold the starter toner cassette by its handle 6 To close the top unit press down firmly but gently on both sides of it until the t...

Page 312: ...the machine The machine will not operate correctly if the scanner is locked 1 Unlock the scanner by pulling the lever located at the back of the machine 1 2 Removing the Protective Sheet 1 Open the AD...

Page 313: ...nt output tray should fit 2 Insert one end of the document output tray into the slot provided Then gently bend the tray so the other end fits into the second slot 3 Make sure the small pieces of plast...

Page 314: ...f the machine and note the locations of the slots for in sertion of the upper paper tray on both sides 2 To install the upper paper tray press down on both sides of the tray making sure that it is ins...

Page 315: ...1 Plug one end of the provided parallel cable into the lower port on the side of the machine and secure it in place as shown in the illustration Note The machine must be connected to a com puter for...

Page 316: ...et at the rear of the machine 2 Connect the other end of the line cable to your telephone line wall socket If you have the optional telephone hand set now do the following 3 Plug the telephone handset...

Page 317: ...o the power source described on the inside of the front cover Avoid multi wiring Do not damage break or make any modifications to the power cable Do not place heavy objects on it pull it hard or bend...

Page 318: ...13 p 11 Letter 81 2 11 Letter 81 2 11 p 11 Legal 81 2 14 Legal 81 2 14 p 11 C5 Envelope 162mm 229mm C5 Env p 13 15 C6 Envelope 114mm 162mm C6 Env p 13 15 DL Envelope 110mm 162mm DL Env p 13 15 Transp...

Page 319: ...tray can cause misfeeds Loading Plain Paper into the Upper Paper Tray 1 Fan the stack of paper to make sure that all pages are free and are not sticking together The upper paper tray holds up to 100...

Page 320: ...isonthe dis play press If the paper feed unit option page 17 is installed you can also select its paper size at this time Note Do not carry out any operations while Reg istered appears on the display...

Page 321: ...the upper paper tray 2 Open the small size paper feed access panel on the back of the machine by unlatching it as shown in the illustra tion Opening the small panel makes it easy to handle small size...

Page 322: ...5 Tray guide OK OK Important Be sure to specify the paper size again before copying printing or receiving faxes onto A4 or Letter size paper If you do not you will not be able to receive faxes Functio...

Page 323: ...s with adhesive on the flaps because heat generated during the printing process can cause the adhe sive to melt and get on rollers Note Paper select operation see page 14 Loading Transparencies Load o...

Page 324: ...computer is turned off before making the con nection Connecting to a Second Printer 1 Turn off both the machine and your sec ond printer 2 Connect one end of a parallel interface cable to your second...

Page 325: ...m the power socket before installing the paper feed unit 1 Remove all the packing tapes from the paper feed unit and pull the paper tray out of the unit 2 After removing all tapes and cardboard from i...

Page 326: ...of the machine properly CAUTION When lifting the machine make sure your hands are at the locations indicated by in the illustration This protects against pinching your fingers between the machine and...

Page 327: ...plain paper 80 g m2 or 20 lb can be inserted into the pa per tray as shown in the illustration Make sure that the top of the stack is not higher than the limit mark on the side fence Note Make sure th...

Page 328: ...in on both sides of the side guide slide it to the correct position for the desired paper size Specifying the Paper Size After you install the paper feed unit option you can select between the upper p...

Page 329: ...play depends on the paper source you last used If Upper Tray appears press or to display the Lower Tray message before proceeding with step 4 A4 4 Press Installing the Paper Size Indicator 1 Remove th...

Page 330: ...UAINTED Selecting the Paper Source 100 U 01 100 L 01 1 Press until the desired pa per source appears Theupperpapertrayisselectedwhen U is on the display and the paper feed unit is selected when L is o...

Page 331: ...to install an 8MB 16MB or 32MB SIMM Note The following are the required specifications for a SIMM used with this machine 72 pin 60ns Extend Date Out EDO parity non parity Important Make sure you touch...

Page 332: ...it down into the slot Gently rock it back and forth until you hear it snap into place Important Make sure the SIMM board is oriented cor rectly when you insert it into the slot 6 Make sure the hooks o...

Page 333: ...provided for both Windows 95 98 and Windows 3 1 but the scanning feature requires Windows 95 98 Setting up Before you can start printing and scanning you need to the following if you have not done so...

Page 334: ...k images under the directory named 3 1 on the CD ROM to floppy disks Then insert the first floppy disk into your floppy disk drive and run install exe Note You cannnot install from CD ROM under Window...

Page 335: ...on dpi 600 600 600 300 600 Graphics Resolution High High High High High Halftone Screening Screening Screening Screening Dithering Job Settings True Type Mode Name Configuration Device Configuration F...

Page 336: ...it off Note Refer to page 16 for details on connecting a second printer Printing to the Second Printer 1 Press The Second Printer indicator lights Important Whenever you change printers be sure to als...

Page 337: ...the fax feature to suit your needs Switching between Fax Operation and Copy Operation Mode This machine has two modes fax operation mode and copy operation mode You can still receive fax messages when...

Page 338: ...678 Entering Pauses and Tones in Fax Numbers see page 43 Entering Letters Symbols and Spaces When the display asks you enter a name you can use the numeric keypad to enter characters and symbols To en...

Page 339: ...e printed correctly on lists and reports Deleting Characters and Moving the Cursor When entering names and storing numbers To delete the character to the left of the cursor press Note If the cursor is...

Page 340: ...e Daylight Saving Time see page 39 The volume of sounds the machine makes see page 66 If you wish to share the line with a telephone handset you may need to change the reception mode Choosing a Recept...

Page 341: ...racters long Entering Characters on the Operation Panel see page xii 30 If you do not want this identification printed on faxes you send see Page Header on page 68 1 Press 2 Press 3 Press 4 Press 5 En...

Page 342: ...ial Mode Specify the type of telephone line you are using tone or pulse dial If you are unsure of what this should be please consult your line provider If your machine is behind a PABX you should also...

Page 343: ...utside dial tone on the numeric keypad e g enter 0 You can enter 0 or a value between 01 and 99 00 is not possible Note When changing an existing setting press to clear it then enter the new number 10...

Page 344: ...This will appear on the other party s display during communication and be printed on their and your own reports Note In some locales you cannot store your own fax number If the other party is using A...

Page 345: ...make sure the cursor is at the far left position then press The display opposite will appear Press to clear the setting or press to cancel this operation 6 Press Note Do not carry out any operations...

Page 346: ...er the month on the numeric keypad E g press Day 01O K Month 05O K Month 02O K Year 00O K Time 01 13 O K Year 99O K Setting the Date and Time This is printed on reports to help you keep track of machi...

Page 347: ...ears on the display 12 Do one of the following Enter another function number Press to return to standby mode Turning Summer Time Daylight Saving Time on off This feature is useful if local custom requ...

Page 348: ...g Pauses and Tones in Fax Numbers see page 43 Set documents you wish to fax in the same way as when setting originals for copying There are two methods On the exposure glass set documents face down on...

Page 349: ...en cover 1 then place the first page of your document face down on the exposure glass aligning it with the arrow mark on the scale 2 Thenclosetheplatencover3 4 Adjust the scan settings if necessary E...

Page 350: ...he fax number and sends your fax message If you set your document on the exposure glass in step 7 you now need to do the following steps 7 To select the length of your document press or until a suitab...

Page 351: ...the numeric keypad to fin 001 To enter a pause in a fax number press The pause is shown on the display as a character Set next OK OK08 To finish 06 ish sending your fax message Entering Pauses and Ton...

Page 352: ...fax or telephone number dialled with the numeric keys a Quick Dial or a Name Dial To redial a fax number follow the procedure below Note If you dialled the last number with a Quick Dial or Name Dial...

Page 353: ...ount maxi mum is reached Note The redial interval and count maximum vary according to your locale Trans canceled Cancelling Automatic Redial To cancel redialling remove your document from the ADF Canc...

Page 354: ...mode automatically TEL Mode In this mode the machine does not answer incoming calls automatically The machine will continue ringing until you pick up the handset option or start fax reception manually...

Page 355: ...ear a voice and you lifted the habdset continue the conversation as normal and replace the handset when finished If you hear another fax machine make sure the machine is in fax operation mode press Fa...

Page 356: ...the Quick Dials or Name Dials If it is found and you have used that Quick Dial or Name Dial to send at least one message to that destination the message is accepted Note You can store up to 30 Specifi...

Page 357: ...ne of the following Enter another function number Press to return to standby mode Recep canceled Cancelling Reception of a Fax If for some reason you want to cancel reception of fax while it is being...

Page 358: ...your conversation as usual Faxing During a Telephone Call You can also have the machine take over the line and send or receive a fax message at the end of your telephone call This is useful when The...

Page 359: ...de Trans OK Mode Trans OK 3 Make sure the machine is in fax opera tion mode set your document and ad just any scan settings as required 4 Press 5 If the display opposite is not shown press or until it...

Page 360: ...you hear a voice answer pick up the external handset press again and continue your conversation To cancel the call press 5 Replace the handset when you have fin ished the call Remote Change If you ha...

Page 361: ...ct the Remote Change digit E g press 8 Press The display opposite will flash briefly on the display and then the function menu will reappear Note Do not turn off the machine while Please wait or Regis...

Page 362: ...number directly on the numeric keypad just press the Quick Dial key the number is stored in If you store a number in a Quick Dial you can also give it a name up to 10 characters long If you press a Q...

Page 363: ...nting 123456789 Prt Help List 1 Press 2 Press 3 Press 4 Press 5 To select a Quick Dial press a Quick Dial key E g press toselectQuickdial Note To print a list of currently stored Quick Dials press The...

Page 364: ...wn on the op eration panel display 10 Do one of the following To store another Quick Dial go back to step 5 Toreturntostandbymode press twice To access another function press then enter a function num...

Page 365: ...g Press To move the cursor press or 9 Press Note Do not turn off the machine while Please wait or Registered is shown on the op eration panel display 10 Do one of the following To edit another Quick...

Page 366: ...wish to delet E g press to select Quick dial 6 Press Note If you do not wish to clear this Quick Dial press twice to return to standby mode 7 Press 8 Press twice to return to standby mode Prt Help Li...

Page 367: ...ith identical first letters and step through them to find the one you want when dialling You can store up to 25 Name Dials Note You cannot store two Name Dials with the same name To check which Name D...

Page 368: ...egistered is shown on the operation panel display If a Name Dial with the same name is al ready stored Name exists will flash on the display Enter a different name 10 Do one of the following To store...

Page 369: ...ress If Name Dial you are looking for does not ap pear keep pressing the key until it does E g press again Note You can also search through Name Dials that begin the same initial letter with the and k...

Page 370: ...d of dialling the number on the numeric keypad do the following in fax operation mode How to Send a Fax see page 40 1 Make sure the machine is in fax operation mode 2 Press 2 Enter the first letter of...

Page 371: ...machine s Own name TTI identification Transmission list of recent fax transmissions from this machine Reception list of recent fax messages received by this machine Date and Time when the communicati...

Page 372: ...mber Quick Dial list of Quick Dial labels and numbers Name Dial list of Name Dial labels and numbers 1 Press 2 Press 3 Press 4 Press 5 Press Transmission Result Report By default this report is turned...

Page 373: ...the communication lasted Reason for error Power Failure Report If power is lost while sending a message receiving a message or while a message has been stored in memory when the Receive File indicator...

Page 374: ...X the sound of a fax being received On Hook sounds made when using the On Hook feature Dialling tones you hear after pressing Start Buzzer warning beep e g when cover is opened and the sound made ever...

Page 375: ...istered appears on the display 8 Do one of the following Enter another function number Press to return to standby mode Sending Faxes Over Unreliable Lines Slow 4800bps If you experience problems sendi...

Page 376: ...is wrong The service technician can also use this feature to change some of your machine s settings if you request it For this feature to work you must turn it on before the service technician starts...

Page 377: ...you wish to change appears on the display E g press once 6 Press 7 Press or to adjust the change 8 Press The display opposite will flash briefly on the display and then the function menu will reappea...

Page 378: ...the scale When your original is not standard size align the upper left edge of the original to the ar row mark on the scale 2 1 3 2 Press to perform the copy opera tion Important After copying a large...

Page 379: ...re is a chance it is not set correctly in the ADF Reset your document and try again For how to set documents in the ADF see page 78 3 Press to perform the copy opera tion Note During the copy operatio...

Page 380: ...uld be no more than 30mm 1 18 1 Lift the platen cover 2 Open to the page you want to copy and lay the page face down on the exposure glass Be sure to align one of the cor ners of the page with the arr...

Page 381: ...he original face down at the arrow mark on the scale 2 Close the platen cover 3 2 Press until the desired size ra tio appears The sizes change in the fol lowing order 100 93 87 82 50 71 A4 A5 3 Press...

Page 382: ...2 Press until the desired size ratio appears The sizes change in the fol lowing order 100 115 122 200 141 A5 A4 3 Press to perform the copy opera tion Note After copying finishes press to clear any s...

Page 383: ...factor in increments of 1 To Use Zoom 1 Lift the platen cover 1 Place the original face down at the arrow mark on the scale 2 Close the platen cover 3 2 Press decrease or increase until the desired s...

Page 384: ...opy operation 3 A pointer T moves on the display to indicate the current setting 2 1 3 4 Press to perform the copy opera tion Note After copying finishes press to clear any settings Choose a setting t...

Page 385: ...l face down at the arrow mark on the scale 2 Close the platen cover 3 3 Press to perform the copy opera tion Note After copying finishes press to clear any settings 2 Press the Density key to select t...

Page 386: ...sheets of plain pa per onto the ADF 2 Straighten up all four sides of the stack by tapping them on a desk or table top 3 Place the stack of originals face down on the ADF and slide the document guide...

Page 387: ...be read correctly Uniform page size All pages should be the same size Page condition Avoid using originals that are bent curled damaged or stapled and originals printed on coated paper carbon paper or...

Page 388: ...tarting the copy operation The number of originals that can be scanned at one time depends on how much memory you have installed Refer to page 23 for de tails on increasing memory capacity Sort Copyin...

Page 389: ...1 COPYING 5 COPYING 3 When you press to start the copy operation all of the originals on the ADF are scanned into memory before they are printed Note After copying finishes press to clear any settings...

Page 390: ...he paper turn the ma chine off and then back on Af ter machine initialization is complete load the paper back into the machine Use a SIMM with the required specifications Page p 9 p 23 p 23 p 9 P 23 C...

Page 391: ...nt on both sides of the paper Printing onto loosely stacked envelopes Misfeeding of the envelope flap Toner is distributed un evenly in the toner cassette Heat damage to the toner cassette caused by t...

Page 392: ...is not in stalled Copyingtosmall sizepaper Different size original and copy paper Non white original back ground Dirty platen cover or expo sure glass Dirty ADF transport path Low contrast original C...

Page 393: ...Change digit is 2 If pressing this digit on the handset keypad still does not work try changing the Remote Change digit to another number Do not press any key on the operation panel before pressing th...

Page 394: ...oad the toner cassette into the machine If a copy job is in progress set the copy quantity again Replace the toner cassette Remove the misfed paper If a copy job is in progress set the copy quantity a...

Page 395: ...line is busy while dial ling connectionfailed you dialled the wrong number or there is no answer The line current was not detected the line may not be connected The machine is busy print ing The mach...

Page 396: ...delete the other Name Dial and try again Press to exit func tion mode and rectify the prob lem indicated on the display Press to cancel the trans mission In some locales if this number was stored in...

Page 397: ...to the information in this chapter please contact your service representative If an Error XX message is displayed be sure to turn off the machine before calling Error 90 Error XX Locked scanner Possi...

Page 398: ...Turning off the power will erase any message stored in memory To print the page out check the display and rectify the problem e g paper has run out When the problem is resolved the page will automatic...

Page 399: ...it out Do not use a tool such as a screwdriver or tweezers as this may damage the unit Note If Clear Paper is still displayed after you clear the jam there may be paper jammed in another part of the...

Page 400: ...use the procedure on page 93 instead If toner gets on your hands wash them im mediately 5 Install the toner cassette into the ma chine Note Besuretoholdthetonercassettebyitshandle Keep the toner casse...

Page 401: ...original Failure to do so can result in damage to the original 2 Pull out the misfed original 3 Close the ADF cover and make sure it locks securely into place Important If copying was in progress be...

Page 402: ...en Paper Will Not Feed If paper has completely stopped feeding check using the following proce dure 1 Remove all paper 2 Pull the top release lever 1 and open the top unit 2 3 Pull out the toner casse...

Page 403: ...de on the right where the toner cassette was set forward 5 Install the toner cassette into the ma chine 6 Close the top unit When the top unit is closed the motor will start running When the sound of...

Page 404: ...96 7 USER MAINTENANCE Daily Maintenance Clean with a damp cloth and wipe dry Note Turn off the machine before cleaning Exposure glass ADF Platen cover Platen...

Page 405: ...and shorten the life of a toner cassette WARNING Do not incinerate used toner or toner containers Toner dust might ignite when exposed to an open flame Dispose of the used toner cassettes according t...

Page 406: ...re that it is inserted as far as it can go Do not forget to install the cleaning pad whenever you install a new toner cassette 7 Prepare the new toner cassette Hold ing the toner cassette by its handl...

Page 407: ...ine Note Be sure to hold the toner cassette by its handle 10 To close the top unit press down firmly but gently on both sides of it until the top unit closes and clicks securely into place Note Backgr...

Page 408: ...aper in a vinyl bag Do not store paper where it will be exposed to heat Store on a flat surface Use older stock first Do not lay heavy objects on paper Keep open reams of paper in the package and stor...

Page 409: ...g the Help List Print this list to get a quick guide to frequently used fax features Prt Help List OK Press Start 1 While the machine is not performing any other operation press 2 Press 3 Press to pri...

Page 410: ...equirements They are four User Parameter Switches numbered 00 to 03 Each switch has 8 adjustable bits which can set to either 0 or 1 7654 3210 bit number Switch number 00 0000 1011 bit values For the...

Page 411: ...lp Function to return to standby mode SWITCH 00 1 2 Explanation Width scanned when faxing a document Display Original left on glass Warningwhenscan ning from the ADF and an original is left on the exp...

Page 412: ...some locales If you turn this func tion off some parts of the printed image may be lost SWITCH 01 Default Copy Yes Auto Text STD Bit 7 6 5 4 3 2 1 0 Explanation Copy Fax Operation mode home position...

Page 413: ...ner Saving mode When Toner Saving is turned on the machine prints using less toner Use this mode if you wish to save on toner and do not mind lighter prints Default 600dpi Off Bit 7 6 5 4 3 2 1 0 Avai...

Page 414: ...34 13 Quick Dial Print Dial List 54 14 Name Dial 59 15 Language 107 16 Own name TTI 33 17 Own Fax No 36 21 Authorized Reception 49 22 Slow 4800bps 67 31 Adjust Volume 66 32 Remote Change 52 41 Journa...

Page 415: ...Selecting the Language 1 Press 2 Press 3 Press and press or until the desired language appears 4 Press Note Do not carry out any operations while Registered appears on the display If you do not press...

Page 416: ...e platen cover is opened When paper is set in or removed from the upper paper tray When the tray of the paper feed unit option is pulled out or pushed back into the machine When the top unit is opened...

Page 417: ...240 V 50 60 Hz Power Consumption Max 640 W Printing Average 230 W Copying Average 250 W Stand by Average 75 W PC Scan Average 75W Sending Faxes Average 75W Receving Faxes Average 230 W Economy Mode 15...

Page 418: ...sed 901 SWC Incised 901 Italic SWC Incised 901 Bold SWC Fixed Pitch 810 Courier Roman SWC Fixed Pitch 810 Courier Bold SWC Fixed Pitch 810 Courier Italic SWC Fixed Pitch 810 Courier Bold Italic SWC Fi...

Page 419: ...n paper Envelopes Transparencies Label paper Paper Weight 60 to 90 g m2 16 to 24 lb Original Types Exposure glass Sheet Book ADF Up to 10 pages of 80g m2 20lb Plain paper Maximum Original Size Legal L...

Page 420: ...Copy operation 29 Corner guides 17 19 D Daily maintenance 96 Date and time 38 Density key xiii Dial mode 34 Display xii Document guides x Document output tray xi Installing 5 E Economy mode 108 Econom...

Page 421: ...elect key xiii paper size Changing 20 Specifying upper 13 15 Specifying lower 19 Paper size indicator 17 19 Paper feed unit 17 Pause Redial key xiv Pauses 43 PC Interface indicator xiii Photo1 76 Phot...

Page 422: ...ory key xiii Sounds 66 Specifications 109 Start key xii Stop key xii Storing your own fax number 36 Storage 100 Summer time 39 T TEL LINE xi 32 Tel mode 46 Telephone call 50 Text fine 76 Toner cassett...

Reviews: