11.4 Display options
The application can be customized using the display options
menu.
The display options menu allows you to change the current
display mode and to select other features which can be adjusted
or turned on and off as required.
Zoom mode
Zoom mode magnifies a region of the screen to display more
detail.
This zoom option enables you to:
• Replace the standard image with a zoomed image alongside
the standard image.
• Set the zoom factor to a predefined level, or adjust it manually.
• Reposition the zoomed portion of the image to a different point
in the display.
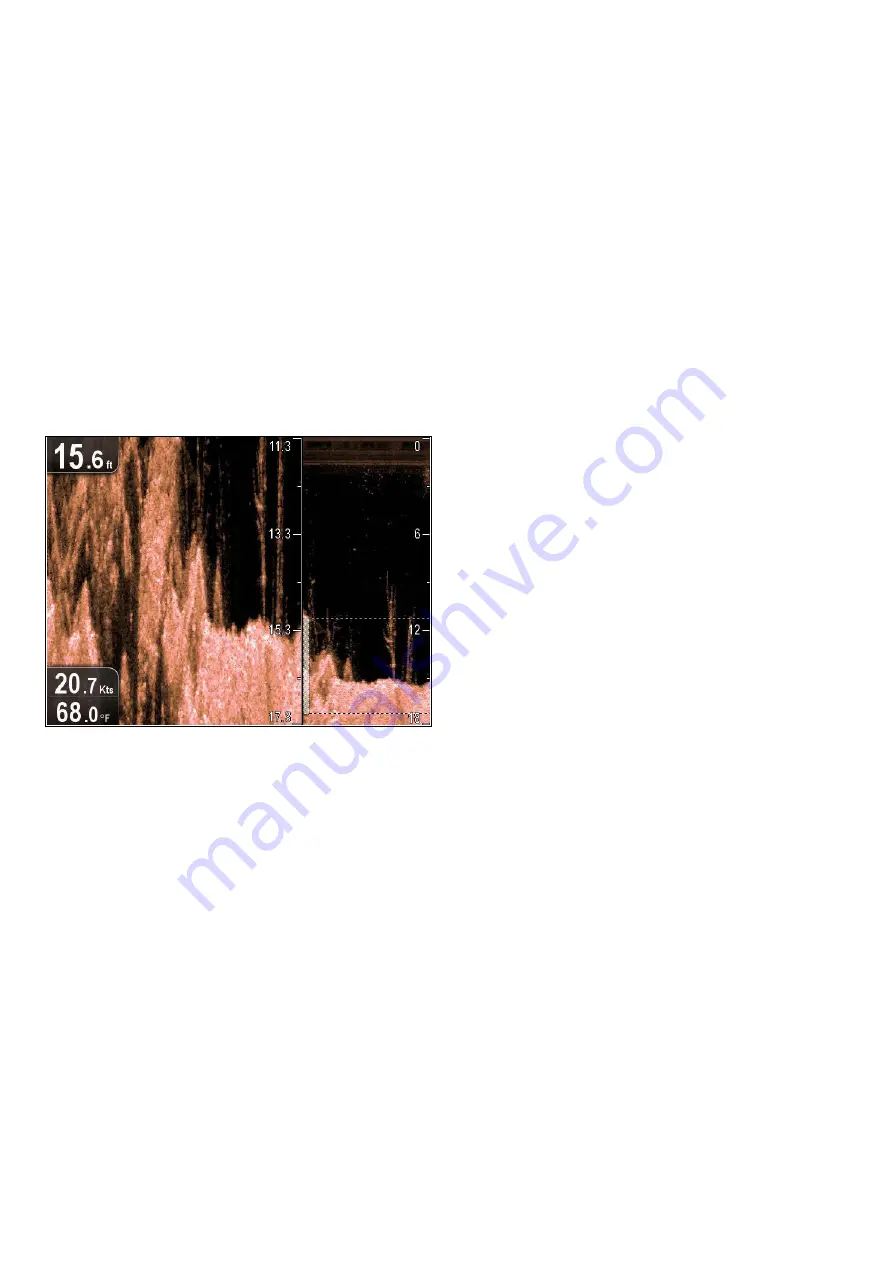
When the range increases, the area shown in the zoom window
also increases.
In Zoom mode the screen is split and displays the zoomed
image alongside the standard image. The zoomed section is
indicated on the standard screen by a zoom box.
Selecting Zoom mode
From the application menu:
1. Select
Display Options
.
2. Select
Display Mode:
so that Zoom is selected.
The Zoom options are displayed in the Display Options menu.
Adjusting the zoom factor
When zoom mode is active you can either select a predefined
zoom factor or adjust it manually.
In Zoom mode, from the application menu:
1. Select
Display Options
.
2. Select
Zoom Factor
.
3. Select a preset Zoom Factor (
x2
,
x3
,
x4
) or select
Manual
Once selection is made you will be returned to the Display
Options menu.
4. If Manual is chosen select
Manual Zoom
The manual zoom factor dialog is displayed.
5. Adjust the setting to the required value.
6. Select
Back
or use the
Ok
button to confirm the setting.
Adjusting the position of the zoomed area
In Zoom mode the system automatically selects the zoom
position so that the bottom is always in the lower half of the
display. If required you can reposition the portion of the image
that is zoomed so that an alternative area is displayed.
In Zoom mode, from the application menu:
1. Select
Display Options
.
2. Select
Zoom Position
so that Man is highlighted.
The Manual Zoom Pos: menu item is now displayed in the
Display Options menu.
3. Select
Manual Zoom Pos:
.
Selecting the zoom position displays the zoom position
control dialog.
4. Adjust the setting to the required value.
5. Press the
Back
button or the
OK
button to confirm the
settings and return to the Display Options menu.
Enabling / Disabling Depth Lines
You can display horizontal depth lines on-screen.
From the application menu:
1. Select
Display Options
.
2. Select
Depth Lines
.
Selecting Depth Lines will switch the horizontal depth lines
On and Off.
Scrolling
The image scrolls from right to left. You can pause the scrolling
or adjust the scroll speed, to ease placing of waypoints and
target identification.
Scroll speed
You can adjust the speed at which the image scrolls. A faster
speed provides more detail which may be useful when you are
looking for fish. If you select a slower speed the information
remains on the display for longer.
Scroll pause
You can pause the display to see a ‘snapshot’ of the image.
When the image is paused scrolling stops but the depth
indication continues to be updated.
Adjusting the scroll speed
From the application menu:
1. Select
Display Options
.
2. Select
Scroll Speed
.
The Scroll speed numeric adjust control is displayed.
3. Use the
Rotary control
to adjust the scroll speed between
0% to 100%.
4. Press the
Ok
or
Back
button to confirm and close the
numeric adjust control.
Pausing the scrolling image
With the display scrolling from right to left:
1. Move the
Joystick
directional controls in any direction.
The Scrolling will pause.
2. Press the
Back
button to resume scrolling.
68
Dragonfly
Summary of Contents for E70085 Dragonfly
Page 2: ......
Page 4: ......
Page 10: ...10 Dragonfly ...
Page 14: ...14 Dragonfly ...
Page 18: ...18 Dragonfly ...
Page 28: ...28 Dragonfly ...
Page 32: ...32 Dragonfly ...
Page 52: ...52 Dragonfly ...
Page 70: ...70 Dragonfly ...
Page 78: ...78 Dragonfly ...
Page 82: ...82 Dragonfly ...
Page 95: ......
Page 96: ...www raymarine com ...


