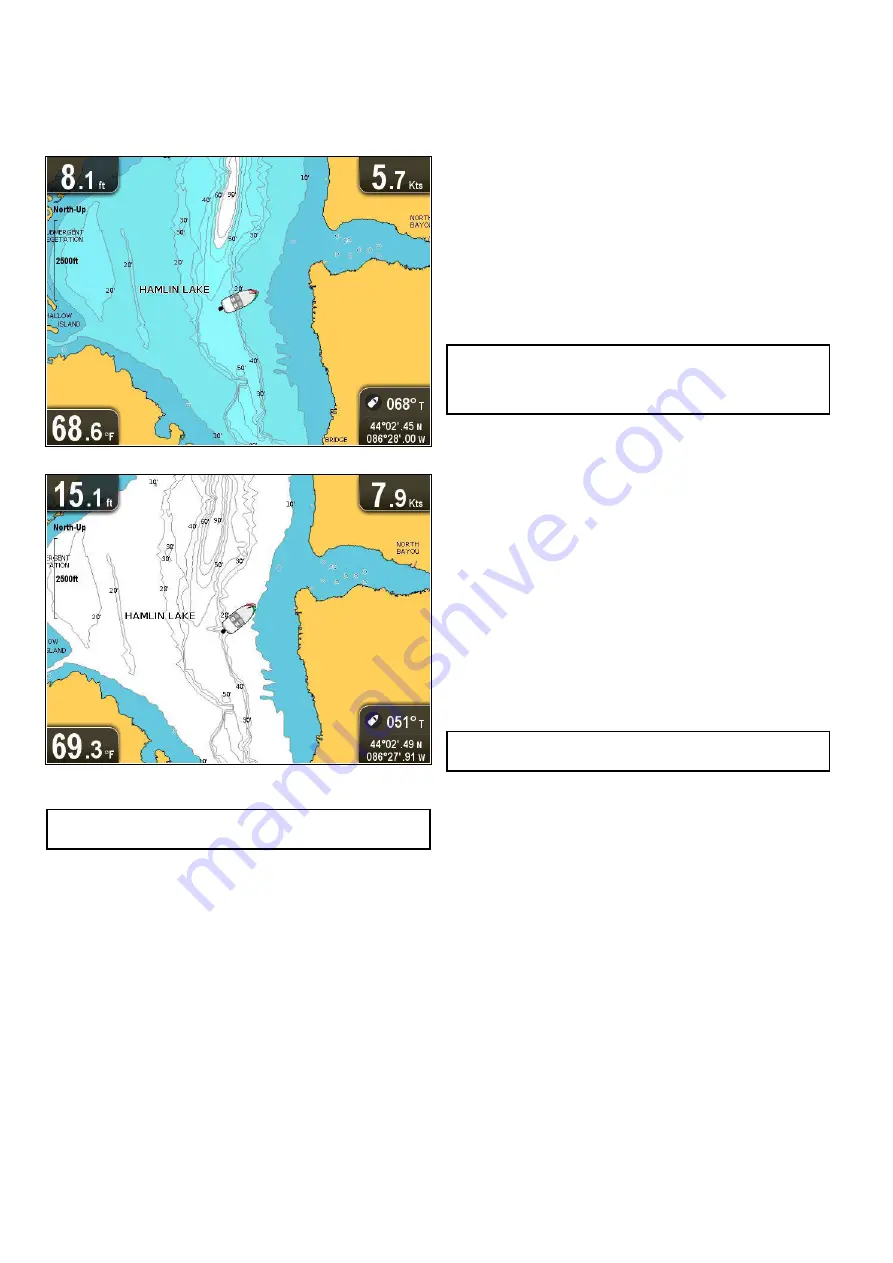
8.8 Deep Water
Water depth can be represented using blue shading with white
used to represent deep water.
The depth at which water color turns from blue shading to white
can be changed to suit user requirements.
Example 1 — Deep water from: 66 ft
Example 2 — Deep water from: 7 ft
The deep water feature can also be turned off so that all water
appears as white.
Note:
The Deep Water function is restricted to the depth data
available on your chart card.
Changing the Deep Water From setting
You can choose the depth that water changes color to white.
From the Chart application menu:
1. Select
Chart Settings
.
2. Select
Deep Water From:
.
3. Select the relevant depth, or select Off.
Selecting Off will display all water as white regardless of depth.
8.9 Chart objects
You can display additional information on the chart for
cartographic objects, ports, and marinas.
Depending on the chart card you are using, you can view some
or all of the following additional information:
• Details of each cartographic object that is marked on the
chart, including source data for structures, lines, open sea
areas, and so on.
• Details of ports, port features, and business services.
• Pilot book information (similar to what you would see in a
marine almanac). Pilot book information is available at certain
ports.
• Panoramic photos of ports and marinas. The availability of
photos is indicated by a camera symbol on the chart display.
This information can be accessed using the chart context menu
options.
Note:
The amount of object information available depends
upon the electronic charts that you are using for your system.
For full details of the features available for your chart cards
contact your chart card supplier.
Displaying pilot book information
From the chart application, when a port symbol is displayed for
a port which has a pilot book:
1. Select the port symbol.
The chart context menu will be displayed.
2. Select
Pilot Book
.
3. Select the relevant chapter.
Displaying panoramic photos
From the chart application, when a camera symbol is displayed,
indicating the availability of a photo:
1. Select the camera symbol.
The chart context menu is displayed.
2. Select
Photo
.
The photo is displayed on screen.
Note:
Not all cartography types are capable of displaying
panoramic photos.
Displaying chart object information
From the chart application:
1. Select an object.
The chart context menu is displayed.
2. Select
Chart Objects
to view detailed information about the
selected object
The Object Info dialog is displayed.
3. Selecting the position in the object info dialog will close the
information dialog and position the cursor over the object.
4. Selecting available options will display detailed information
about that item.
50
Dragonfly
Summary of Contents for E70085 Dragonfly
Page 2: ......
Page 4: ......
Page 10: ...10 Dragonfly ...
Page 14: ...14 Dragonfly ...
Page 18: ...18 Dragonfly ...
Page 28: ...28 Dragonfly ...
Page 32: ...32 Dragonfly ...
Page 52: ...52 Dragonfly ...
Page 70: ...70 Dragonfly ...
Page 78: ...78 Dragonfly ...
Page 82: ...82 Dragonfly ...
Page 95: ......
Page 96: ...www raymarine com ...


