background image

Autonomous Operation Overview

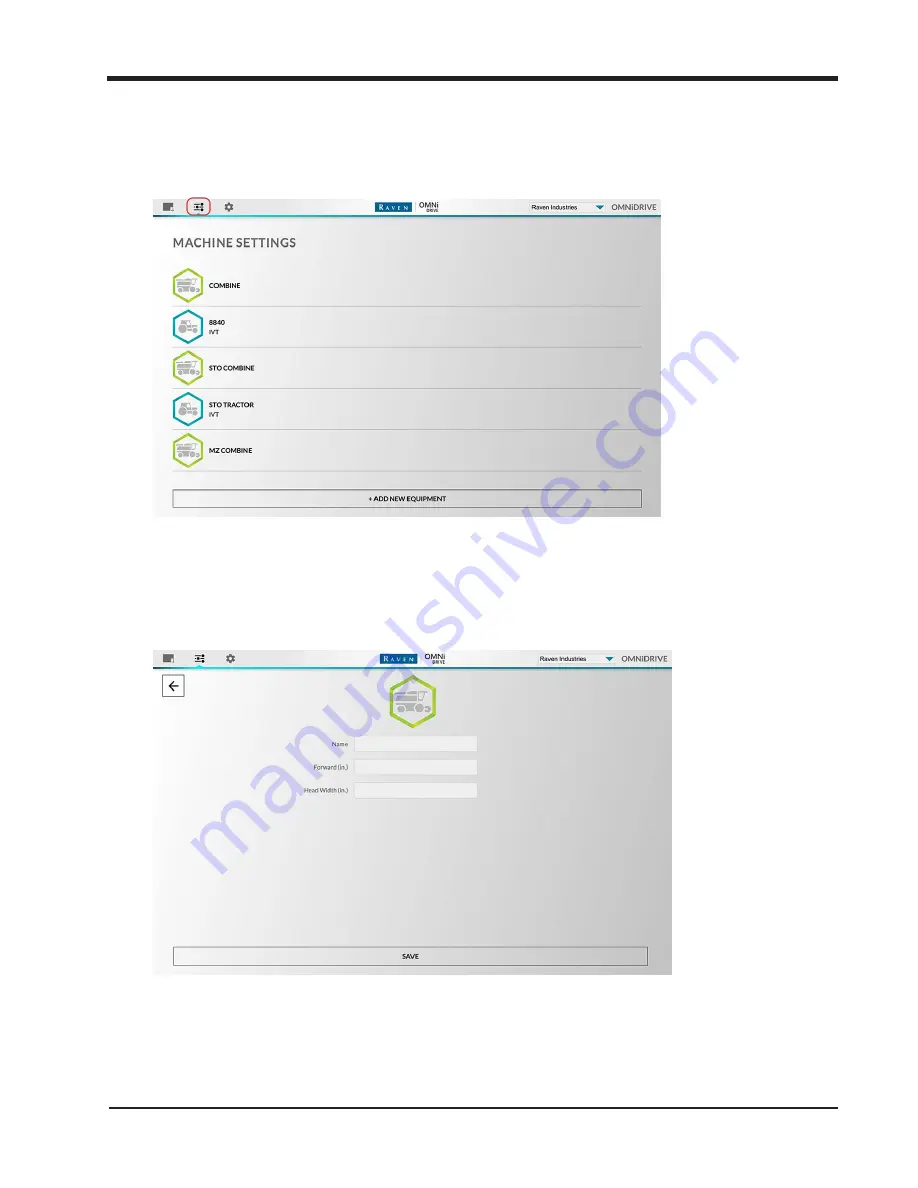
Machine Profile Setup

1. Select the

Machine Settings

icon along the top of the screen.

Note:

Select the

Add New Equipment

button at the bottom of the page to create

new equipment profiles. Refer to the following sections for assistance with completing

each profile.

Create Combine Profile

242

Summary of Contents for OMNiDRIVE

Page 1: ...OMNiDRIVE Installation Provisioning and Operation Manual P N 016 2610 001 Rev B Rev B Aug 2021 E37866 Copyright 2021 ...

Page 2: ......

Page 3: ...eld responsible for any modifications or repairs made outside our facilities nor damages resulting from inadequate maintenance of this system As with all wireless and satellite signals several factors may affect the availability and accuracy of wireless and satellite navigation and correction services e g GPS GNSS1 SBAS etc Therefore Raven Industries cannot guarantee the accuracy integrity continu...

Page 4: ...ness Routing 21 Installation Overview 23 Combine Installation 24 Combine Kit Contents 24 Universal Combine Kit P N 117 2610 002 25 John Deere Generic OMNiDRIVE Kit P N 117 2610 003 26 Combine Field Hub Kit P N 117 2610 010 27 OMNiDRIVE Combine Tablet Kit P N 117 2610 015 28 OMNiDRIVE Combine CR7 with RAM Mount and UT Unlock Kit P N 117 2295 022 28 Combine Cab Preparation 28 Mount In Cab Components...

Page 5: ...ts 55 John Deere 8R Kits 56 IVT CommandView III P N 117 2610 006 56 IVT CommandView II Kit P N 117 2610 004 56 PST CommandView III P N 117 2610 007 57 PST CommandView II Kit P N 117 2610 005 57 OMNiDRIVE Tractor Base Kit P N 117 2610 001 58 Tractor Field Hub Kit P N 117 2610 011 59 OMNiDRIVE Camera System Kit P N 117 2610 012 59 Implement Flood Light Kit P N 117 2610 014 60 Cab Preparation 60 Popu...

Page 6: ...ering Valve Harness 88 Mount and Connect the Radar Assembly 91 Mount the Radar Sensor 91 Calibrate the Radar Sensor 92 Connect the Radar Harness 94 Install the Camera System 97 Mount Cameras to the Tractor Roof 98 Forward Facing Cameras 98 Connect Cameras to the Perception Controller 102 Install the Flood Lighting System 105 Bracket Assembly 105 Side Mounting Bracket 106 Rear Bracket Mounting 107 ...

Page 7: ...arness Connections 134 Connect the Throttle Adapter 135 Power the OMNiDRIVE System 137 Battery Disconnect 137 Battery Cable and Device Plate Power 137 Base Cable Power Connection 140 Mount and Secure the OMNiDRIVE Device Plate 142 Field Provisioning Overview 144 Create an OMNiDRIVE User Account 145 Tractor Provisioning 147 Activate the Slingshot Field Hub for the OMNiDRIVE Tractor 147 Register the...

Page 8: ...es 184 Recalibrate Transmission Settings 185 Current Calibration Values 189 Recalibrate Transmission Settings 189 User RPM 190 Tractor Interface Board TIB Throttle Settings 190 Tractor Interface Board TIB Brake Settings 193 Combine Provisioning 198 Activate the Slingshot Field Hub for the OMNiDRIVE Combine 198 Register the RS Lite on the OMNiDRIVE Combine 205 Build the Combine System in Slingshot ...

Page 9: ... 229 Set Up and Start an Operation 229 Set Points Plan Routes and Sync with the Combine 230 Safety and Inspections 230 Daily Walk Around and Inspection 230 Tractor 231 Grain Cart 232 Initial Safety Checks and Start Up Procedures 233 E Stops 236 Controlling E Stop 236 Reassign the Controlling E Stop 236 Tractor E Stop 236 Hand held and Non controlling E Stops 237 E Stop Status LED 237 Test the E St...

Page 10: ...nterface Settings 248 Autonomous Manual Mode 249 Stage Point 249 Unload Point 250 Tractor 250 Tractor Status 250 Sync 250 Combine Status 251 Combine 251 Set Stage and Unload Points 251 Stage Point 252 Unload Point 252 Mid point 252 Route Planning and Syncing with the Combine 253 Stage or Unload Route Planning 254 The Mid point and Route Planning 255 Sync Planning 255 Tractor Interface Board TIB Ad...

Page 11: ... System 263 Brakes and Brake Module 263 Support Resources 265 Product Information and Support 265 Warranty Service and Repair 265 Training Tutorials and Videos 266 Raven Slingshot 266 Social Media and Raven Podcast 266 Limited and Extended Warranties 267 Limited Warranty 267 What does this warranty cover 267 How long is the coverage period 267 How can I get service 267 What will Raven Industries d...

Page 12: ...ct to qualify for the extended warranty 268 Where can I register my product for the extended warranty 268 How long is the extended warranty coverage period 268 How can I get service 268 What will Raven Industries do 269 What is not covered by this warranty 269 Glossary 270 12 ...

Page 13: ...ep safety labels in good condition and replace any missing or damaged labels Contact a local Raven dealer to obtain replacements for safety labels Observe the following safety measures when operating the implement after installing this Raven system l Do not operate this Raven system or any agricultural equipment while under the influ ence of alcohol or an illegal substance l Be alert and aware of ...

Page 14: ...the machine unattended DANGER Anhydrous Ammonia NH3 Anhydrous ammonia NH3 under pressure NH3 can cause severe burning blindness sickness or death Understand all safety instructions and warnings before operating or servicing equipment l Review the properties of NH3 and the procedures for safe handling and use with your NH3 supplier l Contact your NH3 supplier or the appropriate agricultural departm...

Page 15: ... valves slightly Allow pressure to discharge for an extended period of time Treat every section where NH3 can be trapped as though it is pressurized l Thoroughly bleed all system lines and disconnect the nurse tank hose to remove NH3 from the system before transporting the system or beginning service or maintenance Liquid NH3 can absorb heat from surroundings and re pressurize the system Any bleed...

Page 16: ...en Industries are recommended for use with NH3 products Raven shall not be liable for any damages and this warranty shall not cover defects from l The use of a system with a harness not approved by Raven l The use of a control system not approved by Raven l The use of an on off valve not approved by Raven l The use of the system in a manner that is inconsistent with the instructions l Unauthorized...

Page 17: ... hazards exist for autonomous operations l By accepting a planned route you are accepting all responsibility for the oper ation of the autonomous equipment and the route which was planned l Ensure there are no obstacles in the path of the equipment prior to move ment WARNING Hydraulic Safety When installing or servicing a hydraulic system or hydraulic components be aware that hydraulic fluid may b...

Page 18: ...e properly disposing of them Contact a local environmental agency or recycling center for additional information l Always follow safety labels and instructions provided by the chemical manufacturer or supplier l Always wear appropriate personal protective equipment as recommended by the chemical and or equipment manufacturer l When storing unused agricultural chemicals l Store agricultural chemica...

Page 19: ...own fuses with only fuses of the same type and amperage l Do not connect the system power cable to the vehicle ignition or battery until all sys tem components are mounted and all electrical connections are completed l Always start the machine before initializing this Raven system to prevent power surges or peak voltage l To avoid tripping and entanglement hazards route cables and harnesses away f...

Page 20: ... and surrounding hazards e g tree limbs fence posts crop stubble dirt clumps or rocks that may fall or be thrown by the imple ment l Protect hoses from sharp bends twisting or flexing over short distances and nor mal implement operation l Ensure sufficient length for free movement of the implement during normal oper ation and prevent pulling pinching catching or rubbing especially in artic ulation...

Page 21: ...universal joints and suspension components pulleys gears belts and chains moving linkages cylinders articulation joints etc l Protect harnessing from field debris and surrounding hazards e g tree limbs fence posts crop stubble dirt clumps or rocks that may fall or be thrown by the implement l Protect harnessing from sharp bends twisting or flexing over short distances and normal implement operatio...

Page 22: ...rrosion or otherwise damage electrical components When performing maintenance l Inspect electrical components and connectors for corrosion damaged pins or hous ings etc Repair or replace components or harnessing as necessary l Ensure connectors are kept clean and dry Apply dielectric grease to the sealing sur faces of all connections exposed to moisture dirt debris and other contaminates Repair or...

Page 23: ...nded to complete and submit the OLAF2 procedures for the Field Hub on all OMNiDRIVE machines Refer to the following for additional assistance l Activate the Slingshot Field Hub for the OMNiDRIVE Tractor on page 147 l Activate the Slingshot Field Hub for the OMNiDRIVE Combine on page 198 1 Review the Important Safety Information on page 13 and Recommendations and Best Practices on page 20 before st...

Page 24: ...page 97 i Install the Flood Lighting System on page 105 j Connect the RS Lite and StarFire Receiver on page 109 k Install the Antenna Bracket on page 114 l Install the Armrest and Foot Throttle Harness on page 119 m Power the OMNiDRIVE System on page 137 n Mount and Secure the OMNiDRIVE Device Plate on page 142 4 Proceed to the field provisioning procedures to configure the OMNiDRIVE system and li...

Page 25: ... for the Field Hub on all OMNiDRIVE machines Refer to the following for additional assistance l Activate the Slingshot Field Hub for the OMNiDRIVE Tractor on page 147 l Activate the Slingshot Field Hub for the OMNiDRIVE Combine on page 198 OMNiDRIVE System Diagram Combine Universal Combine Kit P N 117 2610 002 Part Number Description Qty 117 2610 010 Kit Combine Field Hub 1 117 2295 022 Kit CR7 UT...

Page 26: ...loc 8 332 0000 044 Tape Adhesive 2 John Deere Generic OMNiDRIVE Kit P N 117 2610 003 Part Number Description Qty 117 2610 010 Kit Combine Field Hub 1 117 2295 022 Kit CR7 UT Unlock with RAM Mount Combine 1 117 2610 015 Kit OMNiDRIVE Combine Tablet 1 063 2610 015 Assembly Combine Antenna Mount 1 077 7000 082 Subscription 1 Year Autonomous Coverage 1 063 2610 003 Assembly OMNiDRIVE 900 Mhz Radio 1 1...

Page 27: ...63 0173 172 Mag Mount 20 ft W SMA NMO 2 063 0173 179 Antenna Patch with Cable Protection 1 063 0173 992B Field Hub Verizon WiFi 1 121 0000 036 Antenna Low Profile Cellular LTE NMO Mount 2 420 2002 038 Cable Cat5 Ethernet Patch 60 in 152 4 m 1 115 2610 065 Cable Combine Slingshot Field Hub and Switch Power 1 420 2002 081 Cable 2 m Ethernet M12 D Code to RJ45 2 107 2610 024 Bracket Combine Field Hub...

Page 28: ...thernet M12 D Code to RJ45 1 115 2610 050 Cable CR7 E Stop1 Generic Combine 1 107 2610 025 Bracket CR7 E Stop Combine Mounting 1 063 2610 006 Assembly Hand held E Stop 2 332 0000 042 Tape 2 Sided VHB 1 ft 103 0001 036 Mount 2 5 in Round 1 5 in Ball RAM 2 103 0001 035 Mount RAM Double Socket Arm 1 016 0171 649 Sheet Warranty Help 1 016 0171 667 Manual CR7 Installation 1 016 0171 664 Manual CRX Oper...

Page 29: ...ortal ravenprecision com or by using the links above Please refer to these documents when installing the OMNiDRIVE system NOTICE The information affixed to the bottom of the Field Hub will be required to activate the device and provision the OMNiDRIVE system Before mounting the Field Hub it is strongly recommended to remove the SIM card and modem labels affixed to the bottom of the modem Store thi...

Page 30: ...Chapter 2 30 ...

Page 31: ... and other OMNiDRIVE components in the combine cab John Deere Combines 1 Remove the cup holder in the right rear corner of the cab This will allow easier access to the cables as you route them into the cab 2 On the outside of the cab locate the panel at the right rear corner of the cab where the factory harnesses connect to the cab 31 ...

Page 32: ...le that can be used by removing the plastic hole cover 4 Proceed to the Mount In Cab Components below topic for assistance with con necting the CR7 Field Hub and other OMNiDRIVE components in the combine cab Mount In Cab Components The following steps offer cab installation and connection instructions specific to the OMNiDRIVE system 32 ...

Page 33: ...are update will be pushed to the Field Hub the next time the device powers up It may be recommended to complete and submit the OLAF2 procedures for the Field Hub on all OMNiDRIVE machines Refer to the following for additional assistance l Activate the Slingshot Field Hub for the OMNiDRIVE Tractor on page 147 l Activate the Slingshot Field Hub for the OMNiDRIVE Combine on page 198 OMNiDRIVE System ...

Page 34: ...he tablet to accommodate different mounting configurations as desired 3 Secure the round RAM base to the display mount P N 103 0159 024 as shown below 4 Remove the OEM display and install the RAM display mount between the OEM dis play and bracket 34 ...

Page 35: ...ailable at https portal ravenprecision com or by using the links above Please refer to these documents when installing the OMNiDRIVE system NOTICE The information affixed to the bottom of the Field Hub will be required to activate the device and provision the OMNiDRIVE system Before mounting the Field Hub it is strongly recommended to remove the SIM card and modem labels affixed to the bottom of t...

Page 36: ...Chapter 2 36 ...

Page 37: ...e Slingshot Ethernet switch bracket P N 107 2610 024 2 Place the Field Hub Ethernet switch assembly on the floor of the combine Select a loc ation where the bracket and cables will be out of the way but still visible Note Review the Field Hub Installation Manual for additional instructions on mounting and connecting the Field Hub antennas 37 ...

Page 38: ... documents when installing the OMNiDRIVE system NOTICE The information affixed to the bottom of the Field Hub will be required to activate the device and provision the OMNiDRIVE system Before mounting the Field Hub it is strongly recommended to remove the SIM card and modem labels affixed to the bottom of the modem Store this information in a safe location or on the top of the modem temporarily Ta...

Page 39: ...Installation Overview 1 Secure the CR7 field computer to the mounting bracket P N 107 2610 025 using the supplied hardware 39 ...

Page 40: ...tion while working on the cab roof Surfaces on the roof may be uneven or slippery and hardware and harnesses may present tripping hazards Contact a local equipment dealer for additional information or assistance with working on the roof of specific make and model machine Complete the following steps to assemble and mount the antenna bracket including the radio and RS Lite Note The CR7 and Field Hu...

Page 41: ...ld Hub will be required to activate the device and provision the OMNiDRIVE system Before mounting the Field Hub it is strongly recommended to remove the SIM card and modem labels affixed to the bottom of the modem Store this information in a safe location or on the top of the modem temporarily Take a photo of the IMEI1 information on the bottom of the Field Hub 1International Mobile Equipment Iden...

Page 42: ...Chapter 2 OMNiDRIVE System Diagram Combine 42 ...

Page 43: ...verview 1 Thread the radio antenna onto the roof bracket 2 Use the supplied bolts P N 311 4050 139N and nuts P N 312 4000 216 to mount the RS Lite P N 063 0174 121 to the RS Lite mounting bracket P N 107 2610 023 43 ...

Page 44: ...up through the bottom flat face of the mounting plate so that the bolt heads are facing down toward the cab roof 3 Apply the supplied tape P N 332 0000 044 to the bolt heads to help prevent the bolts from contacting the cab roof 44 ...

Page 45: ...be necessary to adjust the height of the RS Lite mounting bracket while securing the antenna bracket assembly to the roof 5 Secure the radio P N 063 2610 003 to the radio mounting bracket P N 107 2610 022 using the supplied bolts P N 311 4050 095N and nuts P N 312 4000 215 6 Mount the radio bracket assembly to the top of the antenna bracket assembly with the bolts P N 311 4050 139N and nuts P N 31...

Page 46: ...ntenna bracket assembly 8 On top of the cab roof remove two roof bolts toward the front of the cab 9 Place the antenna bracket assembly on the roof and line up the holes Note If necessary loosen the small bolts on each side of the antenna bracket and adjust the bracket to fit the mounting posts 1Emergency stop button or switch 46 ...

Page 47: ...e Field Hub Once activation has been completed a confirmation email will be sent to the customer and an OTA1 software update will be pushed to the Field Hub the next time the device powers up It may be recommended to complete and submit the OLAF2 procedures for the Field Hub on all OMNiDRIVE machines Refer to the following for additional assistance l Activate the Slingshot Field Hub for the OMNiDR...

Page 48: ...from the bulkhead connector under the front of the roof and insert the 12 pin roof plug into the bulkhead port 4 Connect the 12 pin plug labeled StarFire to the OEM receiver plug previously con nected to the bulkhead port 5 Connect the 8 pin plug labeled Radio to the battery to roof cable P N 115 2610 051 or 115 2610 059 48 ...

Page 49: ...e battery to roof cable P N 115 2610 051 or 115 2610 059 route and connect the small round connector to the radio mounted to the roof bracket 2 Locate the radio cable P N 115 2610 068 previously connected to the antenna bracket and connect it to the radio 49 ...

Page 50: ...ker to label the cab end of the Ethernet cable to simplify connections later 3 Locate the following cables previously connected or installed to OMNiDRIVE system components on the combine roof l E Stop1 cable P N 115 2610 056 previously connected to the E Stop antenna on the antenna bracket l Ethernet cables from the RS Lite and radio l Open connectors on the battery to roof cable P N 115 2610 051 ...

Page 51: ...s through as needed Review Recommendations and Best Practices on page 20 for additional information on cable routing In Cab Connections RS Lite and Radio Ethernet Connections 1 Route the Ethernet cable previously connected to the radio to the port labeled X1 on the Ethernet switch 51 ...

Page 52: ...viously connected to the RS Lite to the port labeled X2 on the Ethernet switch Complete CR7 and E Stop Connections 1 Route the E Stop cable from the antenna bracket on the roof to top port on the E Stop mounted with the CR7 field computer 52 ...

Page 53: ...e E Stop 4 Connect the 8 pin plug to the 8 pin connector on the battery to roof cable routed from the roof P N 115 2610 051 Note The 2 pin plug labeled Aux Power is not used during installation 5 Connect the Ethernet cable P N 420 2002 081 to the back of the CR7 field com puter 6 Route the Ethernet cable to the port labeled X4 on the Ethernet switch 53 ...

Page 54: ... the combine power cable P N 115 2610 065 to the remaining connector on the tablet tee power cable 5 Route the square 4 pin plug on the combine power cable to the power port on the Slingshot Field Hub 6 Connect the round 4 pin plug on to the port labeled X6 on the Ethernet switch 7 Connect the tablet Ethernet cable P N 420 2002 081 to the Ethernet port on the tab let 8 Route the Ethernet cable to ...

Page 55: ...es and the machine on which each device is installed l Slingshot Field Hub l RS Lite l Perception Controller This information will be required during device registration and field provisioning procedures and will help locate each device within the Slingshot portal Note Please allow up to 4 business days to activate the Field Hub Once activation has been completed a confirmation email will be sent ...

Page 56: ... III 1 115 2610 048 Cable IVT2 Armrest for John Deere 8R CommandView III 1 311 4062 201J SHCS3 M8 x 130mm Class 12 9 DIN 912 1 313 6000 013K Washer M8 1 312 6001 027K Nut M8 Nylock 1 311 4062 183J SHCS M8 x 40mm Class 12 9 DIN 912 1 077 7000 072 Unlock 1 Year OMNiDRIVE Guidance 1 IVT CommandView II Kit P N 117 2610 004 Part Number Description Qty 063 2610 017 Assembly Long Feedback Brake Actuator ...

Page 57: ...m Class 12 9 DIN 912 1 313 6000 013K Washer M8 1 312 6001 027K Nut M8 Nylock 1 311 4062 183J SHCS M8 x 40mm Class 12 9 DIN 912 1 077 7000 072 Unlock 1 Year OMNiDRIVE Guidance 1 PST CommandView II Kit P N 117 2610 005 Part Number Description Qty 063 2610 017 Assembly Long Feedback Brake Actuator 1 116 2610 013 Weldment Tractor Brake Block for John Deere 8R 1 115 2610 014 Cable Throttle for John Dee...

Page 58: ...54 Cable John Deere 8R Base Harness 1 115 2610 018 Cable Power Module Battery Connection 1 039 2610 005 Decal Powered by Raven Autonomy 1 312 6001 012K Nut M5 Nylock 2 313 6000 007K Washer M5 2 435 3001 043 Clamp 1 Dia Insulated Cable 2 435 3001 049 Clamp 0 625 Dia Insulated Cable 10 063 2610 008 Assembly Machine Lockout Switch 1 412 2011 116 Switch Lighted On Off 1 063 2610 020 Assembly AprilTag1...

Page 59: ...ution 1 OMNiDRIVE Camera System Kit P N 117 2610 012 Part Number Description Qty 115 2610 032 Cable 15 Camera 2 115 2610 033 Cable 20 Camera 3 116 2610 003 Bracket Side Camera 2 116 2610 004 Bracket Rear Camera 1 107 2610 030 Bracket Front Camera Forward Facing 1 107 2610 031 Bracket Front Camera Downward Facing 1 107 2610 021 Cleat Camera 4 063 2610 016 Assembly 57 FOV Camera 1 063 2610 010 Assem...

Page 60: ...115 2610 078 Cable Implement Flood Light Harness 1 116 2610 011 Weldment Side Light Mount for John Deere 8R 2 116 2610 012 Weldment Rear Light Mount for John Deere 8R 1 107 2610 021 Cleat Camera Mounting 3 311 4062 098N SHCS M5 x 45mm DIN 912 3 313 6001 007N Washer Spring Lock DIN 912 3 311 4050 138N Bolt M6 x 30mm DIN 931 2 313 6000 010N Washer M6 DIN 125 2 Cab Preparation Recommended Tools l Met...

Page 61: ... not to start or move the tractor until the installation of the OMNiDRIVE system is complete 2 Lower the 3 point hitch all the way down to provide easier access to the rear of the tractor during the installation 3 Locate and disconnect the battery from the machine 4 Remove the rubber floor mat to provide easier access for routing and connecting cables during the OMNiDRIVE installation 5 Remove the...

Page 62: ... Pull gently on the cowl until it unlocks Lift the cowl off and set it aside Remove the bottom panel a To remove the bottom section use a 13 mm socket to remove the bolts located on the bracket near the window 62 ...

Page 63: ...emove the clips from the back of the panel that secure the wiring harness c Remove the bottom cowl 6 Remove the foot plate located below the steering wheel to provide easier access for routing and connecting cables 7 Remove the rear trim panel behind the operator seat This panel will not be reinstalled with the OMNiDRIVE system 63 ...

Page 64: ...the Populating the OMNiDRIVE Device Plate below topic to continue the OMNiDRIVE system installation Populating the OMNiDRIVE Device Plate The following sections provide initial cable connections on the device plate Complete the following procedures prior to placing the device plate behind the operator seat in the tractor cab 64 ...

Page 65: ...shot portal Note Please allow up to 4 business days to activate the Field Hub Once activation has been completed a confirmation email will be sent to the customer and an OTA1 software update will be pushed to the Field Hub the next time the device powers up It may be recommended to complete and submit the OLAF2 procedures for the Field Hub on all OMNiDRIVE machines Refer to the following for addit...

Page 66: ...rake module cable into the port on the left side of the brake module 3 Insert the 6 pin male plug into the upper brake module port Note The lower 6 pin port on the brake module will not be used 4 Route the 3 pin plug to the J8 port on the power distribution module Note The plugs labeled J1 and J3 will be used with the base cable The black connector is not used 66 ...

Page 67: ...w VCU Power Cable P N 115 2610 006 1 On the device plate locate the Perception Controller and the power distribution block 2 Insert the rectangular male plug into the port to the left side of the Perception Con troller 67 ...

Page 68: ...e 2 pin power plug to the J6 port on the power distribution module Note The two triangular 3 pin plugs will connect to the radar and J1939 CAN systems while the remaining rectangular plug is not connected during install 68 ...

Page 69: ...low connector to the bottom of the radio 3 Route the 2 pin power plug to the J2 connector on the power distribution module Note The small round plug will connect to the hand held E Stop1 P N 063 2610 006 in the tractor cab The 3 pin rectangular plug will connect to the RS Lite to StarFire cable from the tractor roof 1Emergency stop button or switch 69 ...

Page 70: ...Chapter 2 Ethernet Power Cable P N 115 2610 017 and Device Plate Ethernet Cables 1 On the device plate locate the Ethernet switch and power distribution module 70 ...

Page 71: ...Installation Overview 2 Connect the round yellow plug to the port labeled X6 on the Ethernet switch 3 Route the 2 pin plug to the J7 port on the power distribution module 71 ...

Page 72: ...Chapter 2 4 On the device plate locate the TIB radio Perception Controller and Ethernet switch 5 Connect one of the Ethernet cables P N 420 2002 077 to the Ethernet port on the bottom of the TIB 72 ...

Page 73: ...thernet cable P N 420 2002 077 to the Ethernet port on the bot tom of the Perception Controller 8 Route the other end of the cable to the X4 port on the Ethernet switch 9 Connect the Ethernet cable P N 420 2002 083 to the bottom of the radio 10 Route the other end of the cable to the X2 port on the Ethernet switch 73 ...

Page 74: ...iderations for mounting and connecting these components These manuals are available at https portal ravenprecision com or by using the links above Please refer to these documents when installing the OMNiDRIVE system NOTICE The information affixed to the bottom of the Field Hub will be required to activate the device and provision the OMNiDRIVE system Before mounting the Field Hub it is strongly re...

Page 75: ...Installation Overview 75 ...

Page 76: ...ay connectors to the TIB Note Be sure to secure the connectors by sliding the red lock into the lock position 3 Route the other pair of blue and gray connectors to the TIB side of the TIB Disconnect Note Check the label affixed to the TIB disconnect to confirm TIB and armrest connections When properly connected the cable harnesses should be pointing down 76 ...

Page 77: ...ween the seat and the rear cab wall with the Perception Controller and other devices facing toward the front of the tractor Note For easier cable routing and connection do not mount the OMNiDRIVE device plate to the tractor until all harness connections are complete Seat Switch Tee 1 Locate the seat switch at the rear of the operator seat and use the S1 and S2 con nectors to tee the base cable int...

Page 78: ... tee into the existing connection Proceed to the Mount and Connect the Lockout Switch below topic to proceed with the installation process on the tractor Mount and Connect the Lockout Switch Recommended Tools l Metric socket set 5 to 24 mm OMNiDRIVE System Diagram Tractor 1 Mount the Lockout Switch P N 063 2610 008 to the hand rail using the integrated bracket and four bolts provided on the back o...

Page 79: ... through the grommet located in the floor to the left of the steering column Note This will be the grommet through which the radar and secondary power harnesses are also routed 4 Route the cable along the floor to the right side of the cab and to the back of the oper ator seat 79 ...

Page 80: ... the Mount and Connect the Radar Assembly on page 91 topic to proceed with the installation process Install the Brake System and Clutch Harness Recommended Tools l Metric socket set 5 to 24 mm l Metric wrenches l Metric Allen wrenches up to 8 mm l Large flat head screw driver OMNiDRIVE System Diagram Tractor 80 ...

Page 81: ...Installation Overview Remove Factory Brake Rods 1 Release the bottom of spring from the steering wheel tilt foot lever 81 ...

Page 82: ...s installed between the pedals and one washer is installed between the left pedal and the steering column When reassembling the brake pedals and brake stop weldment bracket these washers must be replaced in the same locations 3 Grasp the brake pedal above the brake rod and e clip and pull straight up to remove the OEM brake rods from the cab floor 4 Remove E Clips and pins which hold the brake rod...

Page 83: ...mblies P N 063 2610 018 or long actuator assemblies P N 063 2610 017 Note If the OEM brake rods are not the same length as the supplied actuator assemblies contact Raven Technical Service for the correct kit for the tractor 2 Attach the supplied actuator assemblies to brake pedals using the E Clips and pins Note Ensure that the actuator motors face forward toward the windshield and that the nuts h...

Page 84: ... locations Connect the Clutch Sensor Cable Note IVT1 tractors will not use the Clutch connection on the base cable Complete this procedure on PST2 installations only 1 Locate the clutch sensor on the steering column to the left of the brakes and dis connect the factory wiring harness 2 Tee the orange clutch cable P N 115 2610 016 to the factory connectors a CL2 to the factory sensor b CL1 to the f...

Page 85: ...the guides and into floor 2 Tighten the 24 mm bolt to 73 ft lb 99 Nm to secure the brake pedals 3 Remove the two 13 mm hex head bolts from the right brake rod guide on the floor 4 Place the brake block bracket P N 116 2610 013 on top of the brake rod guide and reinstall the factory bolts to secure the bottom of the bracket Tighten the bolts to 13 ft lb 17 Nm 85 ...

Page 86: ...ote The longer 130 mm bolt is installed in the lower hole while the shorter 40 mm bolt is installed in the upper hole of the brake block bracket 6 Secure the longer 130 mm bolt using the supplied M8 lock nut 7 Use a long flat headed screw driver to assist with reconnecting the spring to the steer ing wheel tilt pedal 86 ...

Page 87: ...Installation Overview 8 Connect the black connector from the brake solenoids to the Brake Actuators con nector on the base cable P N 115 2610 054 87 ...

Page 88: ...assemble the steering column until after the brakes have been fully calibrated after the system is fully installed Connect the Steering Valve Harness Recommended Tools l 2 hole saw optional OMNiDRIVE System Diagram Tractor Locate the steering valve The steering valve may be mounted on either the left or right side of the tractor in front of the rear axle 88 ...

Page 89: ...n the center c The Left port is located at the left end of the valve 2 Route the steering harness to the back corner of the cab 3 Remove the rubber mat from behind the operator seat 4 Use a 2 in hole saw and drill a hole in the rear door left side of the cab floor 5 Pass the harness through this hole into the cab 6 Connect the steering valve cable to the connector labeled steering valve on the bas...

Page 90: ...a The Enable port is located at the right end of the valve b The Left port is located in the center c The Right port is located at the left end of the valve 2 Route the steering harness to the back corner of the cab 3 The harness may be routed through the pass through in the lower right corner of the back window 90 ...

Page 91: ...to 8 mm l Tape measure l Digital level e g mobile phone with level app OMNiDRIVE System Diagram Tractor Mount the Radar Sensor 1 Park the tractor on a known level surface Note Bring the tractor to a gradual stop Stopping slowly helps prevent the self adjusting suspension and tractor cab from activating and placing the tractor at an unlevel position or angle 2 Loosen and remove the bolts securing t...

Page 92: ...tor and that the radar sensor is aligned with the center line of the tractor 1 2 5 cm 5 Reinstall and tighten the weight bolts to secure the weights and the radar sensor Calibrate the Radar Sensor 1 Locate the ground speed radar and bracket underneath the tractor near the center of the cab This is a known level surface of the tractor for correct ground speed readings 92 ...

Page 93: ...e of the bracket 3 Zero the level to this surface 4 Place the level on the on rear surface of radar sensor flag 5 Use a 5mm hex key wrench to loosen the radar flag on the braket 6 Adjust the radar flag bracket 2 0 5 above horizontal from the ground speed radar bracket measurement 7 Tighten the set screws and recheck level measurement 93 ...

Page 94: ...diators 2 Connect the radar pigtail cable P N 115 2610 019 to the radar assembly 3 Connect the 2 pin and 3 pin connections on the radar pigtail to the John Deere 8R radar cable P N 115 2610 005 Note Two 3 pin Y adapters P N 408 4002 811 are connected to the radar cable and a 3 pin terminator P N 408 4002 734 has already been installed in each adapter 94 ...

Page 95: ...erview 4 Route the radar cables from the weight rack into the tractor cab and secure using the provided zip ties The following images offer an example of the recommended cable routing through the engine compartment 95 ...

Page 96: ... radar cable into the cab through the grommet located next to the steering column Note It may be necessary to remove the Y adapter from the radar cable to feed the cable into the cab Be sure to replace the Y adapter once the cable connection is inside the cab 6 Route the radar cable to the right side of the tractor cab and behind the operator seat 96 ...

Page 97: ... 80 topic to con tinue with the installation process Install the Camera System DANGER Use extreme caution while working on the cab roof Surfaces on the roof may be uneven or slippery and hardware and harnesses may present tripping hazards Contact a local equipment dealer for additional information or assistance with working on the roof of specific make and model machine Recommended Tools l Metric ...

Page 98: ...to the customer and an OTA1 software update will be pushed to the Field Hub the next time the device powers up It may be recommended to complete and submit the OLAF2 procedures for the Field Hub on all OMNiDRIVE machines Refer to the following for additional assistance l Activate the Slingshot Field Hub for the OMNiDRIVE Tractor on page 147 l Activate the Slingshot Field Hub for the OMNiDRIVE Comb...

Page 99: ...ousing The remaining cameras are marked with 112 on the housing 2 Secure one of the downward facing 112 cameras P N 063 2610 010 to the down ward facing bracket P N 107 2610 031 3 Use the supplied 2 spacers P N 104 1000 279 and bolts to secure the forward facing camera brackets and StarFire receiver base plate to the roof as shown in the image above 99 ...

Page 100: ...kets P N 116 2610 003 and rear camera bracket P N 116 2610 004 Note During the installation process note the serial number and bar code of the following devices and the machine on which each device is installed l Slingshot Field Hub l RS Lite l Perception Controller 100 ...

Page 101: ...OMNiDRIVE Tractor on page 147 l Activate the Slingshot Field Hub for the OMNiDRIVE Combine on page 198 5 Use the provided hardware to secure the RS Lite P N 063 0174 121 to the rear cam era bracket 6 Remove the existing roof bolts at the rear of the cab Note These bolts will not be used with the OMNiDRIVE system 7 Use the supplied bolts to secure the rear camera bracket with the RS Lite and camera...

Page 102: ...Chapter 2 Note Do not over tighten the clamp Connect Cameras to the Perception Controller 1 Connect camera cables to each of the cameras 102 ...

Page 103: ... 115 2610 032 to cameras 3 and 4 Note To ensure the cameras are properly connected to the Perception Controller use the supplied labels to mark both ends of each cable 2 Route the camera cables to the right rear corner of the roof and down the post to the pass through located in the lower right corner of the rear cab window 103 ...

Page 104: ...supplied AprilTag1 bracket P N 063 2610 020 on the hood of the tractor as shown in the picture below Ensure the AprilTag code is visible to the cameras at the front of the cab 1A specific system of fiducial markers used in robotics with visual or perception systems OMNiDRIVE utilizes an AprilTag marker on the hood of the tractor with the Perception Con troller 104 ...

Page 105: ...nesses may present tripping hazards Contact a local equipment dealer for additional information or assistance with working on the roof of specific make and model machine Recommended Tools l Metric socket set 5 to 24 mm l Metric Allen wrenches up to 8 mm OMNiDRIVE System Diagram Tractor Bracket Assembly 1 Use the large mounting bolt isolator washer and lock nut to secure the flood light base bracke...

Page 106: ...just behind the antenna bracket mounting location on the left and right sides of the roof Note Do not mount the light brackets to the same location as the antenna bracket 2 Use the provided M6 bolts and washers to secure the side mounting brackets and lights to the roof 3 Insert the cleats P N 107 2610 021 onto each mounting bracket and secure the cleat using the provided M5 hex key bolts 106 ...

Page 107: ... eras Rear Bracket Mounting 1 Remove the roof bolt to the right side of the rear camera and RS Lite mounting bracket 2 Use the existing bolt from the tractor roof to mount the rear light bracket to the tractor roof 3 Adjust the flood light as needed to illuminate the area in view of the perception cam eras 107 ...

Page 108: ...of the cab roof and into the cab through the grommet in the lower right corner of the rear cab window 3 Route the lighting harness along the right window to the accessory power strip in the cab and connect to an available port 4 Continue to the Assemble the Antenna Bracket on page 112 topic for assistance with assembling the OMNiDRIVE antenna and beacon bracket 108 ...

Page 109: ...nd StarFire Receiver OMNiDRIVE System Diagram Tractor 1 Connect the RS Lite to StarFire cable P N 115 2610 047 to the RS Lite 2 Route and connect this cable to the StarFire receiver and then to the roof connection in front of the windshield 109 ...

Page 110: ... 4 business days to activate the Field Hub Once activation has been completed a confirmation email will be sent to the customer and an OTA1 software update will be pushed to the Field Hub the next time the device powers up It may be recommended to complete and submit the OLAF2 procedures for the Field Hub on all OMNiDRIVE machines Refer to the following for additional assistance l Activate the Sli...

Page 111: ...ght corner of the rear cab window 5 Connect the Ethernet cable to the Ethernet switch on the OMNiDRIVE device plate 6 Locate the RS Lite connector on the radio power cable P N 115 2610 064 already installed on the OMNiDRIVE device plate 7 Connect the RS Lite to StarFire cable to the radio power cable 8 Connect the Slingshot power cable P N 115 2610 043 to port J5 on the power dis tribution module ...

Page 112: ...h assem bling the OMNiDRIVE antenna and beacon bracket Assemble the Antenna Bracket Recommended Tools l Metric Allen wrenches up to 8 mm 1 Thread the radio antenna onto the roof bracket 2 Thread the beacon cable through the beacon standoff and thread the flange and stan doff together 112 ...

Page 113: ...t the beacon cable connector into the port on the bottom of the beacon 4 Thread the beacon onto the standoff Note To avoid twisting the beacon cable hold the beacon light stationary while threading the standoff onto the beacon 113 ...

Page 114: ...hile working on the cab roof Surfaces on the roof may be uneven or slippery and hardware and harnesses may present tripping hazards Contact a local equipment dealer for additional information or assistance with working on the roof of specific make and model machine Recommended Tools l Metric socket set 5 to 24 mm l Metric Allen wrenches up to 8 mm OMNiDRIVE System Diagram Tractor Complete the foll...

Page 115: ...MNiDRIVE system NOTICE The information affixed to the bottom of the Field Hub will be required to activate the device and provision the OMNiDRIVE system Before mounting the Field Hub it is strongly recommended to remove the SIM card and modem labels affixed to the bottom of the modem Store this information in a safe location or on the top of the modem temporarily Take a photo of the IMEI1 informat...

Page 116: ...Chapter 2 1 Connect the beacon light cable P N 115 2610 044 to the beacon connectors on the the bottom of the antenna mounting bracket 116 ...

Page 117: ... 115 2610 025 Note The radio cable and E Stop cables are included as parts of the antenna bracket assembly 3 Remove the two bolts located on the roof of the tractor 4 Set the antenna bracket assembly on the cab and align with the existing bolt holes 1Emergency stop button or switch 117 ...

Page 118: ...ab roof and along the rear window 7 Pass the cables into cab of the tractor through either the window grommet or through the hole drilled in the cab as part of the Connect the Steering Valve Harness on page 88 process Note Make sure there are no kinks in the cables when coiling up any excess cable length Ensure the harness is secured using the supplied zip ties 8 Connect the E Stop antenna cable P...

Page 119: ...t ance with connecting the OMNiDRIVE system to the operator controls in the tractor armrest Install the Armrest and Foot Throttle Harness Recommended Tools l Metric socket set 5 to 24 mm OMNiDRIVE System Diagram Tractor IVT Tractors Note Foot throttle connections are recommended on tractors with an IVT1 transmission but are not required No clutch connections will be made for IVT transmissions Comm...

Page 120: ...a cap over an open slot in the arm rest 3 Insert the autonomous on off bypass switch P N 412 2011 116 in the open slot Make sure that the OMNiDRIVE symbol is toward the front of the tractor Arm Rest Harness Connections 1 Route the supplied IVT CM2 arm rest cable P N 115 2610 066 up through the open ing in the bottom panel of the arm rest 120 ...

Page 121: ...Installation Overview 2 Connect the autonomous bypass switch to the arm rest cable 121 ...

Page 122: ...t connections use the same connections but are pinned differently Ensure that the correct cables part number is used for the specific application 5 Reassemble the arm rest Connect the Throttle Adapter Note This is only necessary if a foot throttle is present 1 Locate the foot throttle sensor on the floor on the right side of the cab and disconnect the factory connection 1PowerShift Transmission 12...

Page 123: ...labeled T1 into the factory sensor b plug the connector labeled T2 into the factory wiring harness 3 Route the throttle cable to the blue throttle connector on the base cable 4 Proceed to the Power the OMNiDRIVE System on page 137 topic to read more about connecting OMNiDRIVE to the tractor batteries CommandView III 123 ...

Page 124: ...t for the top half of the arm rest 2 Remove the top of the arm rest by removing the bolts underneath the bottom of the arm rest 3 Remove a cap over an open slot in the arm rest 4 Insert the autonomous on off bypass switch P N 412 2011 116 in the open slot Make sure that the OMNiDRIVE symbol is toward the front of the tractor 124 ...

Page 125: ...view Arm Rest Harness Connections 1 Route the supplied IVT CM3 arm rest cable P N 115 2610 048 up through the open ing in the bottom panel of the arm rest 2 Connect the autonomous bypass switch to the arm rest cable 125 ...

Page 126: ...r from the arm rest adapter harness where the J3A was loc ated and plug the J3A into the C1 connector on the arm rest adapter harness 5 Locate the 10 pin connector found toward the front of the arm rest Unplug the con nection 6 Locate the two 10 pin connectors from the arm rest adapter harness labeled D2 and D3 126 ...

Page 127: ...ector into the C1 connector on the arm rest adapter harness 9 Reassemble the arm rest 10 Reconnect the main connection underneath the armrest 11 Route the 31 pin round connector to the mating connector on the base cable Connect the Throttle Adapter Note This is only necessary if a foot throttle is present 1 Locate the foot throttle sensor on the floor on the right side of the cab and disconnect th...

Page 128: ...abeled T2 into the factory wiring harness 3 Route the throttle cable to the blue throttle connector on the base cable 4 Proceed to the Power the OMNiDRIVE System on page 137 topic to read more about connecting OMNiDRIVE to the tractor batteries PST Tractors Note Foot throttle and clutch connections are required on tractors with a PST transmission CommandView II 128 ...

Page 129: ...emove a cap over an open slot in the arm rest 3 Insert the autonomous on off bypass switch P N 412 2011 116 in the open slot Make sure that the OMNiDRIVE symbol is toward the front of the tractor Arm Rest Harness Connections 1 Route the supplied PST CM2 arm rest cable P N 115 2610 067 up through the open ing in the bottom panel of the arm rest 129 ...

Page 130: ...Chapter 2 2 Connect the autonomous bypass switch to the arm rest cable 130 ...

Page 131: ...CV2 PST CV2 armrest connections use the same connections but are pinned differently Ensure that the correct cables part number is used for the specific application 5 Reassemble the arm rest Connect the Throttle Adapter Note This is only necessary if a foot throttle is present 1 Locate the foot throttle sensor on the floor on the right side of the cab and disconnect the factory connection 131 ...

Page 132: ...d T1 into the factory sensor b plug the connector labeled T2 into the factory wiring harness 3 Route the throttle cable to the blue throttle connector on the base cable 4 Proceed to the Power the OMNiDRIVE System on page 137 topic to read more about connecting OMNiDRIVE to the tractor batteries CommandView III 132 ...

Page 133: ...ovement for the top half of the arm rest 2 Remove the top of the arm rest by removing the bolts underneath the bottom of the arm rest 3 Remove a cap over an open slot in the arm rest 4 Insert the autonomous on off bypass switch P N 412 2011 116 in the open slot Make sure that the OMNiDRIVE symbol is toward the front of the tractor 133 ...

Page 134: ...rm Rest Harness Connections 1 Route the supplied PST CM3 arm rest cable P N 115 2610 049 up through the open ing in the bottom panel of the arm rest 2 Connect the autonomous bypass switch to the arm rest cable 134 ...

Page 135: ... harness where the J3A was loc ated and plug the J3A into the C1 connector on the arm rest adapter harness 5 Reassemble the arm rest 6 Reconnect the main connection underneath the armrest 7 Route the 31 pin round connector to the mating connector on the base cable Connect the Throttle Adapter Note This is only necessary if a foot throttle is present 135 ...

Page 136: ...2610 015 to the factory connectors a plug the connector labeled T1 into the factory sensor b plug the connector labeled T2 into the factory wiring harness 3 Route the throttle cable to the blue throttle connector on the base cable 4 Proceed to the Power the OMNiDRIVE System on the facing page topic to read more about connecting OMNiDRIVE to the tractor batteries 136 ...

Page 137: ...m Diagram Tractor Battery Disconnect CAUTION The OMNiDRIVE system will draw power even when the tractor is shut down Over time this may drain the tractor battery A battery disconnect is required to avoid damage to the tractor battery Battery Cable and Device Plate Power Note Toggle the battery disconnect to the off state before connecting the OMNiDRIVE system to power 1 Connect the battery cable P...

Page 138: ...Chapter 2 2 Use a 14 mm socket to remove the cover on the rear of the tractor cab 3 Locate the ignition relay at the top left of the panel 138 ...

Page 139: ...post located above ignition relay l battery wire larger eyelet to the battery post below the relay Note If studs are broken the factory power relay module will need to be replaced 6 Connect the ground wires to either of the following locations CAUTION Corrosion and build up on the power relay module may make connecting OMNiDRIVE leads difficult Use penetrating oil on studs and nuts before attempti...

Page 140: ...nections are completed 1 Locate and access the battery compartment below the left side of the cab It may be necessary to remove the tool box or battery cover 2 Use a 10 mm socket to remove the two nuts holding the black cover over the electrical components and power hook ups CAUTION Corrosion and build up on the power relay module may make connecting OMNiDRIVE leads difficult Use penetrating oil o...

Page 141: ...Installation Overview 3 Route the base cable power leads out of the cab through the grommet in the floor to the left of the steering column 141 ...

Page 142: ...necting directly to the tractor battery will not allow the OMNiDRIVE system to shut down fully and may drain the batteries 6 Proceed to the Mount and Secure the OMNiDRIVE Device Plate below Mount and Secure the OMNiDRIVE Device Plate Once all cables have been routed and connected 1 Coil and tuck excess cable length behind the device plate 2 Set the tabs of the bracket into the metal tabs were the ...

Page 143: ...Overview 3 Replace the trim pieces covers and floor mat to finish installation Note It may be desirable to test the OMNiDRIVE system prior to securing all trim and covers or reassembling the steer column panels 143 ...

Page 144: ...lling combine1 is the machine with which the OMNiDRIVE tractor will sync during autonomous grain cart operations Refer to Activate the Slingshot Field Hub for the OMNiDRIVE Combine on page 198 to get started with provisioning a combine to control OMNiDRIVE autonomous operations Combine Non controlling Non controlling combines will add data to the harvest coverage map which will allow the OMNiDRIVE...

Page 145: ...iDRIVE dealer will need exact user name entered for the Slingshot account 4 Select the Submit Request button at the bottom of the form 5 Provide the Slingshot user name to your OMNiDRIVE dealer and wait for the dealer to complete the account setup Note Devices installed as part of the OMNiDRIVE system will be certified on specific machines Once certified it is important that these devices are not ...

Page 146: ...iew 7 Select the Manage tab and then OMNiDRIVE 8 The OMNiDRIVE user interface is displayed Double check that the account shown in the upper right corner of the OMNiDRIVE user interface shows the correct location or account 146 ...

Page 147: ...ate cellular data fees and charges It is recommended to start this process a couple days prior to the date on which the OMNiDRIVE system will be installed to avoid excessive data costs but to also ensure that the system may be tested after installation is complete To activate the OMNiDRIVE Tractor Slingshot Field Hub Note On the OMNiDRIVE tractor only the Slingshot Field Hub requires an OLAF The S...

Page 148: ...the Dealer drop down list to select the dealer location with which the customer account will be associated 4 Select the Field Hub Activation option 5 On the Device Info page enter the IMEI1 number found on the Field Hub in the first device field 1International Mobile Equipment Identity 148 ...

Page 149: ...elect the cellular data provider and sub scription information required for the client account 7 In the Data Plan Options area it is recommended to Activate data plan through Data Activation Center 8 Confirm that the SIM card number shown on the Device Info page matches the info on the card taped to the bottom of the Field Hub 149 ...

Page 150: ...ield Provisioning Overview 9 In the Subscription Information section select the Registration Code option and enter the 1 year OMNiDRIVE guidance unlock P N 077 7000 072 provided with the tractor kit 150 ...

Page 151: ...correct devices All devices on an OLAF must be associated with the same client account 12 The OLAF form will update and a page similar to the following example is displayed Note If a page similar to the above does not display check that the correct information has been entered on the Device Info form and select Save Device again If the page still does not update correctly contact the Raven Technic...

Page 152: ...ormation provided on the OLAF Note Please allow up to 4 business days to activate the device Once activation has been completed a confirmation email will be sent to the customer and an OTA1 software update will be pushed to the Field Hub the next time the device powers up 1 Over the Air Software updates and other information pushed from Slingshot servers via the Slingshot system 152 ...

Page 153: ...e added to an existing cellular account or not and provide the contact information for the manager or admin istrator of the cellular account 17 Select the Next button in the lower right corner of the web page 18 On the Finish page enter any notes about the device or activation and select the Finish button 19 The following page is displayed 153 ...

Page 154: ...eature to search for the last 5 digits of the modem ID found on the Field Hub and confirm the information displayed in the Owner Company column displays correctly Register the RS Lite on the OMNiDRIVE Tractor To register the RS Lite on the OMNiDRIVE tractor 1 Log into the Slingshot dealer portal https portal ravenslingshot com index php r site login 154 ...

Page 155: ...t number and bar code information from the RS Lite unit to be mounted to the machine 4 Use the Owner drop down list to select the OMNiDRIVE system owner with which the RS Lite will be registered 5 Enter a name for the OMNiDRIVE system or location 6 Select the Submit button to register the RS Lite 155 ...

Page 156: ...tem to properly associate the devices connected to the combine Confirm Slingshot System 1 Log into the Slingshot dealer portal https portal ravenslingshot com index php r site login 2 Select Manage and Hardware 3 On the Hardware page use the device ID search feature to search for the last 5 digits of the modem ID or IMEI1 of the Field Hub 1International Mobile Equipment Identity 156 ...

Page 157: ...chine 5 Ensure that the following devices are detected and displayed in the Slingshot portal l Field Hub l RS Lite RS1 Slingshot Communication Settings To set up Slingshot communication for the OMNiDRIVE tractor 1 From the main CommandView page select the Menu button in the lower right corner of the screen 157 ...

Page 158: ...T2 working set 1A Universal Terminal formerly Virtual Terminal is an electronic display or console capable of interfacing with ECUs on an ISOBUS network 2A Universal Terminal formerly Virtual Terminal is an electronic display or console capable of interfacing with ECUs on an ISOBUS network 158 ...

Page 159: ...hapter 3 3 From the Slingshot home page select the Settings menu followed by the Ethernet Settings tab 4 Select the Field Hub Client Mode option 5 Follow the on screen prompts and reboot the RS Lite 159 ...

Page 160: ...ctor and the controlling combine1 Note The OLAF2 must be completed and the cellular data plan must be activated to complete the following steps Review Activate the Slingshot Field Hub for the OMNiDRIVE Combine on page 198 1 From the main CommandView page select the Menu button in the lower right corner of the screen 1The combine that may assign paths to and may sync with the OMNiDRIVE tractor One ...

Page 161: ...g set 1A Universal Terminal formerly Virtual Terminal is an electronic display or console capable of interfacing with ECUs on an ISOBUS network 2A Universal Terminal formerly Virtual Terminal is an electronic display or console capable of interfacing with ECUs on an ISOBUS network 161 ...

Page 162: ...Ethernet radio and Slingshot status icons are displayed in green This indicates that the Field Hub is activated properly and has an active cellular data connection Note If the Field Hub is not receiving data contact Technical Service at 1 800 243 5435 for further assistance 162 ...

Page 163: ...ons to update the OMNiDRIVE components with Over the Air OTA1 updates Update the RS Lite 1 From the main CommandView page select the Menu button in the lower right corner of the screen 1 Over the Air Software updates and other information pushed from Slingshot servers via the Slingshot system 163 ...

Page 164: ...T2 working set 1A Universal Terminal formerly Virtual Terminal is an electronic display or console capable of interfacing with ECUs on an ISOBUS network 2A Universal Terminal formerly Virtual Terminal is an electronic display or console capable of interfacing with ECUs on an ISOBUS network 164 ...

Page 165: ...n to which the RS Lite will be updated Note For OMNiDRIVE systems operating with a John Deere 8R use software version 20 3 Tractor Engine and Transmission Settings Disable the Maximum Engine Speeds 1 From the main CommandView page select the Menu button in the lower right corner of the screen 165 ...

Page 166: ...Field Provisioning Overview 2 Next select Machine Settings and select the Engine option 3 Disable both of the maximum engine speeds orange indicator light off for autonom ous OMNiDRIVE operations 166 ...

Page 167: ...steps when operating with an IVT1 tractor Note Skip this procedure when working on a PST2 tractor 1 From the main CommandView page select the Menu button in the lower right corner of the screen 1Infinitely Variable Transmission 2PowerShift Transmission 167 ...

Page 168: ...Transmission option 3 Set the transmission to Full AUTO to allow the tractor to automatically control engine RPM during autonomous operation 4 When operating an IVT tractor use the control stick speed dial to set the speed for F1 at 10 mph 16 km h and F2 at 20 mph 32 km h 168 ...

Page 169: ... display in the StarFire UT1 menu 1 From the main CommandView page select the Menu button in the lower right corner of the screen 2 Next select Applications then StarFire and select the Setup tab 1A Universal Terminal formerly Virtual Terminal is an electronic display or console capable of interfacing with ECUs on an ISOBUS network 169 ...

Page 170: ...ext select the Serial Port tab and confirm the serial port is set to the following set tings l baud rate to 115 200 l update rate to 10 Hz l output only GGA and ZDA messages Complete the RS Lite Profile Wizard To configure the RS Lite communication for the OMNiDRIVE tractor 170 ...

Page 171: ...e RS1 and RS Lite Calibration and Operation Manual P N 016 4010 001 for additional assistance with completing the profile wizard Note Ensure that the base station is running if using StarFire corrections 1 From the main CommandView page select the Menu button in the lower right corner of the screen 171 ...

Page 172: ...e is displayed instead a new profile will need to be created to ensure that the RS Lite is configured for the OMNiDRIVE system correctly 1A Universal Terminal formerly Virtual Terminal is an electronic display or console capable of interfacing with ECUs on an ISOBUS network 2A Universal Terminal formerly Virtual Terminal is an electronic display or console capable of interfacing with ECUs on an IS...

Page 173: ...lect the Machine Settings tab and then the Change Profile button and create a new profile Note Refer to the RS1 and RS Lite Calibration and Operation Manual P N 016 4010 001 for additional assistance with creating and editing profiles as well as settings and options available in the profile wizard 173 ...

Page 174: ...uration 6 Continue with the wizard until the Differential1 Correction page is displayed and select RTK2 as the correction type Note The RTK correction source is not working correctly if the GPS status does not display green It may take several minutes to converge the RTK correction type 7 Complete the RS Lite calibration wizard Configure the Tractor Radio 1 From the main CommandView page select th...

Page 175: ...g set 1A Universal Terminal formerly Virtual Terminal is an electronic display or console capable of interfacing with ECUs on an ISOBUS network 2A Universal Terminal formerly Virtual Terminal is an electronic display or console capable of interfacing with ECUs on an ISOBUS network 175 ...

Page 176: ...n list select Tractor This setting configures the RS Lite for the types of radio data to transmit or receive during autonomous operation 5 Ensure the Radio Channel drop down is set to Hop and the Radio Transmit TX Power is set to a value of 15 6 Use the drop down list to set the number of Non Controlling Combines present during field operations 176 ...

Page 177: ...016 4010 001 for additional assistance with the RS Lite features and menus and completing the profile wizard 1 From the main CommandView page select the Menu button in the lower right corner of the screen 1The combine that may assign paths to and may sync with the OMNiDRIVE tractor One controlling combine is required for all OMNiDRIVE locations 2A combine operating with the OMNiDRIVE tractor and c...

Page 178: ...1 and select the RS Lite working set 3 From the RS Lite home page select the Settings menu followed by the TIB Settings tab 1A Universal Terminal formerly Virtual Terminal is an electronic display or console capable of interfacing with ECUs on an ISOBUS network 178 ...

Page 179: ...with a CommandView II command center enable the CM2 check box option If the tractor is equipped with a CommandView III command center this option must remain disabled CommandView II Identification Enable the CM2 option if the armrest has a separate panel with operator controls and the 7 CommandView II command center display 179 ...

Page 180: ...mmandView III command center display 6 Complete the calibration procedures defined in the following topics a Tractor Interface Board TIB Transmission Settings and Calibration on the next page b Tractor Interface Board TIB Throttle Settings on page 190 c Tractor Interface Board TIB Brake Settings on page 193 180 ...

Page 181: ... with an IVT Review current transmission calibration values or recalibrate the transmission for OMNiDRIVE autonomous operation To review transmission settings in the RS Lite working set 1 From the main CommandView page select the Menu button in the lower right corner of the screen 181 ...

Page 182: ...1 and select the RS Lite working set 3 From the RS Lite home page select the Settings menu followed by the TIB Settings tab 1A Universal Terminal formerly Virtual Terminal is an electronic display or console capable of interfacing with ECUs on an ISOBUS network 182 ...

Page 183: ...Chapter 3 4 Select the Transmission Settings button Note Depending upon the transmission type selected on the TIB Settings page one of the following pages will be displayed 183 ...

Page 184: ...Field Provisioning Overview Current Calibration Values The current calibration values for Park Power Hold F1 and F2 are displayed at the top of the Transmission Settings page 184 ...

Page 185: ... To recalibrate the transmission settings set the control lever to the appropriate position and select the calibrate button for the lever position Note To properly calibrate the IVT1 power hold position move the control lever to the power hold position detent just above the park position 1Infinitely Variable Transmission 185 ...

Page 186: ...or recalibrate the transmission for OMNiDRIVE autonomous operation To review transmission settings in the RS Lite working set 1 From the main CommandView page select the Menu button in the lower right corner of the screen 2 Next select Applications ISOBUS VT and select the RS Lite working set 186 ...

Page 187: ...Chapter 3 3 From the RS Lite home page select the Settings menu followed by the TIB Settings tab 187 ...

Page 188: ...Field Provisioning Overview 4 Select the Transmission Settings button Note Depending upon the transmission type selected on the TIB Settings page one of the following pages will be displayed 188 ...

Page 189: ...mission Settings page Note These values may be useful for tuning or diagnostics of the OMNiDRIVE system Recalibrate Transmission Settings To recalibrate the transmission settings 1 Toggle the autonomous armrest switch to the off position 2 Press and hold the clutch pedal and then select the Calibrate Clutch Pressed button 189 ...

Page 190: ...is range based upon field conditions or operational concerns For example limiting the maximum RPM may allow smoother shifting while maintaining better power with a loaded grain cart Tractor Interface Board TIB Throttle Settings Review current throttle calibration values or recalibrate the throttle for OMNiDRIVE autonomous operation To review throttle settings in the RS Lite working set 1 From the ...

Page 191: ...ect the RS Lite working set 3 From the RS Lite home page select the Settings menu followed by the TIB Settings tab 1A Universal Terminal formerly Virtual Terminal is an electronic display or console capable of interfacing with ECUs on an ISOBUS network 191 ...

Page 192: ...Field Provisioning Overview 192 ...

Page 193: ... switch to the off position 7 Release the foot throttle or reduce the throttle to the minimum position and select the Calibrate Minimum button 8 Depress the foot throttle or increase the throttle to the maximum position and select the Calibrate Maximum button Note The minimum throttle values must be lower than the maximum throttle values to successfully complete the calibration Tractor Interface B...

Page 194: ...tonomous mode 1 From the main CommandView page select the Menu button in the lower right corner of the screen 2 Next select Applications ISOBUS VT1 and select the RS Lite working set 1A Universal Terminal formerly Virtual Terminal is an electronic display or console capable of interfacing with ECUs on an ISOBUS network 194 ...

Page 195: ...Chapter 3 3 From the RS Lite home page select the Settings menu followed by the TIB Settings tab 195 ...

Page 196: ... autonomous armrest switch to the on position Note The brake system automatically calibrates the first time that the armrest switch is toggled to autonomous mode after each ignition cycle Note Disconnect the left and right brake pedals when calibrating the brake actuators 196 ...

Page 197: ...ter 3 6 Select the Calibrate Brakes button to perform a brake actuator calibration 7 Monitor the brake pedals in the tractor cab The pedals should extend briefly and then retract to the normal position 197 ...

Page 198: ...ing the OLAF1 will initiate cellular data fees and charges It is recommended to start this process a couple days prior to the date on which the OMNiDRIVE system will be installed to avoid excessive data costs but to also ensure that the system can be tested after installation is complete To activate the OMNiDRIVE Combine Slingshot Field Hub Note The OMNiDRIVE combine requires an activation for bot...

Page 199: ...r drop down list to select the dealer location with which the customer account will be associated 4 Select the Field Hub Activation option 5 On the Device Info page enter the IMEI1 number found on the Field Hub in the first device field 1International Mobile Equipment Identity 199 ...

Page 200: ... the cellular data provider and sub scription information required for the client account 7 In the Data Plan Options area it is recommended to Activate data plan through Data Activation Center 8 Confirm that the SIM card number shown on the Device Info page matches the info on the card taped to the bottom of the Field Hub 200 ...

Page 201: ...Chapter 4 9 In the Subscription Information section select the Registration Code option and enter the 1 year OMNiDRIVE coverage unlock P N 077 7000 082 provided with the com bine kit 201 ...

Page 202: ...ct devices All devices on an OLAF must be associated with the same client account 12 The OLAF form will update and a page similar to the following example is displayed Note If a page similar to the above does not display check that the correct information has been entered on the Device Info form and select Save Device again If the page still does not update correctly contact the Raven Technical Se...

Page 203: ...provided on the OLAF Note Please allow up to 4 business days to activate the device Once activation has been completed a confirmation email will be sent to the customer and an OTA1 software update will be pushed to the Field Hub the next time the device powers up 1 Over the Air Software updates and other information pushed from Slingshot servers via the Slingshot system 203 ...

Page 204: ...and provide the contact information for the manager or admin istrator of the cellular account 17 Select the Next button in the lower right corner of the web page 18 On the Finish page enter any notes about the device or activation and select the Fin ish button 19 The following page is displayed 20 Return to the Slingshot home page and select the Manage tab and select Hardware 204 ...

Page 205: ...m ID found on the Field Hub and confirm the information displayed in the Owner Company column displays correctly Register the RS Lite on the OMNiDRIVE Combine To register the RS Lite on the OMNiDRIVE combine 1 Log into the Slingshot dealer portal https portal ravenslingshot com index php r site login 205 ...

Page 206: ...ber and bar code information from the RS Lite unit to be mounted to the machine 4 Use the Owner drop down list to select the OMNiDRIVE system owner with which the RS Lite will be registered 5 Enter a name for the OMNiDRIVE system or location 6 Select the Submit button to register the RS Lite 206 ...

Page 207: ...ine Build the Combine System in Slingshot Complete the following steps to allow the Slingshot system to properly associate the devices connected to the machine Reconfigure Device Connections 1 In the combine cab disconnect the Ethernet cable on the OMNiDRIVE tablet 207 ...

Page 208: ...ired to allow the Slingshot system to properly build the combine device system on the Slingshot portal 3 From the CR7 main page select the UT1 button along the bottom of the screen 4 Next select the Slingshot UT working set 1A Universal Terminal formerly Virtual Terminal is an electronic display or console capable of interfacing with ECUs on an ISOBUS network 208 ...

Page 209: ...for normal operation of the OMNiDRIVE system This mode is only selected to allow the Slingshot system to properly build the combine device system on the Slingshot portal 7 Follow the on screen prompts and reboot the RS Lite when prompted 8 Power cycle the machine Confirm Slingshot System 1 Log into the Slingshot dealer portal https portal ravenslingshot com index php r site login 209 ...

Page 210: ...e the device ID search feature to search for the last 5 digits of the modem ID or IMEI1 of the Field Hub 4 Next select the OMNiDRIVE combine and select the System tab to view the devices assigned to the machine 1International Mobile Equipment Identity 210 ...

Page 211: ...ort and display properly on the Slingshot portal 5 Ensure that the following devices are detected and displayed in the Slingshot portal l Field Hub l RS Lite RS1 l CR7 6 If all devices are displayed correctly move the Ethernet connection from the Field Hub back to the OMNiDRIVE tablet 211 ...

Page 212: ...n Settings To set up Slingshot communication for the OMNiDRIVE combine 1 From the CR7 main page select the UT1 button along the bottom of the screen 2 Next select the Slingshot UT working set 1A Universal Terminal formerly Virtual Terminal is an electronic display or console capable of interfacing with ECUs on an ISOBUS network 212 ...

Page 213: ...e WiFi Settings tab 7 Use the Mode drop down option to select the Manual Client option Verify Cellular Data on the Field Hub Complete the following steps to verify the cellular data activation on the Slingshot Field Hub in both the OMNiDRIVE tractor and the controlling combine1 1The combine that may assign paths to and may sync with the OMNiDRIVE tractor One controlling combine is required for all...

Page 214: ...hot Field Hub for the OMNiDRIVE Combine on page 198 1 From the CR7 main page select the UT2 button along the bottom of the screen 2 Next select the Slingshot UT working set 1Online Activation Form 2A Universal Terminal formerly Virtual Terminal is an electronic display or console capable of interfacing with ECUs on an ISOBUS network 214 ...

Page 215: ...Chapter 4 3 Touch the WiFi Status icon at the top of the home page 4 Select the Slingshot Field Hub SSID from the list of available networks and use the password provided on the Field Hub 215 ...

Page 216: ...ular data connection Note If the Field Hub is not receiving data contact Technical Service at 1 800 243 5435 for further assistance Over the Air OTA Combine Device Updates The following sections offer instructions to update the OMNiDRIVE components with Over the Air OTA1 updates 1 Over the Air Software updates and other information pushed from Slingshot servers via the Slingshot system 216 ...

Page 217: ... working set and select the Field Update button 3 Select a software version to which the RS Lite will be updated Note For OMNiDRIVE systems operating with a John Deere 8R use software version 20 3 1A Universal Terminal formerly Virtual Terminal is an electronic display or console capable of interfacing with ECUs on an ISOBUS network 217 ...

Page 218: ...MNiDRIVE system Note Refer the CRX Operation Guide P N 016 0171 664 for additional assistance with the CR7 field computer 1 From the CR7 home page select the Settings button in the lower left corner of the page 2 Select the Software Update option from the settings menu 218 ...

Page 219: ...in Compensation and Message Output Settings Note The following settings are made through the CommandView armrest display in the StarFire UT1 menu 1 From the main CommandView page select the Menu button in the lower right corner of the screen 1A Universal Terminal formerly Virtual Terminal is an electronic display or console capable of interfacing with ECUs on an ISOBUS network 219 ...

Page 220: ...2 Next select Applications then StarFire and select the Setup tab 220 ...

Page 221: ...ing controller is present toggle the 3D TCM feature On In this configuration the Antenna Height setting in the RS Lite UT must be set to zero 4 Next select the Serial Port tab and confirm the serial port is set to the following set tings l baud rate to 115 200 l update rate to 10 Hz l output only GGA and ZDA messages 221 ...

Page 222: ...ite Calibration and Operation Manual P N 016 4010 001 for additional assistance with completing the profile wizard Note Ensure that the base station is running if using StarFire corrections 1 From the CR7 main page select the UT1 button along the bottom of the screen 1A Universal Terminal formerly Virtual Terminal is an electronic display or console capable of interfacing with ECUs on an ISOBUS ne...

Page 223: ... UT menu If the home page is displayed instead a new profile will need to be created to ensure that the RS Lite is configured for the OMNiDRIVE system correctly To create a new profile 1 Select the Settings button along the right side of the page 2 Select the Machine Settings tab and then the Change Profile button and create a new profile 223 ...

Page 224: ...ht page is displayed 5 If a steering controller is present set the height value to zero 6 Continue with the profile wizard until the OMNiDRIVE System page is displayed and enable the OMNiDRIVE System option 7 Proceed with the wizard until the Steering Configuration page is displayed and select GPS Only Configuration 8 Continue with the wizard until the Differential1 Correction page is displayed an...

Page 225: ...calibration wizard Configure the Combine Radio 1 From the CR7 main page select the UT1 button along the bottom of the screen 2 Next select the Slingshot UT working set 3 From the Slingshot home page select the Settings menu followed by the Radio Link tab 1A Universal Terminal formerly Virtual Terminal is an electronic display or console capable of interfacing with ECUs on an ISOBUS network 225 ...

Page 226: ...r the controlling combine and each non controlling combine2 7 Power cycle the machine Configure the CR7 Machine Note The following steps must be completed in the Settings menu on the Raven CR7 field computer The CR7 Operation Guide P N 016 0171 664 may be found here or on the Raven Industries Applied Technology web site 1The combine that may assign paths to and may sync with the OMNiDRIVE tractor ...

Page 227: ...tton 2 Create a machine configuration for the combine on which the CR7 is installed 3 While creating the machine configuration enter the width of the combine header as the Guidance Width Disable Section Control 1 From the main screen select the Settings icon in the lower left corner of the display and select the Section Control button 227 ...

Page 228: ...etworking button 2 Disable the Enable WiFi option Note OMNiDRIVE may encounter communication errors if this option is not disabled Enable the On Screen Master Switch 1 From the main screen select the Settings icon in the lower left corner of the display and select the Master Switch button 2 Enable the On Screen option This option allows the combine operator to use the CR7 touch screen to toggle co...

Page 229: ...out Switch Daily Inspections Daily inspections are important to ensure that the tractor and grain cart are in operational condition Refer to the Daily Walk Around and Inspection on the facing page for assistance with completing a daily inspection before initiating autonomous operation Note Each tractor and grain cart is different Follow recommendations provided by the tractor and grain cart manufa...

Page 230: ...may change dir ection speed or stop without warning Always engage the Lock out Switch when working on or around the autonomous vehicle Toggle the armrest switch to manual mode while in the operator position 1 Set stage and unload points within the operation Refer to Set Stage and Unload Points on page 251 2 Plan routes and sync the tractor with combine Refer to Route Planning and Syncing with the ...

Page 231: ...sensor is clear of debris l wipe off the lens on each of the perception cameras l check that camera brackets are secure and undamaged l suspend autonomous operation and repair any brackets as needed l Calibrate the brakes l When the Autonomous switch is toggled to autonomous mode monitor the brake pedals in the cab The pedals will fully extend and retract Note Disconnect the left and right brake p...

Page 232: ...shut l Set the climate control system to maintain a temperature between 70 and 75 F 21 24 C l close and confirm that the door is latched securely l release the lockout switch to allow the controlling combine2 to send com mands to the autonomous OMNiDRIVE tractor Grain Cart l Inspect wheels l check tire pressure or inspect tracks and service as recommended by the man ufacturer l Open any tarps or c...

Page 233: ...ark Note When operating an IVT1 tractor use the control stick speed dial to set the speed for F1 at 10 mph 16 km h and F2 at 20 mph 32 km h 2 Toggle the armrest switch to the autonomous mode l On a PST2 tractor the corner post display will remain in Park l On an IVT tractor the corner post display will cycle through Park F1 F2 Neutral and Reverse gears 3 Toggle the armrest switch off and move the ...

Page 234: ... to the autonomous mode Note Refer to the Field Boundary Set Up on page 243 topic for assistance with creating a field boundary 5 Open the OMNiDRIVE user interface and check the combine and tractor information displays Make sure the green check mark icon is shown in both displays Note Refer to Connect to the OMNiDRIVE User Interface on page 241 for assistance with logging into the OMNiDRIVE user i...

Page 235: ...Lockout Switch and E Stops NOTICE The Lockout Switch and E Stops are critical safety components of the OMNiDRIVE system Be sure to test each mounted or hand held switch individually prior to starting autonomous operations 8 On the OMNiDRIVE user interface set a stage point2 and send the tractor to set point 9 Before the tractor reaches the stage point press the E Stop button and verify that the tr...

Page 236: ...ollowing steps to reassign a hand held E Stop as the controlling E Stop 1 Press an hold the power button on the E Stop for 12 seconds 2 Confirm that the status LED changes to solid Note The following status LED colors will be the same between the controlling E Stop and all other E Stops within range Tractor E Stop An E Stop is required to be mounted in the tractor cab This E Stop is required for t...

Page 237: ...f the OMNiDRIVE tractor press the power button to wake the hand held E Stop and confirm that the status LED indicates that Tractor Interface Board TIB communication is detected E Stop Status LED Color Description Autonomous Oper ation Green E Stop is on and receiving TIB communication Ready or Active Yellow Tractor E Stop is functional and receiving messages via the radio Ready or Active Red Indic...

Page 238: ...onary activate the autonomous switch on the tractor armrest 2 Press the power button on each E Stop mounted or hand held to be used during the day Note Ensure that the controlling E Stop is mounted in the controlling combine2 Refer to E Stops on page 236 for assistance with reassigning the master E Stop if necessary 3 Make sure the tractor beacon and all E Stop status LEDs are green 4 Monitor the ...

Page 239: ...in autonomous mode but has not received a command to move and is currently idle Ready Red E Stop has been activated Disabled Off Tractor is shutdown or ignition is off Disabled l A notification displays on the OMNiDRIVE user interface within 5 seconds indic ating that an E Stop has been activated l Confirm that the status LED on each E Stop turns red E Stop Status LED Color Description Autonomous ...

Page 240: ...llowing conditions l Verify that the tractor brake pedals return to normal position l The tractor beacon returns to green Tractor Beacon Status Color Description Autonomous Operation Green Tractor is in the manual mode Disabled Yellow Blinking Tractor is in autonomous mode has received a route and is moving or ready to move Active Yellow Solid Tractor is in autonomous mode but has not received a c...

Page 241: ...ff E Stop is in sleep mode or the battery is depleted l Press the power button on the E Stop to wake up the device l Charge the E Stop to restore normal oper ation Not Shown 7 Repeat these steps to test each E Stop in the OMNiDRIVE system individually Connect to the OMNiDRIVE User Interface Connect to the RS Lite WiFi Network 1 Access the OMNiDRIVE tablet and select the OMNiDRIVE user interface sh...

Page 242: ...ct the Machine Settings icon along the top of the screen Note Select the Add New Equipment button at the bottom of the page to create new equipment profiles Refer to the following sections for assistance with completing each profile Create Combine Profile 242 ...

Page 243: ...n cart Note The type minimum and maximum RPM and speed dial F1 and F2 fields are not used It is recommended to leave these fields empty Field Boundary Set Up Note An external field boundary is required for every OMNiDRIVE operation to set the bounds for the autonomous tractor and grain cart Field boundaries may be either created within the OMNiDRIVE user interface or uploaded with a shape shp file...

Page 244: ...ld button in the lower left corner of the screen 3 Select the Create Field button 4 Select the Draw Boundary tool and tap around the edges of the field to draw a bound ary 5 Double tap on the last point to create the boundary 6 Select the Save Exit button to save the boundary in the OMNiDRIVE user inter face 244 ...

Page 245: ...RIVE external boundary 1 Select the Field Settings icon along the top of the screen 2 Select the Add Field button in the lower left corner of the screen 3 Select the Upload Fields button 4 Browse for the field shape files shp to load them into the OMNiDRIVE user inter face 245 ...

Page 246: ...ny non controlling combines can join the active job to add to the same coverage map and allow the OMNiDRIVE system to accurately plan routes based upon current harvested areas Review the CR7 Operation Guide for additional assistance with starting a job on the CR7 field computer Start an OMNiDRIVE Operation 1 Select the desired field within which to operate the OMNiDRIVE system Note To add a field ...

Page 247: ...s to select l the controlling combine1 for the operation l the OMNiDRIVE tractor Note Refer to Machine Profile Setup on page 242 to add equipment profiles to the OMNiDRIVE user interface 1The combine that may assign paths to and may sync with the OMNiDRIVE tractor One controlling combine is required for all OMNiDRIVE locations 247 ...

Page 248: ...d system errors or conditions This may also be used as a diagnostic tool during autonomous operations 2 Field Management Tap the field management icon to edit the external field boundary or to create edit or delete an internal boundary 3 User Interface Settings Tap the settings icon to change the following user interface options l switch the map orientation l toggle combine bubbles on off l select...

Page 249: ...ops must be green l All system components must be online and functioning 5 Stage Point To stage the grain cart 1 Move the stage point2 marker to the desired location for the grain cart to wait to unload the controlling combine3 2 Tap the Start button to plan a route to the stage point 3 Confirm the route to command the tractor to move to the stage point 4 Once the tractor reaches the stage point t...

Page 250: ...ed the combine operator may command the cart to the stage point 7 Tractor Tap the tractor icon to center the map view over the tractor location 8 Tractor Status Displays the status of all OMNiDRIVE devices on the tractor Tap within the tractor status display to change tractor speed settings Note It may take up to 5 seconds for changes to take affect for the OMNiDRIVE tractor autonomous status 9 Sy...

Page 251: ...ombine Tap within the combine status display to save a new sync point 11 Combine Tap the combine icon to center the map view over the combine location Set Stage and Unload Points DANGER Autonomous machines may move without someone in the cab Always activate the Lockout Switch before boarding the machine DANGER The perception system may not be able to see all areas around the machine Always activat...

Page 252: ... OMNiDRIVE system and command the tractor back to the stage point in preparation for syncing with the tractor Mid point Mid points are points through which the cart must pass on the way to the stage or unload points Mid points may be used to adjust a planned route as necessary or desired during autonomous operations For example use a mid point3 to direct the tractor away from a 1Location where the...

Page 253: ...ays activate the Lockout Switch while working on or around the machine Route Planning Requirements The following requirements must be met to enable OMNiDRIVE route planning l The arm rest switch in the tractor and the toggle must be set to autonomous mode l The Lockout Switch and all E Stop1s must be deactivated l The tractor and combine must be within the external field boundary and within a har ...

Page 254: ...or the OMNiDRIVE tractor WARNING By confirming the route the operator is confirming that the route is safe and accepting liability for the autonomous tractor on that route 1Location where the grain cart will stop and wait to sync with the combine During har vesting move the stage point to ensure the tractor is positioned conveniently for efficient syncing with the combine 2Location where the grain...

Page 255: ...e route is safe and accepting liability for the autonomous tractor on that route 3 Tap the start button again to confirm the displayed route and command the OMNiDRIVE system to start moving the tractor to the selected point The OMNiDRIVE tractor will navigate through the mid point on the way to the selected way point Sync Planning The sync point is different from the stage and unload points When t...

Page 256: ...Tap the start button again to confirm the displayed route and command the OMNiDRIVE system to sync with the combine Note While synching the OMNiDRIVE user interface will change to a syncing view as the tractor is approaching the combine Tap the X icon in the lower right corner of the screen to stop syncing for any reason 4 Once the tractor syncs with the combine four nudge arrows will be displayed...

Page 257: ... will stop and await further commands Tractor Interface Board TIB Advanced OMNiDRIVE Tuning Advanced tuning allows the OMNiDRIVE operator to tune the autonomous OMNiDRIVE tractor To tune responsiveness settings in the RS Lite working set 1 From the main CommandView page select the Menu button in the lower right corner of the screen 257 ...

Page 258: ...T1 and select the RS Lite working set 3 From the RS Lite home page select the Settings menu followed by the TIB Settings tab 1A Universal Terminal formerly Virtual Terminal is an electronic display or console capable of interfacing with ECUs on an ISOBUS network 258 ...

Page 259: ...Chapter 4 4 Select the Advanced OMNiDRIVE Tuning button The following responsiveness set tings will be displayed 259 ...

Page 260: ...controlling the steering valve A higher value may allow the steering system to respond more rapidly to steering inputs A value that is too high may cause the machine to steer too aggressively and will be jittery while trying to maintain a straight line PWM Max The maximum pulse width which provides control response during operation A value too low may limit the speed which the system allows the ma...

Page 261: ......

Page 262: ...y operating in autonomous mode Ready to Enable Autonomous button is not active Machine is operating in manual operation mode Disabled System status good TIB and RS Lite communicating but the armrest switch is toggled to manual operation Autonomous operation is disabled E Stop Active At least one of the system E Stop1s is activated Fault A system fault prohibits the system from engaging autonomous ...

Page 263: ... Check fuses on both the tractor and combine l tractor l fuses for the combine harnessing are located on the roof Check the condition of these fuses seasonally to prepare for autonomous grain cart operation or when troubleshooting the OMNiDRIVE system l combine harness the OMNiDRIVE harness fuses are located on the roof com bine Brakes and Brake Module If the brakes stay fully extended Note Do not...

Page 264: ...brake module cable 3 The brakes should retract and OMNiDRIVE is in a limp home mode 4 If the brakes still don t retract check the 7 5 A fuse located in the upper right corner of the power distribution unit and replace as necessary 5 Reconnect the base cable to the J1 to resume autonomous operation Note Contact the Raven Technical Service team for additional troubleshooting assistance 264 ...

Page 265: ...aven components l User assistance and product documentation l Product warranty registration and activation key requests l Product documentation application drawings and updates Or visit the Raven Public Knowledge Base PKB at http ravenprecision force com knowledgebase Warranty Service and Repair Review the Product Service and Repair page for additional details about what is not covered under warra...

Page 266: ...nPrecision com Raven Slingshot Information regarding Slingshot products and services may be found at RavenSlingshot com Social Media and Raven Podcast Raven invites you to follow us on your favorite social media The Raven Precision Podcast may be found at RavenPrecision podbean com or on Apple iTunes Google Play and Spotify 266 ...

Page 267: ... approval The freight cost to Raven Industries will be the customer s responsibility The Return Materials Authorization RMA number must appear on the box and all documentation including proof of purchase must be included inside the box to be sent to Raven Industries What will Raven Industries do Upon confirmation of the warranty claim Raven Industries will at our discretion repair or replace the d...

Page 268: ...w long is the extended warranty coverage period Raven Applied Technology products that have been registered online are covered for an additional 12 months beyond the Limited Warranty for a total coverage period of 24 months from the date of retail sale In no case will the Extended Warranty period exceed 36 months from the date the product was issued by Raven Industries Applied Technology division ...

Page 269: ...se or liability for repairs made outside our facilities without written consent Raven Industries is not responsible for damage to any associated equipment or products and will not be liable for loss of profit labor or other damages Cables hoses software enhancements and remanufactured items are not covered by this Extended Warranty The obligation of this warranty is in lieu of all other warranties...

Page 270: ...ne that may assign paths to and may sync with the OMNiDRIVE tractor One controlling combine is required for all OMNiDRIVE locations D DGPS Differential Global Positioning System is an enhancement to standard GNSS GPS messages to provide better position accuracy Differential Differential Global Positioning System is an enhancement to standard GNSS GPS messages to provide better position accuracy DT...

Page 271: ...n Satellite System GNSS Global Navigation Satellite System H HDOP Horizontal Dilution of Precision homologation Approval or certification of devices especially electrical and communications devices for use in specific regions or countries I IMEI International Mobile Equipment Identity IVT Infinitely Variable Transmission 271 ...

Page 272: ...ting with the OMNiDRIVE tractor and controlling combine A non controlling combine may share harvest coverage data to the coverage map during a harvest job but cannot sync with or plan routes for the OMNiDRIVE tractor O OLAF Online Activation Form OTA Over the Air Software updates and other information pushed from Slingshot serv ers via the Slingshot system P prescription map Variable Rate Applicat...

Page 273: ...efile is a vector format consisting of a shp shx and dbf file and is used to store geospacial data and information such as field boundaries product application coverage and waypoints SHCS Socket Head Cap Screw SNR Signal to Noise Ratio SOG Speed Over Ground stage point Location where the grain cart will stop and wait to sync with the combine During har vesting move the stage point to ensure the tr...

Page 274: ...erminal is an electronic display or console capable of interfacing with ECUs on an ISOBUS network V VRA Variable Rate Application utilizes a prescription Rx map for a given field and product to automatically adjust the rate of application based upon the target rate zones within the field VT A Universal Terminal formerly Virtual Terminal is an electronic display or console capable of interfacing wi...

Page 275: ......

Reviews: