


7-12
Field
–
Replaceable Units (FRUs)
501510 Rev. S
2.
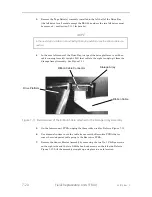
Reinstall the four pan-head screws removed in Section 7.6.1 using a No. 2 Phil-
lips screwdriver.
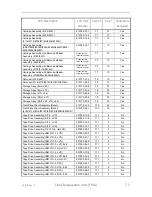
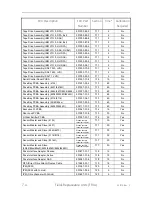
7.7
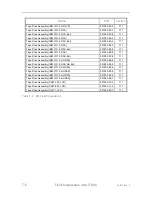
Carriage Assembly
RLS-4124/4221
(8mm) P/N 510180-01-1
RLS-4445/4470
(8mm) P/N 510180-14-4
RLS-5116
(SAIT) P/N 510180-12-8
RLS-5244
(SAIT) P/N 510180-15-1
RLS-6227
(SDLT) P/N 510180-15-1
RLS-8116/8216H/8236/8236D
(LTO) P/N 510180-12-8
RLS-8216C/8216CD/8236C/8236CD
(LTO) P/N 510180-02-9
RLS-8202/8204/8204D/8244/8244D/8404/
(LTO) P/N 510180-15-1
8404D/8444/8444D
Please contact Technical Support for additional information about Carriage
Assemblies with the Barcode Reader Assemblies installed.
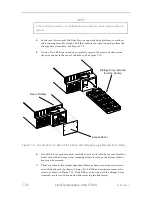
NOTE
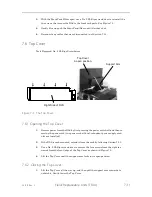
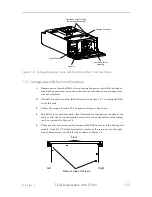
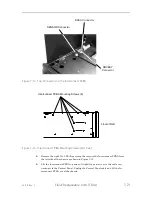
Before replacing the Carriage Assembly,
open the library’s Top Cover and read the RLS
Carriage Assembly Label located on the top of the Carriage Assembly to determine
which model of Carriage Assembly is installed in the library. See Figure 7-4. The label will
read 510180-xx-x. If the part number does not match those listed above, please contact
Qualstar Technical Support to obtain the correct replacement Carriage Assembly.
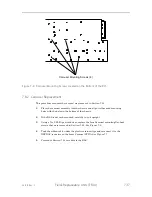
The Carriage Assembly contains the Handler that moves laterally and carries the Gripper
Assembly and the optional Barcode Reader Assembly. The Gripper Assembly grasps the
tape cartridges and moves fore and aft to insert or remove tape cartridges. The Barcode
Reader Assembly is an option on RLS models and may be added by replacing the existing
Carriage Assembly with one containing a Barcode Reader Assembly.
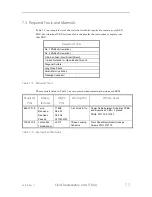
Tools Required: No. 2 Phillips Screwdriver
Summary of Contents for RLS-4470
Page 1: ...RLS 8000 Tape Library Technical Service Manual 501510 Rev S...
Page 2: ......
Page 14: ...xiv 501510 Rev S This page left blank intentionally...
Page 16: ...1 2 Introduction 501510 Rev S Table 1 1 Applicable Documents...
Page 20: ...1 6 Introduction 501510 Rev S This page left blank intentionally...
Page 23: ...501510 Rev S Description and Theory of Operation 2 3...
Page 34: ......
Page 50: ...3 16 The Operator Interface 501510 Rev S This page left blank intentionally...
Page 64: ...4 14 The Maintenance Menu 501510 Rev S This page left blank intentionally...
Page 65: ...501510 Rev S The Private Menu 5 1 5 The Private Menu...
Page 69: ...501510 Rev S The Private Menu 5 5 10 Close the Front Panel Door...
Page 188: ...8 10 Firmware Updating 501510 Rev S Figure 8 7 Properties Screen...
Page 205: ...501510 Rev S RLS Expansions 9 13 This page left blank intentionally...