CDJ-800MK2
113
5
6
7
8
5
6
7
8
C
D
F
A
B
E
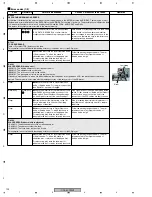
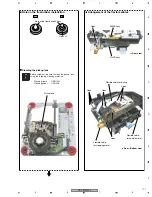
Notes on replacing the JFLB Assy
Notes on replacing the Sheet SW
Rib
Sheet SW
Be careful not to pinch the flexible
cable coming from the sheet SW
during assembly.
Apply tape to the circumference of the JOG FL
section to secure it.
JFLB Assy
Adhere a reinforcing polycarbonate sheet to the surface.
Sheet SW
JOG holder
SW cushion HH48/2
SW cushion HH48/2 Engraved arrow
Places to Roller Assys A and B
Notes:
1. Be careful not to warp the sheet SW.
2. Remove any dirt on the JOG holder to which the sheet SW
is to be adhered. If some adhesive for the old sheet SW
remains on the JOG holder, completely remove it with a cloth
moistened with alcohol.
3. Do NOT place the sheet SW so that it is mounted on the
rib of JOG holder.
4. When adhering the sheet SW, be careful not to trap air
bubbles in it. If air bubbles are formed, remove the sheet SW
and adhere a new sheet SW.
Do NOT reuse the removed sheet SW.
5. When making a connection, be sure to first release the lock
of the connector then securely relock the connector after
making the connection.
Adhere the cushions to the right and left of the engraved
arrows (
←
) (12 positions in total) on the sheet SW.
Notes on Replacement
Place to adhere the Sheet SW
Place to adhere the SW cushions HH48/2
Roller A Assy
×
9
Roller B Assy
×
8
SW ring
JOG holder
Summary of Contents for CDJ-800MK2
Page 27: ...CDJ 800MK2 27 5 6 7 8 5 6 7 8 C D F A B E MODE MODE 3 3 A 27 24 26 19 36 ...
Page 29: ...CDJ 800MK2 29 5 6 7 8 5 6 7 8 C D F A B E Data PANEL DATA Digital A 2 3 3 3 A 3 3 A 23 ...
Page 130: ...CDJ 800MK2 130 1 2 3 4 1 2 3 4 C D F A B E Pin Function ...
Page 135: ...CDJ 800MK2 135 5 6 7 8 5 6 7 8 C D F A B E Pin Function ...
Page 139: ...CDJ 800MK2 139 5 6 7 8 5 6 7 8 C D F A B E Pin Function ...
Page 143: ...CDJ 800MK2 143 5 6 7 8 5 6 7 8 C D F A B E ...
Page 153: ...CDJ 800 7 5 6 7 8 5 6 7 8 C D F A B E ...

