


AXL SE PSDI8/3
18 / 84
PHOENIX CONTACT
108928_en_02
3.6
Terminal point assignment
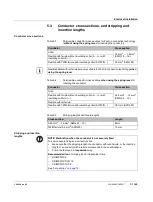
Starting from the top, the terminal points are marked with 0, 1, ... 15.
Table 3
-
1
Terminal point assignment
Figure
Terminal point Signal
Assignment
0
IN0_CH1
Input 0, channel 1
1
IN0_CH2
Input 0, channel 2
2
IN1_CH1
Input 1, channel 1
3
IN1_CH2
Input 1, channel 2
4
IN2_CH1
Input 2, channel 1
5
IN2_CH2
Input 2, channel 2
6
IN3_CH1
Input 3, channel 1
7
IN3_CH2
Input 3, channel 2
8
Takt OUT_T1
Clock output of channel 1
9
Takt OUT_T2
Clock output of channel 2
10
Takt OUT_T1
Clock output of channel 1
11
Takt OUT_T2
Clock output of channel 2
12
GND
I/O, GND
13
GND
I/O, GND
14
GND
I/O, GND
15
GND
I/O, GND
WARNING: Loss of the safety function
Parasitic voltages can result in the loss of the safety function.
•
Connect sensors that require a GND to a GND terminal point (0 V) on the
Smart Element.
E
E
0
1
2
3
4
5
6
8
9
10
11
12
13
14
15
7
0
1
2
3
4
5
6
7
8
9
10
11
12
13
14
15