Note
f
Replace the air filter unit with a new optional Replacement Filter Unit (Model No.: ET-RFV410) if it is damaged or if the dirt does not come
off even after washing
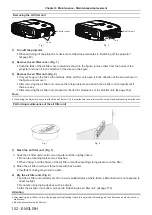
Attaching the air filter unit
Tab
Air filter unit
Fig. 1
1) Attach the air filter unit to the projector. (Fig. 1)
f
Hold the air filter unit with the tab on the left side as shown in the figure, attach it from the right side, and
push the tab until it clicks.
f
Do not press on the crease part of the air filter when pressing into place.
2) Attach the air filter cover to the projector.
f
Perform in the reverse order of the Step
2)
of “Removing the air filter unit” (
Æ
page 152) to close the air
filter cover. Make sure to press the air filter cover firmly until it clicks into place.
f
When the air filter unit is attached to the projector, proceed to the “Resetting the air filter counter” (
Æ
page 153).
Note
f
When using the projector, be sure to attach the air filter unit. If it is not attached, the projector will suck in dirt and dust causing a malfunction.
Resetting the air filter counter
1) Turn on the projector.
2) Press the <MENU> button on the remote control or the control panel.
f
The main menu screen is displayed.
3) Press
as
to select [PROJECTOR SETUP].
4) Press the <ENTER> button.
f
The
[PROJECTOR SETUP]
screen is displayed.
5) Press
as
to select [FILTER COUNTER].
6) Press the <ENTER> button.
f
The
[FILTER COUNTER]
screen is displayed.
7) Press
as
to select [FILTER COUNTER RESET] and press the <ENTER> button.
8) When the confirmation screen is displayed, press
qw
to select [OK], then press the <ENTER> button.
f
The [PROJECTOR SETUP] menu
→
[FILTER COUNTER]
→ [FILTER COUNTER] is displayed as “0H”.
Note
f
When the projector is used without resetting the filter counter, the actual filter usage time (counter numeric value) will not be able to be confirmed.
ENGLISH
-
153
Chapter 6 Maintenance - Maintenance/replacement


