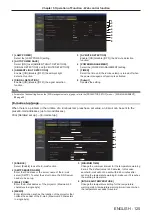
1 [DHCP ON], [DHCP OFF]
To enable the DHCP client function, set to [DHCP ON].
2 [IP ADDRESS]
Enter the IP address when not using a DHCP server.
3 [SUBNET MASK]
Enter the subnet mask when not using a DHCP server.
4 [DEFAULT GATEWAY]
Enter the default gateway address when not using a
DHCP server.
5 [DNS1]
Enter the DHCP1 server address.
Permissible characters for the entry of DNS1 server
address (preferred).
Numbers (0 - 9), period (.)
6 [DNS2]
Enter the DHCP2 server address.
Permissible characters for the entry of DNS2 server
address (alternate).
Numbers (0 - 9), period (.)
7 [SSID]
Enter the same character string as the SSID that is
registered in the access point.
8 [Back], [Next]
Click the [Back] button to return to the previous screen.
Click the [Next] button to move to the next page.
9 [AUTHENTICATION]
Set the user authentication method used by the network
to be connected.
10 [EAP]
Select the EAP setup in the RADIUS server.
11 [ENCRYPTION]
Select the encryption method to be used for
communication between the projector and the network.
12 [Back], [Next]
Click the [Back] button to return to the previous screen.
The setting confirmation screen is displayed by pressing
the [Next] button. Click the [Submit] button to update the
settings.
13 [KEY]
Set the key to be used in USER.
Input either 8 to 63 ASCII characters or a 64 digit string in
the hexadecimal format.
14 [USER NAME]
Enter the user name for authentication in alphanumerics
(excluding spaces, maximum 64 characters)
15 [PASSWORD]
Input the password for authentication in alphanumerics
(Maximum 64 characters)
Note
f
The setting items will change according to the authentication method of wireless LAN which is connected.
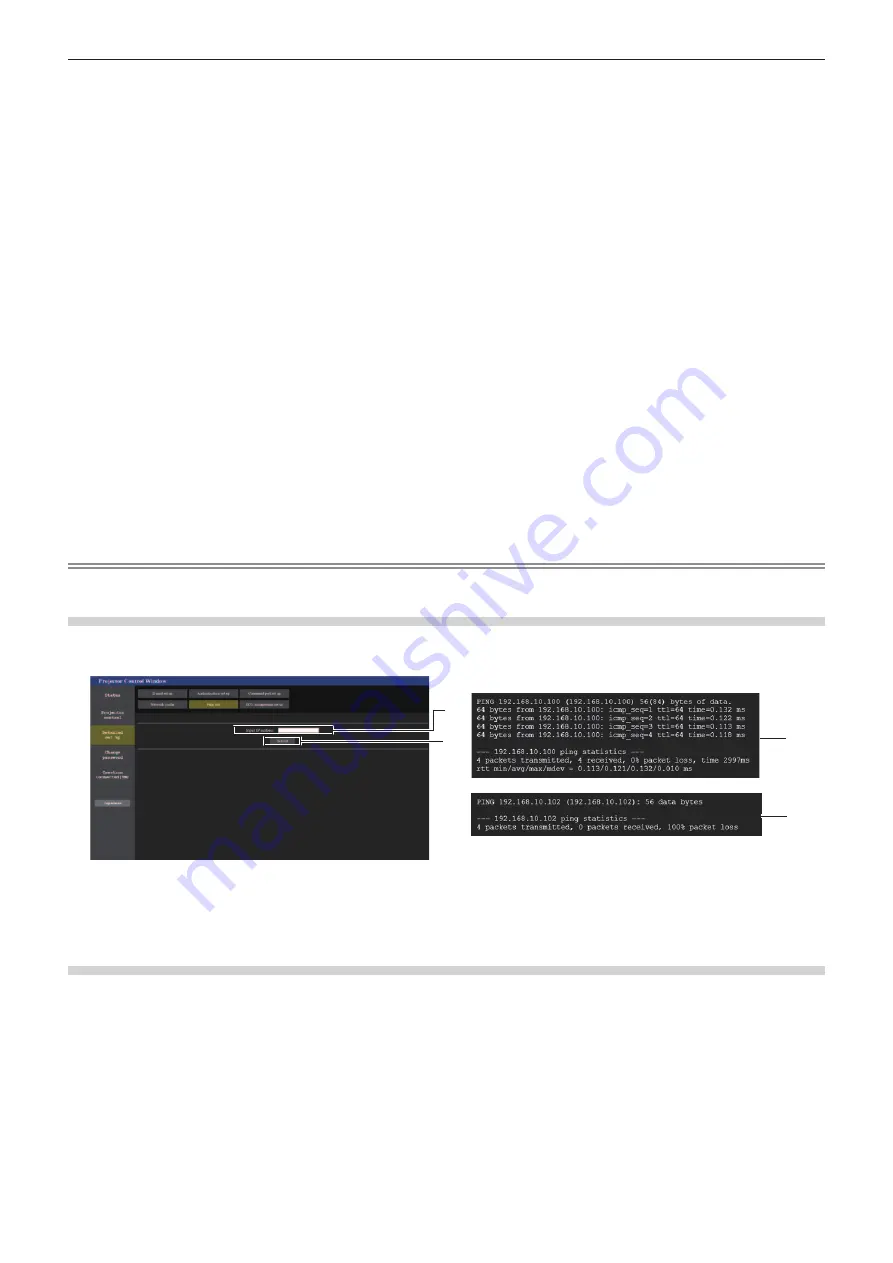
[Ping test] page
Check whether the mail server, POP server, DNS server, etc. is connected to the network.
Click [Detailed set up] → [Ping test].
1
2
3
4
1 [Input IP address]
Enter the IP address of the server to be tested.
2 [Submit]
Executes the connection test.
3 Example of display when the connection has
succeeded
4 Example of display when the connection has failed
[ECO management set up] page
Settings related to the ECO management function of the projector can be made.
Click [Detailed set up] → [ECO management set up].
124 -
ENGLISH
Chapter 5 Operation of Function - Web control function


