2
Setup
22
2.4
When Using a Router
Before connecting your cameras to the BL-WV10, make sure that each camera's
firmware version meets the requirements noted on page 3. If necessary, refer to
the operating instructions included with the camera and update the firmware.
Note
•
Make sure your router's DHCP feature is turned on. Refer to the operating
instructions included with your router for more information.
•
If you are using a wireless router, connect the BL-WV10 to the router using an
Ethernet cable. Wireless connection to the router is not supported.
2.4.1
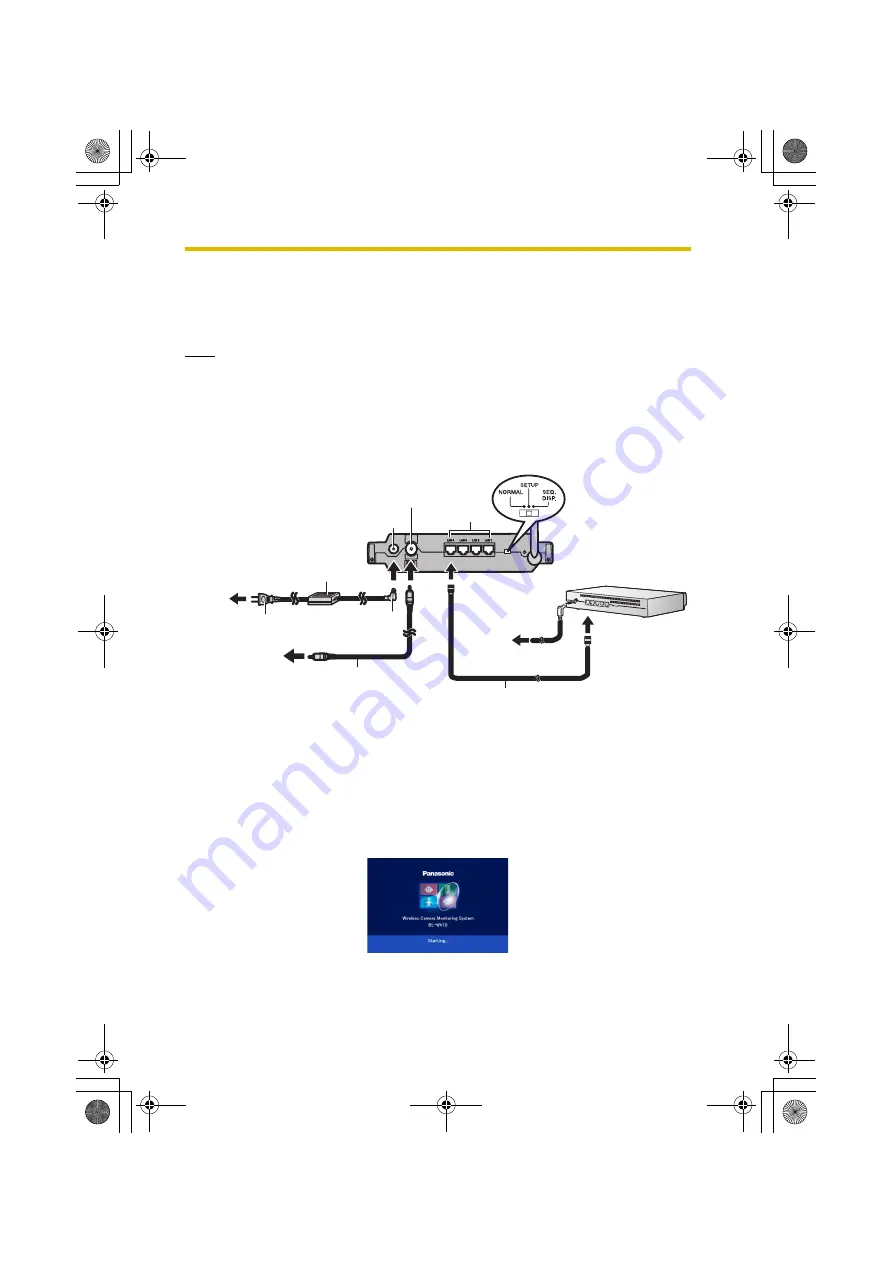
Initial Connections (When Using a Router)
1.
Connect the BL-WV10 to your TV using the included video cable.
2.
Turn on the TV and set the TV’s input switch to the external video input
(“VIDEO”, “EXT”, “INPUT 1”, etc.)
3.
Set the mode switch on the rear of the BL-WV10 to
SETUP
.
4.
Connect the AC cord to the AC adaptor and to the power outlet.
5.
Turn on the BL-WV10 by connecting the DC cord to the unit.
•
The startup screen appears on the TV screen.
Ethernet cable
To
power
outlet
To LAN jack
Router
Rear panel of BL-WV10
To TV
Video cable
(included)
AC adaptor
(included)
AC cord
(included)
DC cord
LAN jacks
DC IN jack
Video output
terminal
To
power
outlet
BL-WV10_OI.book Page 22 Thursday, January 26, 2006 8:03 PM
Summary of Contents for BL-WV10
Page 135: ...135 16 Appendix BL WV10_OI book Page 135 Thursday January 26 2006 8 03 PM ...
Page 136: ...136 16 1 Declaration of Conformity BL WV10_OI book Page 136 Thursday January 26 2006 8 03 PM ...
Page 137: ...137 BL WV10_OI book Page 137 Thursday January 26 2006 8 03 PM ...
Page 157: ...157 Index BL WV10_OI book Page 157 Thursday January 26 2006 8 03 PM ...
Page 161: ...161 BL WV10_OI book Page 161 Thursday January 26 2006 8 03 PM ...
Page 162: ...162 BL WV10_OI book Page 162 Thursday January 26 2006 8 03 PM ...
Page 163: ...163 BL WV10_OI book Page 163 Thursday January 26 2006 8 03 PM ...


