RETURN
MENU
CONTROL PANEL
ON/
OFF
9
Front panel
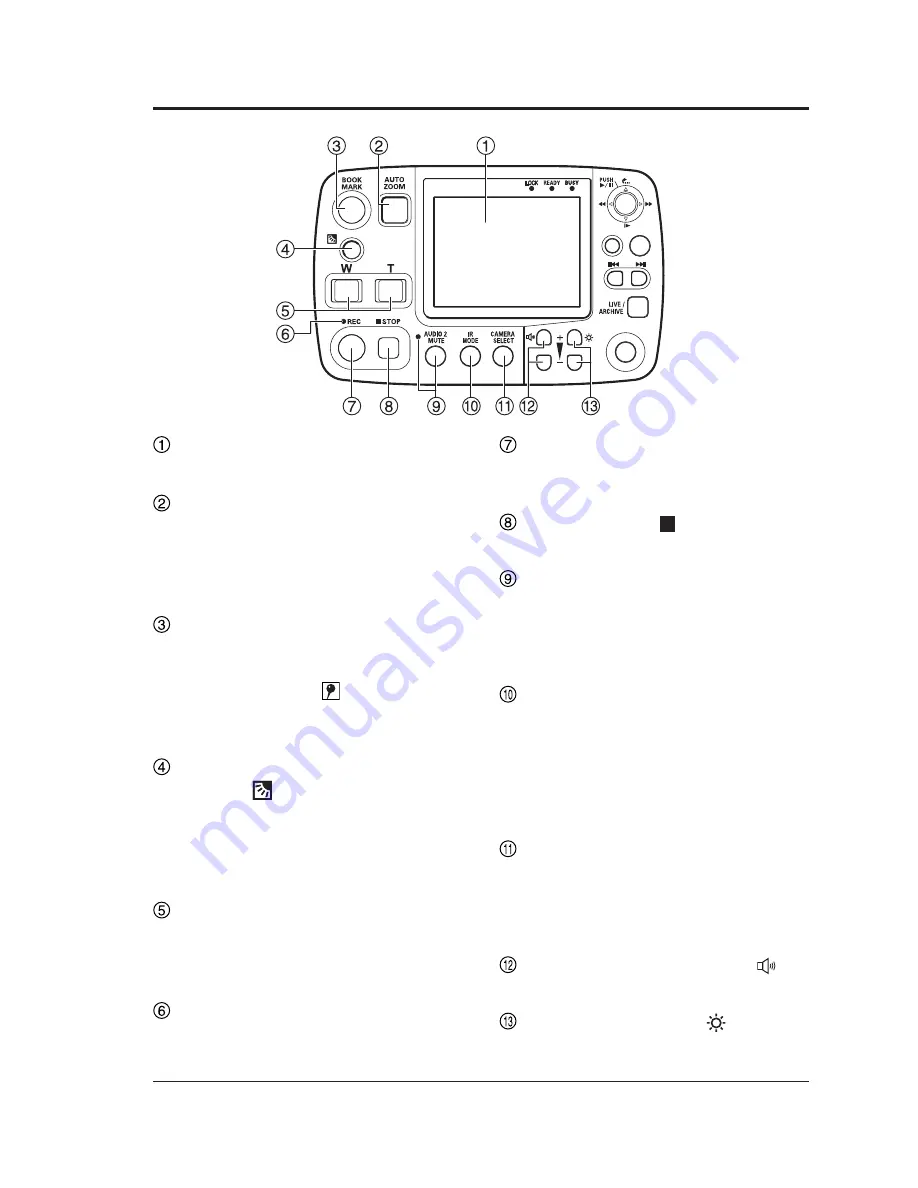
LCD panel
Shows images and operation menus.
AUTO ZOOM button
∗
1, 2
Provides automatic control of zoom-in,
pause and zoom-out operation.
The officer can set zoom ratio and
pause time. (see page 19.)
BOOK MARK button
∗
2
Press during recording or playback
to enter bookmarks. A set bookmark
displays an icon
on the display
for 1 to 2 seconds when pressed.
(see pages 23 and 26.)
B a c k l i g h t c o m p e n s a t i o n
button (
)
∗
1, 2
Press to compensate for strong
backlighting. This button toggles
between ON and OFF at each press.
(see page 19.)
Zoom buttons
∗
1, 2
Use these buttons to zoom out (W-
button) and zoom in (T-button).
(see page 19.)
REC lamp
Lights or flashes during recording.
(see page 52.)
REC button
∗
2
Press to start recording video and
sound to P2 card. (see page 23.)
STOP button (
)
∗
2
Stops recording. (see page 23.)
AUDIO2 MUTE button/lamp
Starts/releases recording for AUDIO2.
Pressing this button turns the lamp
on/off. While the lamp is lit, AUDIO2 is
not being recorded. (see page 19.)
IR MODE button
∗
1
Switches the IR mode to one of the
following modes.
AUTO: Automatically changes IR mode
depending on ambient brightness.
ON: Turns on the IR mode.
OFF: Turns off the IR mode.
CAMERA SELECT button
Selects a camera.
CAMERA1 input: separately sold Color Camera
CAMERA2 input: commercially available camera
(see page 19.)
Volume control buttons ( )
Adjusts speaker sound volume.
Brightness button ( )
Adjusts LCD panel brightness.
Control Reference Guide
∗
1 A commercially available camera connected to the [CAMERA2] connector cannot be controlled.
∗
2 The lamp turns on when the [CONTROL PANEL ON/OFF] button is set to ON.


