Chapter 6 Calibration
Page 6-3
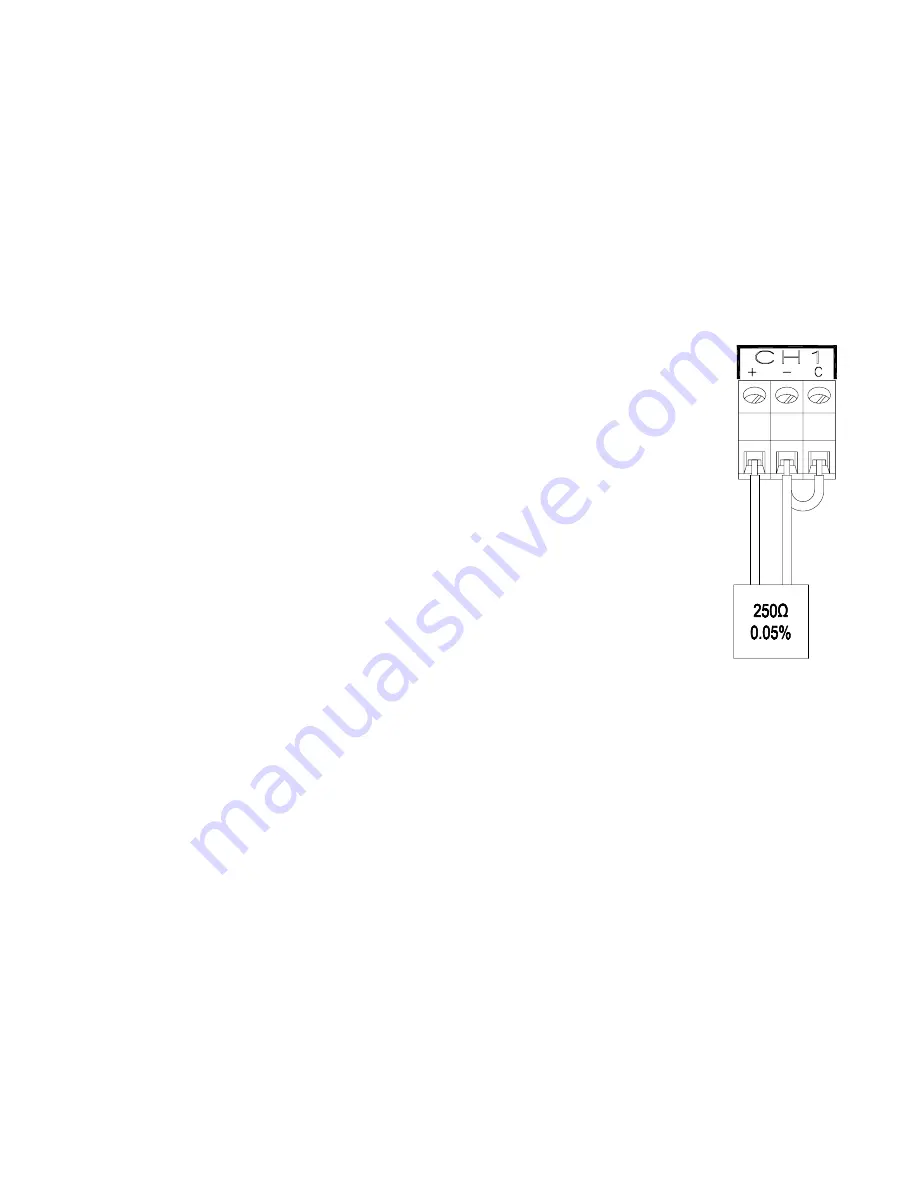
Figure 6-1
Calibration
Resistor
Connection
6.4 RTD Current Calibration
The ADC current source is used for RTD measurements and needs calibration for the RTD’s.
6.4.1 Calibrating the RTD Current
The following procedure contains step-by-step instructions on Calibrating the Current source. A 250
Ω
±0.05%
resistor must be connected across the
+
and
-
terminals of a free input and the current source return path
C
must be connected to the
-
input terminal. The Recorder then applies 1mA of Current through the resistance to
Calibrate Current. These programming steps are discussed in menu order.
NOTE:
Before Calibrating Currents, ensure that the Zero Calibration and 1.25 Volt Scale range has been
calibrated per the previous sections as this will affect the accuracy of Current Calibration.
6.4.1.1 Connecting Resistance
Select a free set of input terminals on the rear of the unit, or remove any connections
from the set of terminals to be used. Connect the 250
Ω
±0.05% resistor across the
+
and
-
terminals of this input and connect the Current source return path
C
to the
-
input
terminal (see Figure 6-1).
6.4.1.2 Calibrating the RTD Current
To Calibrate the RTD Current:
From the Hidden Menu use the
UP (
↑↑↑↑↑
)
or
DOWN (
↓↓↓↓↓
)
button to select
ADC control
and
then press the
ENTER
button. The only available option is
Cal Adc
so just press the
ENTER
button. Use the
UP (
↑↑↑↑↑
)
or
DOWN (
↓↓↓↓↓
)
button to highlight
Cal currents
and
press the
ENTER
button. You will be prompted with “cal input? X”. Use the
UP (
↑↑↑↑↑
)
or
DOWN (
↓↓↓↓↓
)
button to select the channel input number (1, 2, 3, 4, 5 or 6) to which the
resistor is connected and press the
ENTER
button. You will be prompted with “APPLY
[resistor value]”. To allow the Recorder to detect the actual value of the Current, press
the
OK?
button. A window will appear showing the reading of the Current connected.
Press the
CAL.
button. You will then be prompted with “Are You Sure?”. Press the
CAL.
button to continue the calibration or the
NO
button to abort. If the
CAL.
button is
pressed, the Recorder program will store the adjusted value from a nominal 1mA of
Current. Calibration of Currents is complete.
6.5 Calibration Recall
If the calibration equipment listed above is not available, the factory Calibration for the Zero Calibration and Scales
(sections 6.2 and 6.3) can be recalled
. All channels will be recalled.
To Recall the factory Calibration:
From the Hidden Menu use the
UP (
↑↑↑↑↑
)
or
DOWN (
↓↓↓↓↓
)
button to select
ADC control
and then press the
ENTER
button. The only available option is
Cal Adc
so just press the
ENTER
button. Use the
UP (
↑↑↑↑↑
)
or
DOWN (
↓↓↓↓↓
)
button
to highlight
Cal recall
and press the
ENTER
button. You will be prompted with “Are You Sure?”. Press the
YES
button to retrieve the factory Calibration settings or the
NO
button to abort.
6.6 Factory Set
This option is for factory use only and overwrites the default factory Calibration constants with the current ones in
the analog board. This makes the Current Calibration constants the default, and it is these values that will be
recalled when attempting to restore factory Calibration.
Artisan Scientific - Quality Instrumentation ... Guaranteed | (888) 88-SOURCE | www.artisan-scientific.com


