background image

292

User manual

2.

Remove any jammed material at the bottom of the second fold section.

3.

Close the front door of the second fold section.

4.

If you have a belt unit, put the belt in an upward position.

[103] Putting the belt in an upright position

[103] Putting the belt in an upright position

5.

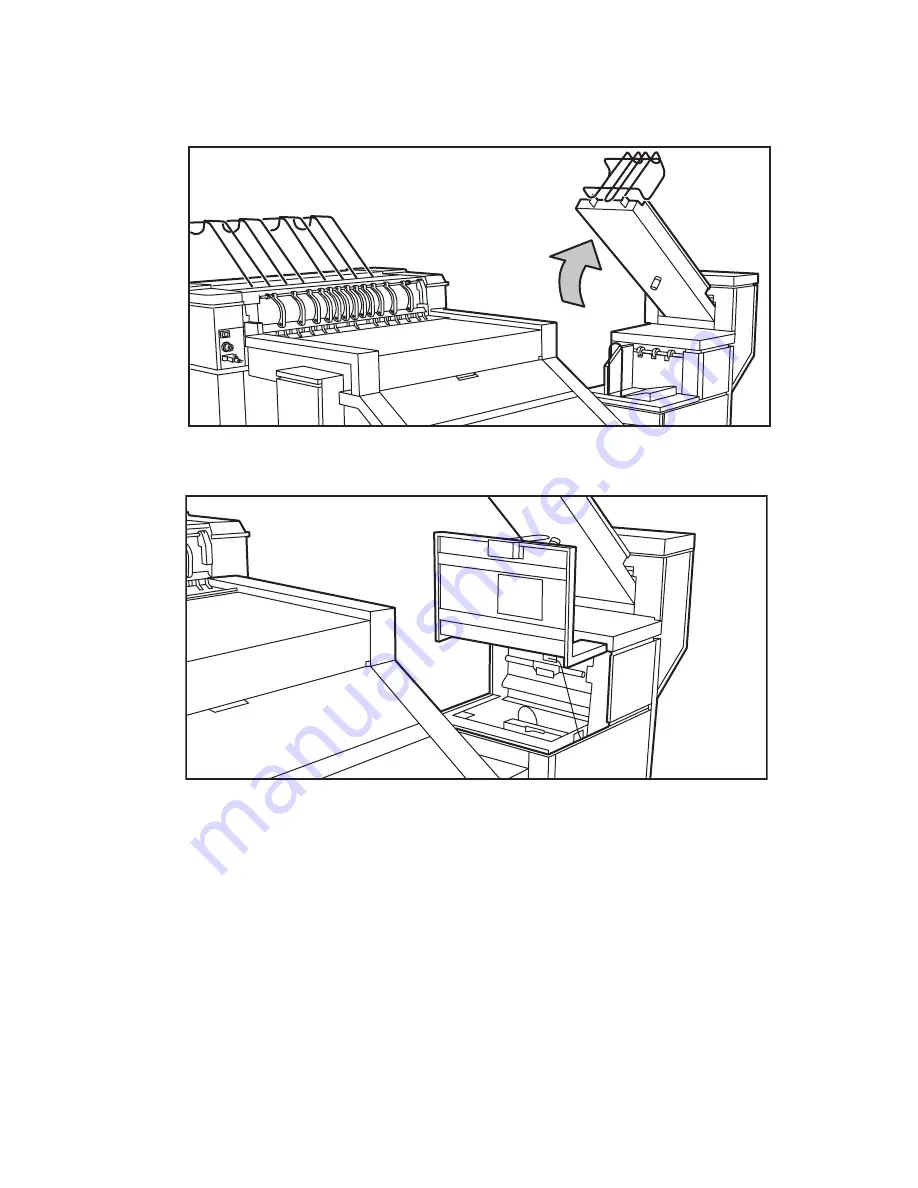
Open the delivery unit.

[104] Opening the delivery unit

[104] Opening the delivery unit

Summary of Contents for TDS400-CS

Page 1: ...Oc TDS400 CS User manual...

Page 2: ...c Oc Power Logic Oc Print Exec and Oc Remote Logic are registered trademarks of Oc Technologies B V Adobe and Postscript 3 are registered trademarks of Adobe Systems Incorporated Macintosh is a regist...

Page 3: ...properties Note Attention and Caution The words Note Attention and Caution indicate these important parts The word Note comes before additional information about the correct operation of the Oc TDS400...

Page 4: ...4 User manual...

Page 5: ...Power Logic controller applications 39 Use the Oc Settings Editor 40 Define the settings in the Oc Settings Editor 40 Save load and print the settings 41 Oc System Control Panel 43 Introduction to the...

Page 6: ...anel 82 The menu structure of the printer 84 Chapter 5 Get to know the finishing options Introduction 90 The folder components 93 Chapter 6 Get to know the software applications Job submission softwar...

Page 7: ...118 About the network settings 118 Access the system settings in the system menu 119 Define the DHCP server 120 Define the IP address 121 Define the subnet mask 122 Define the default gateway 123 Def...

Page 8: ...Perform a license activation job 164 Chapter 10 Print jobs Use the printer drivers to send jobs to the Oc TDS400 printer 168 Use Oc Print Exec Workgroup LT to send print jobs to the Oc TDS400 printer...

Page 9: ...and background compensation 226 Original width 227 Remove strip 228 Chapter 13 Finish copy and print jobs Overview of the finishing settings 230 Define the folded output delivery 233 Define the foldin...

Page 10: ...intain the finishing options 273 The reinforcement unit 273 Insert a new tape roll 273 Empty the waste box 281 Clean the reinforcement knives 283 Handle errors at the reinforcement unit 285 No reinfor...

Page 11: ...11 Oc TDS400 CS User manual Chapter 1 Introduction...

Page 12: ...uments The following illustration gives an overview of a complete Oc solution and the document workflow Illustration 1 Overview of a complete Oc solution The system set up and control 1 Overview of a...

Page 13: ...A print job starts with a file 4 and ends with a print 3 Copy job A copy job starts with an original 1 and ends with a copy 2 Scan to file job A scan to file job starts with an original 1 and ends wit...

Page 14: ...g table gives an overview of how the chapters are arranged logically Chapters Section Topics 1 6 Get to know the system The product concept and complete workflow Scanner Controller Printer Finishing o...

Page 15: ...Introduction 15 Available documentation Introduction This manual is part of a complete documentation set The following table shows a complete overview of the available documentation...

Page 16: ...as an on line help file in multiple languages Oc Windows Printer Driver Oc Windows Printer Driver User Manual CD ROM as a PDF file in multiple languages on Oc Driver Pack CD ROM Oc Windows Printer Dr...

Page 17: ...as a PDF file in multiple languages Oc Account Logic on line help Embedded in the application as an on line help file in multiple languages Oc Account Console on line help Embedded in the application...

Page 18: ...erator The repro operator is responsible for the daily use of the Oc TDS400 CS in a central repro department The repro operator has no permission to change the settings in the Oc Settings Editor The r...

Page 19: ...n of the Oc TDS400 CS in the network environment The system administrator has the permission to define the system administrator settings in the Oc Settings Editor System administrator settings Mode Se...

Page 20: ...20 User manual...

Page 21: ...21 Oc TDS400 CS User manual Chapter 2 Get to know the Oc TCS4 scanner...

Page 22: ...22 User manual The Oc TCS4 scanner Introduction The Oc TCS4 scanner is a wide format scanner with an optical resolution of 600 dpi Illustration 2 The Oc TCS4 scanner 2 The Oc TCS4 scanner 1 2 3 4 5...

Page 23: ...TCS4 scanner Number Component Function 1 Top cover Get access to the glass plate 2 Original feed table Feed the original 3 Operator panel Define the job settings 4 On off switch Turn the Oc TCS4 scan...

Page 24: ...or panel Introduction Use the scanner operator panel to do a copy or scan to file job Illustration 3 The operator panel of the Oc TCS4 scanner 3 The operator panel of the Oc TCS4 scanner 1 2 3 4 5 6 7...

Page 25: ...ction Cancel a set with Cancel set in case of a set copy The upper right softkey can have one of the following functions Cancel a setting with the Cancel function Create and close a set with the Creat...

Page 26: ...ob settings step 9 Numeric keys Enter a numeric value 11 Left softkeys Open a template Define a setting that contains two values This setting is called a toggle setting Open a setting that contains va...

Page 27: ...27 Oc TDS400 CS User manual Chapter 3 Get to know the Oc Power Logic controller applications...

Page 28: ...default system settings Manage the job queue Manage the set memory Receive jobs over the network The location of the Oc Power Logic controller You can place the Oc Power Logic controller in one of th...

Page 29: ...u need a password There are two types of settings Key operator settings KO settings To edit the key operator settings you need a key operator password System administrator settings SA settings To edit...

Page 30: ...erform some of these actions you need a password Oc License Logic Manage the licenses for the Oc software applications Oc Remote Logic Use Oc Remote Logic to access the Oc System Control Panel the Oc...

Page 31: ...t to the Oc Settings Editor when you do not have a keyboard mouse and monitor with your Oc Power Logic controller Description of the Oc Settings Editor Use the Oc Settings Editor to define the default...

Page 32: ...atic Language Selection ALS settings Controller identification settings Set memory reservation settings Connectivity settings In the Anonymous mode the operator is not logged on The anonymous user is...

Page 33: ...w the Oc Power Logic controller applications 33 Illustration 4 The structure of the Oc Settings Editor 4 The structure of the Oc Settings Editor 5 The menu bar 5 The menu bar 6 The top toolbar 6 The t...

Page 34: ...34 User manual 7 The left toolbar 7 The left toolbar...

Page 35: ...Get to know the Oc Power Logic controller applications 35 8 The settings area 8 The settings area...

Page 36: ...mode View Toggle between the display languages Toggle between the display of the KO settings and the SA settings Help Access the contents of the on line help Get more information about the copyright a...

Page 37: ...or the jobs Note The Jobs button is only available in the key operator view Printer Gives access to the settings for the printer System Gives access to the settings for the system Scanner Gives access...

Page 38: ...ected The system name local host if you are working on the controller The user mode key operator system administrator or anonymous The view mode KO Settings or SA Settings 8 The icons for the connecti...

Page 39: ...n describes how to start the applications locally on the Oc Power Logic controller The section Start the applications with Oc Remote Logic describes how to start the applications from a remote worksta...

Page 40: ...to view the settings How to define the key operator settings 1 Log on to the key operator mode 2 Use the buttons on the left toolbar to display the required group of settings 3 Select the required se...

Page 41: ...These files contain the values for the key operator settings and the system administrator settings after the last Apply If you need a complete overview of all settings defined in the Oc Settings Edit...

Page 42: ...red to the system When you are logged on as a key operator the system only loads the KO settings When you are logged on as a system administrator the system only loads the SA settings Repro operators...

Page 43: ...keyboard mouse and monitor with your Oc Power Logic controller you must use Oc Remote Logic to connect to the Oc System Control Panel See Oc Power Logic controller Oc Settings Editor for information a...

Page 44: ...toolbar with buttons to access the view area 3 The status of the printer 4 An overview of the loaded media types 5 The status of the scanner 6 The status of the Oc Power Logic controller 7 The amount...

Page 45: ...omatic logon Use Automatic logon to start up automatically in the defined user mode Select the two screen languages View Select one of the display languages for the application Display the items for t...

Page 46: ...hen a roll is disabled the roll icon is greyed out The text disabled replaces the media information Controller View the status of the controller Memory Check the amount of set memory that is available...

Page 47: ...nected The system name local host if you work on the Oc Power Logic controller The job status for example Printing The user mode Key operator Repro operator System administrator Service operator or An...

Page 48: ...a number of icons to display the information about the media available on the printer The following icons are used Icon Description The media roll is available and the roll is ready to print The media...

Page 49: ...page 31 for information about how to start the application locally on the controller see Start the Oc Power Logic controller applications on page 39 see Start the applications with Oc Remote Logic on...

Page 50: ...esume or delete the jobs or to move the jobs to the top of the queue The anonymous user mode only allows the user to view the queue All the buttons and menu items are disabled in this mode The anonymo...

Page 51: ...nager application Use the Oc Queue Manager to manage the jobs in the job queue Illustration 10 The Oc Queue Manage 10 The Oc Queue Manage The structure of the Oc Queue Manager The Oc Queue Manager con...

Page 52: ...assword Click Log off to leave the user mode Click Connect to and select a different controller only for remote users Click Close to leave the Oc Queue Manager Edit Click Options to define the followi...

Page 53: ...ue or history queue The inbox queue in the right hand pane contains the jobs that were sent to the inbox on the controller You can print the jobs delete the jobs and view the properties of the jobs Th...

Page 54: ...a job in the print queue Processing a job in the print queue Processed a job in the print queue An active job in the print queue bold font and above the grey separation line Printing a job Delivering...

Page 55: ...on the controller see Start the Oc Power Logic controller applications on page 39 Description of the Oc Scan Manager The Oc Scan Manager allows you to do the following Create the destinations for sca...

Page 56: ...Oc Scan Manager application Use the Oc Scan Manager for scan to file Illustration 11 The Oc Scan Manager 11 The Oc Scan Manager The structure of the Oc Scan Manager The Oc Scan Manager has the follow...

Page 57: ...d destination Open the destination Save the destination When a file is selected the File menu includes the following items View the properties of the selected file Delete the selected file Print the s...

Page 58: ...les that are scanned last use the Refresh button on the toolbar to update the view or select Refresh in the View menu Component Function New Create a destination Delete Delete a destination View View...

Page 59: ...in the file The progress status of the current scan job The status bar The status bar of Oc Scan Manager displays the following information The system status connected disconnected The system to whic...

Page 60: ...n Oc Settings Editor Use the application to change the default settings of the system Oc Queue Manager Use the application to manage the print jobs Oc System Control Panel Use the application to view...

Page 61: ...3 with 32 Mb RAM Installation procedure for Microsoft Windows platforms 1 Insert the Oc Remote Logic CD ROM or the Oc Power Logic controller CD ROM into the CD ROM drive of your PC 2 The installation...

Page 62: ...nstallation of the JVM 5 Run the file remotelogic with the applications as parameters for example remotelogic QM SCP SE to start the three applications or use remotelogic AL as the application launche...

Page 63: ...2 From the Oc Remote Logic CD ROM load RemoteLogic_vX tar or RemoteLogic_vX zip 3 Set the environment variable RL_VM_HOME to point to the Java Products remotelogic UNIX installation directory 4 If ne...

Page 64: ...to the controller on page 67 Use command line parameters to start the applications Six command line parameters are available to facilitate the start of the applications configfile config_file Sets the...

Page 65: ...s Apply the parameters to the following applications QM exe Oc Queue Manager SCP exe Oc System Control Panel SE exe Oc Settings Editor AL exe Application launcher Language Language parameters Country...

Page 66: ...Files Remote Logic Bin Example of a command line parameter The example below shows how to start the controller applications with the configuration file Myconfig cfg connected to the MyTCS400 server T...

Page 67: ...CS is not available in the Connect to dialogue box you must add the Oc TDS400 CS to the list of available systems How to connect to a system 1 Open the application you want to run 2 From the File men...

Page 68: ...stem 1 From the File menu select Connect to 2 Click Edit The Edit systems dialogue box appears 3 Select the system you want to remove 4 Click Remove The system is removed from the list 5 Click OK 2 ti...

Page 69: ...n automatically in the indicated user mode How to enable automatic logon Automatic logon is now enabled Step Action 1 From the Edit menu select Options The Options window appears 2 Select the Enable a...

Page 70: ...word 1 From the File menu select Log on 2 Click Password in the dialogue box 3 Open the drop down list and select a user 4 Enter the old password 5 Enter the new password 6 Enter the new password a se...

Page 71: ...Oc Settings Editor on page 31 Log on to the correct user mode in the Oc Settings Editor to change the key operator settings or the system administrator settings Only assigned operators are allowed to...

Page 72: ...ntroller applications 1 From the File menu select Log on 2 Select the required user name 3 Enter the password 4 Click OK You are now logged on as special user When you are not logged on you have Anony...

Page 73: ...The Oc applications and options are protected against unauthorised use You need to activate the license to enable an application or option for use Oc License Logic enables you to manage the licenses v...

Page 74: ...ic Introduction Oc License Logic has the following possibilities Possibilities View the current active licenses Get the host id of the Oc system Save the active licenses Perform a license activation j...

Page 75: ...the Oc system Oc needs the host id of your Oc system to create a new license file 2 Send the list of new options you need the list of license numbers and the host id to Oc Oc creates and delivers one...

Page 76: ...ith Oc License Logic You can preview the new active licenses with Oc License Logic during the license activation job A license file contains licenses of the same license type A license file you receiv...

Page 77: ...active demo licenses All new active demo licenses Note You can not see the current active resale licenses at this point Preview the resale licenses during the license activation job if you use the li...

Page 78: ...78 User manual...

Page 79: ...79 Oc TDS400 CS User manual Chapter 4 Get to know the Oc TDS400 printer...

Page 80: ...available with an automatic 1 roll unit and an Integrated Receiving Tray as the output delivery device An automatic 2 roll unit is available as an option Each of the rolls can contain different types...

Page 81: ...ide access to the toner 2 Fuser unit Provide access to the fuser section 3 Operator panel Set up the print system and the folder settings 4 Manual feed table Use if you need to print or copy on a cut...

Page 82: ...erator panel to select your print settings or finishing settings 15 The Oc TDS400 Printer operator panel 15 The Oc TDS400 Printer operator panel The components of the User manual operator panel 1 The...

Page 83: ...structure of the printer has a maximum of 4 printer menu levels The keys The printer operator panel contains the following keys 20 The keys 20 The keys Key Function previous Return to a higher menu le...

Page 84: ...printer Introduction In the off line mode the printer operator panel allows you to define settings The table below shows the menu structure of the printer If you browse through the tree the menu leve...

Page 85: ...gs Roll 1 Roll 2 Width Material see Define the media type and media size on page 258 Manual feed Material see Define the media type and media size on page 258 Time out see Define the manual feed time...

Page 86: ...rinter on page 114 Folding Delivery Stacker Belt First Fold see Define the folded output delivery on page 233 Input Legend Trailing Leading see Define the folding legend on page 234 Method Standard Af...

Page 87: ...the folded package length on page 238 Width see Define the folded package width on page 239 Clean RU knife Configuration Language see Define the display language of the printer on page 116 Paper seri...

Page 88: ...print see Print the menu card of the Oc TDS400 printer on page 112 Network sett adapter 1 adapter 2 Use DHCP server see Define the DHCP server on page 120 IP address see Define the IP address on page...

Page 89: ...89 Oc TDS400 CS User manual Chapter 5 Get to know the finishing options...

Page 90: ...an automatic 1 roll unit and an Integrated Receiving Tray as the output delivery device The Integrated Receiving Tray is advised for a low production environment and a lot of same size output It is po...

Page 91: ...utput Delivery Tray the printer requires more space 16 Output delivery tray 16 Output delivery tray Compact Output Stacker Collects output in the Integrated Receiving Tray but has a mechanism to preve...

Page 92: ...utput Delivery Tray and a folder The optional reinforcement unit adds reinforcement strips to folded output 19 Reinforcement unit 19 Reinforcement unit The optional belt unit transports the folded out...

Page 93: ...uction The folder folds the output according to the selected folding settings Attention You can only fold paper If you attempt to fold polyester transparent or vellum media a media jam will occur Illu...

Page 94: ...nts 23 The components of the folder 23 The components of the folder Component Function 1 Lever 2 Stacker 3 Belt unit 4 Second fold section 5 Reinforcement unit 6 Folder transport section 7 First fold...

Page 95: ...95 Oc TDS400 CS User manual Chapter 6 Get to know the software applications...

Page 96: ...ns printer drivers Oc Print Exec Workgroup LT and FTP Note You upgrade to the full version of Oc Print Exec workgroup with a license key in Oc License Logic After you send jobs to the printer you can...

Page 97: ...ile jobs and for the print jobs The users can enter the account information at the Oc Power Logic controller and at the workstation The administrator can manage Oc Account Logic from the Administratio...

Page 98: ...rkflow The administrator defines and distributes the Account information dialogue The users enter the account information when the users print copy or scan to file The bookkeeper collects the account...

Page 99: ...count information requirements are defined and managed by the administrator Purpose Use Oc Account Logic for the following Enter the account information for the print jobs Manage print jobs that do no...

Page 100: ...tab to enter account information for copy jobs and scan to file jobs The Print tab Use this tab to enter account information for print jobs The Administration window Use this window to define the adm...

Page 101: ...Editor on the Oc Power Logic Controller Before you begin Before you can define the correct settings in the Oc Settings Editor on the Oc Power Logic Controller log on as a Key Operator KO Note Refer t...

Page 102: ...automatically moved from the Inbox to the Print queue Enter the account information for the print jobs that do not have valid account information on the Print tab of Oc Account Logic Path KO System Jo...

Page 103: ...Console is installed on the administrator s workstation Access to Oc Account Console is password protected and limited to the administrator Purpose Use Oc Account Console is intended for the followin...

Page 104: ...ge preview and publish the Account information dialog for Oc Account Logic The Account data tab Use this tab to define the devices from where the log files are retrieved Use this tab to export the log...

Page 105: ...lly Oc Repro Desk Remote Client allows you to submit jobs for printing via Internet modem or FTP communication Oc Repro Desk LAN Client allows you to submit jobs for printing via LAN communication 2 O...

Page 106: ...the following products Oc Doc Exec Pro An application to organise archive and share documents Oc Print Exec Pro An application to provide controlled access to the documents printing and distribution r...

Page 107: ...107 Oc TDS400 CS User manual Chapter 7 Prepare the Oc TDS400 CS for use...

Page 108: ...ime before it can handle jobs The preparation time for scan to file and copy jobs is less than twenty seconds Illustration 23 The on off switch at the right of the Oc TCS4 scanner 23 The on off switch...

Page 109: ...Prepare the Oc TDS400 CS for use 109 How to turn off the Oc TCS4 scanner 1 Set the on off switch at the right to position 0 Result The green light at the operator panel is turned off...

Page 110: ...er Oc System Control Panel Oc Settings Editor and Oc Scan Manager are automatically started The Oc TDS400 CS is ready Note The Oc Queue Manager and the Oc System Control Panel applications are shown o...

Page 111: ...k of the Oc TDS400 printer 24 The on off switch at the back of the Oc TDS400 printer How to turn on the Oc TDS400 printer 1 Set the on off switch at the back of the Oc TDS400 printer to position 1 Res...

Page 112: ...ettings A demo print to check the controller and printer Before you begin Use the key the key and the previous key to navigate Use the next select key to select a menu or a value How to print the menu...

Page 113: ...m settings A demo print to check the controller and printer Before you begin Use the key the key and the previous key to navigate Use the next select key to select a menu or a value How to print the c...

Page 114: ...ttings A demo print to check the controller and printer Before you begin Use the key the key and the previous key to navigate Use the next select key to select a menu or a value How to print the demo...

Page 115: ...s Key Operator Take the following steps to log on 1 Click File and select Log on 2 Select Key operator and enter the password How to define the display languages 1 Click View and select KO settings 2...

Page 116: ...efore you begin Use the key the key and the previous key to navigate Use the next select key to select a menu or a value How to define the display language 1 Press the on line key to turn the printer...

Page 117: ...e you begin Open the Oc Settings Editor and log on as System Administrator Take the following steps to log on 1 Click File and select Log on 2 Select System administrator and enter the password How to...

Page 118: ...c TDS400 printer Access the network settings Before you can set the network settings you need to enter the system menu Available network settings You can use the following settings to define the netwo...

Page 119: ...he next select key to select a menu or a value How to access the system settings 1 Press the on line key to turn the printer off line 2 Navigate to System and select this menu The string Enter passwor...

Page 120: ...a value How to define the DHCP server 1 Make sure you have access to the system settings see Access the system settings in the system menu on page 119 2 Navigate to Network settings and select this me...

Page 121: ...4 Navigate to IP address and select this menu The first three digits flash 5 Enter the first three numbers with the key and the key and press the next select key to confirm the value The next three d...

Page 122: ...e to Subnet mask and select this menu The first three digits flash 5 Enter the first three numbers with the key and the key and press the next select key to confirm the value The next three digits fla...

Page 123: ...enu 4 Navigate to Default gateway and select this menu The first three digits flash 5 Enter the first three numbers with the key and the key and press the next select key to confirm the value The next...

Page 124: ...reen automatically The Oc TCS4 scanner is ready for the next user The sleep mode time out of the scanner When the Oc TCS4 scanner remains unused for a time the Oc TCS4 scanner enters the sleep mode au...

Page 125: ...and the set time out setting Define the sleep mode time out as the highest value according to the set time out and scanner operator panel time out setting Automatic behaviour of the unused Oc TCS4 sca...

Page 126: ...Open the Oc Settings Editor and log on as Key Operator Take the following steps to log on 1 Click File and select Log on 2 Select Key operator and enter the password How to define the sleep mode time...

Page 127: ...e panel time out Before you begin Open the Oc Settings Editor and log on as Key Operator Take the following steps to log on 1 Click File and select Log on 2 Select Key operator and enter the password...

Page 128: ...n Open the Oc Settings Editor and log on as Key Operator Take the following steps to log on 1 Click File and select Log on 2 Select Key operator and enter the password How to define the set time out o...

Page 129: ...inter prints the next job either the print job that is in the queue or the next print job that arrives if the queue is empty Before you begin Use the key the key and the previous key to navigate Use t...

Page 130: ...130 User manual...

Page 131: ...131 Oc TDS400 CS User manual Chapter 8 Set up your workflow with the Oc Power Logic controller applications...

Page 132: ...f settings to optimize your workflow Use the Oc Settings Editor to define the most used settings for your jobs Open the Oc Settings Editor to get a complete overview of the available settings Refer to...

Page 133: ...ings You can select 5 settings that you want to see immediately when you open the job template at the scanner operator panel The top 5 settings are the settings that you need to change frequently if y...

Page 134: ...s to define the scan to file job templates 3 Define the job template name and the job template description 4 Select the top 5 settings that you want to see on the scanner operator panel when you open...

Page 135: ...r Take the following steps to log on 1 Click File and select Log on 2 Select Key operator and enter the password How to define the auto original feed settings 1 Click View and select KO settings 2 Nav...

Page 136: ...inal release mode 1 Click View and select KO settings 2 Navigate to KO Scanner Original handling Original release mode 3 Select the required value You can select one of the following modes Hold the or...

Page 137: ...sword How to create the stamps 1 Click View and select KO settings 2 Navigate to KO Printer Stamps 3 Define the name 4 Define the text Enter DATE if you need the date that the copy was made on a copy...

Page 138: ...he Oc Settings Editor and log on as Key Operator Take the following steps to log on 1 Click File and select Log on 2 Select Key operator and enter the password How to define the media series 1 Click V...

Page 139: ...139 Oc TDS400 CS User manual Chapter 9 Control your workflow with the Oc Power Logic controller applications...

Page 140: ...s in the printer queue The Oc Queue Manager displays the jobs in the sequence that the jobs are received By default the copy jobs have priority over the print jobs How to print jobs from the inbox que...

Page 141: ...om the Oc Queue Manager Attention You can never undo this action The cancelled jobs are not saved in the history queue 1 Select the jobs in the print queue the history queue or the inbox queue 2 From...

Page 142: ...e than one job with the mouse and the shift or control key Note The active print job cannot be placed on hold in the Oc Queue Manager How to restart jobs in the Oc Queue Manager 1 Click the job that w...

Page 143: ...of scanned files Use the SA System Set memory reservation setting in the Oc Settings Editor to define the available space on the controller for scanned files A network destination with SMB An internet...

Page 144: ...n to select the path 6 Click OK to accept the destination properties Create a network destination with SMB 1 Create a shared folder on a workstation For example c Scan 2 From the File menu on the Oc S...

Page 145: ...n 2 Enable FTP on the workstation 3 From the File menu on the Oc Scan Manager select New You can also click the New button on the toolbar The Destination properties dialogue box opens 4 From the Type...

Page 146: ...Select a destination 2 From the File menu select Properties You can also click the Properties button on the toolbar 3 Check the Locked check box Uncheck the Locked check box to unlock the destination...

Page 147: ...estination 2 From the File menu select Properties You can also click the Properties button on the toolbar 3 Change the destination properties like described in the Create destinations section see Crea...

Page 148: ...ination 2 From the File menu select Properties You can also click the Properties button on the toolbar 3 Enter a name in the Base name text box The Base name can contain for automatic file naming An a...

Page 149: ...nned file View a scanned file 1 Select a file 2 From the File menu select View You can also click the View button on the toolbar 26 The View button on the toolbar 26 The View button on the toolbar Oc...

Page 150: ...e toolbar The system deletes the selected file Clear the temporary store 1 From System menu select Clear temporary store or 2 Use the settings KO System Disk cleanup in the Oc Settings Editor to clear...

Page 151: ...flow with the Oc Power Logic controller applications 151 3 The Scanfile properties window appears 30 The Scanfile properties window 30 The Scanfile properties window 4 Click OK to close the Scanfile p...

Page 152: ...viewer included in Oc Scan Manager Oc View Station LT displays the scanned files Auto view When Auto view is enabled Oc View Station LT starts automatically to display the scanned file when the scan t...

Page 153: ...th the Oc Power Logic controller applications 153 Overview of Oc View Station LT Introduction Oc View Station LT has the following fields The menu bar The view ribbon The view area 31 Oc View Station...

Page 154: ...the image at a 1 1 scale factor Magnify Zoom into the page Reduce Zoom out of the page Refresh Refresh the view of all the windows that show the active document Invert Reverse the black and white par...

Page 155: ...menu items See the View ribbon section below Status bar Shows the status bar at the bottom of the Oc View Station LT window The Status Bar shows the pointer co ordinates and a status line Reference S...

Page 156: ...the left Rotate the image 90 degrees counter clockwise to the right Rotate the image 180 degrees Enables you to measure the lines and the areas on the image how the Reference window The Reference wind...

Page 157: ...ation of the memory space the viewer cannot show the scanned file Then the viewer shows a red border with a red cross Use your right mouse button to click on the file shown in the view area You can se...

Page 158: ...ogic for the following purposes View the current active licenses Get the host id of the Oc system Save the current active licenses Perform a license activation job You can activate new licenses or sav...

Page 159: ...Note Printer name is the host name or IP address of the printer The logon window opens 3 Select System administrator 4 Enter the Password 5 Click the Logon button Result Oc License Logic starts with o...

Page 160: ...splays one of the following license types Resale Demo Duration in days This field displays the time your license is valid License number This field displays a license number Purpose View the license i...

Page 161: ...Read the message carefully and follow the instructions Before you begin Make sure that the print system has active licenses If Oc License Logic does not detect active licenses the No active license op...

Page 162: ...icense Logic The No active license window opens if there are no active licenses The View licenses windows opens if Oc License Logic detects active licenses 2 Click the Host id link The The host id of...

Page 163: ...e the current active licenses before you start a license activation job or to save the current license situation Before you begin Make sure that the print system has active licenses If Oc License Logi...

Page 164: ...the following situations Activate the new licenses when you received one or more new license files from Oc Activate the saved licenses when an activation job for new licenses failed Before you begin T...

Page 165: ...in the license file you use see The structure of license files and licenses on page 76 You see one of the following options If you use a license file with demo licenses the current active and the new...

Page 166: ...166 User manual...

Page 167: ...167 Oc TDS400 CS User manual Chapter 10 Print jobs...

Page 168: ...Oc TDS400 printer remotely from their applications to print their files Note More information about how to install configure and use the drivers is available in the documentation provided with the dri...

Page 169: ...he document or drawing settings and the print job settings You can add a banner to the print job and add a settings configuration for a print job 3 Submit the print jobs to the printer queue or inbox...

Page 170: ...ine the manual feed media type at the printer operator panel 1 Press the on line key to turn the printer off line 2 Navigate to Media settings and select this menu 3 Navigate to Manual feed and select...

Page 171: ...e media manually and hold it until the printer pulls in the first part of the cut sheet After a few seconds the printer pulls in the complete sheet Note The printer prints the image face up 33 Feed th...

Page 172: ...el a print job 1 Press the red stop key 2 The print job stops Result 29 Cancel a print job 29 Cancel a print job If Then The printer already started the print job The printer stops printing immediatel...

Page 173: ...173 Oc TDS400 CS User manual Chapter 11 Copy jobs...

Page 174: ...ct Copy the scanner operator panel shows five copy job templates The copy job templates provide access to the different settings per copy job template When you select a copy job template the scanner o...

Page 175: ...34 The copy job templates 34 The copy job templates Steps in a basic copy job 1 Feed the original 2 Press the green start key Result You do a basic copy job in 2 steps The basic copy job uses the sett...

Page 176: ...Feed the original 2 Define the job settings Select the required template at the scanner operator panel and change the pre defined settings only if necessary 3 Press the green start key Result An exte...

Page 177: ...ftkeys and the scroll wheel You can use this method if you prefer a general step by step method Use the scroll wheel and scroll wheel key only You can use this method if you prefer a fast method Know...

Page 178: ...178 User manual Illustration 35 The operator panel of the Oc TCS4 scanner 35 The operator panel of the Oc TCS4 scanner 1 2 3 4 5 6 7 8 9 0...

Page 179: ...focus the setting becomes in focus When you select this setting while the setting was already in focus the setting stays in focus and there are no changes Change the value of the setting with the left...

Page 180: ...ey to change the value of the setting The value and icon changes A setting that contains a list of values like Lighter darker Open the setting with the scroll wheel key Define the required value with...

Page 181: ...1 Place the original face down and right aligned The scanner takes the original 36 Place the original face down and right aligned 36 Place the original face down and right aligned 2 Press the green st...

Page 182: ...setting in the Oc Settings Editor After you press the start key the scanner operator panel always shows the job number and status of the job A copy job appears temporarily in the printer queue of the...

Page 183: ...The copy job templates appear Open a copy job template with a left softkey The top 5 settings appear Scroll to a setting Select a setting with the left softkey Scroll to the required value Select the...

Page 184: ...copy faster when you feed the original landscape unless you must scale your original to another media size In that case you must feed the original portrait Result The Oc TDS400 CS makes a copy accord...

Page 185: ...copy job 1 Press the red stop key Note This will not affect a set job Result When you press the red stop key while the scanner scans the scan process stops The scanner rewinds the original and the co...

Page 186: ...nded copy jobs The following table gives an overview and a very short description of the available settings This table is not complete because a setting can contain more than one setting You find a de...

Page 187: ...ine the type of media you use Lighter darker Make a lighter or darker copy Remove strip Copy without strips Original width Define the width of the original Delete area Copy without a specific area Cut...

Page 188: ...ght image You can adjust the brightness manually with the Lighter darker setting to improve the copy or scan quality according to the type of original you use You have an original with very fine detai...

Page 189: ...9 The Lines text icon of the Original type setting Select Copy with the upper left softkey The copy job templates appear Open a copy job template with a left softkey The top 5 settings appear Scroll t...

Page 190: ...py with the upper left softkey The copy job templates appear Open a copy job template with a left softkey The top 5 settings appear Scroll to Lighter darker and open this setting with the left softkey...

Page 191: ...setting 41 The Best icon of the Scan quality setting Select Copy with the upper left softkey The copy job templates appear Open a copy job template with a left softkey The top 5 settings appear Scroll...

Page 192: ...value for that setting in the Oc Settings Editor After you press the start key the scanner operator panel always shows the job number and status of the job A copy job appears temporarily in the print...

Page 193: ...Close set option appears at the upper right corner of the screen Scroll to Sort and define By set with the left softkey This setting is disabled after you press the green start key for the first time...

Page 194: ...ears at the upper right corner of the screen Scroll to Sort and define By page with the left softkey This setting is disabled after you press the green start key for the first time Scroll to another s...

Page 195: ...d their default values Before you begin If you must enter the same value for a setting very often you can set this value as the default value for that setting in the Oc Settings Editor After you press...

Page 196: ...emplate with a left softkey The top 5 settings appears Scroll to Stamp and open this setting with the left softkey Select a stamp with the scroll wheel Select Position with the left softkey Select a p...

Page 197: ...en 25 and 400 A value lower than 100 reduces the copy a value greater than 100 enlarges the copy Before you begin If you must enter the same value for a setting very often you can set this value as th...

Page 198: ...ple of a Scale icon Select Copy with the upper left softkey The copy job templates appear Open a copy job template with a left softkey The top 5 settings appear Scroll to Scale and open this setting w...

Page 199: ...ust enter the same value for a setting very often you can set this value as the default value for that setting in the Oc Settings Editor After you press the start key the scanner operator panel always...

Page 200: ...to Media and open this setting with the left softkey The Feed setting appears Define Manual at the Feed setting with the scroll wheel The settings Size and Type appear Select Size with the left softk...

Page 201: ...strip at the leading or trailing side of a copy Before you begin If you must enter the same value for a setting very often you can set this value as the default value for that setting in the Oc Setti...

Page 202: ...y The top 5 settings appears Scroll to Add strip and open this setting with the left softkey Select Leading or Trailing with the left softkey and define the value with the scroll wheel or numeric keys...

Page 203: ...copy Before you begin If you must enter the same value for a setting very often you can set this value as the default value for that setting in the Oc Settings Editor After you press the start key th...

Page 204: ...The top 5 settings appears Scroll to Remove strip and open this setting with the left softkey Select Leading or Trailing with the left softkey and define the value with the scroll wheel or numeric ke...

Page 205: ...same value for a setting very often you can set this value as the default value for that setting in the Oc Settings Editor After you press the start key the scanner operator panel always shows the job...

Page 206: ...wheel or numeric keys Left is the left side of an original that is turned face up Select Right with the left softkey and define the value with the scroll wheel or numeric keys and close the setting R...

Page 207: ...th setting Select Copy with the upper left softkey The copy job templates appear Open a copy job template with a left softkey The top 5 settings appears Scroll to Delete area and open this setting wit...

Page 208: ...208 User manual...

Page 209: ...209 Oc TDS400 CS User manual Chapter 12 Scan to file jobs...

Page 210: ...Scan to file the scanner operator panel shows five scan to file job templates The scan to file job templates provide access to the different settings per scan to file job template When you select a sc...

Page 211: ...tration 47 The scan to file job templates 47 The scan to file job templates Steps in a basic scan to file job 1 Feed the original 2 Select Scan to file 3 Press the green start key Result You get a dig...

Page 212: ...ng and define the value Select the last setting and define the value 4 Press the green start key Result The second step takes several additional actions Steps in an extended scan to file job with fine...

Page 213: ...t softkeys and the scroll wheel You can use this method if you prefer a general step by step method Use the scroll wheel and scroll wheel key only You can use this method if you prefer a fast method K...

Page 214: ...214 User manual Illustration 48 The operator panel of the Oc TCS4 scanner 48 The operator panel of the Oc TCS4 scanner 1 2 3 4 5 6 7 8 9 0...

Page 215: ...in focus the setting becomes in focus When you select this setting while the setting was already in focus the setting stays in focus and there are no changes Change the value of the setting with the...

Page 216: ...ey to change the value of the setting The value and icon changes A setting that contains a list of values like Lighter darker Open the setting with the scroll wheel key Define the required value with...

Page 217: ...us of the job A copy job appears temporarily in the printer queue of the Oc Queue Manager a scan to file job appears in the selected destination of the Oc Scan Manager How to do a basic scan to file j...

Page 218: ...fter you press the start key the scanner operator panel always shows the job number and status of the job A copy job appears temporarily in the printer queue of the Oc Queue Manager a scan to file job...

Page 219: ...jobs 219 2 Select Scan to file with the upper left softkey The scan to file job templates appear 3 Define the job settings 51 The top 5 settings of a scan job template 51 The top 5 settings of a scan...

Page 220: ...ting with the left softkey Scroll to the required value Select the next setting with the left softkey Scroll to the required value Select Close to close the setting Repeat the selection of settings fr...

Page 221: ...anel How to stop a scan to file job 1 Press the red stop key Result When you press the red stop key while the scanner scans the scan process stops The scanner rewinds the original and the scan to file...

Page 222: ...anisation will change For some File types the Compression and Organisation settings cannot be set in all situations see File type on page 224 Resolution Use this setting to define the resolution of th...

Page 223: ...this setting to define the exposure of the original Negative values mean less exposure and darker scanned output Positive values mean more exposure and greyer scanned output Note This setting can onl...

Page 224: ...e Colour mode Colour Colour mode File type Compression Organisation Greyscale TIFF None Packbits LZW Raw Tiled Striped PDF None Flate Group 4 Packbits LZW Not available Colour mode File type Compressi...

Page 225: ...canned images The higher the resolution you select the finer the image quality Select the required scan resolution with the scroll wheel Note A higher resolution increases the file size Setting Value...

Page 226: ...ackground compensation with the scroll wheel Note If the colour mode of a scan to file job is set to colour the original type is fixed Setting Value Original type Lines text for paper Greys Lines Dark...

Page 227: ...width is automatically determined based on the actual width of the original Standard Use this setting to a Standard width of the original The standard widths that you can select depend on the media s...

Page 228: ...side that you feed into the scanner Remove strip Trailing Use this setting to remove a strip at the bottom of the image This action decreases the print or file length Remove strip Left Use this settin...

Page 229: ...229 Oc TDS400 CS User manual Chapter 13 Finish copy and print jobs...

Page 230: ...shing settings Introduction Before you use the folder switch the lever downward If you want to use the Integrated Receiving Tray switch the lever upward The lever 52 To fold switch the lever downward...

Page 231: ...ond fold and that you want to collect in belt 3 You can collect a maximum of 75 PPP see Define the folded output delivery on page 233 Note The First Fold option is selected automatically if the length...

Page 232: ...if you want your folded output to have a reinforced strip that is pre perforated for filing purposes see Define the binding method on page 236 Note You can only choose Reinforce if your folder has a r...

Page 233: ...vigate Use the next select key to select a menu or a value How to define the folded output delivery 1 Press the on line key to turn the printer off line 2 Navigate to Folding and select this menu 3 Na...

Page 234: ...the next select key to select a menu or a value How to define the folding legend 1 Press the on line key to turn the printer off line 2 Navigate to Folding and select this menu 3 Navigate to Input an...

Page 235: ...select key to select a menu or a value How to define the drawing method 1 Press the on line key to turn the printer off line 2 Navigate to Folding and select this menu 3 Navigate to Input and select...

Page 236: ...the next select key to select a menu or a value How to define the binding method 1 Press the on line key to turn the printer off line 2 Navigate to Folding and select this menu 3 Navigate to Binding a...

Page 237: ...edge value 1 Press the on line key to turn the printer off line 2 Navigate to Folding and select this menu 3 Navigate to Binding edge and select this menu 4 Navigate to Method and select this menu 5...

Page 238: ...o select a menu or a value How to define the folded package length 1 Press the on line key to turn the printer off line 2 Navigate to Folding and select this menu 3 Navigate to Package and select this...

Page 239: ...a menu or a value How to define the folded package width 1 Press the on line key to turn the printer off line 2 Navigate to Folding and select this menu 3 Navigate to Package and select this menu 4 N...

Page 240: ...Note You can only use reinforcement strips with the Standard folding method The reinforcement strip allows you to store your copy in a binder The punch holes will not wear out You can unfold a folded...

Page 241: ...ending on the width of the folded package Before you begin Select Belt as folded output delivery as described in the see How to define the folded output delivery on page 233 procedure How to adjust th...

Page 242: ...operator panel and watch the light on the top cover of the folder 32 Indication light folder 32 Indication light folder Note See the label on the top cover of the folder 2 Make any setting for off lin...

Page 243: ...243 Oc TDS400 CS User manual Chapter 14 Maintain the Oc TDS400 CS...

Page 244: ...ed to clear the set memory You can clear the set memory at the Oc Queue Manager and at the printer operator panel Oc advises you to clear the set memory with the Oc Queue Manager if possible When you...

Page 245: ...system settings see How to access the system settings on page 119 2 Navigate to Clear setmem and select this setting 3 Select Yes 4 Press next select to confirm 5 Press on line to put the printer on...

Page 246: ...m occurred How to remove a jammed original 1 Pull the top cover towards you and lift the top cover to open it 56 Open the top cover 56 Open the top cover 2 Remove the original 3 Lift the top cover tur...

Page 247: ...n An error code Functions at the lower softkeys In some cases you need these functions like wind and rewind for example to come to the solution How to handle error messages at the scanner 1 Read the e...

Page 248: ...nsert calibration sheet and the following icon appears 58 The Insert calibration sheet icon 58 The Insert calibration sheet icon 3 Insert the calibration sheet and press the green start key to start t...

Page 249: ...e Oc TDS400 CS 249 Note When the calibration process stops or fails follow the instructions on the scanner operator panel carefully Result The Oc TCS4 scanner is calibrated and the scan quality is cor...

Page 250: ...py and scan quality Clean the glass plate when you have lines on the image that are not on the original Required tools Oc cleaner A part of cleaning kit with codenumber 1068117 Two lint free cloths At...

Page 251: ...ith a lint free cloth and a small quantity of the cleaner 62 Do not damage the sensor at the right side in front of the glass plate 62 Do not damage the sensor at the right side in front of the glass...

Page 252: ...a are indicated on the operator panel If you install new print media you must tell the system the size of the material and the type of print material paper transparent or polyester When a roll is empt...

Page 253: ...the roll holder from the drawer 3 Remove the empty core from the roll holder when you press the knob 4 Slide the roll holder in the new roll of media while pressing the knob Make sure that the knob i...

Page 254: ...he media between the input guide plates against the rollers 67 Feed the media 67 Feed the media 8 Turn the rollers until the media is visible Also refer to the label inside the drawer 9 If you inserte...

Page 255: ...tain the Oc TDS400 CS 255 Install the media on roll 2 1 Open the flap to get access to roll 2 68 Open the flap 68 Open the flap 2 Remove the roll holder 69 Remove the roll holder 69 Remove the roll ho...

Page 256: ...e that the knob is at the right side and that the media is positioned as shown in the figure below 70 Press the knob 70 Press the knob 5 Align the roll with the correct lines on the roll holder while...

Page 257: ...le Also refer to the label inside the drawer 72 Feed the media 72 Feed the media 9 If you inserted a roll with another media or with a different width you must program the correct width and media type...

Page 258: ...ntify the media format and media type After you fill the media you must indicate the media type and media format in this menu Purpose To define the media type and media size of a media roll When to do...

Page 259: ...to turn the printer off line 2 Navigate to Media settings and select this menu 3 Navigate to Roll 1 or Roll 2 and select this menu 4 Navigate to Material select this menu 5 Navigate to the required me...

Page 260: ...How to cut the media 1 Press the on line key to turn the printer off line 2 Open the drawer and feed the media manually until it is 5 cm above the top drawer 3 Close the drawer 4 Navigate to Media set...

Page 261: ...the next select key to select a menu or a value How to define the media series of the Oc TDS400 printer 1 Press the on line key to turn the printer off line 2 Navigate to Configuration and select this...

Page 262: ...er Introduction If the Refill toner message appears on the printer panel you must refill the toner immediately Attention Use only B5 toner Refill the toner 1 Turn off the printer 2 Open the left cover...

Page 263: ...e bottle clockwise in a slanted position 5 Move the toner bottle upwards into a vertical position 6 Tap the toner bottle gently to let the toner flow from the bottle 7 When the toner bottle is empty r...

Page 264: ...er and place the cap provided on the bag on the opening 2 Slide a new waste toner bag over the holder 3 Close the cover 4 Turn on the printer Handle media jams at the Oc TDS400 printer Printer error m...

Page 265: ...necessary Press on line see Load the media on page 252 Knife 2 error Remove paper Press on line An error occurred during the cut of the roll Check the media on roll 1 and remove scrapped media if nec...

Page 266: ...folder A tape jam occurred in the reinforcement unit or a media jam occurred in the folder A media jam can occur in the transport section of the folder or in the reinforcement unit of the folder Clear...

Page 267: ...he toner on page 262 Remove original Try the following solutions Close the top cover Make sure that all media scraps are removed Turn the printer off and on see Turn the Oc TDS400 printer on and off o...

Page 268: ...is empty Reload roll 1 see Load the media on page 252 Printer ready Roll 2 empty Media roll 1 is empty Reload roll 1 see Load the media on page 252 Printer running Roll 1 empty Media roll 1 is empty...

Page 269: ...n page 252 Roll 2 empty Open roll unit Replace the media on roll 2 see Load the media on page 252 Wait for folder The communication between the printer and the folder starts up Please wait Folder is o...

Page 270: ...on page 307 No pieces of media block the paper path Clear a media jam in the media feed section 1 Turn off the printer 2 Open the correct roll compartment Note You must open one 1 compartment at a ti...

Page 271: ...ion Caution Open the fuser only to remove the media after a media jam Do not remove the materials from the fuser without heat protective gloves The surface of the fuser is hot 1 Turn off the printer 2...

Page 272: ...272 User manual 4 Open the fuser unit 5 Remove the jammed material 6 Lift the green handle and close the fuser unit 7 Close the left cover and tighten the screw 8 Turn on the printer...

Page 273: ...ng message will appear on the display RU tape empty Open the reinforcement unit and replace the empty tape roll Remove an empty tape roll Attention To prevent damage to the reinforcement unit only use...

Page 274: ...ning the guide plates 3 Remove the trailing strip of the old tape 77 Removing the trailing strip of the old tape 77 Removing the trailing strip of the old tape 4 Open the front side plate of the roll...

Page 275: ...ure that the roll is placed with the holes to the back and the protection sheet to the front 78 Placing the new roll 78 Placing the new roll 2 Loosen the end of the roll and lead the tape over the lar...

Page 276: ...r knife and over the pin roller 80 Leading the tape between upper and lower knife 80 Leading the tape between upper and lower knife 4 Make sure that at least 200 mm 2 strip lengths of tape bulges out...

Page 277: ...on the frame plate of the reinforcement unit Lift the tape from the pin roller and push the tape between the two knives until the holes are aligned 82 Adjusting the holes on the tape 82 Adjusting the...

Page 278: ...t from the tape 84 Peeling off the protection sheet 84 Peeling off the protection sheet 2 Guide the protection sheet back between the upper and lower knife 85 Leading the protection sheet between uppe...

Page 279: ...the protection sheet tight 86 Leading the protection sheet between the rollers 86 Leading the protection sheet between the rollers 4 Insert the strip of the tape into the closed section of the slide...

Page 280: ...ate down and cut the tape at the knife section Quickly pull the strip up so that the upper knife cuts the tape 88 Cutting the tape at the knife section 88 Cutting the tape at the knife section 6 Close...

Page 281: ...the protective sheet from the reinforcement tape is stored in a waste box For each roll of tape you must empty the box twice Empty the waste box 1 Open the waste box First pull the waste box to the le...

Page 282: ...282 User manual 2 Empty the box 3 Close the waste box and First push the waste box forward Next push the waste box to the right hand side 90 Closing the waste box 90 Closing the waste box...

Page 283: ...the reinforcement unit has occurred Clean the reinforcement knives Attention Only use the original Cleaner K and Fixing Unit Cleaning Oil silicon oil from Oc to prevent damage to the reinforcement uni...

Page 284: ...to oil the felt 92 Oiling the felt 92 Oiling the felt 9 Close the side door of the reinforcement unit The knives are automatically put back in their home positions This depends on whether or not a jo...

Page 285: ...he reinforcement strip is not available Install a new reinforcement strip 1 Press the On line key on the operator panel to put the printer off line 2 Open the side door of the reinforcement unit 3 Che...

Page 286: ...tion sheet is not on the reinforcement strip there is no mechanical error You must insert a new tape roll see Insert a new tape roll on page 273 If this error frequently occurs you must call your Oc r...

Page 287: ...t unit the following message appears on the display Error in folder Illustration 95 Location of the reinforcement unit 95 Location of the reinforcement unit Clear a tape jam 1 Open the front door of t...

Page 288: ...way from the pin roller and lock the two guide plates into their open position 3 Remove all tape between the rollers and the knives 97 Removing the tape 97 Removing the tape 4 Move a new trailing stri...

Page 289: ...s in the folder can occur in either the first fold section the folder transport section the second fold section or the belt unit Clear a jam in the first fold section 1 Open the top cover of the folde...

Page 290: ...old section 99 Opening first fold section 99 Opening first fold section 4 Open the guide plate 100 Opening guide plate 100 Opening guide plate 5 Remove any jammed material 6 Close the guide plate 7 Cl...

Page 291: ...ection 101 Opening the cover of the folder transport section 2 Remove any jammed material 3 Close the cover of the folder transport section from the left side Lift and push the hinge to the rear Clear...

Page 292: ...3 Close the front door of the second fold section 4 If you have a belt unit put the belt in an upward position 103 Putting the belt in an upright position 103 Putting the belt in an upright position...

Page 293: ...reen lever 105 Opening the guide plate with the green lever 105 Opening the guide plate with the green lever 7 Remove any jammed material 8 Open the vertical transport unit with the green lever 106 Op...

Page 294: ...med material 10 Close the vertical transport unit 107 Closing the vertical transport 107 Closing the vertical transport 11 Close the guide plate 12 Close the delivery unit 108 Closing the delivery uni...

Page 295: ...in the belt unit 1 Open the door of the belt unit 109 Opening the belt unit door 109 Opening the belt unit door 2 Press the two green knobs in the upper section of the belt unit and open the plate 11...

Page 296: ...e lower section of the belt unit lift and pull forward the lower section to open the lower plate 111 Opening the lower plate 111 Opening the lower plate 6 Remove any jammed material 7 Pull the green l...

Page 297: ...297 Oc TDS400 CS User manual Appendix A System specifications...

Page 298: ...ec Greyscale Colour up to 4 m min or 2 8 inch sec Resolution 575 dpi Camera 3 colour linear CCD 21360 Pixels 24 bits colour Scan width 914 4 mm Original feed Right aligned Original size Minimum 210 mm...

Page 299: ...g horizontal Delete area Other functionalities Pre programming of next job Programmable default settings Synchro cut mode Leading and trailing strip adjustment 0 mm 400 mm Concurrent scanning and prin...

Page 300: ...4 scanner are listed in the table below 33 Original types Original type Type Icon Black white grey Lines text 112 Lines text icon 112 Lines text icon Greys Lines 113 Greys lines icon 113 Greys lines i...

Page 301: ...System specifications 301 33 Original types Dark original 116 Dark original icon 116 Dark original icon Colour Photo 117 Photo icon 117 Photo icon Original type Type Icon...

Page 302: ...phical user interface Optional keyboard mouse and monitor Standard interface 10 100BaseT with RJ45 Optional interfaces 10 100BaseT with RJ45 Network protocols TCP IP SMB IPX SPX FTP LPD Power consumpt...

Page 303: ...manipulation Rotation Auto scaling Positioning Pen management Trailing strip adjustment add up to 400 mm Colour modes Black White Greyscale Colour Quality modes Standard Lines Text Poster Language sen...

Page 304: ...nual feed Guaranteed print length 15 meters Output delivery Standard Integrated Receiving Tray IRT Output sizes From A3 to A0 and 36 Warm up time None instant behaviour Media types Plain translucent t...

Page 305: ...oloured papers and different polyester films from your Oc representative Attention Do not store the paper in rooms where temperature and humidity are high Avoid dust and direct sunlight Wrap not used...

Page 306: ...Label Paper 75 g m2 LFM 010 Eng Standard Paper 75 g m2 LFM 140 Oc Green Label TCF 80 g m2 Oc Transparent Papers LFM 220 Oc Translucent Paper 80 g m2 LFM 230 Oc Translucent Paper 90 g m2 LFM 240 Oc Tra...

Page 307: ...arent paper coloured papers and different polyester films from your Oc representative Attention Do not store the paper in rooms where temperature and humidity are high Avoid dust and direct sunlight W...

Page 308: ...nch range Others Media Width inch Length inch 12 inch B 12 18 18 inch C 18 24 24 inch D 24 36 36 inch E 36 44 Media Width Length 30 inch 30 inch 12 inch B1 700 mm 1000 mm B1 DIN 707 mm 1000 mm B2 500...

Page 309: ...can loose information Supported DIN media series The table shows the scale factor if you copy from one media size original column to another media size first row 36 DIN table 36 DIN table Origina ls S...

Page 310: ...media size original column to another media size 37 ISO table 37 ISO table Original s Standard scale fixed steps for the ISO media series A0 A1 A2 A3 A4 A5 A0 100 71 50 35 A1 141 100 71 50 35 A2 200...

Page 311: ...osoft Windows network location with Server Message Block SMB Scan to an internet location with File Transfer Protocol FTP Resolution 72 150 200 300 400 and 600 dpi File formats TIFF PDF CALS I Availab...

Page 312: ...ingle scan File naming Automatically generate unique file names for each scan Viewing View scans at point of scanning Oc Image Logic The best scan quality for different image types Ease of use Job tem...

Page 313: ...printers HDI AutoCAD 2000 family AutoCAD 2000 family HDI drivers The drivers allow you to plot from the AutoCAD 2000 2000i 2002 2004 2005 and 2006 based applications to Oc plotters Graphical applicat...

Page 314: ...ndows Server 2003 to your Oc TDS systems Oc Windows Raster Driver TDS The driver allows you to print from a Windows 98 Windows ME Windows NT 4 0 Windows 2000 Windows XP or Windows Server 2003 applicat...

Page 315: ...315 Oc TDS400 CS User manual Appendix B Miscellaneous...

Page 316: ...nual convenient in size readability and arrangement page layout chapter order etc O Yes O No Could you find the information you were looking for O Always O Most of the times O Sometimes O Not at all W...

Page 317: ...l in your occupation Name Occupation Company Phone Address City Country Please return this sheet to Oc Technologies B V For the attention of ITC User Documentation P O Box 101 5900 MA Venlo The Nether...

Page 318: ...ulo SP 04578 000 Brasil http www oce brasil com br Oc Canada Inc 4711 Yonge Street Suite 1100 Toronto Ontario M2N 6K8 Canada http www oce ca Oc Office Equipment Beijing Co Ltd Xu Mu Cheng Chaoyang Dis...

Page 319: ...a Superiore 2 B 20063 Cernusco sul Naviglio MI Italia http www oce it Oc Japan Corporation 3 25 1 Nishi Shinbashi Minato Ku Tokyo 105 0003 Japan http www ocejapan co jp Oc Belgium S A Rue Astrid 2 A 1...

Page 320: ...tugal Oc Singapore Pte Ltd 190 MacPherson Road 03 00 Wisma Gulab Singapore 348548 Oc Printing Systems PTY Ltd P O Box 629 Rivonia 2128 South Africa Oc Espa a SA Business Park Mas Blau Osona 2 08820 El...

Page 321: ...stacker 90 components folder 93 oc power logic controller 28 oc tcs4 scanner 22 oc tds400 printer 80 components finishing options 90 concept 12 configuration report 113 controller hardware specificati...

Page 322: ...e name define 148 file type scan to file 224 finishing options belt unit 90 compact output stacker 90 folder 90 output delivery tray 90 reinforcement unit 90 finishing options 90 finishing settings ov...

Page 323: ...5 off line folding 242 operator panel scanner operator panel overview 24 scanner operator panel usage 177 213 original release mode setting 136 original type background compensation 226 blueprint 226...

Page 324: ...262 reinforcement knives reinforcement unit 283 reinforcement strip reinforcement unit 285 reinforcement unit 90 93 definition 240 install reinforcement strip 285 reinforcement knives 283 tape jam 28...

Page 325: ...ssages 267 scanner error messages 247 specifications controller hardware 302 software 302 drivers 313 oc scan logic 311 optional application software 314 printer 304 scanner 298 stacker 93 stamp 195 s...

Page 326: ...26 set time out 124 125 128 toner refill 262 top 5 settings 133 turn the system on off oc power logic controller 110 oc tcs4 scanner 108 oc tds400 printer 111 U user mode 55 71 users 18 anonymous user...

Reviews: