


Chapter 25 — Fault locating and clearing
Page 513 of 536
Option 11C Compact
Planning, Installation, Fault Clearing and CCBR Guide
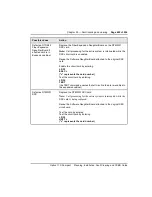
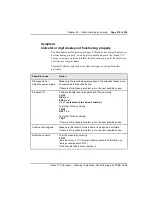
Possible cause
Action
PE card circuitry
latched
Disable card, reseat card and enable the card
If the fault persists, go to the next possible cause.
Defective PE circuit
card
Software disable the TN indicated by the OVD message by entering
LD 32
DISU c u
(“c u” represents card unit number)
Disconnect the wiring between the PE circuit card and the
cross-connect terminal.
Re-enable the TN by entering
ENLU c u
(“c u” represents card unit number)
Wait for an OVD message
If you receive a message indicating a problem with the circuit card
or unit, replace the circuit card.
If you do not receive a message indicating a problem with the circuit
card or unit, reconnect the wiring and go to the next possible cause.
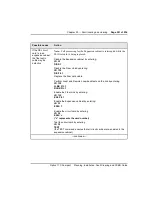
Defective console
Disable the TN. Disconnect the wiring from the console to the jack.
Re-enable the TN and wait for an OVD message.
If you do not receive an OVD message, replace the console.
If you receive an OVD message, reconnect the wiring and go to the
next possible cause.
Defective wiring
Disable the TN. Disconnect the wiring between the console and the
cross-connect terminal.
Re-enable the TN and wait for an OVD message.
If you do not receive an OVD message, replace or repair the wiring
between the console and the cross-connect terminal.
If you receive an OVD message, replace or repair the wiring
between the PE shelf and the cross-connect terminal.
Summary of Contents for Meridian Meridian 1
Page 3: ...553 3121 210 Standard 3 0 January 1999 ...
Page 17: ...xiv Contents 553 3121 210 Standard 3 0 January 1999 ...
Page 97: ...Page 78 of 536 Chapter 8 Installing a new system 553 3121 210 Standard 3 0 January 1999 ...
Page 107: ...Page 88 of 536 Chapter 10 Installing the system ground 553 3121 210 Standard 3 0 January 1999 ...
Page 113: ...Page 94 of 536 Chapter 11 Installing the power supply 553 3121 210 Standard 3 0 January 1999 ...
Page 125: ...Page 106 of 536 Chapter 12 Adding an expansion cabinet 553 3121 210 Standard 3 0 January 1999 ...
Page 209: ...Page 190 of 536 Chapter 18 Connecting the trunks 553 3121 210 Standard 3 0 January 1999 ...
Page 323: ...Page 304 of 536 Chapter 21 Installing Hospitality 553 3121 210 Standard 3 0 January 1999 ...
Page 419: ...Page 400 of 536 Chapter 23 Pre programmed data 553 3121 210 Standard 3 0 January 1999 ...
Page 555: ...Page 536 of 536 Chapter 25 Fault locating and clearing 553 3121 210 Standard 3 0 January 1999 ...