background image

P-400R Digital Microscope Instructions 

83


T

roubleshoot

ing 


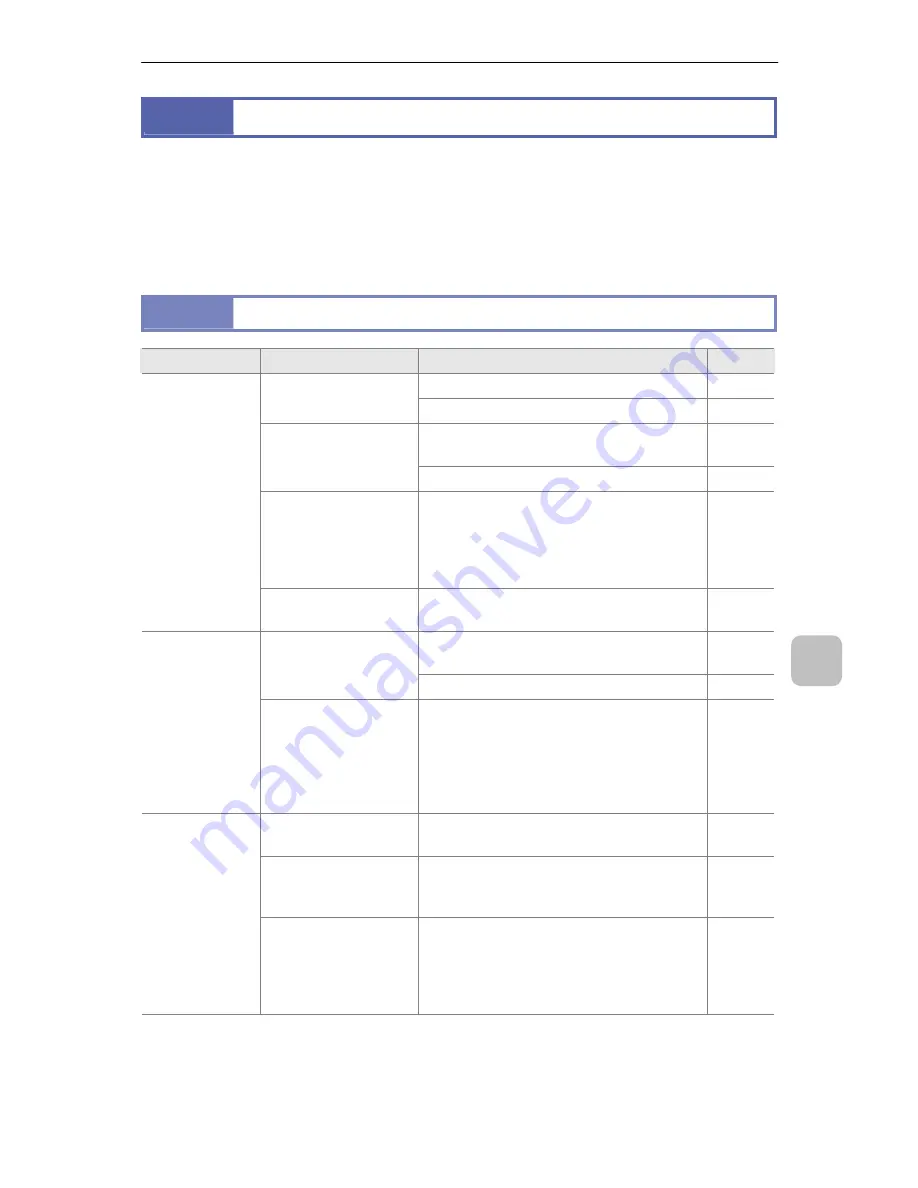
Troubleshooting 

Incorrect use might prevent this product from providing primary performance even 
though the product is not damaged. If a symptom such as those in the following table 
occurs, take action as described in the table before requesting repair. 
If a problem that is not listed in the table occurs or if a problem that occurred is not 
corrected by taking action as described in the table, remove the battery or disconnect 
the power cord of the product, and then contact your nearest Nikon representative. 
 

9.1 


About the Power Supply and Battery 


Symptom 

Possible cause 

Action 

Ref. 

Insert a battery. 

No battery is inserted.
 

Connect an optional AC adapter. 

16 

Use a battery charger to charge the 
battery. 

The battery charge 
level is low. 
 

Connect an optional AC adapter. 

16 

The battery 
performance is 
degraded temporarily 
because the 
temperature is low. 

Connect an optional AC adapter. 

16 

The power 
does not come 
on.  
 

The AC adapter is not 
connected correctly. 

Connect the AC adapter cable and power 
cord correctly. 

16 

Use a battery charger to charge the 
battery. 

The battery charge 
level is low. 
 

Connect an optional AC adapter. 

16 

The power is 
turned off. 

Auto power save 
function works. 

If no button is pressed during a 
predetermined period, this product enters 
the standby status automatically (except 
for during interval shooting). Change the 
auto power save setting or turn on the 
power again. 

22 
77 

The battery is not 
inserted correctly. 

Insert the battery to the battery charger in 
the correct orientation. 

The power cord of the 
battery charger is not 
connected. 

Connect the power cord correctly. 

The battery 
cannot be 
charged. 
 

An attempt is made to 
charge the battery via 
the AC adapter 
connected to the 
P-400R. 

A battery cannot be charged when it is 
connected to the P-400R. Remove it from 
the P-400R and insert it to the battery 
charger to charge it. 

16 


Summary of Contents for P-400R

Page 1: ...P 400R Digital Microscope Instructions M559EN01 M559 E 10 11 NF 1 ...

Page 2: ......

Page 3: ...tal Microscope to a P MFSC Motorized Focusing Stand Controller for use with a P TPM Touch Panel Monitor see the ShuttlePix Digital Microscope Instructions If this product is used in a manner not specified by the manufacturer the protection provided by this product may be impaired Symbols used in this manual This manual uses the following symbols for special purposes This icon marks precautions the...

Page 4: ...or and a monitor allows you to observe and capture images without cable connections 20x optical zoom The 20x high magnification zoom lens is adopted which enables not only capturing an image of an entire sample at low magnification but also capturing a more detailed image at high magnification Internal LED illumination unit LED ring illumination is installed inside the main unit Oblique illuminati...

Page 5: ...Basic Operation 18 1 Turning on the power 18 2 Directing the P 400R to the object 18 3 Obtaining optimal shooting conditions 19 4 Capturing an image 19 5 Playing back the captured image 20 6 Deleting captured image 21 4 Basic Operations for Capturing and Playing Back 22 4 1 Turning On and Off the Power 22 4 2 Operating the LCD Monitor 24 4 2 1 Opening the LCD panel 24 4 2 2 Operating the LCD panel...

Page 6: ...2 2 Setting an existing folder as the active folder 52 5 3 Selecting the Image Quality Mode 53 5 4 Selecting the Image Size 54 5 5 Selecting the Exposure Mode 55 5 6 Program AE Settings 56 5 7 Setting the Quality of Images to be Captured 58 5 8 Switching the Metering Method 61 5 9 Switching the Metering Area 62 5 10 Using Continuous Shooting Mode 63 5 11 Using Shading Correction 65 5 12 Setting th...

Page 7: ...ge Display 84 9 3 About Operating This Product 85 9 4 View of Microscopic Images 85 9 5 Image Saving 87 9 6 System Operation 87 9 7 Warning Messages 88 10 Daily Maintenance 92 10 1 Cleaning the Lens 92 10 2 Cleaning the LCD Panel 92 10 3 Cleaning Painted Printed or Plastic Parts 93 10 4 Storage 93 10 5 Periodic Inspections Charged 93 11 Major Specifications 94 11 1 P 400R Digital Microscope 94 11 ...

Page 8: ...ding instructions marked with this symbol may lead to serious injury or death CAUTION Disregarding instructions marked with this symbol may lead to injury or property damage WARNING for the overall product 1 Purpose of this product This product is designed to be used for microscopic observation and capturing and for displaying the captured images Do not attempt to use it for any other purpose 2 Re...

Page 9: ...vironment may cause an explosion or fire 8 Do not place anything on the product or cover the product Do not place anything on the product or cover the product Doing so might result in damage to the product or a fire This is because heat emission is hindered and abnormal heat might be caused 9 Use the specified AC adapter An optional AC adapter can be used as a power supply for the P 400R Be sure t...

Page 10: ...al shock protection class I always connect the adapter to a grounded outlet 13 Precautions for illumination The ring illumination using white LEDs is installed around the lens of the P 400R To prevent damage to the eyesight be sure to observe the following precautions Do not point the luminous section to a person Do not look into or look directly the luminous section When you observe a specimen wi...

Page 11: ... plugging in out cables and starting maintenance work To prevent occurrence of possible accidents such as electrical shock and fire always turn off the power of the product remove the battery and disconnect the power cord before installing the product plugging in out of cables and starting maintenance such as cleaning the lens 5 Precautions for the LDC panel Do not strike or push the LCD panel scr...

Page 12: ...perature is from 20 to 60 C and a relative humidity is 90 or less no condensation When you install or store this product in a hot and humid place condensation or mold may appear on the lens resulting in a performance degradation or malfunction Use this product in a less dusty and dirty location Do not place and use this product in a closed space such as a locker or a cabinet Do not place anything ...

Page 13: ...tore the removed battery together with a metal object Doing so may cause the battery to leak explode or overheat due to a short circuit This could result in burning personal injury or fire 5 Use only the dedicated battery charger to charge the battery Otherwise the battery may leak explode or overheat This could result in burning personal injury or fire 6 Do not use the battery for any other equip...

Page 14: ...spect this has happened consult your physician immediately 5 If charging has not finished within the specified charging time stop charging Otherwise the battery may leak explode or overheat This could result in burning personal injury or fire 6 If you notice any abnormality of the battery such as discoloration deformation and unusual odor stop using it Otherwise the battery may leak explode or ove...

Page 15: ...urning or fire 2 When storing the battery observe the following precautions Store the battery in the environment specified in 11 Major Specifications Never leave the battery in a location where it will be subject to high temperature such as a location exposed to direct sunlight a location exposed directly to a heater or stove or a closed vehicle during summer months Be careful not to short the con...

Page 16: ...unction or electrical shock 6 Never use the battery charger in a flammable or combustible environment Using it in a combustible gas or dust environment may cause an explosion or fire 7 Clean off any dust on and around the metallic part of the power plug with a dry cloth Otherwise continued use may cause fire 8 Check the input voltage The battery charger operates on 100 to 240 VAC 50 60 Hz power su...

Page 17: ... Return to this chapter whenever you want to confirm the names and positions of components Front left side view LCD panel LCD panel closed Connector for the stand Square dovetail for mounting the stand Grip LED ring illumination Contact observation adapter Lens cover Lens Capture switch shutter LCD panel open LCD monitor Light control buttons Zoom buttons Illumination area switching button Delete ...

Page 18: ...About attaching a strap A strap can be attached to the back of the P 400R in order not to drop it Caution About attaching a strap The P 400R weighs approximately 1 1 kg including the battery Make sure that you use a camera strap or a similar strap that has adequate strength Do not use a thin strap like the one for a mobile phone Such a strap might be broken resulting in damage to the product Video...

Page 19: ...wer half Left half Right half Off 6 LED illumination level 1 to 10 10 levels 7 Image quality mode JPG BASIC JPG NORMAL JPG FINE TIFF 8 Size of saved image 0 5M 2M 9 Number of exposures remaining 0 to 9999 number of exposures remaining is also displayed 10 Scale 0 15 mm to 3 mm On Off Embedded 11 Zoom magnification x1 to x20 16 levels 12 Shutter speed 1 to 1 1000 21 levels 13 Camera gain 100 to 225...

Page 20: ...t half Off 5 LED illumination level 1 to 10 10 levels 6 Image quality mode JPG BASIC JPG NORMAL JPG FINE TIFF 7 Size of saved image 0 5M 2M 8 Current exposure number n total number of exposures 9 Zoom magnification x1 to x20 16 levels 10 Shutter speed 1 to 1 1000 21 levels 11 Camera gain 100 to 2250 10 levels 12 Exposure compensation 2 0 to 2 0 1 3 steps 13 Aperture mode Resolution priority DOF pr...

Page 21: ...The display items on the menu screen are as follows Example of the menu screen display Shooting menu For details about how to operate in each menu screen see 5 Advanced Use of Capturing Functions 6 Advanced Use of Playback Functions and 7 Changing Settings It indicates that there are more items below It indicates the menu screen page List of the setting items Select an item with the top and bottom...

Page 22: ...i01 P Li ion Rechargeable Battery 1 Connect the power cord to the battery charger AC inlet and then connect the power plug to an outlet 2 Attach a battery to the battery charger Make sure that you insert the battery in the correct orientation as shown in the illustration The CHARGE lamp is on while the battery is being charged The charging is completed when the CHARGE lamp is off Charging a comple...

Page 23: ...On Now charging The battery is now being charged Off Charging completed Charging of the battery is completed Slow blinking Temperature is too high or low The temperature of the battery is too low below 0 C or too high above 60 C to charge the battery Charge the battery at a temperature of 0 to 40 C Fast blinking Battery is abnormal Immediately disconnect the power plug from the outlet to stop char...

Page 24: ...2 A V OUT 1 2 2 Insert a battery Insert a battery into the battery chamber in the correct orientation terminal side first A V OUT When the battery is completely inserted it is secured by a latch A V OUT 3 Close the battery cover Close the battery cover 1 and shift the battery chamber open close knob in the direction of the arrow 2 so that it returns to the original position A V OUT 2 1 Battery cha...

Page 25: ... in the illustration 1 to open the battery cover 2 A V OUT 1 2 3 Release the latch that is securing the battery and then remove the battery When the latch is released the battery is pushed out of the battery chamber A V OUT Pull out the battery straight A V OUT 4 Close the battery cover Close the battery cover 1 and shift the battery chamber open close knob in the direction of the arrow 2 so that ...

Page 26: ... the battery for the first time or after it has not been used for a long time always charge the battery with the P CH01 P BACH Battery Charger Do not use the battery at a place whose ambient temperature is beyond the range from 0 to 40 C Doing so might degrade battery performance or cause damage The internal temperature of the battery is high immediately after it has just been used In such a case ...

Page 27: ...operation has been proven by Nikon If the SD card is not recognized remove the card and then insert it again If it is still not recognized replace the SD card with another one Do not touch the terminal of the SD card with your hand or a metal object Do not attach a label or sticker to the SD card About discarding or giving the recording medium Note that deleting data or formatting the SD card usin...

Page 28: ...he power of the P 400R Check that the power indicator is off 2 Open the cover of the SD card Slide the SD card cover to the direction of 1 and open it to the direction of 2 1 2 3 Insert the SD card Insert the SD card in the correct orientation as shown in the right figure Push forward until it clicks L O C K 4 Close the cover of the SD card Close the SD card cover to the direction of 1 and slide i...

Page 29: ...the SD card If the P 400R is turned on when the inserted SD card has not been formatted a confirmation message is displayed on the LCD monitor This message prompts you to initialize the SD card About initializing the SD card Before using an SD card which was used with any other device on P 400R be sure to format it in P 400R After formatting the data stored in the SD card will be all deleted If so...

Page 30: ...ch Do not eject the SD card or turn off the power of this product while the SD card is being formatted or while data is being written deleted or loaded LOCK 2 2 2 Specifying an Active Folder When you initialize an SD card in P 400R a sub folder 100NIKON is created in the DCIM folder in the SD card and it is automatically set as an image recording destination active folder For using other folders o...

Page 31: ...f the cable to the external input terminal of the external monitor A cover is attached to the P 400R video output terminal Open it when making a connection 3 Turn on the external monitor power and then switch its input to video input external input For details see the documentation for the external monitor you use 4 Turn on the power of the P 400R and select the video output signal format NTSC or ...

Page 32: ... P 400R If you want to charge the battery that is in the P 400R remove the battery from the P 400R and then charge the battery with the P CH01 P BACH battery charger When P 400R has been installed in the P MFSC Motorized Focusing Stand Controller the AC adapter cannot be used Be sure to remove the AC adapter 1 Make sure that the P 400R power lamp is off 2 Connect the DC output cable of the AC adap...

Page 33: ...bottom buttons of the multi selector to select the display language and press the OK button A confirmation message for the date and time setting is displayed 2 Use the top and bottom buttons of the multi selector to select Yes and press the OK button The Date menu is displayed 3 Use the multi selector to set date and time Select an item with the right and left buttons and the value with the top an...

Page 34: ... person and do not look it directly 1 Turning on the power 1 Press the power switch to turn on the P 400R power When the power is turned on the power switch indicator lights in green with a startup sound 2 Directing the P 400R to the object 1 Open the LCD panel The live image is displayed on the LCD monitor 2 Direct the P 400R to the object and adjust the position so that the object displayed on t...

Page 35: ... the light control amount can be adjusted by 10 levels The Lighting pat and Light value menus are displayed respectively during operation 3 Make adjustment using of the zoom button so that the object is displayed at a desired magnification The zoom magnification can be adjusted by 1 0x to 20x 16 levels The Zoom menu is displayed during operation 4 Capturing an image 1 To capture an image press the...

Page 36: ...st captured image is displayed in the LCD monitor The last captured image is displayed 2 To switch the displayed playback image press the right and left or top and bottom buttons of the multi selector When you press the capture switch the P 400R enters shooting mode Displays the next image Displays the previous image LCD panel Playback button LCD panel ...

Page 37: ... you whether to delete the image appears When you press the delete button in shooting mode the last captured image is displayed and a confirmation message asking you whether to delete the image appears 2 Select Yes or No with the top and bottom buttons of the multi selector and press the OK button If you select Yes the image is deleted LCD panel OK button LCD panel Delete button ...

Page 38: ...ote Notes on ring illuminator When the power is turned on since the P 400R reproduces the status of the previous usage the ring illumination may be automatically turned on Do not point the luminous section to a person and do not look directly the luminous section Turning off the power Pressing the power button when the P 400R power is on the power is turned off The LCD monitor and ring illuminator...

Page 39: ...ery charge level is low Prepare for charging or replacing the battery No battery charge remains Replace the battery Operation is no longer possible Charge or replace the battery When the battery has become empty When the remaining battery charge level is near empty the message Battery exhausted is displayed and then the power of this product is automatically turned off In this status you can no lo...

Page 40: ... menus The menus displayed in the screen can be accessed by using the buttons on the LCD panel Holding the back of the LCD panel gently press the desired button About operation sound The operation sound is heard when a confirmation or alert message is displayed on the LCD monitor or when the setting is changed using a button on the LCD panel The volume of the operation sound can be changed in the ...

Page 41: ...de if you press the Monitor button the information items displayed in the LCD monitor switch in the following order Displaying the shooting menu When the P 400R is in shooting mode if you press the MENU button the shooting menu is displayed For details about how to use the shooting menu see 5 Advanced Use of Capturing Functions To terminate the display of the shooting menu set the shooting conditi...

Page 42: ...g the microscope in hand When you capture images while holding the microscope in hand hold the grip tightly To reduce vibration hold the LCD panel and the product with both hands if at all possible About the strap If the strap is attached in order not to drop the product always insert your hand into the strap 2 Using the microscope with a tripod The P 400R has a screw hole for a tripod Attach a co...

Page 43: ...ear a click sound and the rotation stops To remove the contact observation adapter rotate it counterclockwise until the rotation stops and then pull it out straight When you attach or remove the contact observation adapter rotate it while holding its rear ring Do not hold the front ring because it is used for focusing Adjusting the focal surface of the contact observation adapter The front ring of...

Page 44: ...illumination area Switch the illumination area of the ring illuminator as described below 1 Press the illumination area switching button to change the illumination area When you press the illumination area switching button the Lighting pat menu is displayed Every time you press the button the illumination area changes in the following order ALL LEDs Upper half LEDs Lower half LEDs Left half LEDs R...

Page 45: ... light while checking the brightness of the live image 1 to 10 ten levels If the light control button is pressed and held for more than one second the brightness is adjusted consecutively at a 0 2 sec interval While the menu is displayed if you press the OK or right button or no operation is performed for two seconds the setting is applied and the ordinary display is restored Light value menu Abou...

Page 46: ...magnification is displayed Adjust the zoom magnification while checking it in the live image 1 1 2 1 5 1 8 2 2 5 3 4 5 6 8 10 12 15 18 20 16 levels If the button is pressed and held over 1 second the zoom magnification can be adjusted consecutively While the Zoom menu is displayed if you press the OK button or no operation is performed for two seconds the setting is applied and the ordinary displa...

Page 47: ...h The focus status of the actual image may differ from the display of the focus indicator When the following objects are used the lighting number of the focus indicator steps may be decreased even though focus is achieved Low contrast object Object with regular vertical lines About the P 400R focus position The P 400R focus position is 29 mm off the end of the objective Adjust the position of the ...

Page 48: ...n for the selected scene mode is displayed at the top left of the screen If no operation is performed for six seconds the selection is cancelled and the live image appears again Icon Scene mode Meaning Standard General mode that can be used without detailed settings Wafer IC Chip Suitable for capturing a silicon wafer or IC chip Metal Ceramic Suitable for capturing a metal specimen Bright parts ar...

Page 49: ...nges cannot be saved in the scene mode To save the shooting conditions use custom setting For details about how to use custom settings see 4 3 7 Using custom settings and for registration see 5 1 Registering a Custom Definition About flickering during observation Flickering may occur in the live image depending on the object to be observed This is noticeable in a color chart which has an even colo...

Page 50: ... mode icons appear 3 Use the top and bottom buttons of the multi selector to select the custom setting selection icon 4 Use the right and left buttons of the multi selector to select the desired kind of custom settings Custom 1 to 4 Reproduces one kind of registered custom settings 5 Press the OK button to apply the selection The live image is displayed again The icon for the selected kind of cust...

Page 51: ...ction The live image is displayed again The icon for the selected aperture mode is displayed on the left of the screen If no operation is performed for six seconds the selection is cancelled and the live image appears again Resolution priority and DOF priority modes The following explains the difference between Resolution priority mode and DOF priority mode Resolution priority mode The depth of fi...

Page 52: ...mp menu is displayed 3 Press the top and bottom buttons of the multi selector to adjust the exposure compensation value and press the OK or right button to apply the value you set Adjust the exposure while checking it in the live image 2 0 1 3 steps Holding down either of the top and bottom buttons for one second or more continuously changes the value every 0 2 seconds While the menu is displayed ...

Page 53: ... to apply the value you set Adjust the shutter speed while checking it in the live image 1 1000 1 700 1 500 1 350 1 250 1 180 1 125 1 90 1 60 1 40 1 30 1 20 1 15 1 10 1 8 1 6 1 4 1 3 1 2 1 1 5 1 unit second factory default 1 60 Holding down either of the top and bottom buttons for one second or more continuously changes the value every 0 2 seconds While the menu is displayed if you press the OK or...

Page 54: ...nt exposure mode is displayed at the top left of the LCD monitor Manual 2 Press the right button exposure compensation of the multi selector The Camera gain menu is displayed 3 Press the top and bottom buttons of the multi selector to adjust the camera gain Adjust the camera gain while checking it in the live image 100 140 200 280 400 560 800 1130 1600 2250 factory default 100 Holding down either ...

Page 55: ... Program AE or Shutter priority AE The current exposure mode is displayed at the top left of the LCD monitor Program AE Shutter priority AE Change the photometry range as necessary For details see 5 9 Switching the Metering Method 2 Press the OK button at the position whose exposure you want to lock The exposure at that time is locked and the AE lock icon is displayed in the LCD monitor 3 To relea...

Page 56: ... so that the object fills within the metering area 2 Adjust the illumination to set the light condition for observation capturing 3 Press the bottom button of the multi selector The white balance is obtained from the view of the object when the button is pressed After the message White Balance completed is displayed on the LCD monitor the ordinary display is restored 4 Check the result with the li...

Page 57: ...ber of exposures remaining is displayed at the bottom right of the LCD monitor Precautions for saving images While an image is being recorded the number of exposures remaining displayed on the LCD monitor and the power switch indicator blink While they are blinking do not open the battery cover or remove the SD card Doing so may cause improper image recording or damage to this product or to the SD...

Page 58: ...r a specified number of shots This is useful to see how the object changes with time To switch continuous shooting mode For switching continuous shooting mode see 5 10 Using Continuous Shooting Mode Using the release switch Even when the P 400R has been attached to a tripod vibration might occur when the capture switch is pressed In such a case using the optional P RELS Release is recommended The ...

Page 59: ...d image is displayed Changing the items displayed in playback mode When the P 400R is in playback mode if you press the monitor button the information items displayed in the LCD monitor change in the following order Displaying the playback menu When the P 400R is in playback mode if you press the MENU button the playback menu is displayed For details about how to use the playback menu see 6 Advanc...

Page 60: ...selector the first image is displayed Playing back images at fast speed If you press and hold any of the multi selector buttons for three or more seconds you can play back images at fast speed 4 5 3 Displaying thumbnail images If you press the side of the zoom button when the P 400R is in playback mode the screen changes to the thumbnail view in which nine thumbnail images are displayed Pressing t...

Page 61: ...1600 The zoom magnification is increased by pressing the side of the zoom button and decreased by pressing the side If you hold down either side for one second or more the zoom magnification changes sequentially When an image is being magnified the magnification is displayed at the top left of the screen and the magnified area indicator is displayed at the bottom right of the screen You can use th...

Page 62: ...ly want to delete the image are displayed in the LCD monitor Shooting mode 2 Use the top and bottom buttons of the multi selector to select Yes or No 3 Press the OK button or the right button of the multi selector to apply the selection If you selected Yes the image is deleted and a completion message is displayed for two seconds The live image appears again When no images have been saved When no ...

Page 63: ...sage asking you whether you really want to delete the image is displayed Playback mode 3 Use the top and bottom buttons of the multi selector to select Yes or No 4 Press the OK button or the right button of the multi selector to apply the selection If you selected Yes the image is deleted and a completion message is displayed for two seconds The screen shows the playback mode again and the previou...

Page 64: ...n Shooting menu screen Shooting mode Using the shooting menu The shooting menu is operated by using the multi selector on the LCD panel Use the top and bottom buttons of the multi selector to select the item and then press the right or OK button to apply the selection Pressing the left button redisplays the upper level menu item Multi selector Restarting shooting mode If the MENU button or the cap...

Page 65: ...6 Program AE Settings The upper limit on the camera gain and the lower limit on the shutter speed in Program AE mode can be set 56 5 7 Setting the Quality of Images to be Captured The image quality settings for observation or capturing can be specified The settings that can be specified are chroma hue contrast sharpness color effect and RB adjustment 58 5 8 Switching the Metering Method The meteri...

Page 66: ...try and then press the OK or right button The Custom entry screen appears 4 Select the number of the custom definition you want to create and then select the OK or right button The current shooting conditions are saved as a custom definition The Shooting menu screen appears again Shooting conditions that can be registered in a custom definition Exposure mode Program AE Shutter priority AE or Manua...

Page 67: ...ctor to enter a three digit number Folder name initial value 100NIKON The folder name format is nnnNIKON nnn three digit number Any one digit numeric value can be set for each digit The digit can be selected by using the right and left buttons The numeric value can be selected by using the top and bottom buttons 5 Press the OK or right button A new folder is created and set as the active folder If...

Page 68: ...rs 3 Select Select folder and then press the OK or right button The Select folder screen which lists the three digit numbers of the folders saved on the SD card appears 4 Select the folder you want to use as the active folder 5 Press the OK or right button The selected folder is set as the active folder The Shooting menu screen appears again Maximum number of folders A maximum of 900 folders 100NI...

Page 69: ...image quality modes TIFF Images are recorded in 8 bit non compressed TIFF RGB format JPG FINE Images are recorded in JPEG format at the compression rate of about 1 4 JPG NORMAL initial setting Images are recorded in JPEG format at the compression rate of about 1 8 JPG BASIC Images are recorded in JPEG format at the compression rate of about 1 16 4 Press the OK or right button to apply the selectio...

Page 70: ...1 In shooting mode press the MENU button to display the Shooting menu screen 2 Select Image size and then press the OK or right button The Image size screen appears 3 Select either of the following image sizes 2M 1600 x 1200 initial setting 1600 x 1200 pixels 0 5M 800 x 600 800 x 600 pixels 4 Press the OK or right button to apply the selection The Shooting menu screen appears again ...

Page 71: ...d the camera gain Shutter priority AE The P 400R automatically sets the camera gain according to the shutter speed set by the user Manual The user manually sets both the shutter speed and the camera gain 4 Press the OK or right button to apply the selection The Shooting menu screen appears again About overexposure and underexposure indications If exposure mode is Program AE or Shutter priority AE ...

Page 72: ...elect Max camera gain and then press the OK or right button The Max camera gain screen appears 4 Select the maximum camera gain value and then press the OK or right button to apply the selection Maximum camera gain initial value 2250 100 to 2250 10 levels The Prog AE setting screen appears again 5 Select Low shutter speed and then press the OK or right button The Low shutter speed screen appears 6...

Page 73: ... brightness of the object is low 100 1 1 1000 2250 1 60 Low Object brightness High Relationship between the camera gain and shutter speed when the upper limit on the camera gain is 2250 and the lower limit on the slow shutter speed is 1 60 Exposure control in Program AE mode If the brightness of the object is high the P 400R first decreases the camera gain to maintain the image quality and then in...

Page 74: ... the items that can be adjusted appears 3 Select the desired item and then press the OK or right button The items that can be adjusted from the Image optimization screen are listed below When one of these items is selected and then the OK or right button is pressed the setting menu for the selected item is displayed Chroma Hue Contrast Sharpness Color effect RB adjustment 4 Use the multi selector ...

Page 75: ...rast 5 Linear 6 Contrast for metal 7 Enhanced contrast Sharpness edge emphasized 3 soft to 5 sharp Initial value 2 Color effect Color initial setting B W Nega RB adjustment The tint can be adjusted by changing the R red and B blue values Each value can be changed in the range from 50 to 150 on the assumption that the status existing when the white balance is acquired is 100 The value can be increm...

Page 76: ... dark to bright 2 Weak contrast Use this to lower the contrast 3 Standard contrast initial setting Use this for the normal capturing 4 Strong contrast Use this to increase the contrast so that the image is clear 5 Linear Use this to obtain linear output especially when examining the difference of the illumination amount with the capture data 6 Contrast for metal Use this to obtain a high contrast ...

Page 77: ...ect Metering method and then press the OK or right button The Metering method screen appears 3 Select either of the following two metering methods Averaging metering initial setting The exposure is adjusted so that the average exposure value in the metering area and the preset value match Peak hold metering The exposure is adjusted so that the highest peak exposure value and the preset value match...

Page 78: ...d then press the OK or right button The Metering area screen appears 3 Select one of the following three metering area sizes Large About 95 of the image sensor is measured Middle initial setting About 50 of the image sensor is measured Spot About 20 of the image sensor is measured 4 Press the OK or right button to apply the selection The Shooting menu screen appears again Position of the metering ...

Page 79: ...itial setting In this mode a single image is acquired with a press of the capture switch Best Shot Selector In this mode a maximum of 10 frames of images is acquired while the capture switch is pressed and only the image whose file size is largest is saved the shutter sound is not emitted Generally the size of images that are not vibrated or defocused tends to be larger than vibrated or defocused ...

Page 80: ...mages to be captured You can specify a number from 2 to 999 the maximum varies depending on the amount of free space left on the SD card Interval Specify the interval at which images are to be captured You can select 10s 15s 20s 30s 45s 60s 90s 2m 3m 4m 5m 6m 10m 15m 20m 30m 45m 60m 90m 2h 3h 4h 5h or 6h s seconds m minutes h hours initial setting 10s When the capture switch is pressed interval sh...

Page 81: ...ollows 1 Select Shading correction and then press the OK or right button 2 Select Shading correction and then press the OK or right button The Shading correction screen appears 3 Select either of the following items to determine whether to enable shading correction Shading ON initial setting Shading correction is performed Select this setting for normal use OFF Shading correction is not performed ...

Page 82: ...reen appears 3 Select the desired category and then press the OK or right button The menu for the selected category appears 4 Use the multi selector to specify the setting The following shows the categories and the settings that can be specified Scale display OFF initial setting Display ON Display Overwrite If Display Overwrite is selected the scale is embedded in saved images Line width Thick Thi...

Page 83: ...menu is displayed in this screen Playback menu screen Playback mode Using the playback menu The playback menu is operated by using the multi selector on the LCD panel Use the top and bottom buttons of the multi selector to select the item and then press the right or OK button to apply the selection Pressing the left button redisplays the upper level menu item Multi selector Restarting playback mod...

Page 84: ...at can be performed using the playback menu Section Item Description Page 6 1 Deleting Multiple Images All at One Time The images selected by using their thumbnail images or a folder containing images can be deleted 69 6 2 Specifying the Playback Folder The folder containing the images to be displayed when a playback operation is performed is specified 72 ...

Page 85: ... selected images You can select images and delete them all at one time The procedure is as follows 1 In playback mode press the MENU button to display the Playback menu screen 2 Select Delete and then press the OK or right button The Delete screen appears 3 Select Delete images and then press the OK or right button The Delete images screen appears and the thumbnail images for the images saved in t...

Page 86: ... card is write protected when deletion is attempted a confirmation message appears 6 1 2 Deleting a folder containing images You can select a folder that contains images on the SD card and delete the folder and the images contained in the folder The procedure is as follows 1 In playback mode press the MENU button to display the Playback menu screen 2 Select Delete and then press the OK or right bu...

Page 87: ...utton When deletion is completed a confirmation message appears for two seconds The Playback menu screen appears again Notes on folder deletion If the SD card is write protected a confirmation message appears The active folder or the folder specified as the playback folder cannot be deleted If the active folder or playback folder is selected for deletion a confirmation message appears If a read on...

Page 88: ...e OK or right button The Playback folder screen appears 3 Select either of the following menu items Active folder initial setting The folder currently used as the active folder is selected as the playback folder Select folder Select this menu item if you want to specify a specific folder in the DCIM folder as the playback folder 4 Press the OK or right button If Select folder is selected a list of...

Page 89: ...ing menu or Playback menu Then press the bottom button to select the tab of Setup menu The Setup menu screen appears The setup menu is displayed in this screen Setup menu screen Select the tab Using the setup menu The setup menu is operated by using the multi selector on the LCD panel Use the top and bottom buttons of the multi selector to select the item and then press the right or OK button to a...

Page 90: ... performed can be selected from Loud Normal Soft and OFF 75 7 3 Selecting the Video Output Signal Format The format of video output signal can be selected from NTSC PAL and OFF 76 7 4 Selecting the Shutter Release Method Whether the capture switch on the P 400R or the optional external release switch P RELS is used to release the shutter can be selected 76 7 5 Initializing an SD Card The SD card i...

Page 91: ...evel checking the display of the chart 4 Press the OK or right button to apply the selected brightness level The setup menu screen appears again 7 2 Adjusting the Volume of the Operation Sound You can adjust the volume of the startup operation and shutter sounds The procedure is as follows 1 Display the Setup menu screen 2 Select Sound volume and then press the OK or right button The Sound volume ...

Page 92: ...e Setup menu screen appears again 7 4 Selecting the Shutter Release Method You can select whether the capture switch on the P 400R or the optional release switch P RELS is used to release the shutter The procedure is as follows 1 Display the Setup menu screen 2 Select Capture input setting and then press the OK or right button The Capture input setting screen appears 3 Use the top and bottom butto...

Page 93: ... folder The Setup menu screen appears again 7 6 Setting the Automatic Power Save Function The P 400R has the automatic power save function which automatically places the P 400R in standby mode if no operation is performed for a length of time The following shows to procedure for enabling this function and specifying the time 1 Display the Setup menu screen 2 Select Auto off and then press the OK o...

Page 94: ...enu screen appears again 7 8 Setting the Current Date and Time You can set the current date and time The procedure is as follows 1 Display the Setup menu screen 2 Select Date and then press the OK or right button The Date screen appears 3 Set the date YYYY MM DD and time hh mm Use the right and left buttons of the multi selector to select each of the year month day hour and minute fields and use t...

Page 95: ...u can check the version information of the P 400R firmware The procedure is as follows 1 Display the Setup menu screen 2 Select Firmware version and then press the OK or right button The version number of the P 400R firmware is displayed 3 Press the left or OK button to redisplay the Setup menu screen ...

Page 96: ... multi selector to select Yes or No and then press the OK or right button If Yes is selected the P 400R settings are initialized to the factory settings The Setup menu screen appears again The settings that will be initialized The following settings will be initialized Settings that can be specified from the shooting menu Settings that can be specified from the playback menu Settings that can be s...

Page 97: ...After transfer is completed turn off the P 400R and disconnect it from the PC Make sure that you turn off the P 400R before disconnecting the USB cable Notes on connecting the USB cable When connecting the USB cable make sure that you plug the connectors at both ends of the cable correctly without putting excessive pressure on the connectors Do not use a USB hub when connecting the P 400R to the P...

Page 98: ...Editor see the ShuttlePix Editor documentation Windows 7 32 bit edition Windows XP Service Pack 3 32 bit edition Note The operating environment might change without prior notice For more information see the ShuttlePix Editor documentation About using ShuttlePix Editor Using ShuttlePix Editor you can import images from a ShuttlePix series digital microscope and then view simply measure and edit the...

Page 99: ...ce is degraded temporarily because the temperature is low Connect an optional AC adapter 16 The power does not come on The AC adapter is not connected correctly Connect the AC adapter cable and power cord correctly 16 Use a battery charger to charge the battery 6 The battery charge level is low Connect an optional AC adapter 16 The power is turned off Auto power save function works If no button is...

Page 100: ... the P 400R is mounted on the motorized focusing stand the LCD monitor of the P 400R is turned off See the ShuttlePix Digital Microscope Instructions P RELS Release is connected to the P 400R Turn off the video output signal when the P RELS Release is connected or disconnect it 42 76 No image is displayed in the LCD monitor No SD card is inserted Insert an SD card 11 The cable is not connected cor...

Page 101: ...pecific operations can be accepted After checking the message use the multi selector and the OK button to operate the LCD panel 88 Operation with the LCD panel is not possible Interval shooting is being performed During interval shooting requests for operations other than those permitted cannot be accepted 42 63 The best shot selector does not function correctly TIFF is set for the image quality m...

Page 102: ...e contrast sharpness and other settings 58 The image is too dark or too bright The brightness of the LCD monitor is not proper Adjust the brightness properly 75 Adjust brightness of the illumination properly 28 The illumination is too bright or too dark Adjust the exposure 36 The image quality is not adjusted properly Properly specify the chroma hue contrast sharpness and other settings 58 The con...

Page 103: ...on folder are incorrect In this product save and playback folders can be set separately Make sure that the desired folders have been set correctly 51 72 9 6 System Operation Symptom Possible cause Action Ref Date or time is incorrect No battery has been inserted for two days or more When you use this product after it has not been used for a long time set the date and time again The internal clock ...

Page 104: ...d Use a supporting SD card 11 SD card is not formatted Format SD card There is no DCIM folder on the SD card or no xxxNIKON xxx represents a 3 digit number in the DCIM folder Initialize the SD card or replace it with another SD card 12 13 No more images can be saved The number of the files in the SD card has reached 9999 The maximum number of the files that can be stored in the SD card is 9999 Del...

Page 105: ...fast an appropriate exposure cannot be obtained Adjust the illumination or set the shutter speed to slow 28 37 Image cannot be saved An error occurred during image recording and the image could not be stored Access to the SD card is possible but image recording has failed Replace the SD card to another one or initialize the SD card and try again 12 77 White Balance failed White balance could not b...

Page 106: ...bute of the image in the PC before deleting the image 46 Protected images cannot be deleted The image specified as an exception of the deletion or the image in a protected folder is included The image which has been set as Read only in a PC cannot be deleted Change the attribute of the image in the PC before deleting the image 69 Play back folder cannot be deleted An attempt was made to delete the...

Page 107: ...er this message the power is automatically turned off If this message appears during the normal use a failure is concerned Ask your nearest Nikon representative for repair The battery voltage is higher than the normal voltage After this message the power is automatically turned off Replace the battery with a proper one If this message appears during the normal use a failure is concerned Ask your n...

Page 108: ...if the lens become dirty with fingerprints or grease stains slightly dampen a piece of soft clean cotton cloth lens tissue or gauze with absolute alcohol ethyl or methyl alcohol and gently wipe away the stains Since absolute alcohol is highly flammable be careful in handling it so that it does not ignite Observe the manufacturer s handling instructions when handling absolute alcohol 10 2 Cleaning ...

Page 109: ...nner to painted parts plastic parts and printed parts These substances may cause discoloration or peeling of the printed matters 10 4 Storage Store this product in a location with low humidity where mold is unlikely to form During storage place a plastic cover over the equipment to prevent dust accumulation 10 5 Periodic Inspections Charged Periodic inspections are recommended in order to maintain...

Page 110: ...18 0x 20 0x NA Up to 0 2 Aperture 2 levels Resolution priority mode DOF priority mode Imager Image sensor 1 1 8 in square pixel CCD Number of pixels Total number of pixels 1688 x 1248 about 2 11 M pixels Number of effective pixels 1620 x 1220 about 1 98 M pixels Number of recording pixels 1600 x 1200 1 92 M pixels or 800 x 600 0 48 M pixels Frame rate 28 fps Image capturing Continuous shooting mod...

Page 111: ... 1 20 sec 1 15 sec 1 10 sec 1 8 sec 1 6 sec 1 4 sec 1 3 sec 1 2 sec 1 1 5 sec 1 sec 21 levels Camera gain ISO sensitivity Program AE or Shutter priority AE mode 100 to 2250 in about 1 steps Manual mode 100 140 200 280 400 560 800 1130 1600 2250 10 levels White balance Manual setting red blue gain can be adjusted Shading correction On Off can be switched Image playback Zoom 1x to 16x magnified area...

Page 112: ...or the stand Stand connecting terminal For connection with the P MFSC Motorized Focusing Stand Controller or the P CUS USB Cable only either of these Video signal output release switch connecting terminal For connection with the P CV Video Cable or the P RELS Release Video signal output component video signal 75 ohm NTSC PAL DC power input terminal For connection with the AC adapter Input rating 1...

Page 113: ...nstalled and used in accordance with the instruction manual may cause harmful interference to radio communications Operation of this equipment in a residential area is likely to cause harmful interference in which case the user will be required to correct the interference at his own expense This product complies with Canadian EMI regulations ICES 003 Class A This Class A digital apparatus complies...

Page 114: ...Use only a detachable cord set with a PSE mark 3 conductor type 3 conductor grounding Type VCTF 3x0 75mm2 3m long maximum rated at 125 VAC minimum External dimensions width x depth x height 60 x 35 x 120 mm Mass 253 g excluding the power cord Usage environment Temperature 0 to 40 C Humidity 90 RH Max no condensation Storage environment Temperature 20 to 85 C Humidity 90 RH Max no condensation Safe...

Page 115: ...acturers to be used mutually Exif Exchangeable image file format Version 2 2 The goal of this standard is to enhance the linkage between digital cameras and printers to easily obtain high quality print output By using a printer complying with this standard you can get the optimum printout because the information about the image when it is captured can be used For details refer to the instruction m...

Reviews: