.
NETWORK
.
VI Basic Operations
4 Using the DS-L1 via a Network
- 88 -
Internal Server
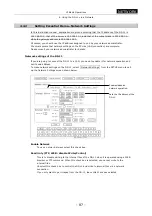
Set the IP address, subnet mask, user ID, and password of the DS-L1.
Refer to “Settings for improved security” described below for details on how to set a
password.
•
When automatically acquiring an IP address
D.H.C.P * ( Auto get an IP )
IP Address
Automatically set after restarting
Subnet Mask Automatically set after restarting
NOTE: The DS-L1 takes some time after it restarts before the addresses are
displayed.
•
When setting a fixed IP address
D.H.C.P ( Auto get an IP )
IP Address
192 168 010 002
←
Input example
Subnet Mask
255 255 000 000
←
Input example
If any entry in the IP address consists of two digits or one digit, add “0” or “00” at
the beginning so that entry will consist of three digits.
Click the input box and enter an address value. If you missed entering any address value,
hold down Skip on the screen keyboard while you skip to the last entry of the address,
then reenter the correct value.
Once you have finished with all the settings, press SAVE and then restart the DS-L1.
To revert to the initially set value, press Default and then SAVE and restart the DS-L1.
Settings for improved security
To improve security, make the following settings on the Network Settings screen.
Be aware that the transferred images and information are not encrypted.
Limiting logins by User ID and Password settings
In the Internal Server, set a user ID and a password.
User ID
Input (up to 10 characters)
Pass Word
Input (up to 10 characters)
Once you set a user ID, you will be asked to provide authentication when connecting to
the DS-L1 from a browser. You cannot log in unless you supply your user ID and
password.
If the user ID is defaulted to “anonymous,” anybody can access your DS-L1 via a network.
NOTE: Note that if you save a password as the default word “none” without
changing it, the word “none” will become your password.


