VI Basic Operations
SETUP
Preparations Before Photographing
- 39 -
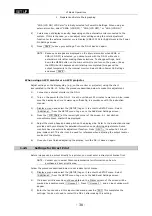
NOTE: If the message “NG!! Code Error!!” is displayed when you enter the license
code, check to see that the license code you've entered is correct before
retrying.
The printers to perform the direct printing can be selected from either Mitsubishi CP900D or
anyone which supports PictBridge Standard (*).
Mitsubishi CP900D selection mode
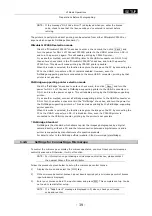
Click the “Mitsubishi CP900D” check box to enter a check mark, then click Save , and
turn the power for DS-L1 off. Connect CP900D printer to the USB-H connector on DS-L1
and turn the power on again. This will enable printing by CP900D printer.
Or, as another method, connect CP900D printer to the USB-H connector on DS-L1 first,
then enter a check mark in the “Mitsubishi CP900D” check box, and turn the power for
CP900D on. This also will make printing by CP900D printer possible.
When this mode is selected, the function to capture the image on the PC by connecting the
PC to the USB-D connector on DS-L1 remains enabled. However, even if a
PictBridge-supporting printer is connected to the same USB-D connector, printing by that
printer is not possible.
PictBridge-supporting printer selection mode
Click the “PictBridge” check box to enter a check mark, then click Save , and turn the
power for DS-L1 off. Connect a PictBridge-supporting printer to the USB-D connector on
DS-L1 and turn the power on again. This will enable printing by the PictBridge-supporting
printer.
Or, as another method, connect a PictBridge-supporting printer to the USB-D connector on
DS-L1 first, then enter a check mark in the “PictBridge” check box, and turn the power for
the PictBridge-supporting printer on. This also makes printing by the PictBridge-supporting
printer possible.
When this mode is selected, the function to capture the image on the PC by connecting the
PC to the USB-D connector on DS-L1 is disabled. Also, even if a CP900D printer is
connected to the USB-H connector, printing by the printer is not possible.
* PictBridge Standard
PictBridge is the standard which allows to print the images photographed by a digital
camera directly, without a PC, and the interconnection between a digital camera and a
printer is supported by manufacturers of respective products.
For details, refer to the PictBridge official website: http://www.cipa.jp/pictbridge/
1.4.6
Settings for Connecting a Microscope
To control the microscope or display the microscope status, you must input your microscope
control license code. Otherwise, it will not function.
NOTE: For information on purchasing a microscope control license, please contact
the nearest Nikon office or distributor.
Follow the procedure given below to set up the microscope control license.
1)
Display the menu and select the [MIC] tag.
2)
If the microscope control license has not been acquired yet, a microscope control license
input window is displayed.
3)
Enter your license code in the input window and press Ent . This completes setup. You do
not need to restart after setup.
NOTE: If a "Code Error!!" message is displayed in 3) above, check your license
code and reenter.

