background image

117

Viewing Multiple Pictures: Thumbnail Playback

Mor

e

 on 

Pla
y

b

a

ck

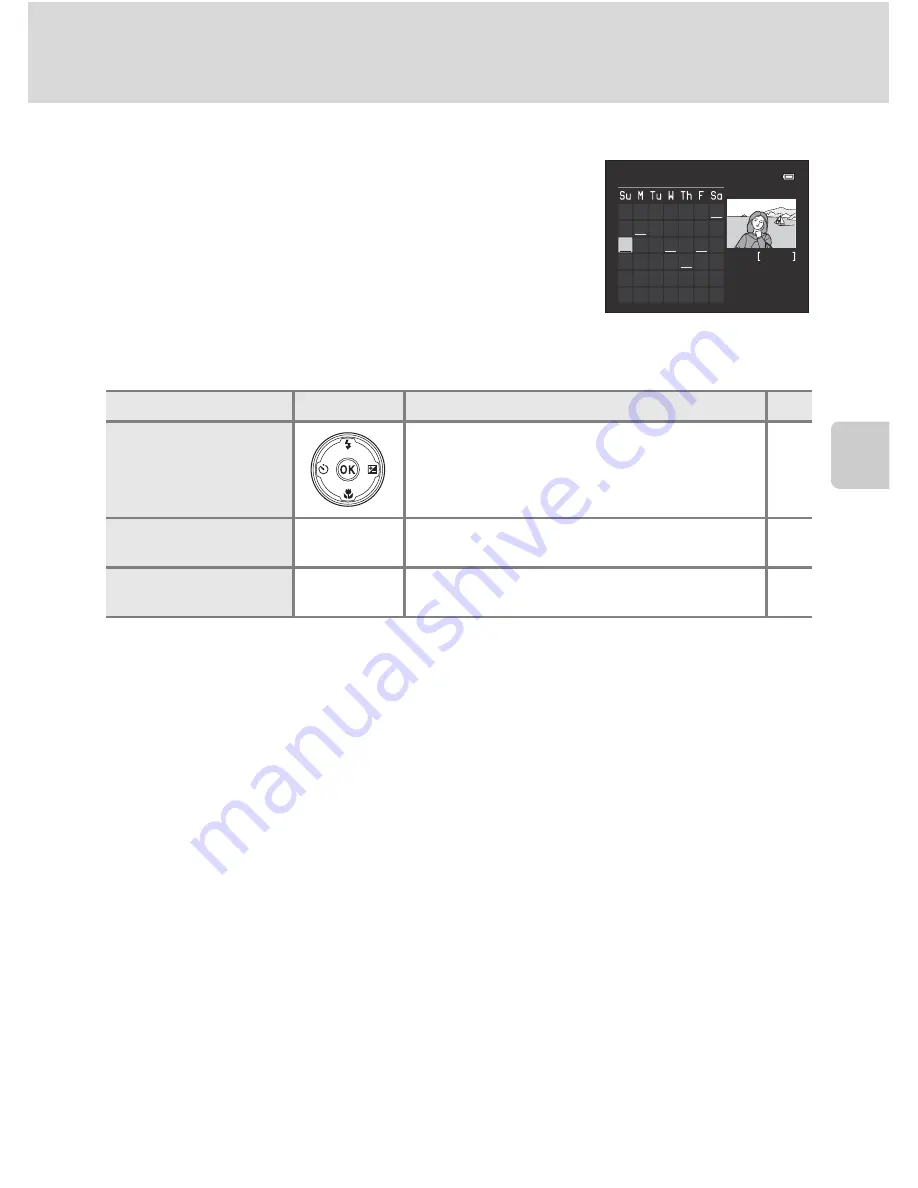
Calendar Display

Rotate the zoom control toward 

f

 (

h

) during 

playback mode when 72 thumbnails are displayed 
(

A

115) to change to calendar display (except for list by 

date mode).
Move the cursor and choose pictures by selecting a 
date. Dates for which pictures exist are underlined in 
yellow.

The following operations can be performed in calendar display mode.

B

Notes on Calendar display

Pictures taken without the date set are treated as pictures taken on “January 1, 2011.”

d

 and 

l

 buttons are disabled while the Calendar is displayed.

D

List by Date Mode

Only the pictures taken on the same date can be played back in list by date mode (

A

132). The list 

by date options (

A

133) are also available only for the pictures taken on the selected dates.

To

Use

Description

A

Select date

Press the multi selector 

H

I

J

 or 

K

. A date 

can also be selected by rotating the command 
dial.

11, 
12

Return to full-frame 
playback

k

Change to full-frame playback for displaying 
the first picture for that date.

34, 
111

Return to picture list 
display

g

 (

i

)

Rotate the zoom control toward 

g

 (

i

).

-

3

20

11   

05

7

8 9

1

0

11 1

2

1

3

1

4

1

5

1

6

1

7

1

8

1

9 20 2

1

22 23 24 25 26 27 28


29 30

2

1

3 4 5 6

3

1

Summary of Contents for CoolPix P500

Page 1: ......

Page 2: ......

Page 3: ......

Page 4: ......

Page 5: ......

Page 6: ......

Page 7: ......

Page 8: ......

Page 9: ......

Page 10: ......

Page 11: ......

Page 12: ......

Page 13: ......

Page 14: ......

Page 15: ......

Page 16: ......

Page 17: ......

Page 18: ......

Page 19: ......

Page 20: ......

Page 21: ......

Page 22: ......

Page 23: ......

Page 24: ......

Page 25: ......

Page 26: ......

Page 27: ......

Page 28: ......

Page 29: ...En User s Manual DIGITAL CAMERA ...

Page 30: ... registered trademarks of HDMI Licensing LLC All other trade names mentioned in this manual or the other documentation provided with your Nikon product are trademarks or registered trademarks of their respective holders AVC Patent Portfolio License This product is licensed under the AVC Patent Portfolio License for the personal and non commercial use of a consumer to i encode video in compliance w...

Page 31: ... Photography and Playback A Auto Mode More on Shooting More on Playback Editing Pictures Movie Recording and Playback Connecting to Televisions Computers and Printers Basic Camera Setup Caring for the Camera Technical Notes and Index ...

Page 32: ...rs should be performed only by qualified technicians Should the camera or Charging AC Adapter break open as the result of a fall or other accident take the product to a Nikon authorized service representative for inspection after unplugging the product and or removing the battery Do not use the camera or Charging AC Adapter in the presence of flammable gas Do not use electronic equipment in the pr...

Page 33: ...ould you notice any change in the battery such as discoloration or deformation If liquid from the damaged battery comes in contact with clothing or skin rinse immediately with plenty of water Observe thefollowingprecautions when handling the Charging AC Adapter Keep dry Failure to observe this precaution could result in fire or electric shock Dust on or near the metal parts of the plug should be r...

Page 34: ...irment Particular care should be observed if photographing infants when the flash should be no less than 1 m 3 ft 4 in from the subject Do not operate the flash with the flash window touching a person or object Failure to observe this precaution could result in burns or fire Avoid contact with liquid crystal Should the monitor break care should be taken to avoid injury caused by broken glass and t...

Page 35: ... may cause harmful interference to radio communications However there is no guarantee that interference will not occur in a particular installation If this equipment does cause harmful interference to radio or television reception which can be determined by turning the equipment off and on the user is encouraged to try to correct the interference by one or more of the following measures Reorient o...

Page 36: ...RRECT TYPE DISPOSE OF USED BATTERIES ACCORDING TO THE INSTRUCTIONS This symbol indicates that this product is to be collected separately The following apply only to users in European countries This product is designated for separate collection at an appropriate collection point Do not dispose of as household waste For more information contact the retailer or the local authorities in charge of wast...

Page 37: ... 7 Monitor 8 Basic Operations 11 Command Dial 11 Multi Selector 12 d Menu Button 13 Switching Between Tabs in the Menu Screen 13 Using Camera Menus 14 Pressing the Shutter Release Button Halfway All the Way 15 x Monitor Button 16 s Display Button 17 First Steps 18 Inserting the Battery 18 Removing the Battery 19 Charging the Battery 20 Turning On and Off the Camera 23 Setting the Display Language ...

Page 38: ...enes for Shooting Mode Dial 44 Shooting Suited to Scenes Scene Mode 45 Shooting in the Scene Selected by the Camera Scene Auto Selector 46 Selecting a Scene Mode to Take Pictures Features 48 Taking Pictures with Easy Panorama 60 Viewing Pictures Recorded with Easy Panorama 62 Taking Pictures with Panorama Assist 63 Taking Pictures of Smiling Faces Smart Portrait Mode 65 Smart Portrait Menu 67 Sett...

Page 39: ...oom 118 Playing Back Images by Category 120 Sorting Favorite Images Favorite Pictures Mode 122 Adding Images to an Album 122 Viewing Images in an Album 124 Removing Images From an Album 125 Using Favorite Pictures Mode 126 Changing the Album Icons 127 Finding Images in Auto Sort Mode 129 Viewing Images in Auto Sort Mode 129 Operations in Auto Sort Mode 131 Viewing Images by Date List by Date 132 V...

Page 40: ...otion HS Movie 160 Capturing Still Pictures While Recording Movies 162 Using the Movie Menu 163 Movie Options 164 HS Movie Options 165 Open with HS Footage 165 Autofocus Mode 166 Electronic VR 167 Wind Noise Reduction 167 Movie Playback 168 Editing Movies 169 Saving a Frame from a Movie as a Still Picture 170 Deleting Unnecessary Movies 170 Connecting to Televisions Computers and Printers 171 Conn...

Page 41: ...on Detection 195 AF Assist 196 Red eye Reduction 196 Digital Zoom 197 Assign Side Zoom Control 198 Sound Settings 199 Auto Off 199 Format Memory Format Card 200 Language 201 TV Settings 201 Charge by Computer 202 Reset File Numbering 202 Blink Warning 203 Reset All 205 Firmware Version 208 Caring for the Camera 209 Caring for the Camera 209 Cleaning 211 Storage 212 ...

Page 42: ... of Contents Technical Notes and Index 213 Optional Accessories 213 Approved Memory Cards 214 File and Folder Names 215 Error Messages 217 Troubleshooting 222 Specifications 229 Supported Standards 233 Index 234 ...

Page 43: ...om monitor and viewfinder display samples so that monitor indicators can be more clearly shown Illustrations and Screen Display Illustrations and text displays shown in this manual may differ from actual display C Internal Memory and Memory Cards Pictures taken with this camera can be stored in the camera s internal memory or on removable memory cards If a memory card is inserted all new pictures ...

Page 44: ...CAMERA AND MAY VOID YOUR NIKON WARRANTY The use of third party rechargeable Li ion batteries not bearing the Nikon holographic seal could interfere with normal operation of the camera or result in the batteries overheating igniting rupturing or leaking For more information about Nikon brand accessories contact a local authorized Nikon dealer Before Taking Important Pictures Before taking pictures ...

Page 45: ...not copy or reproduce passports issued by the government licenses issued by public agencies and private groups ID cards and tickets such as passes and meal coupons Comply with copyright notices The copying or reproduction of copyrighted creative works such as books music paintings woodcut prints maps drawings movies and photographs is governed by national and international copyright laws Do not us...

Page 46: ...hooting mode button 59 77 4 Mode dial 44 5 Microphone stereo 142 157 6 Flash 36 7 m flash pop up button 7 36 8 Power connector cover for connection with an optional AC Adapter 213 9 Shutter release button 15 32 10 Zoom control 31 f Wide 31 g Tele 31 h Thumbnail playback 115 i Playback zoom 118 j Help 45 11 Self timer lamp 39 AF assist illuminator 196 12 Lens 211 229 ...

Page 47: ...ie record button 157 8 Movie mode switch 157 9 Command dial 11 10 USB Audio video connector 171 174 180 11 HDMI Mini Connector 171 12 Connector cover 171 174 180 13 Monitor 8 17 29 14 c playback button 34 15 Multi selector 12 16 k apply selection button 12 17 d button 13 45 82 135 163 186 18 l delete button 35 143 170 19 Tripod socket 20 Battery chamber memory card slot cover 18 26 21 Cover latch ...

Page 48: ... 82 or raised upward to 90 This is convenient when taking pictures with the camera held at high or low positions B Notes on Monitor Do not apply excessive force when changing the angle of the monitor The monitor cannot be moved horizontally Put the monitor back in the original position when using in normal situations ...

Page 49: ...lash lower it by gently pushing it down until it clicks Attaching the Camera Strap and Lens Cap Attach the lens cap to the strap and then attach the strap to the camera at two places B Lens Cap Remove the lens cap before you shoot a picture At times when you are not shooting pictures such as when the power is off or while you are carrying the camera attach the lens cap to the camera to protect the...

Page 50: ...nt camera settings See page 17 for how to switch the monitor display Shooting 1 250 1 250 999 999 999 F5 6 F5 6 F5 6 1 250 1m00s 1m00s 1m00s 34 25 31 30 29 28 32 33 35 37 38 39 26 27 3 4 5 6 1 8 7 999 999 9999 9999 9999 b a 24 18 17 16 19 14 23 22 20 21 9 12 13 10 11 15 45 46 47 44 48 43 42 41 40 36 2 50 49 1342 1342 1342 1 250 1 250 1 250 F5 6 F5 6 F5 6 ...

Page 51: ...21 HS movie type 165 22 Image quality 83 23 Image size 84 24 Easy panorama 60 25 a Number of exposures remaining still pictures 28 b Movie length 157 26 Internal memory indicator 29 27 Aperture value 70 28 Focus area for manual center 32 95 29 Focus area for auto 95 30 Focus area for face detection pet detection 59 65 95 31 Focus area for subject tracking 99 32 Shutter speed 70 33 Hand held tripod...

Page 52: ...f recording 24 3 Protect icon 139 4 Sequence display 113 145 5 Volume indicator 142 168 6 Album icon in favorite pictures mode1 124 Category icon in auto sort mode1 129 7 Battery level indicator 28 8 Movie options2 164 9 Image quality2 83 10 Image size2 84 11 Easy panorama indicator 62 12 a Current frame number total number of frames 34 b Movie length 168 13 Internal memory indicator 34 14 Easy pa...

Page 53: ...set to k Adjust shutter speed 72 Mode dial set to l Adjust aperture value 73 Mode dial set to m Adjust shutter speed or aperture value Press the multi selector K to switch between settings 74 Mode Description A Full frame playback or thumbnail playback Choose a picture 34 111 115 Calendar display Choose a date 117 Playback zoom Change the zoom ratio 118 Movie playback Advanced or rewound 168 Durin...

Page 54: ...s mode A40 menu choose the option below Display n Self timer A39 menu Flash mode Display o exposure compensation A43 guide Choose the previous picture 4 4 132 132 0004 JPG 0004 JPG 0004 JPG 15 30 15 30 15 30 15 05 2011 15 05 2011 15 05 2011 Choose the next picture Shooting menu ISO sensitivity Image quality Image size Optimize image White balance Metering Exposure bracketing Choose the option abov...

Page 55: ... quality Image size Optimize image White balance Metering Exposure bracketing G is displayed when there are previous menu options Displayed when the menu contains two or more pages Tab for the menus available in the current shooting mode tab for playback mode menu Tab for movie menu during shooting mode playback menu during playback mode Tab for displaying the setup menu Displayed when there are f...

Page 56: ...ss H or I to choose an item and press the k button The setting is applied 4 When setting is finished press the d button The camera exits the menu display Shooting menu ISO sensitivity Image quality Image size Optimize image White balance Metering Exposure bracketing Shooting menu AF area mode Autofocus mode Flash exp comp Long exposure NR Active D Lighting Save user settings Reset user settings Mu...

Page 57: ...cus and exposure shutter speed and aperture value are set Focus and exposure remain locked while the shutter release button is pressed halfway While the shutter release button is held in this position release the shutter and take a picture by pressing the shutter release button the rest of the way down Do not use force when pressing the shutter release button as this may result in camera shake and...

Page 58: ...justment of Viewfinder When the diopter for the viewfinder is out of focus and the display is difficult to see adjust the diopter with the diopter adjustment control While looking into the viewfinder rotate the diopter adjustment control until the display is clearly visible Take care not to scratch your eye with your fingertips or nails 1 250 1 250 1 250 F5 6 F5 6 F5 6 1342 1342 1342 1 250 1 250 1...

Page 59: ...r speed aperture value exposure compensation ISO sensitivity and the current file number total number of exposures j is displayed when the shooting mode A y j e o F or j is chosen For Shooting Display information Display the picture and the shooting information Movie frame Display the range of a movie in a frame Information hidden Display the picture only For Playback Display photo information Dis...

Page 60: ... 2 Insert the battery Use the battery to push the orange battery latch down in the direction shown 1 and fully insert the battery 2 When the battery is fully inserted the battery latch locks it in place B Inserting the Battery Correctly Inserting the battery upside down or backwards could damage the camera Be sure to confirm that the battery is in the correct orientation 3 Close the battery chambe...

Page 61: ...attery while being careful not to remove the battery at an angle 2 The camera battery or memory card may be hot immediately after using the camera Observe caution when removing the battery or memory card B Notes on Battery Be sure to read and follow the warnings of For Your Safety Aii thoroughly before using the battery Be sure to read and follow the warnings for The Battery A210 thoroughly before...

Page 62: ...rmly until it is securely held in place Once the two are connected attempting to forcibly remove the plug adapter could damage the product The shape of the plug adapter varies according to the country or region in which the camera was purchased The Charging AC Adapter comes with the plug adapter attached in Argentina and Korea 2 Insert the battery into the camera A18 Do not turn the camera on 3 Us...

Page 63: ...r from the electrical outlet and then disconnect the USB cable Power on lamp Description Blinks slowly orange Battery charging Off Battery not charging When charging is complete the power on lamp stops blinking orange and turns off Flickers orange The ambient temperature is not suited to charging Charge the battery indoors with an ambient temperature of 5 C to 35 C 41 F to 95 F The USB cable or Ch...

Page 64: ...h the Charging AC Adapter the camera cannot be turned on Do not under any circumstances use another make or model of USB AC adapter other than Charging AC Adapter EH 69P Failure to observe this precaution could result in overheating or in damage to the camera C AC Power Source If the AC Adapter EH 62A available separately A213 is used power is supplied to the camera from an electrical outlet enabl...

Page 65: ...camera on is displayed confirm that the lens cap is removed and press the power switch to turn the camera on again C Standby Mode Auto Off If no operations are performed the monitor is turned off automatically the camera enters standby mode and the power on lamp blinks The camera turns off when the standby mode continues for about three minutes When the power on lamp blinks turn on the monitor aga...

Page 66: ...o choose Yes and press the k button To cancel setting the time zone and date select No 4 Press J or K to select your home time zone Time zone A190 and press the k button D Daylight Saving Time To set the date and time in a time zone where daylight saving is in effect turn on the daylight saving setting with H in the time zone selection screen shown in step 4 When turned on the W icon is displayed ...

Page 67: ...dial A11 Finish setting Choose minute check that the lens cap has been removed and then press the k button or K After finishing the setting the lens extends slightly and the shooting screen is displayed D Imprinting the Date and Changing the Date and Time To imprint the date on pictures when shooting first set the date and time and then set Print date A192 in the setup menu A185 To change the date...

Page 68: ... camera before opening the cover 2 Insert the memory card Slide the memory card until it clicks into place B Inserting the Memory Card Correctly Inserting the memory card upside down or backwards could damage the camera or the memory card Be sure to confirm that the memory card is in the correct orientation 3 Close the battery chamber memory card slot cover Removing the Memory Card Before opening ...

Page 69: ...nnot be written to or deleted from the memory card If you want to record data delete data or format the memory card and the switch is in the Lock position slide the switch to its original position to unlock it B Memory Cards Use only Secure Digital memory cards Do not perform the following operations during formatting while data is being written to or deleted from the memory card or during data tr...

Page 70: ... Rotate the mode dial to A 3 Check the battery level and number of exposures remaining Battery Level Number of Exposures Remaining The number of exposures remaining is displayed The number of pictures that can be stored depends on the remaining capacity of the internal memory or memory card the image quality and the image size A85 Display Description b Battery level high B Battery level low Prepar...

Page 71: ...osure compensation A43 can be applied Press the d button to specify settings for the shooting menu options Image quality A83 and Image size A84 D Vibration Reduction See Vibration reduction A193 in the setup menu A185 for more information Set Vibration reduction to Off when using a tripod to stabilize the camera during shooting 1 250 1 250 F5 6 F5 6 32 32 Internal memory indicator Pictures are rec...

Page 72: ...er of the monitor Using the Viewfinder Use the viewfinder to frame pictures when bright light makes it difficult to see the display on the monitor Press the x button to switch to the viewfinder A16 When the diopter for the viewfinder is out of focus rotate the diopter adjustment control to a position where the display is clearly visible A16 Take care not to scratch your eye with your fingertips or...

Page 73: ... about 4 beyond the maximum magnification of the optical zoom The camera focuses at the center of the frame and the focus area is not displayed when digital zoom is in effect C Digital Zoom and Interpolation Unlike the optical zoom the digital zoom uses a digital imaging process known as interpolation to magnify images resulting in slight deterioration of picture quality depending on the image siz...

Page 74: ... focuses on the subject at the center of the screen and the focus area is not displayed When the subject is in focus the focus indicator A8 lights in green When the shutter release button is pressed halfway and the focus area or the focus indicator blinks red the camera is unable to focus Change the composition and press the shutter release button halfway again 2 Press the shutter release button t...

Page 75: ...ldings with multiple rows of similarly shaped windows Subject is moving rapidly In the situations noted above try pressing the shutter release button halfway to refocus several times or focus on another subject and use focus lock When using focus lock be sure that the distance between the camera and the subject with which focus was locked is the same as that for the actual subject The camera can a...

Page 76: ...Options Available in Playback Mode For details see More on Playback A111 or Editing Pictures A146 C Pressing the c Button to Turn on the Camera When the camera is off holding down the c button turns on the camera in playback mode The lens does not extend C Viewing Pictures Press the x button to switch between using the monitor and viewfinder display A16 Press the s button to switch between showing...

Page 77: ... Images Screen 1 Press the multi selector J or K to choose an image to be deleted and press H to add y to the image To undo the selection press I to remove y Rotate the zoom control A4 toward g i to switch back to full frame playback or f h to display thumbnails 2 Add y to all desired images and then press the k button to confirm the selection A confirmation dialog is displayed Follow the instruct...

Page 78: ...is On A68 j k l m M U Auto This feature cannot be used simultaneously with certain features See Functions that Cannot be Applied Simultaneously A104 for more information In the following situations the setting for flash mode is stored in the camera s memory even after the camera is turned off When shooting mode j k l or m is used When shooting with V Auto with red eye reduction in A auto mode U Au...

Page 79: ... Press the multi selector H or I to choose the desired mode and press the k button The mode selected for the flash is displayed When U Auto is applied D is only displayed for a few seconds even if monitor indicators A17 are turned on If a setting is not applied by pressing the k button within a few seconds the selection will be canceled B Lowering the Flash When not using the flash lower it by gen...

Page 80: ...ton is pressed halfway down On Flash fires when picture is shot Blinks Flash is charging Wait a few seconds and try again Off Flash does not fire when picture is shot C Red eye Reduction This camera uses advanced red eye reduction In Camera Red Eye Fix Pre flashes are fired repeatedly at low intensity before the main flash reducing the red eye effect Additionally if the camera detects red eye whil...

Page 81: ...e for preventing camera shake The mode selected for the self timer is displayed If the k button is not pressed within a few seconds the selection will be canceled 3 Frame the picture and press the shutter release button halfway The focus and exposure are set 4 Press the shutter release button the rest of the way down The self timer starts and the number of seconds remaining before the shutter is r...

Page 82: ...acro close up Use for close ups of flowers or small objects The closest shooting distance will vary according to the magnification of the zoom In the zoom position where the F icon and zoom indicator light in green wide angle position from the K icon the camera can focus on subjects as close as about 10 cm 4 in from the lens At the zoom position that is three increments from the maximum wide angle...

Page 83: ...he k button within a few seconds the selection will be cancelled C Macro Close up When using shooting mode j k l m or M if the shooting menu Autofocus mode A101 is set to Full time AF the camera will continually focus until you press the shutter release button halfway and the focus locks A sound will be heard while the camera focuses In other shooting modes Full time AF is turned on automatically ...

Page 84: ...e 3 Press the k button The set focus is locked You can continue shooting with the locked focus To readjust the focus press the k button again to display the screen in step 2 To changebacktoautofocus return to step1andchoose any setting other than E C E Manual Focus In step 2 the figure displayed with the gauge at the right of the monitor indicates an approximate distance m at which the subject can...

Page 85: ...ator on the monitor 4 Press the shutter release button to take a picture To cancel the exposure compensation setting return to step 1 and change the value to 0 0 C Exposure Compensation Value The exposure compensation value applied in j k or l mode is saved in the camera s memory even after the camera is turned off When the shooting mode is m manual mode A74 or the scene mode is Fireworks show A57...

Page 86: ...e saved settings can be immediately retrieved for shooting simply by rotating the mode dial to M Scene mode A45 Shoot with settings suitable for the scene by choosing one of the scene modes y Scene Choose the desired scene from 15 different scene types and the camera s settings are automatically optimized for the selected scene In Scene auto selector mode the camera automatically selects the optim...

Page 87: ...the scene menu and choose one of the following shooting scenes x Scene auto selector default setting A46 i Dusk dawn A54 b Portrait A51 k Close up A55 c Landscape A51 u Food A56 d Sports A52 l Museum A57 f Party indoor A52 m Fireworks show A57 Z Beach A53 n Black and white copy A57 z Snow A53 p Panorama A58 h Sunset A53 O Pet portrait A59 Snow Scene menu Scene auto selector Portrait Landscape Spor...

Page 88: ... not raised the message The flash is lowered is displayed Press the m flash pop up button to raise the flash 3 Frame the subject and take the picture The shooting mode icon changes Press the shutter release button halfway toset thefocus and exposure When the subject is in focus the focus area active focus area lights in green Press the shutter release button the rest of the way down to take the pi...

Page 89: ...pe when using Scene auto selector pictures are shot continuously and the camera combines these pictures to save a single picture If the camera switches to h Night portrait when using Scene auto selector flash mode is fixed at slow sync with red eye reduction for shooting human subjects the camera does not shoot continuously In dark surroundings the use of a tripod is recommended Set Vibration redu...

Page 90: ...y to shoot a series of pictures which will be combined into a single image and saved Once the shutter release button is pressed all the way hold the camera steady without moving it until a still picture is displayed After taking a picture do not turn the camera off before the monitor switches to the shooting screen The angle of view image area seen in the saved image will be narrower than that see...

Page 91: ...e area seen in the saved image will be narrower than that seen on the monitor at the time of shooting If the subject moves while the camera is shooting continuously the image may be distorted overlapped or blurred Tripod default setting Select this mode when the camera is stabilized such as with a tripod The Z icon is displayed on the shooting screen Vibration reduction A193 is automatically set t...

Page 92: ...d very dark areas in the frame the o icon lights in green The digital zoom is not available When the shutter release button is pressed all the way the camera shoots pictures continuously with a high shutter speed and saves the following two images An image processed by D Lighting A149 at the time of shooting HDR composite image the effects of over exposure and under exposure are reduced The second...

Page 93: ...e makes the subject s skin appear smoother up to three people the camera records the image A66 If no faces are detected the camera focuses on the subject at the center of the frame The digital zoom is not available X V n Off p A o 0 0 y M c Landscape Use this mode for vivid landscapes and cityscapes The camera focuses at infinity When the shutter release button is pressed halfway the focus area or...

Page 94: ...up to five pictures are shot at a rate of about eight frames per second fps when Image quality is set to Normal and Image size is set to F 4000 3000 Focus exposure and white balance are fixed at values determined with the first shot in each series The frame rate with continuous shooting may vary depending upon the current image quality setting image size setting and the memory card used AF assist ...

Page 95: ...ter of the frame X U n Off p A o 0 0 y M z Snow Captures the brightness of such subjects as sunlit snowfields The camera focuses on the subject at the center of the frame X U n Off p A o 0 0 y M h Sunset O Preserves the deep hues seen in sunsets and sunrises The camera focuses on the subject at the center of the frame X W n Off p A o 0 0 O Use of a tripod is recommended in scenes with which O is i...

Page 96: ...ay the focus area or focus indicator A8 always lights in green However because the camera focuses at infinity it may not be able to focus on nearby objects AF assist illuminator A196 does not light X W n Off p B o 0 0 O Use of a tripod is recommended in scenes with which O is indicated Set Vibration reduction A193 to Off when using a tripod to stabilize the camera Q Noise reduction is performed fo...

Page 97: ...ion from the K icon the camera can focuson subjects ascloseas about 10 cm 4 in from the lens At the zoom position that is three increments from the maximum wide angle position to the telephoto position the camera can focus on subjects as close as about 1 cm 0 4 in from the lens AF area mode is set to Manual to enable the focus area to be chosen A95 Press the k button and then press the multi selec...

Page 98: ...subjects as close as about 1 cm 0 4 in from the lens You can adjust hue within a slider display at the left of the monitor Press the multi selector H to increase the red hue and I to increase the blue hue The hue adjustments are stored in the camera s memory even after the camera is turned off AF area mode is set to Manual to enable the focus area to be chosen A95 Press the k button and then press...

Page 99: ... y M m Fireworks show O Slow shutter speeds are used to capture the expanding burst of light from fireworks The camera focuses at infinity When the shutter release button is pressed halfway the focus indicator A8 always lights in green However because the camera focuses at infinity it may not be able to focus on nearby objects AF assist illuminator A196 does not light X W n Off p B o 0 0 y M n Bla...

Page 100: ... more information see your printer s manual or contact a digital photo lab y M p Panorama Use this mode for shooting panorama pictures Select Easy panorama or Panorama assist on the screen that is displayed when p Panorama scene mode is selected Easy panorama default setting Shoots panorama pictures that can be played back on the camera by moving the camera in the direction you want to create a pa...

Page 101: ...cuses on the detected face Frame rate up to about 1 8 fps when the image quality is Normal and the image size is F 4000 3000 When pet portrait auto release is not used the camera shoots about 24 pictures at a rate of up to about 1 8 frames per second while the shutter release button is pressed all the way when the image quality is Normal and the image size is F 4000 3000 When Continuous is selecte...

Page 102: ...on The image size W H when the camera is held in landscape orientation is as follows W Normal 180 3200 560 when the camera is moved horizontally 1024 3200 when the camera is moved vertically X Wide 360 6400 560 when the camera is moved horizontally 1024 6400 when the camera is moved vertically For the image size when the camera is held in tall orientation the combinations of the moving direction a...

Page 103: ...ton all the way and release it The I icon showing the current panorama direction is displayed 7 Move the camera straight and slowly in one of the four directions to start shooting When the camera detects the panorama direction the shooting starts The guide showing the current shooting point is displayed When the guide showing the shooting point reaches the end the shooting ends Example of moving t...

Page 104: ...matically The picture is scrolled in the direction of the panorama shooting Press the multi selector to fast forward or rewind Playback controls are displayed at the top of the monitor during playback When you choose a playback control with the multi selector J or K and press the k button the following operations can be performed The pictures can also be scrolled by rotating the command dial B Not...

Page 105: ...icon is displayed to show the direction in which pictures are joined 4 Use the multi selector to choose the direction and press the k button Select the direction in which pictures are joined in the completed panorama right I left J up K or down L The yellowicon II moves to the direction pressed so press the k button to choose the direction A white icon I is displayed in the chosen direction Apply ...

Page 106: ...ted nor can zoom Image quality A83 or Image size A84 be adjusted after shooting the first picture The panorama series is terminated if the auto off function A199 triggers the standby mode during shooting To prevent this setting a longer time for the auto off function is recommended D R exposure lock Indicator When using panorama assist mode all pictures in the panorama have the same exposure white...

Page 107: ...d the face closest to the center of the frame is framed by a double border and the others by single borders When more than one face is detected press the k button to choose on which face to focus Press J or K on the multi selector to choose the face on which to focus and press the k button 3 The shutter is automatically released If the camera detects that the face framed by the double border is sm...

Page 108: ...o On the auto off function A199 will turn the camera off in the following situations if no operations are performed The camera is unable to detect any face The camera has detected one or more faces but is unable to detect a smiling face C When the Self timer Lamp Blinks When using the Smile timer the self timer lamp blinks when the camera detects a face and flickers immediately after the shutter i...

Page 109: ...etting or Low When Off is selected Skin softening is turned off When Skin softening is enabled the icon for the current setting is displayed on the monitor during shooting A8 When Off is selected an icon for the current setting is not displayed Additionally the effects of the current skin softening setting cannot be previewed on the monitor while shooting To confirm view the pictures after shootin...

Page 110: ... pressed all the way once the camera chooses one picture in which the subjects eyes are open and saves it The message on the right will be displayed for a few seconds when the camera records a picture in which someone may have been blinking When Blink proof is turned On Smile timer is turned Off Press the shutter release button to release the shutter When set to On the flash cannot be used The def...

Page 111: ...e A40 and exposure compensation A43 settings can be adjusted Press the d button to adjust the shooting menu A81 settings Mode Description Usage j Programmed auto A71 The camera sets the shutter speed and aperture value automatically for optimal exposure Flexible program which changes the combination of shutter speed and aperture value with the same exposure can be used A71 Recommended for most sit...

Page 112: ...d The following figures show how shutter speed and aperture value affect exposure When the ISO sensitivity setting A92 is changed the range of shutter speeds and aperture values at which the correct exposure can be obtained also changes Shutter Speed Aperture Value Fast shutter speed 1 1000 s Slow shutter speed 1 30 s Large aperture Small f number f 3 4 Small aperture Large f number f 8 1 250 1 25...

Page 113: ...lur background details or for fast shutter speeds to capture fast moving subjects Rotate the command dial to the left for small apertures large f numbers when you want to increase depth of field or for slow shutter speeds to emphasize the motion of a subject To cancel flexible program rotate the command dial until the flexible program mark A is no longer displayed Selecting another shooting mode o...

Page 114: ...s area lights in green maximum of nine areas A95 B Notes on k Shutter Priority Auto Shooting When the subject is too dark or too bright it may not be possible to obtain the appropriate exposure with the set shutter speed In such cases the shutter speed indicator blinks when the shutter release button is pressed halfway Choose another shutter speed and try again At shutter speeds of 1 4 second or s...

Page 115: ... or too bright it may not be possible to obtain the appropriate exposure with the set aperture value In such cases the aperture value indicator blinks when the shutter release button is pressed halfway Choose another aperture value and try again C Shutter Speed The control range of the shutter speed differs depending on the ISO sensitivity setting Additionally the range is restricted during contin...

Page 116: ...r slower the shutter speed indicator lights in red A72 3 Rotate the command dial to choose a shutter speed value When adjusting the aperture value or shutter speed the degree of deviation from the exposure value measured by the camera is displayed in the exposure indicator The degree of deviation in the exposure indicator is shown in EVs 2 to 2 EV in increments of 1 3 EV The display on the right s...

Page 117: ...focus areas containing the subject closest to the camera When the subject is in focus the focus area active focus area lights in green maximum of nine areas A95 B Note on ISO Sensitivity When ISO sensitivity A92 is set to Auto default setting High ISO sensitivity auto or Fixed range auto ISO sensitivity is fixed at ISO 160 C Shutter Speed The control range of the shutter speed differs depending on...

Page 118: ...ter release button is pressed halfway and continues when the shutter release button is pressed all the way A79 Frame rate up to 15 fps Number of frames Up to 25 frames including up to five frames captured in the pre shooting cache Image size for recording is fixed at B 1600 1200 pixels Shooting ends when the shutter release button is released or when the maximum number of frames has been taken C n...

Page 119: ...few seconds even if monitor indicators A17 are turned on W Multi shot 16 Each time the shutter release button is pressed all the way the camera shoots 16 pictures at a rate of about 30 frames per second and arranges them in a single picture The image quality for recording is fixed at Normal and the image size is fixed at D 2560 1920 pixels The digital zoom is not available X Intvl timer shooting T...

Page 120: ...ous H 120 fps Continuous H 60 fps or Multi shot 16 banding or variance in brightness or hue may occur in images that were captured under lighting that flickers at high speeds such as fluorescent mercury vapor or sodium vapor lighting When continuous is set to Pre shooting cache Continuous H 120 fps or Continuous H 60 fps accurate exposure may not be achieved images may be overexposed in images cap...

Page 121: ...icon is displayed The pre shooting cache icon lights in green while the shutter release button is pressed halfway If the number of exposures remaining is less than five shooting with the pre shooting cache is not possible Before shooting check that there are five or more exposures remaining Interval Timer Shooting Pictures are shot automatically at the specified intervals Choose from 30 s 1 min 5 ...

Page 122: ...ter release button all the way again to finish shooting Shooting finishes automatically if the internal memory or memory card becomes full or when the number of shot frames reaches the upper limit B Notes on Interval Timer Shooting To prevent the camera from turning off unexpectedly during shooting use a fully charged battery To power the camera continuously for extended periods use the AC Adapter...

Page 123: ...e light source to produce images with natural looking colors ISO sensitivity A92 Set the ISO sensitivity to suit the brightness of the subject Metering A93 Choose how the camera meters the brightness of the subject Exposure bracketing A94 Vary exposure slightly over a burst of pictures AF area mode A95 Choose how the focus area is determined Autofocus mode A101 Choose how the camera focuses Flash ...

Page 124: ...g menu Press the multi selector to select items and set functions on menus A12 Press the d button to exit the shooting menu B Functions that Cannot be Applied Simultaneously Some functions cannot be enabled in conjunction with others A104 C Navigating the Camera Menu The command dial can also be used in place of pressing H or I on the multi selector Shooting menu ISO sensitivity Image quality Imag...

Page 125: ...d button The setting is also applied to other shooting modes except for shooting mode M This feature cannot be used simultaneously with certain functions See Functions that Cannot be Applied Simultaneously A104 for more information D More Information See Number of Exposures Remaining A85 for more information Set to j k l or m M d Shooting menu M Image quality a Fine Fine image quality compression ...

Page 126: ...ps A76 This feature cannot be used simultaneously with certain features See Functions that Cannot be Applied Simultaneously A104 for more information Set to j k l or m M d Shooting menu M Image size Image size Description F 4000 3000 default setting Record pictures exhibiting greater detail than those shot at E 3264 2448 or D 2592 1944 E 3264 2448 Good balance between file size and quality makes t...

Page 127: ...00 default setting Fine Normal Basic 17 35 68 650 1 280 2 510 34 25 13 10 E 3264 2448 Fine Normal Basic 26 52 101 970 1 910 3 650 28 21 11 8 D 2592 1944 Fine Normal Basic 41 81 153 1 520 2 940 5 480 22 16 8 5 6 5 C 2048 1536 Fine Normal Basic 65 126 235 2 410 4 640 8 620 17 13 7 5 B 1600 1200 Fine Normal Basic 104 199 346 3 770 7 100 12 000 14 10 5 4 A 1280 960 Fine Normal Basic 156 286 470 5 740 ...

Page 128: ...tiplying by 2 54 cm 1 in However even with the same image size setting images printed at higher resolutions will print smaller than the size indicated and those printed at lower resolutions will print larger than the size indicated D Note on Printing Images of Size 1 1 Change the printer setting to Border when printing images of size set to 1 1 The images may not be printed in 1 1 ratio depending ...

Page 129: ...phs select Custom and choose a setting other than Auto for contrast sharpening and saturation This feature cannot be used simultaneously with certain features See Functions that Cannot be Applied Simultaneously A104 for more information Set to j k l or m M d Shooting menu M Optimize image g Normal default setting Standard image optimization recommended in most situations h Softer Softens outlines ...

Page 130: ...r settings preserve detail in misty landscapes and other low contrast subjects The default setting is Auto Image sharpening Choose how much outlines are sharpened during shooting Choose high settings for sharp outlines low settings for softer outlines The default setting is Auto Saturation Control the vividness of colors Choose moderate for less saturated colors enhanced for more vivid colors The ...

Page 131: ...hen B W color is enabled are the same as those shot at an optimize image setting of Normal Contrast Same as Optimize image Custom Contrast A88 Image sharpening Same as Optimize image Custom Image sharpening A88 Monochrome filter This effect simulates black and white photography with a color filter Yellow Orange Red Enhance contrast Can be used to tone down the brightness of the sky in landscape ph...

Page 132: ...hue and the direction increases the red hue When white balance is enabled the current setting is displayed during shooting A8 When Auto is selected an icon for the current setting is not displayed C Notes on White Balance At white balance settings other than Auto or Flash set the flash to W Off A36 This feature cannot be used simultaneously with certain features See Functions that Cannot be Applie...

Page 133: ...e Measure To apply the most recently measured white balance value choose Cancel and press the k button The most recently measured white balance value will be set 4 Frame a white or gray reference object in the reference object frame 5 Press the k button to measure the white balance value The shutter is released and the new white balance preset value is set no picture is recorded B Note on Preset M...

Page 134: ...pplied Simultaneously A104 for more information Set to j k l or m M d Shooting menu M ISO sensitivity ISO sensitivity Auto default setting Sensitivity is ISO 160 when there is sufficient lighting the camera compensates by raising sensitivity to a maximum of ISO 800 when lighting is dim High ISO sensitivity auto The ISO sensitivity is set automatically within the range of ISO 160 to 1600 according ...

Page 135: ...g menu M Metering G Matrix default setting Uses a wide area of the screen for metering This metering mode provides the appropriate exposure for a variety of shooting conditions Recommended for typical shooting q Center weighted The camera meters the entire frame but assigns greatest weight to the subject at the center of the frame This mode is suitable for portraits or other scenes to determine th...

Page 136: ...nnot be used simultaneously with certain features See Functions that Cannot be Applied Simultaneously A104 for more information D More Information See Playing Images Captured Using Continuous Shooting Mode Sequence A113 for more information Set to j k or l M d Shooting menu M Exposure bracketing 0 3 Camera varies exposure by 0 EV 0 3 EV and 0 3 EV over next three shots The three shots are taken in...

Page 137: ...amera Press the shutter release button halfway to activate the focus area When the shutter release button is pressed halfway the focus area selected by the camera is displayed on the monitor up to nine areas x Manual Choose manually the focus position from 99 areas in the screen This option is suited to situations in which the intended subject is relatively still and not positioned at the center o...

Page 138: ...be in focus This feature cannot be used simultaneously with certain features See Functions that Cannot be Applied Simultaneously A104 for more information y Center The camera focuses on the subject at the center of the frame The focus area is always displayed at the center of the frame s Subject tracking Subjecttrackingbeginsonce you selecta subjecttobe focused on and the focus area will move and ...

Page 139: ...the camera detects a face the focus area containing the face is displayed with a double yellow border When the camera detects more than one face depending upon the shooting mode the operation varies as follows Shooting mode Faces framed by a double border Number of faces to be recognized j k l m M modes Face priority The face closest to the camera The other faces are framed by a single border Up t...

Page 140: ... scene mode or smart portrait mode the camera focuses on the subject in the center focus area The camera may not detect faces in the following situations When faces are partially hidden by sunglasses or other obstructions When faces take up too much or too little of the frame If the camera detects more than one face the face that it focuses on depends on the shooting conditions such as whether or ...

Page 141: ...enter of the border and press the k button The subject is registered When the camera is unable to focus on the subject the border lights in red Change the composition and try again Once the subject is registered it is framed by a yellow focus area display and subject tracking begins To change subjects press the k button to cancel the currently selected subject then select a new subject If the came...

Page 142: ...stered the subject will be canceled During certain conditions such as when the subject is moving quickly when there is a large amount of camera shake or when there are multiple subjects that look alike the camera may not be able to register or track a subject or the camera may track a different subject Additionally the subject may not be tracked properly depending on factors such as the subject s ...

Page 143: ...current setting is displayed during shooting A8 When 0 0 is selected an icon for the current setting is not displayed Set to j k l or m M d Shooting menu M Autofocus mode A Single AF default setting The camera focuses only when the shutter release button is pressed halfway B Full time AF The camera focuses continuously until the shutter release button is pressed down halfway Use with moving subjec...

Page 144: ... the monitor during shooting A8 C Note on Long Exposure NR This feature cannot be used simultaneously with certain features See Functions that Cannot be Applied Simultaneously A104 for more information Set to j k l or m M d Shooting menu M Long exposure NR a Auto default setting Noise reduction is performed at slow shutter speeds that are likely to result in pictures affected by noise m On Noise r...

Page 145: ...oting using Active D Lighting The exposure is reduced in comparison to shooting with Active D Lighting set to Off To ensure that the gradation is appropriate adjustments of the highlighted areas shadow areas and mid tones are made before recording This feature cannot be used simultaneously with certain features See Functions that Cannot be Applied Simultaneously A104 for more information B Active ...

Page 146: ...lity is fixed at Normal Image size Continuous A76 Image size is fixed at D 2560 1920 pixels when Multi shot 16 is selected for shooting Image size is fixed at B 1600 1200 pixels when Pre shooting cache or Continuous H 60 fps is selected for shooting Image size is fixed at A 1280 960 pixels when Continuous H 120 fps is selected for shooting Optimize image Active D Lighting A103 When Active D Lighti...

Page 147: ...ntinuous is resetto Single and Exposure bracketing is reset to Off To perform simultaneous recording of black and white and color with Intvl timer shooting first select B W color and then select the Intvl timer shooting setting Long exposure NR A102 When On is selected for Long exposure NR Continuous H Pre shooting cache ContinuousH 120 fps Continuous H 60 fps and Multi shot 16 are not available A...

Page 148: ...racketing A94 Print date is not available Blink warning Continuous A76 Exposure bracketing A94 Blink warning does not take effect when the continuous is set to a setting other than Single or Exposure bracketing is set Digital zoom Focus mode A40 The digital zoom cannot be used when E manual focus is selected AF area mode A95 The digital zoom cannot be used when shooting with Subject tracking Conti...

Page 149: ...tter Speed Setting Control range ISO sensitivity A92 1 Auto2 ISO 160 4002 in Fixed range auto 1 1500 to 2 s j k mode 1 1500 to 4 s l mode 1 1500 to 8 s m mode High ISO sensitivity auto2 1 1500 to 2 s j k l mode 1 1500 to 8 s m mode ISO 160 2002 in Fixed range auto ISO 160 200 1 1500 to 2 s j k mode 1 1500 to 8 s l m mode ISO 400 800 1 1500 to 2 s j k mode 1 1500 to 4 s l m mode ISO 1600 1 1500 to ...

Page 150: ...will also be saved 2 The current monitor display setting and zoom position will also be saved 3 The current focus distance will also be saved when set to E manual focus 4 The preset value for preset manual applies to the j k l m and M shooting modes 5 The current focus area position is saved when AF area mode is set to Manual B Note on Clock Battery If the internal clock battery A189 is exhausted ...

Page 151: ...or to select items and set functions on the menu A12 4 Use the multi selector to choose Save user settings and press the k button Done screen is displayed and the current settings are saved Shooting in M User Setting Mode Rotate the mode dial to M to retrieve the settings saved in Save user settings Frame the subject and shoot with these settings or change the settings as required The setting comb...

Page 152: ...ed in the user settings are reset as follows Shooting mode j programmed auto Monitor display Display information Zoom position maximum wide angle position Flash mode U Auto Focus mode A Autofocus Exposure compensation 0 0 Continuous Single Shooting menu Same as the default setting for each item Shooting menu Autofocus mode AF area mode Flash exp comp Long exposure NR Active D Lighting Save user se...

Page 153: ...back zoom g i Enlarge the view of the picture currently displayed on the monitor up to about 10 Press the k button to return to the full frame playback mode 118 Hide or show shooting information s Hide or show the shooting information and photo information on the monitor 17 Switch between displays x Switch between the monitor and viewfinder display 16 Display individual pictures of a sequence k If...

Page 154: ...2 auto sort mode A129 or list by date mode A132 pictures in the same album category or shooting date can be deleted 35 114 Display menus d Display the menu for the selected mode 13 Switch to another playback mode Display the menu and select the N playback mode tab to switch to favorite pictures mode auto sort mode or list by date mode 120 Switch to shooting screen c Press the c button or the shutt...

Page 155: ...r images captured in a sequence While the key picture of a sequence is displayed in full frame playback mode press the k button to display each image in the sequence individually To return to key picture only display press the multi selector H The following operations are available when each image in a sequence is displayed individually Choose an image Press the multi selector J or K Images can al...

Page 156: ...e erase selected images screen A35 Eraseentire sequence All images in the sequence including the image that is displayed are deleted Delete Erase current picture Erase selected images Erase entire sequence B Note on Sequence Images captured continuously with cameras other than COOLPIX P500 cannot be displayed as a sequence C Playback Menu Options Available When Using Sequence When the d button is ...

Page 157: ...e zoom control toward f h in the 72 picture thumbnail display to change to the calendar display except for list by date mode In calendar display the pictures can be selected accordingtodatebymovingthecursor A117 Rotate toward g i direction to return to thumbnail display Decrease the number of picture thumbnails displayed g i Rotate the zoom control toward g i direction to decrease the number of th...

Page 158: ...the top of the monitor when a movie is selected C Thumbnail Display in Favorite Pictures Mode and Auto Sort Mode In favorite pictures mode A122 the icon of the album being played back is displayed at the top right of the monitor In auto sort mode A129 the current picture s category icon is displayed at the top right of the monitor Switch to the shooting screen c Press the c button or the shutter r...

Page 159: ...es taken on January 1 2011 d and l buttons are disabled while the Calendar is displayed D List by Date Mode Only the pictures taken on the same date can be played back in list by date mode A132 The list by date options A133 are also available only for the pictures taken on the selected dates To Use Description A Select date Press the multi selector H I J or K A date can also beselected by rotating...

Page 160: ...tion ratio reaches 1 the display returns to full frame playback mode Zoom also decreases by rotating the command dial to the left 11 31 Move the display area Press the multi selector H I J or K to move the display area to other areas of the picture 12 Return to full frame playback k Press the k button 34 111 Delete pictures l Select the deletion method and delete the picture s When using favorite ...

Page 161: ... the center of the face that was detected during shooting excluding pictures that were shot using continuous A76 or Exposure bracketing A94 If more than one face was detected the picture is enlarged with the face that was focused on at the center of the monitor Press the multi selector H I J or K to display other faces that were detected When the zoom control is further rotated toward g i or f h t...

Page 162: ...ction menu is displayed c Play A111 Play back all images h Favorite pictures A122 Play back images added to an album F Auto sort A129 Play back images and movies automatically sorted to the selected category with shooting C List by date A132 Play back images captured on the selected date Playback menu Quick retouch D Lighting Skin softening Filter effects Print order Slide show Protect Playback mo...

Page 163: ...se the multi selector to choose a playback mode Toreturntothe currentplaybackmodewithoutswitching playback modes press the d button 6 Press the k button The camera enters the selected playback mode Playback mode Play Favorite pictures Auto sort List by date ...

Page 164: ... playback mode A34 auto sort mode A129 or list by date mode A132 and press the d button The playback menu is displayed 2 Use the multi selector to choose h Favorite pictures and press the k button The favorite pictures screen is displayed 3 Press the multi selector J or K and then choose an image and press H to display y To addmore imagesto the same album repeat thisstep as necessary To cancel the...

Page 165: ...om step 2 Back Back Back Add Add Favorite pictures Favorite pictures Favorite pictures B Notes on Favorite Pictures Up to 200 images can be added to each album Movies cannot be added to an album If the selected image has been already added to an album w is displayed in the album s checkbox When images are added to an album they are not moved from the folder to which they were saved A215 or copied ...

Page 166: ... the d button during playback select the N playback mode tab andthenpressKorthe k button A120 To display a list of albums press H or I to choose h Favorite pictures and press the k button 2 Use the multi selector to choose an album See Using Favorite Pictures Mode A126 for more information about operating the list of albums screen When the k button is pressed an image in the selected album is disp...

Page 167: ...the same album repeat this step as necessary To cancel the selection press I to remove y Rotate the zoom control A4 toward g i to switch back to full frame playback or f h to display thumbnails Press the k button when selection is complete 4 Choose Yes and press the k button The image is removed from the album To cancel removal select No 4 4 4 4 0004 JPG 0004 JPG 0004 JPG 15 30 15 30 15 30 15 05 2...

Page 168: ...h to full frame playback mode k Images in the selected album are displayed in full frame playback mode 111 Delete images l All images added to the selected album are deleted Choose Yes when the confirmation dialog is displayed 35 Change the album icon d Change the album icon 127 Switch to shooting mode c Press the c button or the shutter release button You can also switch to shooting by pressing t...

Page 169: ...r to choose an album and press the d button The choose icon screen is displayed 3 Press J or K to choose an icon color and press the k button 4 Press H I J or K to choose an icon and press the k button The icon changes and the monitor display returns to the list of albums screen B Notes on Album Icons Set the album icons separately for the internal memory and for the memory card To change the albu...

Page 170: ... correspond to the file names added to the albums Note that if an image is deleted while using favorite pictures mode A35 126 the image will be removed from the album and it will be permanently deleted from the internal memory or the memory card Adding Images to Albums Viewing Images in Albums Internal memory or memory card Album 1 0001 JPG 0002 JPG 0003 JPG Add file names Add file names Album 2 0...

Page 171: ...b and then press K or the k button A120 To display a list of categories press H or I to choose F Auto sort and press the k button 2 Use the multi selector to choose a desired category For information about categories see Auto Sort Mode Categories A130 See Operations in Auto Sort Mode A131 for more information about operating the auto sort mode screen Press the k button to display an image in the s...

Page 172: ...n the macro close up focus mode A40 Images captured in the Close up A55 scene mode O Pet portrait Images captured in the Pet portrait A59 scene mode D Movie Movies A157 X Retouched copies Copies created using editing function A146 W Other scenes All other images that cannot be defined by the categories described above B Notes on Auto Sort Mode Up to 999 images and movie files can be sorted to each...

Page 173: ...al 11 12 Switch to full frame playback mode k Display images in the selected category in full frame playback mode 111 Delete images l Delete all images in the selected category Choose Yes when the confirmation dialog is displayed 35 Switch to shooting mode c Press the c button or the shutter release button You can also switch to shooting by pressing the b e movie record button 34 157 b e Quick ret...

Page 174: ...d press the k button 2 Use the multi selector to choose a date The camera lists up to 29 dates If images exist for more than 29 dates all images saved earlier than most recent 29 dates will be combined under Others See Operations in List by Date Mode A133 for information about operating the list by date screen When the k button is pressed the first image captured on the selected date will be displ...

Page 175: ...on Use Description A Select date Press the multi selector H or I A date can also be chosen by rotating the command dial 11 12 Switch to full frame playback mode k Display images captured on the selected date in full frame playback mode 111 Delete images l Delete all images captured on the selected date Choose Yes when the confirmation dialog is displayed 35 View list by date menu d Display the lis...

Page 176: ...rotect selected pictures from accidental deletion f Rotate image A141 Change the orientation of the picture taken i Hide image A141 Hide selected pictures during playback g Small picture A154 Create a small copy of the picture taken E Voice memo A142 Add a voice memo to the picture taken h Copy A144 Copy files between the memory card and internal memory j Black border A155 Create a new picture sur...

Page 177: ... Printing with a DPOF compatible A233 printer that is equipped with a card slot Ordering the prints from a digital photo lab that has a DPOF service Printing by connecting the camera to a PictBridge compatible A233 printer A179 When the memory card is removed from the camera the print order settings can also be applied to the pictures recorded on the internal memory 1 Use the multi selector to cho...

Page 178: ... information shutter speed and aperture value on all pictures in the print order Choose Done and press the k button to complete the print order Pictures selected for printing are recognized by the w icon displayed in playback mode B Notes on Printing Shooting Date and Photo Information When the Date and Info options are enabled in the Print order menu shooting date and photo information are printe...

Page 179: ...main and the current print order settings are removed C Deleting All Print Orders In step 1 of the print order procedure A135 choose Delete print set and press the k button to delete the print orders for all pictures D Print date The shooting date and time can be imprinted in pictures at the time of shooting by using Print date A192 in the setup menu This information can be printed even from print...

Page 180: ...icture Press and hold the button to fast forward or rewind To exit partway or pause press the k button 3 Choose End or Restart When exiting or pausing the slide show the screen shown on the right is displayed Choose End and press the k button to return to the playback menu Choose Restart to play the slide show again B Notes on Slide Shows Only the first frame of movies A168 included in slide shows...

Page 181: ...oose a picture and set or cancel protection See Selecting Pictures A140 for more information Note however that formatting the camera s internal memory or the memory card permanently erases the protected files A200 Protected pictures are recognized by the s icon in playback mode A10 116 Press the c button Playback mode M d Playback menu M d Protect ...

Page 182: ...H or I to select or deselect or to specify the number of copies When a picture is selected a check mark y is displayed with the picture Repeat steps 1 and 2 to select additional pictures 3 Press the k button to apply the picture selection With selections such as Selected images the confirmation dialog is displayed Follow the instructions on the screen Functions for which only one picture can be se...

Page 183: ... Sequence While the key picture of a sequence is displayed images cannot be rotated Apply the setting after displaying individual images A113 145 i Hide Image Hide pictures so that they cannot be played back on the camera monitor In the picture selection screen choose the pictures and set or cancel the hide setting See Selecting Pictures A140 for more information Hidden pictures cannot be deleted ...

Page 184: ...conds or when the k button is released Do not touch the microphone during recording During recording o and p blink on the monitor When recording ends the voice memo playback screen is displayed Follow the procedure in step 3 of Playing Voice Memos A143 to play the voice memo Press the multi selector J before or after recording a voice memo to return to the playback menu Press the d button to exit ...

Page 185: ...ng Voice Memos Select a picture with a voice memo and press the l button Press the multi selector H or I to choose Current image and press the k button A35 When the confirmation dialog is displayed press the multi selector H or I to choose w and press the k button Only the voice memo will be deleted 4 4 132 132 132 0004 JPG 0004 JPG 0004 JPG 15 30 15 30 15 30 15 05 2011 15 05 2011 15 05 2011 Playb...

Page 186: ...d before displaying the playback menu All pictures in the current sequence are copied B Notes on Copying Pictures JPEG MOV and WAV format files can be copied Files saved in any other format cannot be copied Voice memo A142 attached to pictures and Protect setting A139 are also copied with the pictures Operation is not guaranteed with pictures captured with another make of camera or that have been ...

Page 187: ... and the setting is saved in the camera s memory even if the camera is turned off C Choose Key Picture When Sequence display options is set to Key picture only the key picture displayed in full frame playback mode A34 or thumbnail playback mode A115 can be set for each sequence of pictures When changing this setting before pressing d first select the desired sequence using full frame playback mode...

Page 188: ...vailable when there is not enough free space in the internal memory or on the memory card For sequences for which only a key picture is displayed A113 perform one of the following operations before editing Press the k button to display individual images and then select an image in the sequence Set Sequence display options A145 to Individual pictures so that each image is displayed individually and...

Page 189: ...iginal pictures are deleted The original pictures are not deleted if copies created with editing functions are deleted Edited copies are stored with the same shooting date and time as the original Even if the pictures that are marked for Print order A135 or Protect A139 are used for editing these settings are not reflected on the edited copies Editing function used Editing function to add Quick re...

Page 190: ...press the k button The original version is displayed on the left and the edited version is displayed on the right 3 Press H or I to choose the setting level and press the k button A retouched copy is created To cancel press the d button Quick retouched copies can be recognized by the s icon displayed in playback mode D More Information See File and Folder Names A215 for more information Playback m...

Page 191: ...ting and press the k button The original version is displayed on the left and the edited version is displayed on the right 3 Press H or I to choose the setting level and press the k button A new edited copy is created To cancel press the d button D Lighting copies can be recognized by the c icon displayed in playback mode D More Information See File and Folder Names A215 for more information Playb...

Page 192: ...yed 2 Use the multi selector to choose e Skin softening and press the k button The screen that allows you to set the amount of skin softening is displayed If no faces are detected in the image a warning is displayed and the screen returns to the playback menu 3 Press H or I to choose the setting level and press the k button A confirmation screen is displayed and the image is displayed zoomed in on...

Page 193: ...o create a copy edited with skin softening press the k button Copies created by editing with skin softening can be recognized by the E icon displayed in playback mode B Note on Skin Softening Depending on conditions such as the direction the subject is facing or the brightness of the face the face may not be detected properly or the desired effect may not be achieved D More Information See File an...

Page 194: ...f the image from the center to the edge In pictures taken with face priority A97 or pet detection A59 selected areas around faces will be blurred Selective color Keeps only selected image colors and makes other colors black and white Cross screen Produce star like rays of light that radiate outward from bright objects such as sunlight reflections and city lights Suitable for night scenes Fisheye C...

Page 195: ... effect choose Save and press the k button A new edited copy is created To cancel choose Cancel and press the k button Copies created by editing with filter effect can be recognized by the c icon displayed in playback mode D More Information See File and Folder Names A215 for more information Soft Normal Extent Selective color Preview Save Cancel 132 132 132 4 4 0004 JPG 0004 JPG 0004 JPG 15 30 15...

Page 196: ...back mode and press the d button The playback menu is displayed 2 Use the multi selector to choose g Small picture and press the k button 3 Choose the desired copy size and press the k button 4 Choose Yes and press the k button A new smaller copy is created To cancel choose No and press the k button The copy is displayed with a black frame D More Information See File and Folder Names A215 for more...

Page 197: ...ess the k button A new copy with a black border is created To cancel choose No and press the k button Copies created by editing with black borders can be recognized by the J icon displayed in playback mode B Notes on Black Border A part of the picture equivalent to the thickness of the black border is cut off because the black border overlaps the picture When a picture with a black border is print...

Page 198: ...he picture for cropping crop the picture and then rotate the cropped picture back to tall orientation 2 Refine copy composition Rotate the zoom control toward g i or f h to adjust the zoom ratio Press the multi selector H I J or K to scroll the picture so that only the portion to be copied is visible on the monitor 3 Press the d button 4 Use the multi selector to choose Yes and press the k button ...

Page 199: ...hat of still pictures Press the s display button and display the movie frame A17 to check the range of a movie in a frame before recording 2 Rotate the movie mode switch to HD Lower the flash If the flash is raised it may disturb the recording 3 Press the b e movie record button to start movie recording TheLCD monitoristurnedofffor amoment and then the movie recording starts The camera focuses at ...

Page 200: ...her bright areas may leave residual images when the camera is moved B Notes on Autofocus If Autofocus mode in the movie menu is set to A Single AF default setting the focus is locked when the b e movie record button is pressed to start movie recording A166 Autofocus may not perform as expected A33 Should this occur try the following 1 Before recording set Autofocus mode in the movie menu to A Sing...

Page 201: ...Metering A93 setting is also applied to the movie recording except for Spot AF area The self timer A39 can be used If the self timer is set and the b e movie record button is pressed the camera focuses at the center of the frame and starts movie recording after ten or two seconds The flash does not fire Press the d button before starting to record the movie to display the D movie tab and select mo...

Page 202: ...r a moment and then the HS movie recording starts The camera focuses at the center of the frame The focus area is not displayed while the movie is recorded When the Open with HS footage A165 is set to Off normal speedmoviesare recorded when recording begins Press the k button to switch to HS movie recording at the point where the camera should record for slow motion or fast motion playback The cam...

Page 203: ...HS movie options A165 is set to k 240 fps h 120 fps or i 60 fps movies that can be played back in slow motion can be recorded When set to j 15 fps movies that can be played back in fast motion at a speed two times faster than normal speed can be recorded Portions recorded at k 240 fps A movie of up to ten seconds in length is recorded when recording for the purpose of high speed capturing Playback...

Page 204: ...uring Movie Recording When the remaining movie recording time is less than 30 seconds still pictures cannot be saved When recording an HS movie A160 still pictures cannot be saved When the movie option is set to iFrame 540 960 540 still pictures cannot be saved The shutter sound made when saving a still picture may be heard in the recorded movie If the camera moves when the shutter release button ...

Page 205: ...165 Options can be selected for the movie that is recorded when the movie mode switch is rotated to HS Open with HS footage A165 Select whether or not to record slow motion or fast motion movies from the start of the movie recording when the movie mode switch is rotated to HS Autofocus mode A166 Choose how the camera focuses when recording movies with the movie mode switch rotated to HD Electronic...

Page 206: ...ore information Display the shooting screen M d M D Movie menu A163 M Movie options Option Description d HD1080pP 1920 1080 default setting Movies with an aspect ratio of 16 9 are recorded in full high definition This option issuited to playbackona wide screen TV that is compatible with full high definition Image size 1920 1080 pixels Movie bitrate 14 Mbps e HD 1080p 1920 1080 Movies with an aspec...

Page 207: ...oting screen M d M D Movie menu A163 M HS movie options Option Description k 240 fps default setting 1 8 speed slow motion movies with an aspect ratio of 4 3 are recorded Maximum recording time 10 seconds playback time 1 minute 20 seconds Image size 320 240 pixels Movie bitrate 640 kbps h 120 fps 1 4 speed slow motion movies with an aspect ratio of 4 3 are recorded Maximum recording time 15 second...

Page 208: ... focus is fixed at infinity Set the focus mode to E manual focus and adjust the focus using manual focus A42 Option Memory card 4GB d HD 1080pP 1920 1080 default setting 35 min e HD 1080p 1920 1080 40 min f HD 720p 1280 720 55 min p iFrame 540 960 540 15 min g VGA 640 480 2 h 30 min Display the shooting screen M d M D Movie menu A163 M Autofocus mode Option Description A Single AF default setting ...

Page 209: ...the current setting is displayed during shooting A8 When Off is selected an icon for the current setting is not displayed Display the shooting screen M d M D Movie menu A163 M Electronic VR Option Description w On default setting Reduces the effects of camera shake in movie modes k Off Electronic VR is not enabled Display the shooting screen M d M D Movie menu A163 M Wind noise reduction Option De...

Page 210: ...es recorded with cameras other than COOLPIX P500 cannot be played back To Use Description Rewind A Rewind the movie while the k button is pressed down Advance B Advance the movie while the k button is pressed down Pause E The following operations can be performed with the playback controls at the top of the monitor while playback is paused C Rewind the movie by one frame Hold down the k button to ...

Page 211: ...press H or I to choose L Back and press the k button 4 Press H or I to choose K Choose end point Press the multi selector J or K to move the end point at the right end to the end position of the required section To check the playback of the movie in the specified range before saving it choose c Preview and press the k button During preview playback the volume can be adjusted with the zoom control ...

Page 212: ... picture except for movies recorded with p iFrame 540 960 540 Pause a movie and display the screen to be extracted A168 Choose H on the playback control with the multi selector J or K and press the k button When the confirmation dialog is displayed choose Yes and press the k button to save To cancel the saving choose No The still picture is saved with Normal as the image quality The image size is ...

Page 213: ...camera with a commercially available HDMI cable to enjoy recorded movies in the high definition quality 1 Turn off the camera 2 Connect the camera to the TV When connecting using the supplied audio video cable Connect the yellow plug to the video in jack on the TV and the red and white plugs to the audio in jacks When connecting using a commercially available HDMI cable Connect the plug to the HDM...

Page 214: ...0p 1280 720 or higher B Notes on Connecting the Audio Video Cable When connecting the cable be sure that the connector is oriented correctly Do not force the connector into the camera When disconnecting the cable do not pull the connector at an angle Do not connect cables to the HDMI mini connector and USB audio video connector simultaneously B When Nothing Appears on the TV Make sure that TV sett...

Page 215: ...tible Operating Systems Windows Windows 7 Home Basic Home Premium Professional Enterprise Ultimate Windows Vista Home Basic Home Premium Business Enterprise Ultimate Service Pack 2 or Windows XP Home Edition Professional Service Pack 3 Macintosh Mac OS X version 10 4 11 10 5 8 10 6 5 For information on the requirements for playing back high definition movies refer to System Requirements in the Vie...

Page 216: ...can be powered from an electrical outlet Do not use another make or model of AC adapter other than EH 62A Failure to observe this precaution could result in overheating or in damage to the camera Transferring Images from a Camera to a Computer 1 Start the computer to which ViewNX 2 was installed 2 Be sure that the camera is off 3 Connect the camera to the computer using the supplied USB cable Be s...

Page 217: ...ically when the camera is connected to the computer if Yes was selected in the Auto Launch setting dialog when ViewNX 2 was first installed See Starting Nikon Transfer 2 Manually A177 for more information If charge for the battery inserted into the camera is low the computer may not recognize the camera If the camera is not recognized images will not be transferred When battery charging starts aut...

Page 218: ...nformation A177 Disconnecting the Camera Do not turn off the camera or disconnect the camera from the computer during transfer When transfer is complete turn off the camera and disconnect the USB cable The camera turns off automatically if there is no communication with the computer for 30 minutes while the camera is connected via the USB cable B Charging the Battery The power on lamp slowly blink...

Page 219: ...click the ViewNX 2 icon Clicking the ViewNX 2 icon on the Dock will also start ViewNX 2 D Starting Nikon Transfer 2 Manually To start Nikon Transfer 2 first start ViewNX 2 and then click the Transfer icon at the top of the screen or select Launch Transfer from the File menu D For More Information on Using ViewNX 2 and Nikon Transfer 2 For more information on ViewNX 2 or Nikon Transfer 2 start View...

Page 220: ...l stop and the camera may be turned off When disconnecting the camera from a computer turn the camera off and then disconnect the USB cable About five hours and 30 minutes are required to charge a fully exhausted battery Charging time increases when images are transferred while the battery is charging When the camera is connected to a computer an application installed on the computer such as Nikon...

Page 221: ...camera to heat up or malfunction D Printing Pictures In addition to printing pictures transferred to a computer and printing pictures with a direct camera to printer connection the following options are also available for printing pictures recorded on the memory card Insert a memory card into a DPOF compatible printer s card slot Take a memory card to a digital photo lab For printing using these m...

Page 222: ...insert connectors at an angle and do not use force when connecting or disconnecting the USB cable 4 The camera is automatically turned on When connected correctly the PictBridge startup screen 1 isdisplayedin the camera monitor Then the Print selection screen 2 is displayed B If the PictBridge Startup Screen Is Not Displayed Turn the camera off and disconnect the USB cable Set the Charge by comput...

Page 223: ...osen by rotating the command dial Rotate the zoom control toward f h to display 12 thumbnails or toward g i to switch back to full frame playback 2 Choose Copies and press the k button 3 Choose the number of copies up to nine and press the k button 4 Choose Paper size and press the k button D More Information See Note on Printing Images of Size 1 1 A86 for more information 32 32 NO Print selection...

Page 224: ...d press the k button Printing Multiple Pictures After connecting the camera to the printer correctly A180 print pictures by following the procedure below 1 When the Print selection screen is displayed press the d button The Print menu is displayed 2 Use the multi selector to choose Paper size and press the k button To exit the print menu press the d button Paper size Default 3 5 5 in 5 7 in 100 15...

Page 225: ...ected for printing can be recognized by the check mark icon and the numeral indicating the number of copies to be printed A check mark is not displayed with pictures for which no copies have been specified and these pictures are not printed Rotate the zoom control toward g i to switch to full frame playback or f h to switch to 12 thumbnails display Press the k button when setting is complete When ...

Page 226: ...d one per each When the menu shown on the right is displayed choose Start print and press the k button to start printing Choose Cancel and press the k button to return to the print menu DPOF printing Pictures for which a print order was created in the Print order option A135 can be printed When the menu shown on the right is displayed choose Start print and press the k button to start printing Cho...

Page 227: ...ra shake and subject movement when shooting still pictures AF assist A196 Enable or disable AF assist illuminator Red eye reduction A196 Choose the red eye reduction method when the flash mode is auto with red eye reduction Digital zoom A197 Enable or disable the digital zoom Assign side zoom control A198 Choose the function to be performed during shooting when the side zoom control is rotated Sou...

Page 228: ...hoose whether or not to detect blinkingeyeswhen shooting pictures using face priority Reset all A205 Restore camera settings to default values Firmware version A208 Display the camera firmware version Shooting menu ISO sensitivity Image quality Image size Optimize image White balance Metering Exposure bracketing Shooting menu ISO sensitivity Image quality Image size Optimize image White balance Me...

Page 229: ...before displaying the shooting or playback screen Select an image Select a picture that you have shot to display as the Welcome screen Display the picture selection screen choose a picture A140 and press the k button to register it Because the selected picture is stored in the camera the picture appears in the Welcome screen even if the original picture is deleted Pictures shot with Image size A84...

Page 230: ...ingorder D day M month Y year hour minute Set the contents Press H or I Date and time can also be set by rotating the command dial A11 Finish setting Choose minute and press the k button or K Date format Choose the order in which the day month and year are displayed Year Month Day Month Day Year or Day Month Year Time zone w Home time zone can be specified and daylight saving can be enabled or dis...

Page 231: ...ed or the AC adapter is connected and provides several days of clock battery power after about ten hours of charging C w Home time zone To switch to the home time zone choose w Home time zone in step 2 and press the k button To change the home time zone choose w Home time zone in step 2 and perform the same procedure as for x Travel destination to set the home time zone C Daylight Saving Time When...

Page 232: ...Ankara 9 Alaska Anchorage 3 Moscow Nairobi Riyadh Kuwait Manama 8 PST PDT Los Angeles Seattle Vancouver 4 Abu Dhabi Dubai 7 MST MDT Denver Phoenix 5 Islamabad Karachi 6 CST CDT Chicago Houston Mexico City 5 5 New Delhi 5 EST EDT New York Toronto Lima 6 Colombo Dhaka 4 5 Caracas 7 Bangkok Jakarta 4 Manaus 8 Beijing Hong Kong Singapore 3 Buenos Aires Sao Paulo 9 Tokyo Seoul 2 Fernando de Noronha 10 ...

Page 233: ...n the continuous menu is displayed When the face detection function is selected When the subject tracking is selected in AF area mode Press the d button M z Setup menu A186 M Monitor settings Image review On default setting Pictureisautomaticallydisplayedonthe monitorimmediately after it is taken and the monitor display returns to shooting mode Off Picture is not displayed after it is taken Bright...

Page 234: ...inuous H Continuous L Pre shooting cache Continuous H 120 fps Continuous H 60 fps or BSS When Exposure bracketing A94 is used When Smile timer A67 or Blink proof A68 is set to On in smart portrait mode During movie recording Dates imprinted with an Image size A84 setting of f 640 480 may be difficult to read Set the Image size to J 1024 768 or higher The date is recorded using the format selected ...

Page 235: ... optical compensation for camera shake during still picture shooting using the image sensor shift method and under the following conditions also performs electronic VR using image enhancement When the flash does not fire When the shutter speed is slower than 1 30 second wide angle position and 1 250 second telephoto position When the self timer is off When Single is selected for the continuous set...

Page 236: ...y Vibration reduction may be unable to completely eliminate the effects of camera shake in some situations When the camera shake is extremely high or low picture compensation with electronic VR may not be possible even when On hybrid is set When the shutter speed is fast or extremely slow electronic VR may not operate even when On hybrid is set When electronic VR in On hybrid operates saving the p...

Page 237: ...mera shake and subject movement in some situations Motion detection may not function if the subject exhibits significant movement or is too dark The pictures taken may become grainy Press the d button M z Setup menu A186 M Motion detection U Auto When the camera detects the movement of the subject or camera shake the ISO sensitivity is raised and the shutter speed is increased to reduce their effe...

Page 238: ... some focus areas and scene modes AF assist illuminator does not turn on even if Auto is set Off Disable the function The camera may be unable to focus if lighting is dim Press the d button M z Setup menu A186 M Red eye reduction Pre flash on default setting The flash repeatedly fires pre flashes at low intensity before the main flash to reduce the red eye effect and the red eye reduction process ...

Page 239: ...95 At magnifications of 1 2 to 1 8 Metering is set to Center weighted and at magnifications of 2 0 to 4 0 it is set to Spot Press the d button M z Setup menu A186 M Digital zoom On default setting When the camera is zoomed in to the maximum optical zoom position rotating and holding the zoom control at g i triggers the digital zoom A31 Crop Limit zoom magnification up to the position of V during s...

Page 240: ... Snap back zoom This isconvenient whenshootingat the telephotoposition when it ismoredifficult to keep subjects in focus Use the side zoom control in the direction of f to zoom a specific increment from the current zoom position toward the f side Use it in the direction of f again to move the zoom position further toward f side Use it in the direction of g to return to the original zoom position b...

Page 241: ...by mode continues for about three minutes When the power on lamp blinks turn on the monitor again with one of the following operations Press the power switch the shutter release button the c button or the b e movie record button Rotate the mode dial B Auto Off Setting In the following situations the time taken for the camera to enter standby mode is fixed When menus are displayed three minutes Dur...

Page 242: ...rmat the memory card insert it in the camera The Format card option is displayed in the setup menu B Formatting Internal Memory and Memory card Album icon settings A127 are reset to their default settings number icons when the internal memory or memory card is formatted Do not turn off the camera or open the battery chamber memory card slot cover during formatting The first time you insert a memor...

Page 243: ...h Portuguese Traditional Chinese Greek Russian Japanese French Romanian Korean Indonesian Finnish Thai Italian Swedish Press the d button M z Setup menu A186 M TV settings Video mode Choose from NTSC and PAL HDMI Choose a picture resolution for HDMI output from Auto default setting 480p 720p or 1080i When Auto is set the output resolution that is best suited to the connected high definition TV is ...

Page 244: ...et A215 After resetting a new folder is created and the file number for the next image taken starts from 0001 B Notes on Reset file numbering Reset file numbering cannot be applied when scene mode is set to Panorama or when Intvl timer shooting is chosen for continuous in shooting mode j k l m or M For Panorama assist or Intvl timer shooting a new folder is created and file numbers are assigned au...

Page 245: ...when Exposure bracketing A94 is set blink warning does not take effect Press the d button M z Setup menu A186 M Blink warning On When the camera detects that a human subject may have closed the eyes immediately after recognizing the face and shooting the subject the Did someone blink screen appears on the monitor The face of the human subject that may have closed his her eyes is framed by a yellow...

Page 246: ...r which blinking was detected g i Rotate the zoom control toward g i Return to full frame playback f h Rotate the zoom control toward f h Select the face to be displayed When the camera detects one or more human subjects with closed eyes press H I J or K during playback zoom to display other faces The command dial can also be used to change the display Delete the picture taken l Press the l button...

Page 247: ...set all Option Default value Flash mode A36 Auto Self timer A39 OFF Focus mode A40 Autofocus Exposure compensation A43 0 0 Option Default value Scene menu A45 Scene auto selector Hue adjustment in Food mode A56 Center Panorama A58 Normal 180 in Easy panorama Pet portrait A59 Self timer Pet portrait auto release Continuous Continuous Option Default value Night landscape A48 Hand held Option Default...

Page 248: ... Image sharpening Auto Saturation Auto Custom of Black and white in Optimize image A89 Contrast Auto Image sharpening Auto Monochrome filter None B W color Off White balance A90 Auto ISO sensitivity A92 Auto Fixed range auto A92 ISO 160 200 Minimum shutter speed A92 None Metering A93 Matrix Exposure bracketing A94 Off AF area mode A95 Auto Autofocus mode A101 Single AF Flash exp comp A101 0 0 Long...

Page 249: ...alue Welcome screen A187 None Image review A191 On Brightness A191 3 View hide framing grid A191 Off View hide histograms A191 Off Print date A192 Off Vibration reduction A193 On Motion detection A195 Off AF assist A196 Auto Red eye reduction A196 Pre flash on Digital zoom A197 On Assign side zoom control A198 Zoom Button sound A199 On Shutter sound A199 On Auto off A199 1 min HDMI A201 Auto HDMI ...

Page 250: ...enu Preset manual data for White balance A91 Playback menu Sequence display options A145 and Choose key picture A145 Setup menu Time zone and date A188 Language A201 and Video mode A201 in TV settings User settings that were saved for mode dial M are not reset to the default settings when Reset all is performed To change these settings back to the default settings use Reset user settings A110 Firm...

Page 251: ...or extended periods when using or storing the camera Intense light may cause deterioration of the image sensor producing a white blur effect in photographs B Keep away from strong magnetic fields Do not use or store this device in the vicinity of equipment that generates strong electromagnetic radiation or magnetic fields Strong static charges or the magnetic fields produced by equipment such as r...

Page 252: ...spare batteries in a warm place and exchange as necessary Once warmed a cold battery that could not be used temporarily due to lowered performance may recover some of its charge Should the battery terminals become dirty the camera may not turn on due to poor contact Wipe the terminals off with a clean dry cloth before use Recharge it at least once every six months and run it flat before returning ...

Page 253: ... spiral motion that starts at the center of the lens and working toward the edges If this fails clean the lens using a cloth lightly dampened with commercial lens cleaner Monitor Remove dust or lint with a blower To remove fingerprints and other stains clean the monitor with a soft dry cloth being careful not to apply pressure Body Use a blower to remove dust dirt or sand then wipe gently with a s...

Page 254: ... F Poorly ventilated or subject to humidities of over 60 To prevent mold or mildew take the camera out of storage at least once a month Turn the camera on and release the shutter a few times before putting the camera away again C Notes on the Monitor The monitor may contain a few pixels that are always lit or that do not light This is a characteristic common to all TFT LCD displays and does not in...

Page 255: ...eable battery Rechargeable Li ion Battery EN EL51 Charging AC adapter Charging AC Adapter EH 69P1 2 Battery charger Battery Charger MH 612 AC adapter AC Adapter EH 62A connect as shown Before closing the battery chamber memory card slot cover fully insert the power connector cord into the slot in the battery chamber If part of the cord runs out of the groove the cover or cord may be damaged when t...

Page 256: ...Before using a card reader or similar device check that the device supports 2 GB cards 2 SDHC compliant Before using a card reader or similar device check that the device supports SDHC 3 SDXC compliant Before using a card reader or similar device check that the device supports SDXC Contact the manufacturer for details on the above cards SD memory cards SDHC memory cards2 SDXC memory cards3 SanDisk...

Page 257: ...attached In Panorama assist A58 a folder is created for each shooting session using the following naming convention Folder number P_XXX e g 101P_001 Pictures are saved in sequence in file numbers starting from 0001 Each time a picture is taken in Interval timer shooting A77 a folder named with the convention Folder number INTVL e g 101INTVL is created Pictures are saved in sequence in file numbers...

Page 258: ... are assigned file numbers in ascending order following the largest file number in memory Files copied using All images along with their folder are copied together Folder numbers are assigned in ascending order following the largest folder number on the destination medium File names are not changed If the current folder is numbered 999 and contains 200 files or a file is numbered 9999 no further p...

Page 259: ...ing use Five seconds after this message appears the monitor is turned off and the power on lamp flickers After the lamp blinks for three minutes the camera turns off automatically but you can also press the power switch to turn it off manually 23 P The camera will turn off to prevent overheating Inside of the camera has become hot The camera turns off automatically Leave the camera off until the i...

Page 260: ...ry Memory card is full Choose lower image quality or smaller image size Delete pictures and movies Replace memory card Remove memory card and use internal memory 83 84 35 170 26 26 P Image cannot be saved Error occurred while recording picture Format the internal memory or memory card 200 Camera has run out of file numbers Replace the memory card or format the internal memory memory card 26 200 21...

Page 261: ...he picture just taken Someone may have had their eyes closed when the picture was taken Check results in playback mode 68 N Image cannot be modified Cannot edit selected picture Confirm the conditions that are required for editing Movies cannot be edited 146 N Cannot record movie Time out error while recording movie Choose memory card with faster write speed 214 N Cannot reset file numbering No mo...

Page 262: ...in the current time zone Destination in same time zone as home 190 P Mode dial is not in the proper position Mode dial is between two modes Rotate the mode dial to select the desired mode 44 N Raise the flash The flash is lowered when the scene mode ise Nightportrait or HDR in o Backlighting is Off Press the m flash pop up button to raise the flash 37 49 50 The m flash mode button on the multi sel...

Page 263: ...ving the problem select Resume and press the k button to resume printing PR Printer error check paper Specified size of paper is not loaded Load the specified paper select Resume and press the k button to resume printing PR Printer error paper jam Paper has jammed in the printer Remove the jammed paper select Resume and press the k button to resume printing PR Printer error out of paper No paper i...

Page 264: ...2 178 178 Camera cannot be turned on Battery is exhausted The camera cannot be turned on while connected to an electrical outlet via the Charging AC Adapter 28 20 Camera turns off without warning Battery is exhausted Camera has turned off automatically to save power The camera turns off if the Charging AC Adapter is connected while the camera is on The camera turns off if the USB cable connecting ...

Page 265: ...up menu Thecamera clock is not as accurate asa normalclock such as watches Check camera clock regularly against more accurate timepieces and reset as required 24 188 188 No information displayed in monitor Shooting data and photo information may be hidden Press the s button until shooting data or photo information is displayed 17 Print date not available Time zone and date has not been set 24 188 ...

Page 266: ...anually 23 Camera temperature rises When functions such as movie recording are used for a long time or when the camera is used in a location with a high ambienttemperature the camera temperaturemayrise This is not a malfunction 158 Problem Cause Solution A Cannot set to shooting mode Disconnect the HDMI cable or USB cable 171 174 180 No picture taken when shutter release button is pressed When cam...

Page 267: ...trait or Pet portrait When smart portrait is selected When Multi shot 16 is set for continuous When Subject tracking is selected for AF area mode 197 42 46 48 49 51 59 65 77 96 Image size not available Another function that is set now is restricting Image size 104 No sound when shutter is released Off is selected for Shuttersound under Sound settings in the setup menu Continuous shooting is select...

Page 268: ...sation 43 Unexpectedresults occurred when flash is set to auto with red eye reduction In very rare cases when V Auto with red eye reduction or the red eye reduction fill flash in the e Night portrait scene mode is used for flash photography areas other than red eyes may be corrected Set a flash mode other than V Auto with red eye reduction select a scene mode other than e Night portrait and resume...

Page 269: ...layback zoom may not be available for pictures taken with cameras other than COOLPIX P500 Cannot record or play back voice memo Voice memos cannot be attached to movies Voice memos cannot be attached to pictures shot by cameras other than COOLPIX P500 and voice memos recorded by other cameras cannot be played back on this camera 168 142 Pictures and movies cannot be edited Editing other than Black...

Page 270: ...s not correctly connected Camera is not recognized by the computer Confirm that the operating system used is compatible with the camera Computer is not set to launch Nikon Transfer 2 automatically For more information on Nikon Transfer 2 refer to help information contained in ViewNX 2 23 28 174 173 177 The PictBridge startup screen is not displayed when the camera is connected to a printer With so...

Page 271: ... at three increments from the maximum wide angle position to the telephoto position Focus area selection Face priority auto 9 area automatic selection center manual with 99 focus areas subject tracking Electronic viewfinder Color LCD viewfinder 0 6 cm 0 24 in TFT LCD approx 230k dot with diopter adjustment function Frame coverage shooting mode Approx 97 horizontal and 97 vertical compared to actua...

Page 272: ...ering 256 segment matrix center weighted spot spot AF area with support for 99 focus areas Exposure control Programmed auto exposure with flexible program shutter priority auto aperture priority auto manual exposure bracketing motion detection exposure compensation 2 0 to 2 0 EV in steps of 1 3 EV 12 M 4000 3000 8 M 3264 2448 5 M 2592 1944 3 M 2048 1536 2 M 1600 1200 1 M 1280 960 PC 1024 768 VGA 6...

Page 273: ...60 fps Aperture Electronically controlled 6 blade iris diaphragm Range 9 steps of 1 3 EV Self timer Durations of 2 or 10 seconds can be selected Built in flash Range approx ISO sensitivity Auto W 0 5 to 8 0 m 1 ft 8 in to 26 ft T 2 2 to 4 5 m 7 ft 3 in to 14 ft Flash control TTL auto flash with monitor preflashes Interface Hi Speed USB Data transfer protocol MTP PTP Video output Can be selected fr...

Page 274: ... to change without notice Battery life EN EL5 Still pictures Approx 220 shots Movies Approx 1 h 20 min HD 1080pP 1920 1080 Tripod socket 1 4 ISO 1222 Dimensions W H D Approx 115 5 83 7 102 5 mm 4 6 3 3 4 1 in excluding projections Weight Approx 494 g 1 lb 1 5 oz including battery and SD memory card Operating environment Temperature 0 C to 40 C 32 F to 104 F Humidity 85 and below no condensation Ty...

Page 275: ... lab or with a household printer from print orders stored on the memory card Exif version 2 3 This camera supports Exif Exchangeable Image File Format for Digital Still Cameras version 2 3 a standard that allows information stored with photographs to be used for optimal color reproduction when images are output from Exif compliant printers PictBridge A standard developed cooperatively by the digit...

Page 276: ... 215 MOV 215 WAV 215 A AC adapter 213 Active D Lighting 103 AF area mode 95 AF assist 4 196 Album 127 Aperture value 70 Aperture priority auto mode 73 Assign side zoom control 198 Audio video cable 171 Audio video in jack 171 Auto 36 Auto mode 28 Auto off 199 Auto sort menu 131 Auto sort mode 129 Autofocus 41 101 166 Autofocus mode 101 166 AV cable 171 213 B Backlighting R 50 Battery 18 20 213 Bat...

Page 277: ...mat 27 200 Format the internal memory 200 Format the memory card 27 200 FSCN 215 Full frame playback 34 111 Functions that cannot be applied simultaneously 104 H HDMI 171 201 HDMI device control 201 HDMI mini connector 171 Hide image 141 HS movie 160 161 165 HS movie options 165 I Identifier 215 Image copy 144 Image quality 83 Image sharpening 88 Image size 84 Infinity 40 Internal memory 26 Intern...

Page 278: ...5 Printer 179 Programmed auto mode 71 Protect 139 Q Quick retouch 148 R Rear curtain sync 36 Rechargeable battery 213 Rechargeable Li ion battery 18 213 Recording slow motion movies 160 Red eye reduction 36 196 Remove from favorites 125 Reset all 205 Reset file numbering 202 Resetting saved settings 110 Rotate image 141 RSCN 215 S Saturation 88 Save to user setting 109 Scene auto selector x 46 Sce...

Page 279: ...88 TV settings 201 U USB cable 174 180 213 USB audio video output connector 171 174 180 User setting mode 108 V Vibration reduction 193 Video output 201 View hide framing grid 191 View hide histograms 17 191 Viewfinder 16 30 211 ViewNX 2 173 177 Voice memo 142 Volume 168 W Welcome screen 187 White balance 90 Wide 31 Wind noise reduction 167 Z Zoom 31 Zoom control 31 ...

Page 280: ...poration No reproduction in any form of this manual in whole or in part except for brief quotation in critical articles or reviews may be made without written authorization from NIKON CORPORATION FX1B03 11 6MM00111 03 ...

Page 281: ......

Page 282: ......

Page 283: ......

Page 284: ......

Page 285: ......

Page 286: ......

Page 287: ......

Page 288: ......

Page 289: ......

Reviews: