background image

54

Reference: The Tool  Chest

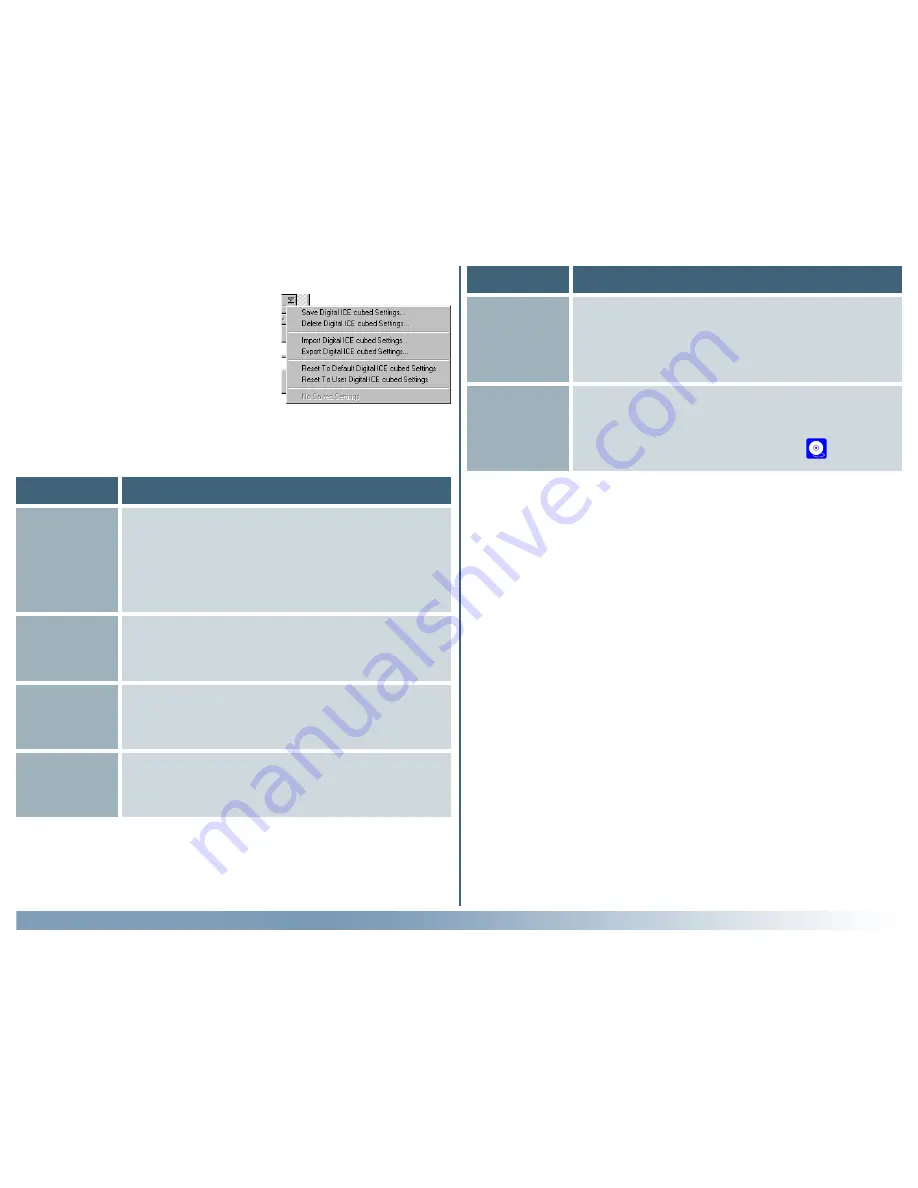
The Digital ICE

3

 Settings Menu

Clicking the triangle at the top right

of the Digital ICE Cubed palette dis-

plays the Digital ICE

3

 settings menu,

where you can save or export image

Digital ICE

3

 settings and recall them

as desired.

The Digital ICE

3

 settings menu contains the following options:

Item

Description

Save

Digital ICE

Settings…

Saves the current settings under a user-speci-
fied name.  These settings will be added to the
end of the Digital ICE

3

 settings menu, where

they can be recalled by selecting the desired
settings by name.

Import

Digital ICE

Settings…

Imports settings saved using the Export
Digital ICE Settings… 
option.

Reset to

Default

Digital ICE

Settings

Turns all Digital ICE

3

 settings off.

Export

Digital ICE

Settings…

Exports the current settings to a separate file
in the folder of your choice.

Item

Description

Reset to

User

Digital ICE

Settings

Restores the user default settings created
with the Set User Settings option in the
scan window settings menu (see 

 88)

.

Delete

Digital ICE

Settings…

Displays a dialog where you can select set-
tings saved using the Save Digital ICE Set-
tings… 
option for deletion.

Summary of Contents for 9235 - Coolscan III

Page 1: ...Nikon Scan 3 Reference Manual Overview pp 1 3 Getting Started pp 4 17 Tutorial pp 18 35 Reference pp 36 137 Appendices pp 138 152 ...

Page 2: ... before or after scanning Supported scanners Nikon Scan 3 can be used with the following scanners 4000 ED SUPER COOLSCAN 4000 ED COOLSCAN IV ED SUPER COOLSCAN 2000 LS 2000 firmware version 1 3 or later see 57 COOLSCAN III firmware version 1 3 or later see 57 Pg For more information on 57 Firmware Nikon Scan functions in two roles first as TWAIN source Win dows or acquire plug in Macintosh that can...

Page 3: ...Web Click the text to follow the link PrintingThis Manual If desired portions of this manual can be printed for ease of reference using the Print command in the Adobe Acrobat Reader File menu This reference manual has been written to guide you through the process of using Nikon Scan to scan and edit images The next chapter Getting Started describes the type of system required to run Nikon Scan and...

Page 4: ...n digital imaging and photography Terminology Throughout this manual 4000 ED is used in reference to SUPER COOLSCAN 4000 ED film scanners and LS 2000 in refer ence to SUPER COOLSCAN 2000 film scanners MA 20 S is used in reference to both MA 20 and MA 20 S slide mount adapters IA 20 S in reference to both IA 20 and IA 20 S adapters for APS IX240 film available separately and SF 200 S in reference t...

Page 5: ...y step through the process of installing Nikon Scan Users who have already completed installation can proceed directly to the next chapter for a tutorial covering basic scan operations Pg For more information on 152 Custom install 148 Uninstall BeforeYou Begin pp 5 6 Installation pp 7 17 ...

Page 6: ...sk Space RAM MMX Pentium 166 MHz or better Pentium II or better recommended Windows 98 Second Edition SE Windows Me Windows 2000 or later 20 MB free for installation with additional 20 MB available while Nikon Scan is running 200 MB or more recommended or 400 MB or more when using Digital ROC or Digital GEM 32 MB 64 MB or more recommended Video Resolution 640 480 pixels or greater with 16 bit RGB ...

Page 7: ...more recommended 20 MB free for installation with additional 20 MB available while Nikon Scan is running 200 MB or more recommended or 400 MB or more when using Digital ROC or Digital GEM Video Resolution 640 480 pixels or greater with 16 bit RGB color thousands of colors or more USB COOLSCAN IV ED Only built in USB ports are supported IEEE 1394 Firewire 4000 ED Firewire Support 2 3 3 or later rec...

Page 8: ...an click the Start button and select the uninstaller from under Nikon Scan in the Programs sub menu Nikon Scan 3 offers full support for the scanners supported under version 2 x Users of Nikon Scan 2 can enjoy the im proved functionality of Nikon Scan 3 while continuing to use their existing scanners If an earlier version of Nikon Scan is already installed on your system before upgrading to versio...

Page 9: ...utorun from the menu that appears Macintosh Step 2 Start the installer Before starting installation of Nikon Scan quit any other programs that may be running including any virus checking software Insert the Nikon Scan 3 CD into the CD ROM drive and double click the installer icon The window shown at right will be displayed click Continue Depending on where you purchased your scanner the Nikon Scan...

Page 10: ...Nikon Scan Click here to proceed to the next step URL s Click to open your web browser to a Nikon Digital Imaging web site your computer must be set up for an Internet connection Link Description The other links in the Welcome dialog are described below Macintosh Step 3 Accept the license agreement The software license agreement will be displayed After reading the agree ment click Accept to contin...

Page 11: ... the ReadMe file which may contain important information that could not be included in this manual When you have fin ished click Continue Step 5 Select the installation type The installer dialog shown at right will be displayed Select Easy Install from the pop up menu at the top left corner of the dialog Click here to proceed to the next step Go to Nikon Home Page Opens your web browser to the Nik...

Page 12: ...in installation The dialog shown at right will be displayed while installation is in progress Macintosh Step 6 Choose a location for Nikon Scan The disk and folder to which Nikon Scan will be installed by default the root directory on the system disk are shown in the Install Location panel Choose a new disk from the Install Location pop up menu or choose Select Folder to navigate to the desired lo...

Page 13: ... Nikon CMS must have information about the color characteristics of your scanner monitor and the color space used when editing or printing images This information is contained in files called profiles Pg For more information on 105 Preferences 115 Color space profiles 107 Nikon Color Management System To choose a profile from a list click Use name list and proceed to Step 8 4 To choose a profile w...

Page 14: ...cts of the color range and gamma value for each profile can be previewed in the image to the right of the list If the image seems too dark or too bright click Too dark to choose from a list of Windows profiles or Too light to choose from a list of Macintosh profiles Click OK to choose the selected profile as the initial RGB color space Click here to proceed to the next step Narrow gamut vivid satu...

Page 15: ... profiles in the profile list have a gamma value of 2 2 which is the de facto standard for Windows The last three have a gamma value of 1 8 the default value for the Macintosh Select a profile appropriate to the platform on which the image is to be displayed The other factor to bear in mind when selecting a profile is the gamut or range of colors you will need for the task at hand If you are not p...

Page 16: ...all a copy of the Nikon Scan plug in in the application s plug in folder The in staller will automatically locate the plug in folders on your computer and display them in the dialog shown at right Select the plug ins folders for the desired applications and click OK Step 10 Quit the installer The dialog shown at right will be dis played when installation is complete Click Restart to restart your c...

Page 17: ...ep make sure the Nikon Scan 3 CD is inserted in the CD ROM drive and then click here to proceed to the next step If you have already registered your scanner with Windows ei ther because you are re installing Nikon Scan or are a user of a LS 2000 or COOLSCAN III film scanner who is upgrading to Nikon Scan 3 installation is complete Click here to view the next chapter Macintosh Step 11 Check the mem...

Page 18: ...ion process differs depending on the scanner and operating system used Click here for step by step instruc tions on registering your scanner Once you have registered your scanner installation is complete Click here to view the next chapter Macintosh Step 12 Connect the scanner Connect the device as described in the hardware documenta tion If you are using the LS 2000 or COOLSCAN III be sure to tur...

Page 19: ...e scan window the scanner control center Takes you step by step through the process of making a scan This chapter provides enough information to enable you to scan images and open them in another application or save them to disk More information on scanning image processing and preferences is included in the following chapters ...

Page 20: ...3 0 icon in the folder to which you installed Nikon Scan Windows users can also start Nikon Scan by clicking the Windows Start button and selecting Nikon Scan 3 0 from the Programs sub menu The Scan Window The Nikon Scan Plug in orTWAIN Source Nikon Scan consists of the following two modules The Scan Window The scan window is the interface between your scanner and the imaging application that acts...

Page 21: ...of the image when opened in the host application enhancing color contrast and sharpness before the image is scanned and when Nikon Scan is used as a stand alone application after im ages are opened in the Nikon Scan applet removing the effects of scratches dust fading and film grain controlling the exposure val ues for the scanning element and other features particular to your scanner Scan Progres...

Page 22: ...he button to zoom in on the current crop enlarging it to fill the preview area Click the button to zoom out Using the options in this menu you can reset the scanner to default set tings or save scanner settings suited to particular scanning conditions and recall them as desired Adjusts scanner settings to match the media in the scanner Select positive when scanning film positives slides reversal f...

Page 23: ...urrent output size and resolution Indicates whether Digital ICE3 and analog gain are in effect Remember to use Digital ICE3 only when needed as turning these features on can sub stantially increase scanning times Indicates the current bit depth which determines the maximum number of colors in the image and whether multi sample scanning 4000 ED and LS 2000 only is in effect Gives the color values f...

Page 24: ...leted tasks are listed in the Log tab 31 Tutorial The Scan Window 29 The Natural ProcessedTabs These tabs allow for a quick before and after comparison showing the effects of processing The Natural tab shows how the image looked before processing the Processed tab how the image will look when scanned at current settings If you are using Nikon Scan as a stand alone application you can switch back a...

Page 25: ...l when adjusting contrast and making changes to color balance that effect only a specific portion of the tone range shadows mid tones or highlights Use the color balance tools to make adjustments to brightness contrast and color balance that affect the entire image Like the Curves too the LCH editor can be used to adjust brightness and contrast in shadows mid tones and highlights It also incorpora...

Page 26: ... the values produced by the autoexposure operation These tools offer you control over features specific to your scanner 56 57 51 Tutorial The Scan Window Depending on your scanner up to three image enhancement tools are available Digital ICE reduces the effects of dust and scratches Digital ROC restores colors lost through fading Digital GEM reduces the effect of film grain Tools marked with a are...

Page 27: ...ter STEP 2Insert the medium in the scanner 27 STEP 1Open the scan window 27 STEP 3Select the media type 27 STEP 4Select the color model 28 STEP 6Preview the frames to be scanned 31 STEP 13Scan the images 35 STEP 5Select the frames to be scanned 29 STEP 10Select an output resolution 34 STEP 11Adjust the output size 34 STEP 12Adjust settings for t h e r e m a i n i n g frames 35 STEP 14Save the scan...

Page 28: ...ow Step 3 Select the media type Select the media type from the pop up menu in the control area The options available depend on the se lected scanner Select Positive when scanningAGFA SCALA monochrome film or when scanning prepared microscope slides using the FH G1 medical slide holder available separately Option When to use it Positive Use when scanning most makes of positive slides or reversal fi...

Page 29: ... the characteristics of the video system printer or monitor Profiles are available for RGB for use when editing images or displaying them on a monitor and CMYK for professionals who wish to create a file ready for printing on a commercial four color printing press Option When to use it Calibrated RGB CMS on Use for images that will be edited or displayed on a computer monitor CMYK CMS on Use for i...

Page 30: ...the media from the adapter between scans The following multi frame adapters are available for the Nikon scanners supported under Nikon Scan 3 the SA 21 4000 ED COOLSCAN IV ED and SA 20 LS 2000 COOLSCAN III strip film adapters the IA 20 S adapter for APS IX 240 film sold separately the SA 31 film roll adapter for the 4000 ED sold separately the SF 200 S slide feeder for the 4000 ED and LS 2000 sold...

Page 31: ...wer click the button at the top right corner To adjust the size of the thumbnail drawer drag the bottom right corner the thumbnail drawer can not be made larger than the scan window When film is inserted in the SA 21 strip film adapter for 4000 ED COOLSCAN IV ED film scanners six frame numbers will be displayed in the thumbnail drawer regardless of the number of frames in the film Similarly when f...

Page 32: ...hat the more pre views stored the greater the demands that will be made on your computer s memory Tutorial Making a Scan The Scan Progress window While scanning is in progress the progress window will show the op eration currently being performed The current task can be cancelled by clicking the Stop button To view operations that have yet to be performed first click the triangle under the progres...

Page 33: ...he palette to display the Layout Tools Opening theTool Chest To display the Tool Chest click the Tools button in the control area and select Tool Palette 1 from the menu that appears Step 8 Adjust image orientation Depending on how the medium was inserted into the scanner you may need to use the rotate and flip but tons in the Layout Tools palette to return the image to its original ori entation P...

Page 34: ...cing the cursor within the crop frame and dragging it to another position To enlarge the crop to fill the preview area click the button If desired you can then select a smaller crop within the original crop and click the button again to enlarge the image still further To zoom out to the previous view click the button Changing the size of the preview area To adjust the size of the preview area drag...

Page 35: ...st to open the Crop palette Enter a value for Resolution that matches the effective resolution of the printer or monitor on which the im age will be displayed after scanning Resolution can also be set by selecting an output device from the output resolution pop up menu Picking an output resolution When scanning images for output on a household inkjet printer keep in mind that unit pixels per inch ...

Page 36: ...on when you want to select the precise area to be scanned using the mouse then adjust the output reso lution and size according to how the image will be used Choose the units for output size from the output units menu and enter a value for either Width or Height in the output size text boxes The other dimension will be adjusted auto matically to maintain the crop selected in the preview area Keep ...

Page 37: ...104 Preferences pp 105 137 AboutThis Chapter This chapter covers scan window settings not detailed in the previous chapter including contrast color balance sharpening and Digital ICE3 controls It also describes the options available in the settings menu and Preferences dialog and details the options available when Nikon Scan is used as a stand alone application ...

Page 38: ... of the image you may also need to select a new focus point if the default focus point at the center of the image lacks contrast This operation can be performed using the button in the scan window con trol area By default the scanner adjusts exposure as necessary before previews or scans Depending on the settings selected for the autoexposure options in the Preview Settings Single Scan or Batch Sc...

Page 39: ...an 58 Manual focus adjustment Control option click the button To perform an autofocus operation when the new focus point is selected hold down the Ctrl Windows or option Macintosh key while clicking the button The cursor will take on the shape of a cross move the cross shaped cursor over the point in the preview image you want to use as the new focus point and click we recommend that you choose a ...

Page 40: ...dialog however autoexposure must be performed manually before previewing media of the selected type Similarly if Auto expo sure for negative film or Auto exposure for positive film is turned off in the Single Scan or Batch Scan tab of the Prefer ence dialog autoexposure must be performed manually before scanning media of the selected type Pg For more information on 135 Preferences Preview Settings...

Page 41: ...Nikon Scan as a stand alone application after scanning when the image is opened in an image window within Nikon Scan Opening theTool Chest To display theTool Chest click the Tools button in the scan window control area and select Tool Pal ette 1 from the menu that ap pears Reference TheTool Chest Displaying the contents of a tool palette To display or hide the contents of a tool palette click the ...

Page 42: ...hest win dow to create a newTool Chest window containing only the selected palette Tools can be added to the new Tool Chest by dragging addi tional palettes into the window The new Tool Chest will be added to the tools menu in the scan window If you close the new Tool Chest by clicking the window close box you can open it again by selecting the desired Tool Chest from the tools menu ...

Page 43: ...isk This allows you to make multiple copies of the same image each edited for color and sharpness in a differ ent way and saved in a separate file Before scanning the image you may want to increase the scan bit depth in the Scanner Extras drawer to preserve image quality Once the image is opened in the Nikon Scan applet save a copy in NEF format to store any changes to the image independently of t...

Page 44: ... applica tion and an image has been opened in the Nikon Scan applet when it can be used to scroll images that are too big to fit in the image window For details see 95 When the scan window is ac tive the hand tool is disabled Crop Tool When the crop tool is active a selec tion can be made by dragging the cur sor over an image In the scan window this tool is used to select a portion of the image to...

Page 45: ...ed for subsequent autofocus operations For details see 38 The focus tool is only available when the scan window is active Focus Tool Reference TheTool Chest Description Control Show grid When this box is checked a layout grid is displayed superimposed over the im age in the active window The grid spacing and color can be set in the Grid panel of the Preferences dialog see 137 ABC A B C ABC ABC ABC...

Page 46: ...lue can be changed using the Sample point size option in the Advanced Color tab of the Preferences dialog see 135 Information This palette provides information about the size and location of the current crop the position of the cursor within the active image and the color of the pixel under the cursor Reference TheTool Chest The Information palette contains the following items Item Description X Y...

Page 47: ... slider if you are using the image in a desktop publishing application you may want to choose pi cas or points as the output units Where the resolution of the printing press is not known you may be requested to produce a file of a specific size In this case simply select Keep this file size and enter the file size directly If the image will be displayed on a monitor or web page After selecting a c...

Page 48: ...mple in a magazine or on a web page When using this option select a resolution and enter the desired output size in the Width and Height text boxes after choosing a unit other than pixels for output size You can then select the area to be scanned using the mouse the proportions of the crop will be adjusted to match the values entered for output size This option is useful when the image has to prin...

Page 49: ...s crop is selected changing the height or width will result in the other value be adjusted automatically to maintain the height width aspect ratio at the propor tions of the current crop When Keep this file size is selected changing one of dimen sion will result in the other being adjusted to maintain a constant file size changing the pro portions of the crop File size The size of the file that wi...

Page 50: ...that al though the terms used differ both pixels and dots refer to the individual elements used to make up a picture pixels in the case of monitors dots in the case of printers Dye sublimation printer Printers that use photographic or dye sublimation processes reproduce each pixel with a single dot continuous halftone The target resolution for these devices is therefore the same as the printer res...

Page 51: ... the end of the Crop settings menu where they can be recalled by selecting the desired settings by name Import Crop Settings Imports settings saved using the Export Crop Settings option Reset to Default Crop Settings Sets the crop to include the entire image and restores the default resolution and scale set tings Export Crop Settings Exports the current crop settings to a sepa rate file in the fol...

Page 52: ...ormal The image is processed digitally to remove the effects of scratches and dust The effects are reflected in the Natural tab in the pre view area Item Description Fine This setting is effective in removing the ef fects of very thin scratches or dust that is barely visible It may however result in re duced sharpness The effects are reflected in the Natural tab in the preview area Sharpen The ima...

Page 53: ...CE requires longer scanning times Restoration of Color ROC Digital ROC a tool for digitally restoring colors lost through fading of the original media is built in to 4000 ED and COOLSCAN IV ED film scanners To use Digital ROC turn the Enable Post Processing check box on and then select the amount of correction to be performed using the Digital ROC slider or by entering a value in the text box to i...

Page 54: ...and Digital GEM check boxes is shown in the information display in the scan window If changes are made to these settings without redrawing the pre view image a warning icon will appear in the information dis play Digital ROC and Digital GEM Because of the complexity of the processing involved Digital ROC and Digital GEM require a substantial amount of time to perform To speed scanning you can disa...

Page 55: ... ICE3 settings menu where they can be recalled by selecting the desired settings by name Import Digital ICE Settings Imports settings saved using the Export Digital ICE Settings option Reset to Default Digital ICE Settings Turns all Digital ICE3 settings off Export Digital ICE Settings Exports the current settings to a separate file in the folder of your choice Item Description Reset to User Digit...

Page 56: ...in the MA 20 S strip film adapter Perform autofocus when film is inserted MA 20 S only Sets the number of slides to be scanned each time the Scan button is clicked Slide feeder scan SF 200 S only Controls the number of passes the scan ner makes over the image to increase ac curacy Multi sample scanning Description Adjusts exposure for each of the colored elements in the scanner s light source Opti...

Page 57: ...sureValue ExposureValues are a measure of the quantity of light that falls on the scanning element Charge Coupled Device or CCD At 1 EV the CCD is exposed to twice the normal amount of light while at 1EV the amount of light is halved EVs are some times referred to as steps To view the effects of analog gain on the image in the preview area click the Update button To return the exposure value for a...

Page 58: ...and LS 2000 only yields 4 096 shades per color while scanning at a bit depth of fourteen bits per pixel 4000 ED only gener ates 16 348 shades per color RGB and grayscale images scanned at twelve and fourteen bits are converted to sixteen bits before being opened in the host application effectively doubling file size CMYK images are converted to eight bits but the extra channel produces images one ...

Page 59: ...ly In multi sample scanning the scanner makes multiple passes over the image and averages the results to reduce the effects of electronic noise producing more accurate reproductions with smoother changes in tone To use multi sample scanning select the desired setting from the Mode menu The menu contains the following items Number of passes Mode Description 1 Normal 1x Multi sample scanning off 2 G...

Page 60: ... to rewind the film before calibration begins Interpolation Method LS 2000 COOLSCAN III only Your scanner can scan at 2 700 ppi and at any resolution below this value that can be produced by dividing 2 700 by a whole number 1 350 ppi 900 ppi 675 dpi etc At other resolutions pixels must be calculated by computer algorithm to make up the specified number of pixels per inch The interpolation method i...

Page 61: ...show a normal balance among shadows mid tones and highlights Use a different setting only if you expe rience problems scanning negatives using the automatic set ting Lo Cont Highkey This setting is suited to low con trast images with clearly defined white areas but no clear shadows for example a photograph of white clouds in a blue sky Lo Cont Neutral This setting is suited to low con trast images...

Page 62: ...th thumbnails displayed Select the de s ired thumbnail and adjust its position using the Boundary Off s et slider or by entering a value in the text box to its right inthe case of the 4000 ED and COOLSCAN IV ED the maxim um and minimum values are 0 and 144 respectively for the irst frame and 144 and 144 for all subsequent frames while in he case of the LS 2000 and COOLSCAN III the offset ranges ro...

Page 63: ...r enter a large value for example 999 Method Description Panorama The initial crop is adjusted to suit the pan orama setting for APS IX240 cameras Classic The initial crop is adjusted to suit the clas sic setting for APS IX240 cameras Wide The initial crop is adjusted to suit the wide setting for APS IX240 cameras IX240 Crop Choices IX240 crop choices for APS IX240 film are available when the IA 2...

Page 64: ...nning you may come across images that are over or under exposed obliterating details in highlights or shadows or that show a general lack of contrast You may also find that the colors are flat or unnaturally vivid or that fluorescent lighting has given your photograph a greenish tinge These flaws can be corrected using Nikon Scan s three color enhancement tools Curves Color Balance and the LCH Edi...

Page 65: ...n zero or no color at the bottom and the maximum output value at the top When the cursor is moved over the curve edit display the input and output values for the point under the cursor are shown in the input output display The input value represents the level of the pixel in the original image the output value the level of the pixel after any changes to the curve have been applied Input Output Hig...

Page 66: ...ght if the selected color model is RGB calibrated RGB or grayscale shadows are to the left and highlights to the right while when CMYK is selected highlights are to the left and shad ows to the right The vertical axis gives the number of pixels of each tone level found in the image scaled to fit in the curve edit display The histogram bears no relation to the position of the individual pixels with...

Page 67: ...s in the image using the master curve or select any of the red green and blue or cyan magenta yellow and black curves for editing using the channel menu see right when grayscale is selected only the master curve L is displayed The histogram shows tone levels for the selected channel only When the master curve is selected the auto contrast button and white point and black point eyedropper tools see...

Page 68: ...curve is dedicated to reproducing tones not actually present in the im age Increasing the input value for the black point until it matches the darkest shade in the image will steepen the curve enhanc ing overall contrast without causing a corresponding loss of detail in shadows Similarly if the original image does not actually con tain shades corresponding to the maximum value the white point can ...

Page 69: ...lue channels will be modified simultaneously the master curve is unaffected Clicking the button with the Ctrl Windows or option Macintosh key held down adjusts con trast only for the channel currently selected in the channel menu If both the brightness and color balance of the image seem to require adjustment click the auto contrast button to adjust both brightness and color by creating new black ...

Page 70: ...the lowest input value displayed in the histogram will set the minimum output value for the selected channel to the darkest pixel actually present in the image steepening the curve and enhancing contrast with out sacrificing detail in shadows Similarly matching the white point slider with the highest input value displayed in the histo gram will set the maximum output value for the selected chan ne...

Page 71: ... the image to find the pixel that you want to use to set the white point keeping an eye on the color value display in the Information palette to identify the pixel with the highest input value With the cursor over the target pixel click the mouse button The input value for the selected pixel will be used as the input value for the white point The cursor will return to its original shape and the im...

Page 72: ... you have found the desired output level the output level can also be set by entering a value directly in the text box to the left of the slider The effects of the change will be reflected in the active image Black point output slider White point output slider It is sometimes the case that the darkest and lightest points of the image should not be displayed or printed as a saturated black or white...

Page 73: ...e text box under the slider The effects of changes to the gray point can be seen in the active image Gamma Gamma also written γ is a fundamental property of video systems one that determines the intensity of the output signal relative to the input When calculating gamma the maximum possible input intensity is assigned a value of one and the minimum possible intensity no input is assigned a value o...

Page 74: ...the color value display in the Information palette to identify pixels with a neutral input value look for pixels that you think should be a neutral gray color in the final image With the cursor over the target pixel click the mouse button The average of the input values for each of the channels in the selected pixel will be used as the reference value for the gray point The cursor will return to i...

Page 75: ...nt then click A new point will be added at this position and the curve will automatically be adjusted to pass through this point The position of the point can be adjusted by dragging it to a new location within the curve edit display The image in the active window will automatically be adjusted to reflect changes to the curve Removing Points from the Curve Points can be removed from the curve by d...

Page 76: ... the desired set tings by name Import Curve Settings Imports settings saved using the Export Curve Settings option Reset to Default Curve Settings Resets all curves to linear Export Curve Settings Exports the current curves to a separate file in the folder of your choice Item Description Reset to User Curve Settings Restores the user default settings created with the Set User Settings option in th...

Page 77: ...ce The Color Balance palette offers simple controls for adjusting overall brightness contrast and color balance for the entire image Unlike the Curves palette the Color Balance palette does not allow you to make changes that affect only a portion of the tone range The controls available in the Color Balance palette are detailed below Note that when the selected color model is grayscale the Color B...

Page 78: ... menu where you can save or export color balance settings and recall them as desired The Color Balance settings menu contains the following op tions Item Description Save Color Balance Settings Saves the current color balance settings under a user specified name These set tings will be added to the end of the Color Balance settings menu where they can be recalled by selecting the desired settings ...

Page 79: ...t the maximum and minimum values for output The hue editor features unique controls that grant unparalleled flexibility when editing colors Using this tool you can map a specific range of colors in the input to a different range of col ors in the output allowing you to make the reds in the image more orange for example or even green or blue Reference TheTool Chest The LCH Editor can only be used w...

Page 80: ... on 63 Using the curves editor The Luminosity Editor Although it affects brightness rather than color editing luminos ity has a similar effect to editing the master curve in the Curves palette Steepening the curve by for example lowering the maxi mum value for input and raising the minimum value increases the difference between light and dark areas of the image increasing contrast Changing the gra...

Page 81: ...r in the edit display Input output levels Output level sliders Black point slider Gray point slider White point slider Histogram Restores the luminosity curve to linear Con trol click Windows or command click Macintosh to restore the curves for lumi nosity chroma and hue to linear Item Description Sets the maximum and minimum values for input to values that exclude 0 5 of the brightest and darkest...

Page 82: ...n be made of the scanner s dynamic range by steepening the curve in the portions of the histogram that contain the greatest number of pixels while leaving colors corresponding to a neu tral gray unaffected Reference TheTool Chest Gray point slider White point slider Input output levels Output level sliders Black point slider Histogram Item Description Output level sliders Sets the maximum and mini...

Page 83: ...ine you can change the relationship between input and output colors over a portion of the color range with the result that colors that are red in the original might be output as or ange or even green or blue Item Description The distribution of pixels of different chromas in the output image are displayed when this button is clicked Click again to view the chroma distribution for the input image W...

Page 84: ...ighlighted in the hue editor You can then drag this point up or down until it in inter sects with the background color that coincides with the hue you want to appear in the output Width slider Adjusts the width of the curve that passes through the selected point enabling you to determine what hues in the vicinity of the selected point are affected by the change Scale button Changes the vertical sc...

Page 85: ...by name Import LCH Curve Settings Imports settings saved using the Export LCH Curve Settings option Export LCH Curve Settings Exports the current settings to a separate file in the folder of your choice Reset to User LCH Curve Settings Restores the user default settings created with the Set User Settings option in the scan window settings menu see 88 Reset to Default LCH Curve Settings Resets the ...

Page 86: ...ecting color balance by making adjustments only to luminosity brightness The ef fect is the same as performing Unsharp Mask with the Lumi nosity channel selected in theAdobe Photoshop Lab color model The amount of Unsharp Mask you will need depends on the size and resolution of the final image The more pixels in the image the greater the amount of Unsharp Mask you will need to achieve the same deg...

Page 87: ...he palette is checked Step 3 Check the results To compare the effects of the Unsharp Mask with the unmodi fied image click the check box at the top left of the Unsharp Mask palette to turn the effects of Unsharp Mask on or off Step 4 Create additional masks Repeat steps 1 3 to create additional masks for different col ors As new masks are created they will be added to the end of the Unsharp Mask l...

Page 88: ...eset to Default Unsharp Mask Settings Deletes all masks currently displayed in the Unsharp Mask palette Export Unsharp Mask Settings Exports the current masks to a separate file in the folder of your choice Item Description Reset to User Unsharp Mask Set tings Restores the user default settings created with the Set User Settings option in the scan window settings menu see 88 Delete Unsharp Mask Se...

Page 89: ...itor Unsharp Mask Nikon Enhancement and Image Enhancement palettes can be saved and recalled separately using the palette settings menu Reference Reusing Settings The following settings can be saved and recalled using the op tions in the settings menu the current scanner media type color model and the dimen sions and location of the current crop all settings in effect in theTool Chest including im...

Page 90: ...u where they can be recalled by selecting the desired settings by name Import Settings Imports settings saved using the Export Set tings option Export Settings Exports current settings to a separate file in the folder of your choice Delete Settings Displays a dialog box where you can select settings saved using the Save Settings option for deletion Set User Settings Saves the current settings as u...

Page 91: ...d party program a mini program or applet is included with Nikon Scan This applet which starts automati cally when you double click the Nikon Scan 3 0 icon or select Nikon Scan 3 0 from the Windows Start menu can be used to edit images after scanning save images in a variety of formats open previously saved images and print images Starting the Nikon Scan Applet Windows To start the Nikon Scan apple...

Page 92: ...the resulting images will be opened separate image windows within the Nikon Scan 3 0 window Reference The Nikon Scan Applet Status bar Toolbar Menu bar Image window The Menu Bar Macintosh When you start the Nikon Scan applet on your Macintosh Nikon Scan s menus will appear in the menu bar When you click the Scan button in the scan window the resulting images will be opened in separate image window...

Page 93: ...and in the Edit menu Print Duplicates the effects of the Print command in the File menu Zoom Duplicates the effects of the Zoom Cur sor command in the View menu Button Description Selection Duplicates the effects of the Selection Cursor command in the View menu Help Click to open the Nikon Scan help file in your web browser Open Source Opens the scan window To display or hide the toolbar select To...

Page 94: ...w or by choosing it from the windows listed at the bottom of the Window menu Windows Image windows Many of the tools in theTool Chest can be applied to images in image windows If multiple images are opened in image win dows in the Nikon Scan applet settings can be adjusted and saved separately for each image With the exception of images saved in NEF format the settings in each tool palette will be...

Page 95: ...ws the date and time the image was created the color model file type and compression and image size and resolution To hide the information display click the settings icon a second time or select Settings Section from the View menu Information display Displaying the layout grid A layout grid can be displayed on the active window by checking Show Grid in the Layout Tools palette or by selecting Show...

Page 96: ... out by clicking on the image while holding down the Ctrl Windows or option Macintosh key Pg For more information on 43 Flipping and rotating images TheView Menu To zoom in on the image in the active image window select Zoom In from the View menu Select Zoom Out to zoom the image out If the image no longer fits in the image window you can scroll it using the image window scroll bars Alternatively ...

Page 97: ... sixteen bits per color forty eight bit RGB 32 bit CMYK Converts the image to CMYK at a bit depth of eight bits per color thirty two bit CMYK In the Macintosh version of Nikon Scan you can change the bit depth of images in the active image window by selecting the desired setting from the Bit Depth sub menu in the Nikon Scan menu This can be used for example to scan images at a bit depth of more th...

Page 98: ...d color balance for the entire image LCH Editor Make precise adjustments to brightness color saturation and hue Unsharp Mask Increase the sharpness of images by making edges more dis tinct either over the entire image or where a selected color predominates The image opened in the host application after scanning is the image after any changes made in the scan window to curves color balance LCH sett...

Page 99: ...e image is scanned You can then save the image in NEF format after adjusting brightness contrast color balance and sharpness in the Nikon Scan applet You can later open the image undo the changes or make further adjustments as desired and then save the results in a different format and in a separate file repeating the process as often as necessary NEF is supported only in Nikon Scan and Nikon Capt...

Page 100: ...n Most Macintosh users will be able to view files of this type This format is not available in theWindows version of Nikon Scan and does not support CMYK sixteen bit grayscale or sixteen bit RGB Reference The Nikon Scan Applet JPEG EXIF JPEG JFIF JPEG is adequate for images that will be output at low resolution or distributed in electronic form Images can be compressed allowing more images to be s...

Page 101: ...alog shown below The Print Setup dialog contains the following options Option Description Name Select the destination printer from this drop down list Properties Change settings for the selected printer Size Choose a paper size Source Choose a paper tray Orientation Choose from Portrait tall or Landscape wide Step 2 Preview how the image will print Choose Print Preview from the File menu for a pre...

Page 102: ...me Zoom In Zooms the preview image in You can also zoom in by clicking on the preview image Zoom Out Zooms the preview image out Close Closes the Print Preview window Prev Page Previews the previous page of a multi page document Step 3 Print the image To print the image click the Print button in the Print Preview window or select Print from the File menu you can also print the image in the active ...

Page 103: ...gs for your printer using the Page Setup option in the File menu The options available in the Page Setup dialog depend on the printer currently selected in the Chooser see your printer documentation for details Step 2 Print the image To print the image select Print from the File menu to display the Print dialog for the type of printer selected in the Chooser After choosing a printer specifying the...

Page 104: ... be used to adjust a variety of scan window settings The following options are available Option Description Tools Like the Tools button in the scan window this sub menu can be used to open the Tool Chest Scan Progress window or the scan window for a selected device see 40 Preferences Windows only Opens the Preferences dialog see 105 Settings When a scan window is active this sub menu offers the sa...

Page 105: ... and forth between the Natural and Processed panes in the preview area Selection Cursor has the same effect as clicking the button in the Layout Tools palette Focus Cursor has the same effect as clicking the but ton in the Layout Tools palette Other menu options For more information on the menu options not covered in this chapter see the Nikon ScanVisual Index in Appendix A Pg For more information...

Page 106: ...f the controls in the scan window Viewing the Preferences Dialog To display the Preferences dialog click the Prefs Preferences but ton in the scan window If you are using Nikon Scan as a stand alone application you can also open the Preferences dialog by selecting Prefer ences from the Nikon Scan menu Windows or Edit menu Macintosh ...

Page 107: ...when scanning mul tiple selected images Batch Scans The default format for saving images File Saving The operations performed automatically when film is inserted in the scanner Automatic Actions White point gray point and black point selection Advanced Color The operations performed automatically during preview Pre view Settings The color and spacing of the grid displayed when Show grid is checked...

Page 108: ...tem or Nikon CMS ensures that the image data from your Nikon scanner are reproduced consistently and accurately on your system s monitor or printer With this powerful tool you can manipulate colors using either a CMYK or calibrated RGB color model before the data are passed to your imaging application Profiles detailing the color characteristics of the chosen color model and the output de vice mon...

Page 109: ...model of scanner used and the type of media posi tive or negative being scanned Color Space Profiles Separate profiles are available for the RGB and CMYK color models Nikon Scan comes with a selection of profiles for the RGB color model while CMYK profiles for color print ers are usually provided by the manufacturer Color space profiles are used when editing images in the scan window and when maki...

Page 110: ... the final scan the scan data are processed according to the selected color space profile and any changes that were made using the color en hancement and Unsharp Mask tools in the scan window The data are then transferred to the host application or opened in image windows in Nikon Scan Where possible the color space profile is transferred to the host application together with the image data The TW...

Page 111: ...r repro duction as described above under the heading How Nikon CMS Works Because color management profiles typically contain their own settings for gamma the controls in the Gamma tab are dimmed and inactive When the check box is off monitor and color space profiles are not used and the controls in the Color Management tab are dimmed and inac tive The only tool available for ensuring that colors f...

Page 112: ...lable The default for the Win dows version of Nikon Scan is an sRGB profile that for the Macintosh version a profile designed for Apple 17 monitors with D50 white see below for details To use the default profile for your platform select Use factory default moni tor profile Use custom monitor profile Use this option to select a profile supplied by the company that manufactured your monitor When thi...

Page 113: ... the out put level for mid tones Windows and Macintosh systems pro cess video signals differently and these differences are reflected in the difference in the standard gamma values for these plat forms The default system gamma for Macintosh computers is 1 8 the de facto standard forWindows systems 2 2 Nikon CMS includes eight RGB profiles with aWindows gamma of 2 2 sRGB Bruce RGB NTSC 1953 Adobe R...

Page 114: ...he blue end of the spectrum 380 nm is at the bot tom left corner the red end of the spectrum 780 nm at the bottom right corner The straight diagonal line connecting these two points represents the different shades of purple created by combining red and blue light The colors inside the area en closed by these lines are created by mixing light of different wavelengths No color profile is capable of ...

Page 115: ... x y 0 67 0 33 x y 0 21 0 71 x y 0 14 0 08 Bruce RGB 6500K D65 x 0 3127159 y 0 3290015 2 2 Bruce RGB x y 0 64 0 33 x y 0 28 0 65 x y 0 15 0 06 Adobe RGB 1988 6500K D65 x 0 3127159 y 0 3290015 2 2 Adobe RGB 1998 x y 0 64 0 33 x y 0 21 0 71 x y 0 15 0 06 CIE RGB Std Illuminant E x 0 3333333 y 0 3333333 2 2 CIE RGB x y 0 735 0 265 x y 0 274 0 717 x y 0 167 0 009 Wide Gamut RGB 5000K D50 x 0 3457029 y...

Page 116: ...larly wide area devoted to the reproduction of blues The corresponding RGB setting in Photoshop 5 0 is Color Match RGB Apple RGB compensated gamma 1 8 This profile defines tristimulus red green and blue chromatic ity as the intersection of the curve that marks the limits of the visible gamut with lines drawn from the Apple RGB white point and passing through the points that define tristimulus chro...

Page 117: ...d in the standard install of Photoshop 5 0 but can be selected as the RGB color space profile for Photoshop by im porting the profile NkBruce icm NTSC 1953 gamma 2 2 This is the color space for video defined by the NationalTelevi sion Standards Committee NTSC in 1953 and used in early color televisions This color space is also used in some Far East newspaper and printing organizations The correspo...

Page 118: ...ed on moni tors and printers It is output to the host application as Wide Gamut RGB If you are scanning images into Photoshop 5 0 using this profile you can set the Photoshop RGB profile to Wide Gamut RGB Scanner RGB gamma 2 2 This profile replicates the color space achieved when scanning with Nikon CMS off It is used when you want to use the LCH editor and Unsharp Mask tools which are not availab...

Page 119: ...rofile is used when Use default CMYK is se lected Use custom profile Use this option to select a profile supplied by the company that manufactured your printer When this option is selected the Choose Custom Profile button will be active Click ing this button displays a standard open file dialog where you can navigate to the disk and folder containing the manufacturer s profile The path to the sele...

Page 120: ...cm Bruce RGB NKBruce icm NTSC 1953 NKNTSC cim Adobe RGB 1998 NKAdobe icm CIE RGB NKCIE icm Profile File name Wide Gamut RGB NKWide cim Apple RGB NKApple icm Color Match RGB NKMatch icm Apple RGB compensated NKApple_CPS icm Do not use the Scanner RGB profile when scanning images for use in a third party application If you are using Nikon Scan as an acquire plug in for the Macintosh version of Adobe...

Page 121: ...ation These adjustments to gamma are made in the Gamma tab of the Pref erences dialog see below The illustration below shows how scanning proceeds when Nikon CMS is off The image shown in the preview window is adjusted for display on the monitor according to the value cho sen for preview gamma in the Gamma tab When the Scan button is clicked the main scan gamma and any changes to curves and color ...

Page 122: ...le however The first is when Nikon Scan is used as a stand alone application the second when Use preview gamma is selected as the main scan gamma option In these cases preview gamma is applied to image data passed to the host application Preview gamma defaults to a value of 1 8 on the Macintosh 2 2 on Windows computers To choose a setting suited to your monitor adjust the value so that the pattern...

Page 123: ...ort gamma transfer If Use application gamma is selected with a Macintosh application that does not support this fea ture Macintosh system gamma 1 8 will be used Use custom gamma When this option is selected a value for main scan gamma can be entered in the text box Reference Preferences Main scan gamma Main scan gamma options are only visible when Nikon Scan is being used as a TWAIN source or acqu...

Page 124: ...pe and in the Macintosh version of the program creator The File Locations Scratch DisksTab The File Locations Windows or Scratch Disks Macintosh tab is where you choose the folder or volume disk that will be used for temporary storage or virtual memory while Nikon Scan is in operation While Nikon Scan requires a minimum of twenty MBs of free hard disk space for temporary storage while in operation...

Page 125: ...sired drive and folder Reference Preferences Changes to File Locations settings only take effect after you have quit and restarted Nikon Scan Macintosh The Scratch Disks tab is shown below The volume used for temporary storage can be chosen from the Volume Name pop up menu The amount of space avail able on the selected disk is shown under the menu Changes to Scratch Disks settings only take effect...

Page 126: ...type supports compres sion you can control the amount using this menu Use alternate creator code Macintosh only If this box is checked you can choose a new creator type by clicking the Choose button navigating to the folder containing the application you wish to use as the creator and selecting the application This option is not available in the Windows version of Nikon Scan Default file format Se...

Page 127: ...s after scanning such as saving the scanned images directly to disk Separate settings are avail able for scanning images one at a time and for batch scans Batch scan Batch scanning refers to automated scanning of multiple im ages Batch scanning can be performed when multiple frames are selected in the thumbnail drawer or when the optional SF 200 S slide feeder 4000 ED LS 2000 only is used for au t...

Page 128: ...r Extras 98 Saving images to disk Once an autofocus or autoexposure operation has been per formed for the current frame the operation will not be re peated before a preview or scan If desired you can use the autofocus and autoexposure buttons in the scan window to ensure that these operations are performed before preview ing or scanning images If Perform auto focus when film is inserted is selecte...

Page 129: ...e Batch ScanTab The Batch Scan tab is used to specify the tasks performed auto matically before during and after batch scans The Batch Scan tab contains the following options Before batch scan Option Description Create scan log If this item is checked a log showing the operations performed and errors that occurred during the batch scan will be displayed in the Log tab of the Progress window If Sav...

Page 130: ... positives Pg For more information on 37 The autofocus and autoexposure buttons 57 Scanner Extras Once an autofocus or autoexposure operation has been per formed for the current frame the operation will not be re peated before a preview or scan If desired you can use the autofocus and autoexposure buttons in the scan window to ensure that these operations are performed before preview ing or scanni...

Page 131: ...n the scanned images will be saved to disk in stead of being opened in image windows in Nikon Scan When the Scan button is clicked a dialog will appear where you can specify a location and file type and choose how the files will be named This option has no effect when Nikon Scan is being used as a plug in orTWAIN source for another application The default option is off Stop on errors If this item ...

Page 132: ...ts assigned in as cending order from a user specified starting point and a suffix The options in the File Naming area control the prefix file num ber and suffix Item Description Suffix Enter the desired suffix up to forty letters Number of digits Use this slider to select the number of dig its for the file number from one to six Prefix Enter the desired prefix up to forty letters Starting Index Fi...

Page 133: ...irty one characters Colons are not allowed Windows In environments that do not support long file names the maximum length is eight characters file names may not contain spaces quotes or any of the following characters and Where long file names are supported the maximum length is 255 characters File names may not contain quotes or any of the following characters and File Saving A Item Description F...

Page 134: ...ically perform a pre view when a slide is inserted in the MA 20 S slide mount adapter or the optional SF 200 S slide feeder If Multiple image adaptor is checked the scanner will au tomatically perform a preview using user default settings when film is inserted in a multi frame adapter if no user defaults are defined factory defaults will be used Option Description Perform autofocus when focus poin...

Page 135: ...grayscale are 255 for each channel which displays as white on most computer monitors The factory defaults for the gray point are 128 for each channel which displays as a neutral gray while the defaults for the black point are zero for each channel which displays as black In the case of CMYK the factory de faults for the white point are 0 for each channel which means that true whites will be the sa...

Page 136: ...to contrast operations in the Curves and LCH Editor pal ettes calculate the input values for the white point and black point By default the white point is set to a value that excludes 0 5 of the brightest pixels in the current crop the black point to a value that excludes 0 5 of the darkest pixels in the crop This produces an optimal dynamic range with minimum loss of detail in shadows and highlig...

Page 137: ...cription Option Cache preview image for slide mount adapter Check this item to store the last preview created with the MA 20 S slide mount adapter This preview will be displayed the next time Nikon Scan is started or when the MA 20 S is next inserted in the scanner Auto exposure for negative film Check this item to perform an autoexpo sure operation as necessary when pre viewing film negatives Aut...

Page 138: ...lines the sub grid as broken lines The following options are available Option Description Display grid line every Enter the spacing for the layout grid Units can be selected from the pop up menu to the right of this text box Color The color of the grid is shown in the box next to this item A new color can be se lected by clicking this box Macintosh or by selecting a color from a pop up menu Window...

Page 139: ...oting pp 146 147 Reinstall Custom Install pp 148 152 AboutThis Section The appendices provide A clickable index to Nikon Scan s windows menus and buttons A guide to what to do when Nikon Scan does not function as expected Instructions on reinstalling Nikon Scan ...

Page 140: ... Scan s windows menus and palettes For more information click a menu option or tool button to open the manual to the page that explains its function Information on menu commands not detailed elsewhere may be found in the notes on these pages The Scan Window Appendix A Nikon ScanVisual Index ...

Page 141: ...140 TheTool Chest LayoutTools Information Crop Appendix A Nikon ScanVisual Index Curves Color Balance LCH Editor ...

Page 142: ...141 The Scan Progress Window Appendix A Nikon ScanVisual Index TheTool Chest continued Digital ICE Cubed Analog Gain Scanner Extras ...

Page 143: ...142 The Preferences Dialog Appendix A Nikon ScanVisual Index ...

Page 144: ...143 The Nikon Scan 3 0 Window Windows Image Window Macintosh Appendix A Nikon ScanVisual Index ...

Page 145: ...y cut and paste commands The Copy Ctrl C shortcut can be used to copy selected portions of an image as well as text Close Closes the active image window Save Saves the image in the active window under its existing name About Nikon Scan 3 0 Displays version information for Nikon Scan Arrange Icons Arranges any minimized image windows along the bottom of the Nikon Scan 3 0 window Cascade Arranges im...

Page 146: ...s The Undo Z Cut X Paste V Clear Del and Se lect All A com mands are only active during text entry in dialogs such as the Save As dialog when they allow you to use keyboard shortcuts to cut paste and clear text undo copy cut paste and clear commands and select all the text in the current text box The Copy C shortcut can be used to copy selected portions of an image as well as text Nikon Scan Help ...

Page 147: ...ectly installed or the device drivers are missing or corrupted See the manufacturer s manuals for details The scanner device drivers are not correctly installed Windows only See the scanner hardware manual for details Your computer does not meet the specifications given in the system require ments Nikon Scan is not correctly installed Reinstall Nikon Scan as described in Appendix C The film jams i...

Page 148: ...t The scanned image is too dark 111 118 112 121 The monitor profile chosen in the Color Management tab of the Preferences dialog does not match your monitor The CMYK profile chosen in the Color Management tab of the Preferences dialog does not match your printer The RGB color space profile chosen in the Color Management tab of the Preferences dialog has the wrong gamma value for your platform You ...

Page 149: ...nstall the program This appendix describes how to uninstall and reinstall Nikon Scan on both the Macintosh andWindows platforms It also explains the Custom Install option available in the Macintosh version of the Nikon Scan installer Reinstalling Nikon Scan Before reinstalling Nikon Scan you will need to uninstall the program Appendix C Reinstall Custom Install Windows Step 1 Export saved settings...

Page 150: ...ller Before starting the Nikon Scan in staller quit any other programs that may be running including any virus checking software Insert the Nikon Scan 3 CD into the CD ROM drive and double click the installer icon The window shown at right will be displayed click Continue Depending on where you purchased your scanner the Nikon Scan 3 CD will contain installers for from one to four language version...

Page 151: ...cuments and Settings All Users Application Data Nikon Nikon Scan 3 0 Settings Click here to proceed to the next step Appendix C Reinstall Custom Install Macintosh Step 3 Uninstall Nikon Scan After you have accepted the license agreement and clicked Continue to close the ReadMe file the dialog shown at right will be displayed To uninstall Nikon Scan first select Uninstall from the pop up menu in th...

Page 152: ...main after Nikon Scan is uninstalled which may affect the operation of Nikon Scan after reinstallation To prevent this problem Nikon Scan comes with a special utility called RegSweeper which re moves all registry entries created by Nikon Scan 4 1 Read the RegSweeper manual located on the Nikon Scan 3 0 CD in the folder NKScan NikonScan3 Utilities PDFfile To view the manual using Adobe Acrobat Read...

Page 153: ...ontinue Step 3 Select components The installer dialog will display the options shown below To select the components you want to install check the box to the left of the item If you intend to use Nikon Scan solely as a plug in for another application you can choose to install only the Nikon Scan plug in Note however that to use Nikon Scan as a stand alone application you will need to install Nikon ...

Reviews: