55
www.climacoolcorp.com
Heat Exchangers
Draining
When performing standard maintenance procedures
such as flushing a heat exchanger, it will be necessary to
close off a section of a module. This can easily be done
if factory mounted water isolation valves are provided .
Access to a floor drain is helpful when performing standard
maintenance procedures .
Back Washing
It may become evident from the recorded weekly log
data that the performance of the chiller is gradually
degrading . This could be due to a buildup of debris or sludge
obstructing the free passage of flow through the heat
exchangers . This debris can be removed by a back washing
process, which involves the introduction of a forced, violent,
backwards flow through the heat exchanger, using a
carefully formulated flushing solution. To be effective, this
back flow should be slightly higher than the normal flow,
and in the opposite direction. The difficulties and practicality
of this method depends on the back wash pumping system
itself. Another method would be to back flush each heat
exchanger using city water as opposed to system water (see
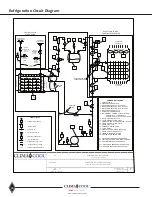
Figure 25 on page 55 – City Water Cleaning Arrangement) .
The back washing procedure is accomplished by isolating
each individual heat exchanger and introducing the city
water using a connection hose to the 3/4” service port to flow
in an opposite direction from the normal heat exchanger
flow direction. On the opposite 3/4” service port, connect a
drain hose to run to a suitable floor drain. Continue back
flow until all debris is removed.
WARNING: Water valves
must be re-opened after flushing is complete.
Chemical Clean In Place Washing Without
Water Isolation Valves
Chemical clean in place washing will typically provide
the best debris removal, even from severely clogged
heat exchangers . In order to clean the heat exchangers
for modules
WITHOUT
water isolation valves, it will be
necessary to mechanically and electrically isolate each
module separately from the bank of modules . The rest of
the chiller modules will need to be disabled during this
cleaning procedure, as the flow through the main bank
header will be interrupted . The cleaning tank, pump and
pump strainer should be arranged in the manner shown
in Figure 26 on page 55 - In Place Cleaning Arrangement .
The flow of the cleaning is arranged in the opposite flow
to the normal operational direction . Connection points are
provided using the 3/4” service ports at each heat exchanger.
The cleaning solution used can be either a detergent or hot
water to remove particles and simple cleaning . If correct
water treatment has been implemented, this should provide
adequate cleaning for most situations . The solution can
be pumped through the heat exchangers and allowed to
“soak” for a time and then pumped again . Upon successful
cleaning of a module, proceed to isolate a second module
separately from the bank to repeat the cleaning process .
Chemical Clean In Place Washing With
Water Isolation Valves
Chemical Clean in place washing will typically provide
the best debris removal, even from severely clogged
heat exchangers . It is only necessary to mechanically and
electrically isolate one chiller module at a time . The rest
of the chiller modules can continue to operate to satisfy
the cooling load required . The cleaning tank, pump and
pump strainer should be arranged in the manner shown
in Figure 26 - In Place Cleaning Arrangement. The flow of
the cleaning is arranged in the opposite flow to the normal
operational direction . Connection points are provided using
the 3/4” service ports at each heat exchanger. The cleaning
solution used can be either a detergent or hot water to
remove particles and simple cleaning . If correct water
treatment has been implemented, this should provide
adequate cleaning for most situations . The solution can
be pumped through the heat exchangers and allowed to
soak for a time and then pumped again . If it is required to
remove carbonates, then an acidic wash should be used . A
2% solution of phosphoric or sulfamic acids in pure water
are generally acceptable . These acid solutions should only
be allowed to circulate within the heat exchanger for 10 to
15 minutes, followed by a thorough pure water flush for 10
to 15 minutes .
Hydrochloric or sulfuric acids must not be
used.
In any case, consult the chemical supplier to establish
the correct formulation and handling process . The materials,
which will be exposed to the wash, are stated on page 24 –
Water Treatment .
Once the washing is complete, the solution should be flushed
out completely by pumping clean, fresh water through the
chiller . To achieve a reasonable level of dilution, it may be
required to change the water several times . After cleaning,
the water quality and water treatment should be confirmed.
Summary of Contents for CLIMACOOL UCR 30
Page 19: ...17 www climacoolcorp com Voltage Phase Monitor Wiring Diagram...
Page 29: ...27 www climacoolcorp com Evaporator Water Pressure Drop Charts...
Page 30: ...28 www climacoolcorp com Glycol Performance Adjustments Factor Charts...
Page 78: ...76 www climacoolcorp com Wiring Diagram...
Page 79: ...77 www climacoolcorp com Wiring Diagram...
Page 80: ...78 www climacoolcorp com Wiring Diagram CoolLogic Control Panel...
Page 81: ...79 www climacoolcorp com Wiring Diagram CoolLogic Control Panel...


