


Disassembly and Reassembly 3-25
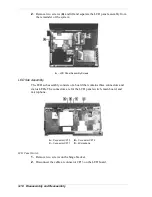
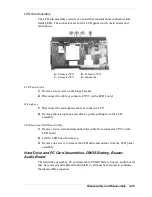
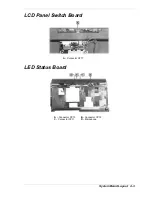
LED Sub Assembly
The LED sub assembly consists of a board that contains three connectors and
status LEDs. The connectors are for the LCD panel switch, main board, and
microphone.
A – Connector CP13
B – Connector CP12
C – Connector CP11
D – Microphone
LCD Panel Switch
1.
Remove two screws on the hinge bracket.
2.
Disconnect the cable at connector CP13 on the LED board.
Microphone
1.
Disconnect the microphone cable at connector CP11.
2.
Remove the microphone and cable by gently pulling from the LCD
assembly.
LED Board and LED Board Cable
1.
Remove two screws and disconnect the cable from connector CP12 on the
LED board.
2.
Lift the LED board to remove.
3.
Remove one screw to release the LED cable and anchor from the LCD panel
assembly.
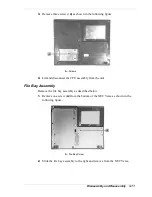
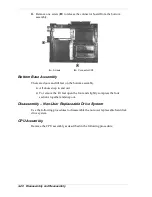
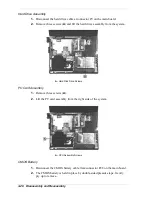
Hard Drive and PC Card Assemblies, CMOS Battery, Buzzer,
Audio Board
The hard drive assembly, PC card assembly, CMOS battery, buzzer, audio board
may be removed and replaced individually or all must be removed to continue
the disassembly sequences.
Summary of Contents for Versa LX
Page 1: ...NEC Versa LX Notebook Computer VERSA LX S E R V I C E A N D R E F E R E N C E M A N U A L...
Page 57: ...3 Disassembly and Reassembly Required Tools and Equipment Disassembly Reassembly...
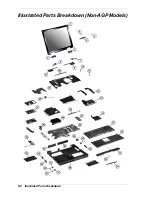
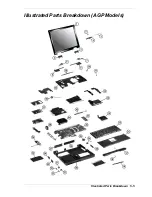
Page 91: ...5 2 Illustrated Parts Breakdown Illustrated Parts Breakdown Non AGP Models...
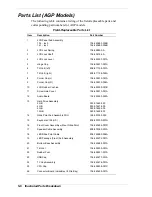
Page 94: ...Illustrated Parts Breakdown 5 5 Illustrated Parts Breakdown AGP Models...
Page 102: ...7 Troubleshooting Quick Troubleshooting Helpful Questions...


