


3-2 Disassembly and Reassembly
Required Tools and Equipment
All NEC Versa LX corrective maintenance procedures can be performed using
the following tools:
Tweezers
Small flat-head screwdriver
Small Phillips screwdrivers (# 1 and # 0)
Right-angled dentist style probe.
Disassembly
This section contains step-by-step disassembly procedures for the system.
Reassembly is the reverse of disassembly. Each procedure is supported by a
simplified disassembly illustration to facilitate removal. The Illustrated Parts
Breakdown and parts lists for the system unit are shown in Chapter 5.
For complete disassembly of the system, follow the disassembly instructions
that follow.
Note:
The following instructions cover two slightly
different disassembly procedures. Some earlier units did not
have a user-removable hard drive. Follow the instructions
carefully to properly disassemble the systems.
When disassembling the system unit, follow these general rules.
Turn off the system and disconnect all power and all options, including
the AC adapter (if connected) and battery packs (see the procedures that
follow).
Do not disassemble the system into parts that are smaller than those
specified in the procedure.
Label all removed connectors. Note where the connector goes and in
what position it was installed.
Note:
Do not interchange boards between non-AGP
and AGP systems.
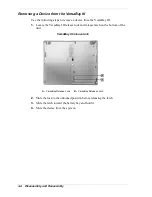
Battery
Remove the battery pack installed in the NEC Versa LX system as follows.
Note:
Use the batteries in the NEC Versa computer for
which they are designed. Also, installing another
manufacturer’s battery, or using a combination of very old
and new batteries can deteriorate battery and equipment
performance.
Summary of Contents for Versa LX
Page 1: ...NEC Versa LX Notebook Computer VERSA LX S E R V I C E A N D R E F E R E N C E M A N U A L...
Page 57: ...3 Disassembly and Reassembly Required Tools and Equipment Disassembly Reassembly...
Page 91: ...5 2 Illustrated Parts Breakdown Illustrated Parts Breakdown Non AGP Models...
Page 94: ...Illustrated Parts Breakdown 5 5 Illustrated Parts Breakdown AGP Models...
Page 102: ...7 Troubleshooting Quick Troubleshooting Helpful Questions...


