background image

4 - 60

Advanced Registration and Setting Operations

Issue 1

NEC IT Series

4.

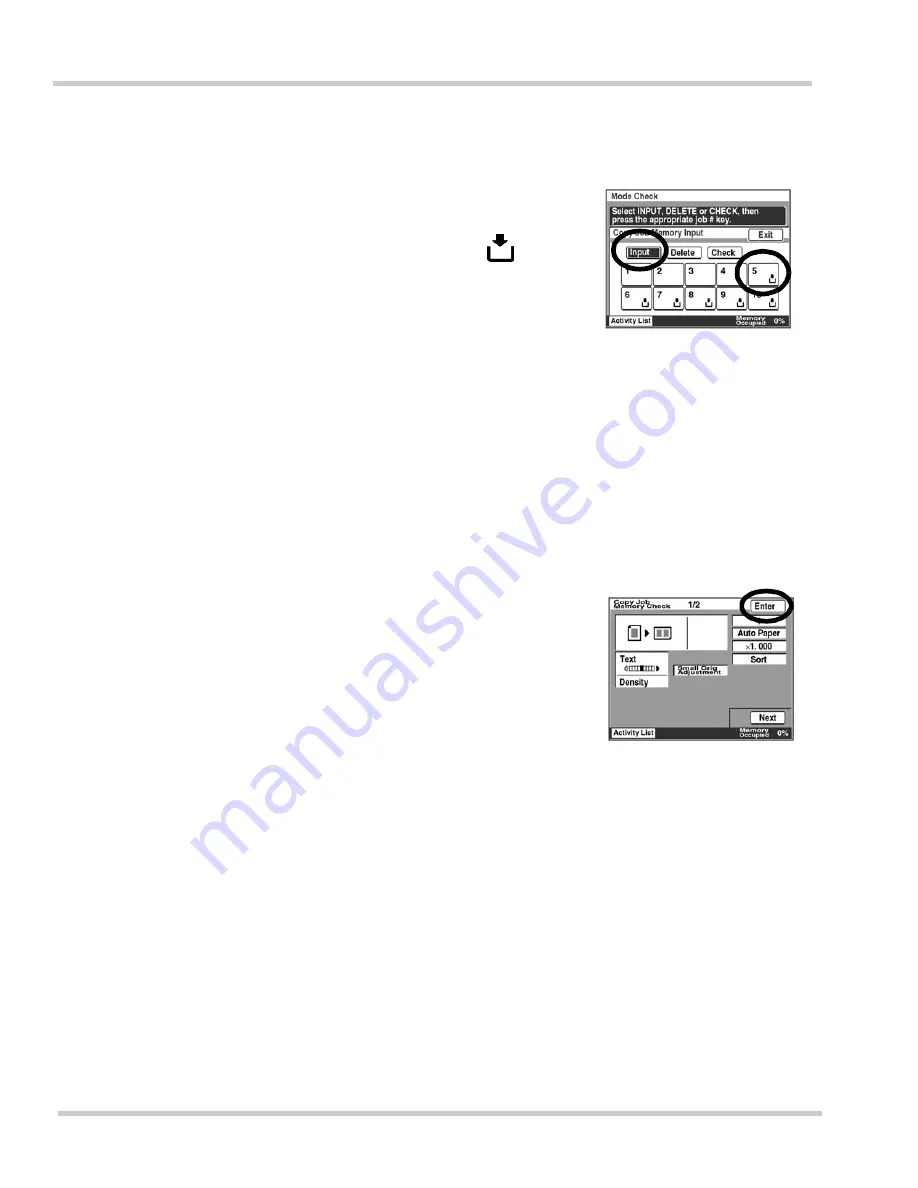
Touch [Input], then touch the 
key to register the program.

i

Keys marked with this 
symbol have not yet 
been programmed.    If 
a new program is 
registered in a key that 
was previously 
registered, the old 
program is deleted.

i

To confirm the registered 
details:

Touch the key that has already been
registered after touching [Check].

i

To delete registration:

Touch the key that is already
registered and touch [Delete].

5.

Touch [Check], then touch the 
programmed key.

6.

Confirm the registered details.  
Touch [Enter] if they are 
correct.

i

There are two type of 
confirmation screens.  When 
[Next] is touched, the screen 
changes to the second one.  
When [Backup] is touched on 
the second screen, it returns to 
the first screen.

7.

Touch [Enter] repeatedly until 
the display returns to the 
stand-by screen.

Registering Copy Programs  (Continued)

Summary of Contents for IT3510

Page 1: ...N E C I T 3 5 1 0 I T 2 5 1 0 O P E R A T I O N S M A N U A L Issue 1...

Page 2: ......

Page 3: ...Operations Manual NEC America Inc Document Solutions CC49001 Issue 1 NEC IT3510 IT2510...

Page 4: ......

Page 5: ...ument has been prepared for the use of employees and customers of NEC America Inc and may not be reproduced without prior written approval of NEC America Inc Windows is a registered trademark of Micro...

Page 6: ......

Page 7: ...ve 5 0 To be certain the number of devices that may be connected to the line as determined by the total RENs contact the telephone company servicing your area to ensure the REN is not exceeded If this...

Page 8: ...erly that is in strict accordance with the manufacturer s instructions may cause interference to radio and television reception It has been type tested and found to comply within the limits for a Clas...

Page 9: ...ingle line individual service may be extended by means of a certified connector assembly telephone extension cord The customer should be aware that compliance with the above conditions may not prevent...

Page 10: ...the RENs of all the devices does not exceed five 5 0 Safety Certifications This equipment has been listed by Underwriters Laboratories and found to comply with all the applicable requirements of the s...

Page 11: ...iological Health CDRH of the U S Food and Drug Administration implemented regulations for laser products on August 2 1976 These regulations apply to laser products manufactured from August 1 1976 Comp...

Page 12: ...machine It is illegal to turn off the TSI feature This facsimile machine meets these requirements by including this information within the Transmitter s Station Identification TSI Please refer to Sec...

Page 13: ...placement of consumables and to perform routine maintenance on the product There is a ventilation duct on the right hand side of the unit A gap of at least six inches 150 mm must be maintained A gap o...

Page 14: ...may result in a fire electric shock or product failure Disconnect the power plug from the wall outlet immediately and contact the dealer for service Do not disassemble or remodel this product Failure...

Page 15: ...if the product falls down or tips over Do not place the product in a humid dusty smoky or steamy environment Such an environment may cause product failure or poor performance in the scanning and prin...

Page 16: ...d and telephone facsimile line connection Failure to do so may damage the power cord and line cable Do not place the power cord near a heater This may cause the power cord to melt thus exposing intern...

Page 17: ...A digital device If this product is used in a residential location it may cause electromagnetic interference In this case the user is asked to take appropriate measures to minimize the interference D...

Page 18: ...ependent wall outlet circuit Do not plug the power cord into a wall outlet that is also powering devices such as air conditioners copiers or refrigerators etc Doing so can cause improper operation due...

Page 19: ...ks etc in a vehicle or area where extreme temperature variations can occur Doing so can result in poor print quality Do not open the wrapping of the toner bottle or imaging unit until it is to be used...

Page 20: ...when storing print paper Be sure to store the paper in a dry low humidly environment Do not unwrap a ream of paper until it is ready for use The wrapping helps keep out moisture Store the paper on a...

Page 21: ...evel that is harmful to your health However the odor produced may be unpleasant if the unit is in an area with poor ventilation In such cases be sure to properly maintain ventilation in the room conta...

Page 22: ...ore than 1 1 2 times the linear dimensions of the original Postal Money Orders Bills Checks or Drafts for Money drawn by or upon authorized officers of the United States Stamps and other representativ...

Page 23: ...l departments and bureaus such as FBI CIA Treasury etc unless a photograph is ordered by the head of such department or bureau Copying the following is also prohibited in certain states Automobile Lic...

Page 24: ...m your NEC authorized dealer when they run out Accessories Operation Manual 1 Quick Reference Guide 1 Telephone line cord 1 Power cord 1 Print paper size label 1 set Imaging Unit 1 Consumables Imaging...

Page 25: ...ar d 91 to 157gm2 OHP sheets Recording system Electronic photographic recording system Power requirements 120VAC 50 60Hz 11 5A Power consumption 3 Stand by Power Saving Mode approx 30W Transmission Mo...

Page 26: ...automatically selected for printing 2 Sided Print Unit Duplex Unit Allows printing on both sides of the print paper Ideal for reports books and publications etc Job Tray Unit Offers sorting by the use...

Page 27: ...t A second facsimile line can be installed allowing the convenience and efficiency of simultaneous sending and receiving Third Tray Unit This tray automatically sorts the printed output from the print...

Page 28: ...22 Regulatory and Safety Information Issue 1 NEC IT Series THIS PAGE INTENTIONALLY LEFT BLANK...

Page 29: ...ntification 6 Section 2 Safety Precautions 7 2 1 Installation Space 7 2 2 Using this Product 8 Section 3 Legal Restrictions To Copying 16 Chapter 1 Getting Started Section 1 Product Overview 1 1 Secti...

Page 30: ...outine Care 1 37 9 1 Installing Print Paper 1 37 9 2 Installing and Replacing the Imaging Unit and Toner Bottle 1 53 9 3 Installing and Replacing the Toner Bottle 1 56 9 4 Installing and Replacing the...

Page 31: ...ity Setting Reset 2 22 Section 2 Advanced Copy Operations 2 23 2 1 Using the Sort Mode While Copying 2 23 2 2 Stapled Binding 2 26 2 3 Hole Punching 2 29 2 4 Mixed Size Original Document Detection 2 3...

Page 32: ...ration 3 7 2 1 Basic Settings 3 7 2 2 Accessing the Administrator Management Screen 3 12 2 3 Registering the Self ID 3 14 2 4 Registering the Self Telephone Number 3 16 2 5 Registering the Transmitter...

Page 33: ...2 Setting the Reception Mode 4 7 2 3 Report Print Settings 4 17 2 4 Copy Settings 4 19 2 5 Printing Settings 4 27 2 6 Power Saving Settings 4 30 2 7 Confirming the Usage Status of Each User 4 34 2 8...

Page 34: ...ne Print and Photos 5 12 2 10 Adjusting Contrast 5 14 2 11 Sending Documents without Reduction 5 15 2 12 Selecting the Scan Area 5 18 2 13 Using Chain Dialing 5 20 Section 3 Basic Receiving Operations...

Page 35: ...rinting TSI Information 6 21 2 12 Destination Insertion 6 22 2 13 Printing the Transmission Report 6 23 2 14 Remote Copying 6 24 2 15 Password Transmission 6 26 2 16 Polling Transmission 6 27 2 17 F C...

Page 36: ...Number List 7 13 1 9 Printing the Program List 7 15 1 10 Printing the Relay Group List 7 16 Chapter 8 Troubleshooting Section 1 Display Icons and Alarm Messages 8 1 1 1 Display Icons 8 1 1 2 Alarm Me...

Page 37: ...Components 1 9 Figure 1 9 Touch Panel Display 1 11 Figure 1 10 User Selection Screen 1 12 Figure 1 11 Utility Screen 1 12 Figure 1 12 Status Display 1 13 Figure 1 13 Auto mode Screen 1 15 Figure 1 14...

Page 38: ...the Paper Width Guide 1 41 Figure 1 35 Adjusting the Paper Length Guide 1 41 Figure 1 36 Loading the Paper Cassette 1 42 Figure 1 37 Pushing In the Paper Cassette 1 42 Figure 1 38 Changing Paper Size...

Page 39: ...Used Imaging Unit 1 54 Figure 1 61 Removing the Packing Items from Imaging Unit 1 55 Figure 1 62 Shaking the New Imaging Unit 1 55 Figure 1 63 Inserting the New Imaging Unit 1 55 Figure 1 64 Closing t...

Page 40: ...86 Displaying the Panel Cleaning Screen 1 71 Figure 1 87 Panel Cleaning Mode 1 71 Figure 1 88 Cleaning the Touch Panel 1 72 Figure 1 89 Reset the Touch Panel Screen 1 72 Figure 1 90 Open the Document...

Page 41: ...Figure 7 1 Activity Report TX Example 7 2 Figure 7 2 Activity Report RX Example 7 4 Figure 7 3 Bulletin Board List Example 7 5 Figure 7 4 User List Examples 7 8 Figure 7 5 User Account Report Example...

Page 42: ...Issue 1 NEC IT Series xiv List of Figures THIS PAGE INTENTIONALLY LEFT BLANK...

Page 43: ...ons 2 25 Table 2 2 Corner Stapling Position 2 28 Table 2 3 2 Point Stapling Position 2 28 Table 2 4 Stapled Number of Pages Per Copied Set 2 29 Table 2 5 Hole Punching Position 2 31 Table 2 6 Examples...

Page 44: ...Issue 1 NEC IT Series xvi List of Tables THIS PAGE INTENTIONALLY LEFT BLANK...

Page 45: ...ring edge adjustment and image repeat are among the many copier features available A full line of document finishing features are also available Stapling hole punching watermarks rotation sorting and...

Page 46: ...walk up and e mail their paper documents directly to any e mail address E mail RX FAX Distribution receives facsimiles to the IT Series unit which automatically converts it into a file and e mails th...

Page 47: ...or entering and registering information Exit Tray Print paper exits the printer in this area Power Switch Cover The power switch is covered to prevent accidental shut off Paper Cassettes No Paper Lamp...

Page 48: ...e Brightness Control Brightness Control Figure 1 3 Open Document Cover Document Pad Document Scanning Area Book Scanner With the document cover opened a document or book is placed on the glass surface...

Page 49: ...ries Issue 1 NEC IT3510 IT2510 Operations Manual 1 5 Figure 1 4 Detaching the Document Feed Tray Swing the tray upright before lifting up to remove it Follow the same procedure in reverse to reattach...

Page 50: ...e Connector for an extra telephone set Line Connector for fax line For Optional 2nd G3 Port Before connecting an extra telephone set check that it can be used on the type of telephone line installed S...

Page 51: ...pier are automatically sorted Documents can be stapled and or hole punched with a Multi staple Finisher as shown 2 Sided Print Unit Allows printing on both sides of paper Large Capacity Cabinet Up to...

Page 52: ...1 8 Getting Started Issue 1 NEC IT Series Figure 1 7 TX Marker Location TX Marker Marks each sheet confirming that it has successfully been scanned...

Page 53: ...the unit Figure 1 8 Operations Panel Components Key Name Function COPY Press this key to copy When this lamp is lit the copy functions are available FAX MAIL Press this key to send a facsimile or e m...

Page 54: ...e pause key can also be used when registering One Touch and Abbreviated dialing keys 10 key Pad Press these keys to enter a facsimile telephone number number of copies desired or other data to be regi...

Page 55: ...elect operations By touching different keys and tabs copy and facsimile functions and registration menus can be selected One type of key changes the actual screen when touched while another type selec...

Page 56: ...and is used to track machine usage by an individual person or department The operator must select their registered name or department before using the machine Utility Screen This screen is used to se...

Page 57: ...s shows the icons displayed during normal machine operation For a complete list of icons used refer to Section 1 1 Display Icons in Chapter 8 Troubleshooting on page 8 1 Figure 1 12 Status Display Tab...

Page 58: ...e the panel backlight simply touch anywhere on the panel surface The panel backlight time out can be set by the user Refer to Section 2 6 Power Saving Settings in Chapter 4 Advanced Registration and S...

Page 59: ...determines this the number of copies required and begins copying When COPY is pressed the copy menu screen is displayed To select the copy function press the COPY key When FAX is pressed the facsimile...

Page 60: ...s screen is used to select the facsimile functions If this equipment is used mainly as a facsimile unit it may be convenient to set this screen as the default stand by screen The facsimile number sele...

Page 61: ...bers total When COPY on the operation panel is pressed the copy menu is displayed Press COPY to select the copy function When Abbr is touched the abbreviated dialing screen is displayed When 10 key Di...

Page 62: ...the operation panel is pressed the copy menu is displayed Press COPY to select the copy function When One Touch is touched the One Touch screen is displayed When 10 key Dialing is touched the dial inp...

Page 63: ...is displayed Press COPY to select the copy function When One Touch is touched the One Touch screen is displayed When Abbr is touched the abbreviated dialing screen is displayed When Quality Reduction...

Page 64: ...dex key When COPY on the operation panel is pressed the copy menu is displayed Press COPY to select the copy function When Enter is touched the One Touch screen is displayed When Abbr is touched the a...

Page 65: ...2 2 Accessing the Administrator Management Screen in Chapter 3 Registration and Setting Operations on page 3 12 Registered user data can be amended by the users Refer to Section 2 8 Amending User Dat...

Page 66: ...ith individual settings When users are not restricted by passwords Open Required No Required Not Required When users are restricted by passwords Open Required Yes Required Required User Selection 1 Pr...

Page 67: ...ransmission When users are restricted Access must be pressed once the task is completed This prevents unauthorized usage after the current operation is finished When Access is pressed all settings for...

Page 68: ...efer to Chapter 5 Basic Sending and Receiving Operations Load the Document Using various copy functions Press the COPY key Refer to Chapter 2 Copy Operations Use the 10 key Pad to enter numbers IT3510...

Page 69: ...t be handled by the ADF such as books catalogs and bound materials 5 1 Using the Automatic Document Feeder ADF 1 Place the document face up at the left side of the Document Feed Tray The right side is...

Page 70: ...the back the entire document may be reduced when transmitted 4 When Book on the Orig Copy is used adjust the center of the document to the mark on the Book Scanner 5 Close the Document cover before b...

Page 71: ...ause the ADF scanning operation to be suspended Ensure that no pages are left on the Book Scanner glass The ADF will not operate with a page left on the Book Scanner glass When Documents are placed on...

Page 72: ...cape Documents larger than Ledger 11 by 17 size When used with the Document Cover open If the paper being scanned is very thin marks on the Document Cover may affect image quality In this case place a...

Page 73: ...re shown in Figure 1 22 Maximum and Minimum Document Sizes Any size of up to Ledger 11 by 17 can be copied or transmitted using the Book Scanner Maximum Number of Pages in the ADF Up to 70 pages can b...

Page 74: ...describes how to quit an operation in progress Press the Stop Key Press the Stop key when setting functions or registering information When the machine is operating the function that is currently bein...

Page 75: ...pressed while copying operation is halted When halted copying may be resumed by pressing the Start key Pressing the Panel Reset key and all settings for copy and facsimile functions are cleared Figure...

Page 76: ...erruption is not possible during document scanning for transmission When a facsimile is received while operation is interrupted the received data is stored in memory without being printed For more det...

Page 77: ...nding Operations in Chapter 5 Basic Sending and Receiving Operations on page 5 1 3 Press Interrupt 4 The machine will return to the pre interrupted status i The interrupted operation can be continued...

Page 78: ...AX Menu confirmation screen FAX Menu settings can be confirmed and reset Copying Settings confirmation screen The copy functions that have been set can be confirmed The settings can also be reset or c...

Page 79: ...leted then touch Del i To confirm the communications mode etc Select the key for the number to be confirmed and touch Detail Description of the screen This icon indicates a number selection by a One T...

Page 80: ...Touch the key for the function to be canceled The appearance of the key returns to normal 2 Touch Enter The display returns to the FAX screen Confirming the Copy Settings 1 Press Mode Check on the Cop...

Page 81: ...aper has run out a red LED on that cassette lights This LED will flash when the paper is at low status Use only the recommended paper When the paper size of the cassette is changed be sure to change t...

Page 82: ...d Issue 1 NEC IT Series Loading paper Multi purpose cassette 1 Pull out the paper cassette 2 Push down on the paper support until it locks Figure 1 28 Pulling Out the Paper Cassette Figure 1 29 Lockin...

Page 83: ...f paper into the cassette being careful not to exceed the maximum load This maximum is indicated by a mark on the paper guide 4 Push the paper cassette back into the machine Figure 1 30 Loading the Pa...

Page 84: ...ue 1 NEC IT Series Changing the Paper Size Multi Purpose Cassette 1 Pull out the paper cassette 2 Push down on the paper support until it locks Figure 1 32 Pulling Out the Paper Cassette Figure 1 33 L...

Page 85: ...41 3 Pinch the paper width guide with your fingers and slide the paper guide to the desired width 4 Hold the paper length guide and slide the guide to the desired length Figure 1 34 Adjusting the Pap...

Page 86: ...ul not to exceed the maximum load This maximum is indicated by a mark on the paper guide 6 Push in the paper cassette and replace the paper size label to reflect the size currently installed Figure 1...

Page 87: ...gular sized paper Touch X or Y and select the size in inches on the free size screen X can be set between 51 2 and 17 inches while Y can be set between 3 9 16 and 11 11 16 inches If the maximum value...

Page 88: ...Enter 3 Touch Enter repeatedly until the screen returns to the stand by screen i If OHP or Card is selected hole punching stapling and 2 Sided Copying cannot be used Loading Paper Universal Cassette 1...

Page 89: ...sh down on the paper support until it locks 3 Insert a quantity of paper into the cassette being careful not to exceed the maximum load This maximum is indicated by a mark on the paper guide Figure 1...

Page 90: ...Series 4 Push the paper cassette back into the machine Loading Paper Fixed Universal Cassette 1 Pull out the paper cassette Figure 1 44 Pushing In the Paper Cassette Figure 1 45 Pulling Out the Paper...

Page 91: ...sh down on the paper support until it locks 3 Insert a quantity of paper into the cassette being careful not to exceed the maximum load This maximum is indicated by a mark on the paper guide Figure 1...

Page 92: ...ng the Paper Size Universal Cassette only i The print paper size is fixed for the Fixed Universal cassette To change the size contact your dealer or service center 1 Pull out the paper cassette Figure...

Page 93: ...tions Manual 1 49 2 Push down on the paper support until it locks 3 Pinch the paper length guide with your fingers and slide the paper guide to the desired length Figure 1 50 Locking the Paper Support...

Page 94: ...and slide the guide to the desired width 5 Insert a quantity of paper into the cassette being careful not to exceed the maximum load This maximum is indicated by a mark on the paper guide Figure 1 52...

Page 95: ...51 6 Push in the paper cassette and replace the paper size label to reflect the size currently installed Installing Paper Large Capacity Cabinet 1 Pull out the paper cassette Figure 1 54 Pushing In th...

Page 96: ...tte being careful not to exceed the maximum load This maximum is indicated by a mark on the paper guide Paper can be installed in both sides of the cassette 3 Push the paper cassette back into the mac...

Page 97: ...t is already being used in the machine do not pull out the IU unless the alarm message is displayed on the touch panel screen Keep the IU in a flat horizontal position at all times Only use an NEC Ame...

Page 98: ...e pushing firmly against the machine s body with your thumbs i This step is not necessary when installing the initial IU 3 While holding the handle with one hand gently pull out the used IU i This ste...

Page 99: ...IU 5 Shake the new IU horizontally about four to five times 6 Set the new IU on the rails inside the machine Push in the IU all the way until it locks into place Figure 1 61 Removing the Packing Item...

Page 100: ...Issue 1 NEC IT Series 7 Close the side cover 9 3 Installing and Replacing the Toner Bottle 1 Pull down on the toner bottle housing area cover Figure 1 64 Closing the Side Cover Figure 1 65 Opening th...

Page 101: ...ly tap the new toner bottle four to five times on each end top and bottom against a firm surface This will loosen any settled toner 4 Shake the new toner bottle well to loosen up the toner inside i Tu...

Page 102: ...er inside the bottle i Remove the sticker very slowly to prevent the toner from spilling out 6 Make sure the UP mark is facing upwards and install the toner bottle in the machine Insert the toner bott...

Page 103: ...Toner Supply If the print is still faint immediately after toner replacement execute the toner supply procedure For details on this procedure refer to Section 5 Toner Replenishment in Chapter 8 Troubl...

Page 104: ...nstalling and Replacing the TX Marker 1 Lift up on the Document Feed Tray 2 Pull out the used Marker i This step is not necessary on an initial Marker installation Figure 1 72 Lifting the Document Fee...

Page 105: ...sue 1 NEC IT3510 IT2510 Operations Manual 1 61 3 Insert the new Marker in place 4 Lower the Document Feed Tray to the operating position Figure 1 74 Installing a New Marker Figure 1 75 Lowering the Do...

Page 106: ...staples will need to be added to the stapler When the warning message There are no staples is displayed the staple supply is exhausted and will need replacement Installing and Adding the Staple Cartri...

Page 107: ...er 4 Pull out the empty staple cartridge from the staple holder 5 Insert a new staple cartridge into the staple holder and carefully remove the stopper sticker Figure 1 78 Removing the Stapling Holder...

Page 108: ...der into the stapling unit 7 Insert the stapling unit so that the arrows are aligned 8 Rotate the cover knob clockwise while pushing it down Figure 1 81 Installing the Refilled Staple Holder Figure 1...

Page 109: ...jammed staple can be removed 3 Replace the staple holder i After a staple jam has been cleared stapling may not occur for a maximum of 10 times until the sheet of staples is brought into position 9 6...

Page 110: ...the dial knob then pull out the staple holder 3 Pull out the empty staple cartridge from the staple holder 4 Insert a new staple cartridge into the staple holder and carefully remove the stopper stick...

Page 111: ...EC IT3510 IT2510 Operations Manual 1 67 6 Connect the Single staple Finisher to the main unit Multi staple Finisher 1 Disconnect the Multi staple Finisher from the main unit 2 Open the cover Single st...

Page 112: ...ull out the empty staple holder 4 Push both sides of the staple holder on the position marked PUSH with thumb and forefinger 5 Pull out the empty staple cartridge from the staple holder 6 Insert a new...

Page 113: ...e staples run out an error message is displayed on the touch screen panel Replace the empty holder with the refilled holder i If a staple jam occurs an error message is displayed on the touch screen p...

Page 114: ...lure The panel cleaning screen should be selected on the touch panel before cleaning it begins i Both the glass surface of the document scanning area and the document feed rollers should be cleaned of...

Page 115: ...10 IT2510 Operations Manual 1 71 Cleaning the Touch Panel 1 The panel screen should be displayed Figure 1 86 Displaying the Panel Cleaning Screen Figure 1 87 Panel Cleaning Mode Press Utility Select M...

Page 116: ...lean the Touch Panel 3 Press Panel Reset to return to the Utility screen Cleaning the Document Scanning Area 1 Open the document cover Figure 1 88 Cleaning theTouch Panel Figure 1 89 Reset theTouch Pa...

Page 117: ...NEC IT3510 IT2510 Operations Manual 1 73 2 Clean the document scanning area glass top and document pad 3 Clean the top white rollers Figure 1 91 Cleaning Areas Figure 1 92 Clean White Rollers Clean h...

Page 118: ...ollers 1 Lift up on the document hopper 2 Clean the eight feed rollers in the hopper area Refer to Figure 1 95 Cleaning the Document Feed Rollers Figure 1 93 Close the Document Cover Figure 1 94 Lifti...

Page 119: ...3 Lift the document hopper up as well and clean the four lower rollers 4 Return the document hopper cover and the document hopper to their original positions Figure 1 96 Cleaning the Four Lower Rolle...

Page 120: ...ent Feeder Cover 2 Wipe the surface of the Document Transport Belt with a clean soft cloth 3 Hold the Document Transport Belt at both edges and pull it to the left to expose a new surface Figure 1 98...

Page 121: ...0 IT2510 Operations Manual 1 77 4 Clean the fresh surface by using the soft cloth 5 Repeat these steps until the entire surface of the Belt is wiped clean 6 Close the Document Feeder Cover Figure 1 10...

Page 122: ...1 78 Getting Started Issue 1 NEC IT Series THIS PAGE INTENTIONALLY LEFT BLANK...

Page 123: ...to determine how to begin the Copy mode Auto mode screen Copying is available whenever this screen is displayed If four digits or more are input three digits for the IT2510 or a number beginning with...

Page 124: ...call on page 2 5 1 1 Copying with the Automatic Document Feeder The Automatic Document Feeder ADF allows up to 70 pages at a time to be placed into the feeder Each page is scanned one by one and exits...

Page 125: ...the stand by screen i If Memory is Full Retry copying later if the facsimile function is being used If paper is empty refill the cassettes as needed Refer to Section 9 1 Installing Print Paper in Cha...

Page 126: ...IT2510 can be made 5 Press Start Copying will now begin i To Stop Copying Press Stop to cease copying Press Panel Reset for the stand by screen i If Memory is Full Retry copying later if the facsimil...

Page 127: ...only when the function is available Memory Recall is not available in the following cases When the power is turned off When a new document is scanned When Start is pressed When Access or Interrupt is...

Page 128: ...priority For details refer to Section 2 4 Copy Settings in Chapter 4 on page 4 19 If an irregularly sized document is set any size other than letter or legal size the document size may not be detected...

Page 129: ...he paper cassette in accordance with the original document s direction i When the Auto Paper key is touched Paper will automatically be selected in accordance with the original document s size and zoo...

Page 130: ...2 8 Copy Operations Issue 1 NEC IT Series 2 Press COPY 3 Select Basics and touch Paper 4 Touch Bypass Copying with the Manual Bypass Tray Continued...

Page 131: ...made when using the Bypass Tray Paper Sizes andTypes Regular Size Letter or Legal 1 Touch the cassette paper size i Print paper selection should be made in accordance with the original document s siz...

Page 132: ...the cursor Sizes available X 5 1 2 inches to 17 inches 140 to 432 mm Y 3 9 16 inches to 11 11 16 inches 90 to 297 mm Copying on OHP paper or Card 1 Touch OHP Card 2 Select the paper type and touch En...

Page 133: ...paper that has been printed on one side This can lead to paper jamming Try to insert the paper slightly deeper once the paper hits the end If a large sheet of print paper is being used support the loo...

Page 134: ...he paper cassette containing recycled print paper is not selected when the automatic paper selection function is enabled For example if both new and recycled paper are loaded into separate cassettes a...

Page 135: ...selected in accordance with the size of the original and the selected copy paper size Fixed Zoom Letter Legal etc Zoom ratio for copying regular sized documents onto regular sized copy paper have alre...

Page 136: ...t X Y Zoom The X and Y zoom ratio can be set for the document s length and width Zoom Memory Input Up to two most frequently used zoom ratios can be registered Selecting the Zoom Ratio 1 Load the docu...

Page 137: ...he original s size and the installed copy paper sizes Setting the Automatic Zoom Ratio 1 Touch Auto Size i Irregular sized documents any size other than Letter or Legal may be copied with an incorrect...

Page 138: ...r width X and length Y and touch Enter Custom Zoom Ratio 1 Touch Custom Zoom 2 Use the 10 key Pad to enter the zoom ratio and touch Enter i To Select Figures ranging from 0 250 25 to 4 000 400 can be...

Page 139: ...m 2 Touch Memorize Zoom Ratio 3 Use the 10 key Pad to enter the zoom ratio before selecting 1 2 or Minimal Then touch Enter i To Select When touching 1 2 or Minimal after entering the zoom ratio the z...

Page 140: ...g the Density for Copying The density can be adjusted to suit the contrast of the text and the background of the document being copied For example if the document is printed on dark colored paper the...

Page 141: ...Density 4 Touch Auto Lighter or Darker to select the density i Using the Automatic Density Function Touch Auto to display it in reverse i Selecting with the Manual Density Function Every time Lighter...

Page 142: ...tting by touching Panel Reset If the machine sits idle the density setting selection will also be reset after a period of time set by the user For more details refer to Section 2 4 Copy Settings in Ch...

Page 143: ...ing documents containing photos or lighter and darker parts Text Photo Select this when copying documents with a mixture of text and photos Setting the Image Quality 1 Load the document in the unit Fo...

Page 144: ...e image quality setting selection will also be reset after a period of time set by the user For more details refer to Section 2 4 Copy Settings in Chapter 4 on page 4 19 3 Touch Density 4 Select the d...

Page 145: ...Grouping When many pages of documents need to be copied for multiple sets such as documents for meetings they can easily be sorted using this function Before Starting Operations To make copies using...

Page 146: ...ion 5 Handling Documents in Chapter 1 on page 1 25 2 Press COPY 3 Touch Finishing 4 Select the desired sorting option i When 1 Sided to 1 Sided copying is done using the Book Scanner the sorting funct...

Page 147: ...fter a period of time set by the user For more details refer to Section 2 4 Copy Settings in Chapter 4 on page 4 19 Table 2 1 Sorting Grouping with Options Selecting Sort or Group When the Single stap...

Page 148: ...ing or 2 Point stapling when the Multi staple Finisher is installed Up to 50 pages can be stapled together up to 30 pages for the Single staple Finisher Do not use this function with thick paper or OH...

Page 149: ...ual 2 27 Staple Settings 1 To staple a document 1 Corner Staple Touch Cor ner Staple 2 2 Point Staple Touch 2 Point Staple then touch Select Position 2 Select a stapling position then touch Enter i To...

Page 150: ...position occurs Refer to Table 2 2 Corner Stapling Position Table 2 2 Corner Stapling Position Automatic Document Feeder Book Scanner 2 Sided Document Feeder optional Table 2 3 2 Point Stapling Posit...

Page 151: ...with the original document and the direction of the copy paper Do not use this function with thick paper or OHP sheets Mail bin Finisher Do not use this function with OHP sheets Multi staple Finisher...

Page 152: ...Basics and touch Finishing 4 Touch Hole Punch 5 Touch Select Position 6 Select the position for punching the holes and touch Enter i To Select Touch the display key for the hole position to be select...

Page 153: ...hole punching position occurs Referto Table 2 5 Hole Punching Position Table 2 5 Hole Punching Position Screens Automatic Document Feeder Book Scanner 2 Sided Document Feeder Optional Hole Punch Posit...

Page 154: ...e document and the same sized paper as the first page will be used for the remainder when used together with the automatic paper selection function Stapling may not be possible when the automatic pape...

Page 155: ...ecting Mixed Original Detection 1 Place the document in the Automatic Document Feeder For more information refer to Section 5 Handling Documents in Chapter 1 on page 1 25 2 Press COPY 3 Select Basics...

Page 156: ...nd copy formats Document Format the document to be scanned 1 Sided documents To be used when a 1 Sided document is copied 2 Sided documents To be used when a 2 Sided document is copied The optional 2...

Page 157: ...e Book Scanner when copying bound material Select Standard Book or Right Bound in accordance with the side of the bound material Copy Format 1 Sided copying Copying onto a single side of paper 2 Sided...

Page 158: ...t is required 1 Sided 4 TO 1 copying A total of four pages of a document are copied onto a single side of paper This function may not be available depending on the model 2 Sided 4 TO 1 copying A total...

Page 159: ...e center can make a booklet magazine reports etc The optional Duplex Unit is required Book Separation copy This function can be used to copy a bound document The bound document is copied onto individu...

Page 160: ...his setting can be used to carry out 2 Sided copying of a bound document Copying is divided into individual pages and 2 Sided copying is carried out in the book page order The optional Duplex Unit is...

Page 161: ...ded document The 2 Sided Document Feeder optional is required for this function Failure to set the document direction and document installation direction may result in the page order and copying direc...

Page 162: ...3 Set the document and copy formats Refer to Section 2 6 Selecting Formats for Various Original Documents and Section 2 7 Selecting the Various Copy Formats for setting the required document and copy...

Page 163: ...then place the pages with the reverse side odd numbered pages facing up and scan them All the pages are scanned and automatically copied in the document page order When the 2 Sided Feeder is installe...

Page 164: ...in a book or to copy two facing pages onto both sides of a sheet of paper i 2 TO 1 copying 4 TO 1 copying and Booklet Creation cannot be carried out when Book is selected Refer to Setting for Copying...

Page 165: ...d must be selected The various copy formats are listed next Choose the copy format in accordance with the original document format selection and the required copy output needed Copying Two Facing Page...

Page 166: ...Enter i To Select Touch the L arrow under the following displays to set the position to be erased i Figures ranging from 1 4 to 3 4 inch 5 to 20 mm can be set as the frame erasing The center erasing...

Page 167: ...opy screen i When the Automatic Document Feeder ADF is used for 2 Sided copying set the same number of documents for the front and back i Copying bound documents onto both sides of paper You can selec...

Page 168: ...verridden if a different scaling factor is preferred Refer to Copy Settings in Chapter 4 on page 4 21 Setting for 2 Sided 2 TO 1 Copying 1 Touch 4 TO 1 Booklet on the Orig Copy screen 2 Select 2 Sided...

Page 169: ...ent scaling factor is preferred i The page order for 4 TO 1 copying can be changed Refer to Copy Settings in Chapter 4 on page 4 21 Setting for 2 Sided 4 TO 1 Copying 1 Touch 4 TO 1 Booklet on the Ori...

Page 170: ...rred Setting for Copying Bound Documents in Page Order 1 Adjust the center of the bound document to the mark on the Book Scanner 2 Touch Book on the Orig Copy screen and touch Enter 3 Touch Page Order...

Page 171: ...screen i This setting is only available when the document is loaded onto a unit equipped with the 2 Sided Document Feeder optional 2 Select the direction of a document and touch Enter Additional infor...

Page 172: ...ith plain copy paper Cover sheet paper should be inserted in the cassette in the same direction as the plain paper used for copies Both front and back cover sheets can be attached Copying is possible...

Page 173: ...2 Front Cover Sheet Blank Back Cover Sheet Blank 3 Front Cover Sheet Blank Back Cover Sheet Copied on 4 Front Cover Sheet Copied on Back Cover Sheet None 5 Front Cover Sheet Copied on Back Cover Sheet...

Page 174: ...e 4 Select the method of attaching the Front and Back Covers and touch the key for the cover sheet paper i To Select Touch the keys for attaching the individual front and back cover sheets The selecte...

Page 175: ...function to operate The separator function does not work when using the Book Scanner Paper of a different size or direction must be inserted into the original document at the required separator posit...

Page 176: ...sue 1 NEC IT Series Examples of Inserting Separators Separators are inserted into the copies wherever paper of a different size or direction is found in the original document during copying Non Copied...

Page 177: ...n refer to Section 5 Handling Documents in Chapter 1 on page 1 25 2 Press COPY 3 Select Auxiliary and touch Page Insertion 4 Select With Image or Blank on the separator sheet whether to print on the s...

Page 178: ...the cassette containing the OHP sheets Paper with the same size as the OHP sheets should be used for the separator and inserted in the same direction Copying is possible on the separators interleaves...

Page 179: ...mation refer to Section 5 Handling Documents in Chapter 1 on page 1 25 2 Press COPY 3 Select Auxiliary and touch OHP Interleaving 4 Select With Image or Blank on the OHP Interleaving screen 5 Touch th...

Page 180: ...he key for the OHP sheets 8 Select the paper cassette in which the OHP sheets are installed and touch Enter Setting OHP Sheets onto the Manual Bypass Tray 1 Touch the key for the Manual Bypass Tray 2...

Page 181: ...s into the Paper Cassette Multi purpose Cassette 1 Touch the key for the paper cassette in which the OHP sheets will be installed then touch Enter i Select the paper type when OHP sheets are installed...

Page 182: ...k of the document is copied upside down to the original document 5 Use the L or M arrow to select the file margin width then touch Enter i To Select Figures ranging from 0 to 3 4 inch 0 to 20 mm can b...

Page 183: ...convenient for erasing header data from facsimiles and any other printing in border areas To Erase 6 Press Start Copying will now begin Erase Mode 1 Load the document in the unit For more information...

Page 184: ...h to be erased then touch Enter i To Select Figures ranging from 1 4 to 3 4 inch 5 to 20 mm can be set Every time M arrow is touched the set value is decreased by 1 16 inch 1 mm Every time L arrow is...

Page 185: ...set as the zoom ratio to copy a Letter sized document When Letter 8 1 2 by 11 is selected as the paper size and 0 500 50 is set as the zoom ratio to copy a Letter sized document Image Repeating 1 Load...

Page 186: ...e Automatic Size Detection 1 Touch Auto Detect then touch Enter Regular Size Letter or Legal 1 Touch Size Input 2 Select the document size then touch Enter Irregular Size any size other than Letter Le...

Page 187: ...length of the original then touch Enter i To Select Touching X and Y moves the cursor When selecting the dimensions enter the size after touching X or Y Width X can be set ranging from 1 to 17 inches...

Page 188: ...d as a background image for each copied set When the Distribution function is set sort mode is automatically selected as the finishing setting Three levels of contrast can be selected for the printed...

Page 189: ...s at 001 Selecting Which Pages are Numbered 1 Touch First page only or All Pages i To Select When First page only is touched the number will just be printed on the first page of each printed set When...

Page 190: ...perations The Book Scanner or an optional 2 Sided Document Feeder is required to use this function Scanning is suspended when memory becomes full In this case press Start to print the document until t...

Page 191: ...completed i To add documents to be scanned Touch Continue to re start scanning Place the page on the glass and press Start 7 Press Start Copying will now begin Using the 2 Sided Document Feeder for S...

Page 192: ...onvenient recall 4 Press Start The document will now begin to scan i To Suspend Scanning Press Stop When Finished is touched during copying copying starts 5 After scanning is complete load the next do...

Page 193: ...ion as Copy Programs Number of Copies Distribution Zoom Separate Scanning Sorting Copy Paper Size Cover Sheets Density OHP Interleaving Mixed Original Detection Edge Frame Erase Page Insertion File Ma...

Page 194: ...2 72 Copy Operations Issue 1 NEC IT Series THIS PAGE INTENTIONALLY LEFT BLANK...

Page 195: ...and Setting Displays Registering a facsimile number for Abbreviated Dialing Registering communications conditions in a Facsimile Program key Establishing a Bulletin Board Registering a facsimile numbe...

Page 196: ...consists of four screens ID Screen Line Screen Function Screen and Management Screen Refer to Figure 3 3 ID Screen Figure 3 4 Line Screen Figure 3 5 Function Screen and Figure 3 6 Management Screen Fi...

Page 197: ...or an External Line Port 1 Setting the type of telephone line used Port 2 if installed Selects either an extension on a PBX or an External Line Port 2 if installed Setting the Initial Screen to be Dis...

Page 198: ...ings for printing styles of reports have already been set at the factory before shipment Those settings defaults can be changed to meet the needs of the business The following items must be registered...

Page 199: ...Operations Use the character keys to select the desired characters Use the 10 key Pad to enter numeric information Entering Characters Alphanumeric Screen This screen is used to enter alphanumeric cha...

Page 200: ...Symbol to display the Symbol screen i To delete characters Move the cursor over the character to be deleted and touch Del Touch to move the cursor i To clear all characters Press C Clear key 2 Touch...

Page 201: ...wing are basic settings Setting the Date and Time Setting the Monitor Speaker and the Alarm Buzzer Volume Setting the Date and Time Before starting to use the machine the current date and time must be...

Page 202: ...rom Year Month Day Hour and Minute The selected key is displayed in reverse i To modify the Date and Time Press Clear Clear key and re enter the data Setting the Year 1 Touch Year and use the 10 key P...

Page 203: ...ean Time GMT is the world wide time reference standard where clocks can be set in accordance to the time in Greenwich England A setting for Daylight Saving Time can also be set Setting the Minutes 1 T...

Page 204: ...communication error etc Setting Daylight Saving Time D S T 1 Touch D S T 2 Touch Auto or OFF to set the Daylight Saving Time i The factory default setting is Auto i When in the Auto setting one hour i...

Page 205: ...such as a paper jam i To set the Monitor volume Touch Monitor Sound Volume to set the speaker volume heard when the machine dials a facsimile number for example 4 Touch Lower or Louder to select the...

Page 206: ...rmation registered The administrator is typically the person who manages the machine and is responsible for seeing that all aspects of using the unit are maintained Setting the Display Language 1 Pres...

Page 207: ...screen is not displayed unless an Administrator Number has been registered Refer to Section 2 13 Registering the Administrator Number on page 3 34 4 Select the registration setting function from the A...

Page 208: ...ho sent a document Before Starting Operations Up to 12 alphanumeric characters and symbols can be registered as the ID This same procedure is used to modify an existing Self ID The Self ID may not be...

Page 209: ...g Characters for Registration on page 3 5 4 Confirm the registration details after the display returns to the screen shown in step 2 Touch Enter if they are correct i To modify Touch Self ID to re reg...

Page 210: ...at the destination It is recommended that the full telephone number be registered including area code and that this number be corrected if a new facsimile telephone number is ever issued This same pro...

Page 211: ...an be registered in the TSI The TSI is printed at the top margin of each page sent Also the first 20 characters of the registered user s name are printed along with the TSI The same procedure is used...

Page 212: ...dministrator Management Screen on page 3 12 2 Select ID then touch TSI 3 Enter the TSI then touch Enter Refer to Section 1 5 Entering Characters for Registration on page 3 5 4 Confirm the registered T...

Page 213: ...he factory default setting Setting the Line Type 1 Touch Initial Setting on the Administrator Management screen Refer to Section 2 2 Accessing the Administrator Management Screen on page 3 12 2 Select...

Page 214: ...The factory default setting is for use on an external line not connected to a PBX 4 Confirm the dial type when the screen returns to the same as in step 2 Touch Enter if the data is correct i To modi...

Page 215: ...t directly to a telephone line Touch Extension to connect to a telephone line via the PBX for example if a 9 must be dialed to gain access to an outside line To select PSTN 1 Touch PSTN and Enter To s...

Page 216: ...d by screens that can be selected FAX Screen Copy Screen or Auto mode Screen Select the screen that best fits how the machine is normally used Stand by Screen FAX Screen This choice is recommended whe...

Page 217: ...uto mode Screen in Chapter 1 Getting Started on page 1 24 Before Starting Operations The factory default is the Auto mode screen When the priority screen is changed the screen switches after executing...

Page 218: ...the stand by screen from the three choices listed then touch Enter i To select Copy Touch this to initially display the copy screen FAX Touch this to initially display the facsimile screen Auto Touch...

Page 219: ...MAIL is pressed Abbreviated Dialing Screen The Abbreviated Dialing Screen is displayed first when FAX MAIL is pressed 10 key Dialing The screen to use the 10 key Pad for dialing a facsimile number is...

Page 220: ...creen is changed the screen will be switched after executing Auto Reset or by pressing Panel Reset Setting the Priority Facsimile Screen 1 Touch Initial Setting on the Administrator Management screen...

Page 221: ...ons The factory default setting is to print the document as soon as it is received When the unit receives a remote copy facsimile it prints a received document irrespective of the current setting 4 Se...

Page 222: ...to Section 2 2 Accessing the Administrator Management Screen on page 3 12 2 Select Func and touch Received Document 3 Select the handling mode for received documents i To select Select the desired me...

Page 223: ...Enter i Using the Abbr key Touch Abbr to select the destination to which the received document is to be sent To print the received document and forward it to another facsimile 1 Touch Prt Forwrd 2 Se...

Page 224: ...eception is transferred when the user is set to Move in the Received Document Setting in User Registration i To select Touch the key for the user to whom the received document is moved or touch User N...

Page 225: ...rd Transmission or Password Reception The password protected transmission Password TX On setting is reset upon completion of each transmission For details refer to Section 2 1 Transmission Settings in...

Page 226: ...r department or individual user The factory default setting is Open 3 Use the 10 key Pad to enter the communication password two digits then touch Enter i To re enter the number Press C clear key and...

Page 227: ...e Administrator Management Screen on page 3 12 2 Select Manage and touch User Management Mode 3 Select Limited or Open then touch Enter 4 Confirm the setting details when the screen returns as that sh...

Page 228: ...irst enter an administrator number This number is simply a password to prohibit unauthorized users from modifying registered information Before Starting Operations If an administrator number is not re...

Page 229: ...efer to Section 2 13 Printing the Transmission Report in Chapter 6 Advanced Sending and Receiving Operations on page 6 23 3 Use the 10 key Pad to enter the password of the administrator up to eight di...

Page 230: ...i To select Times from 10 minutes to 72 hours can be set as the memory holding time 10 20 30 40 or 50 minutes and 1 2 4 8 12 24 or 72 hours Every time M arrow is touched the time is shortened Every ti...

Page 231: ...for each user User TSI Each user can have their own TSI for identification Each TSI can be up to 20 characters F Code The F Code is registered to select the mailbox that can be used per user Up to 20...

Page 232: ...ation Mode The initial value of the communication mode can be set The factory default setting is Com Mode Transmission Mode The initial value of the transmission mode can be set to either memory trans...

Page 233: ...ion and Setting Operations on page 4 35 Registering Users 1 Touch User Reg on the Administrator Management screen Refer to Section 2 2 Accessing the Administrator Management Screen on page 3 12 2 Touc...

Page 234: ...er i When an Access Number has not been registered the user selection screen can be used without entering an Access number i Press C to re enter a number i Touch Cancel to return to the initial screen...

Page 235: ...ouch F CODE 2 Use the 10 key Pad to enter the F Code then touch Enter i Make sure that F Codes entered are not duplicated for the mailboxes and bulletin boards i Use or to move the cursor and re enter...

Page 236: ...lect F CODE then touch F CODE Password 2 Use the 10 key Pad to enter the F Code password then touch Enter Setting Remote Input Checking 1 Select F CODE then touch Remote Input Check 2 Select ON or OFF...

Page 237: ...then touch Enter i To Select Copy Touch this to initially display the copy screen FAX Touch this to initially display the facsimile screen Auto Touch this to initially display the Auto mode screen i W...

Page 238: ...play the One Touch screen Abbr Touch this to initially display the One Touch screen 10 key Dialing Touch this to initially display the 10 key dialing screen Index Touch this to initially display the I...

Page 239: ...mputer Specify destinations by One Touch keys or Abbreviated Dialing Prt Forwrd Touch this to immediately print and simultaneously transfer received documents to other facsimiles or personal computers...

Page 240: ...nding Fine Print and Photos in Chapter 5 Basic Sending and Receiving Operations on page 5 12 Setting the Priority Contrast 1 Select TX1 then touch Priority Contrast 2 Touch a key for the initial contr...

Page 241: ...initial value then touch Enter i Com Mode is displayed only when the optional 2nd G3 Port is installed Setting the Transmission Mode 1 Select TX2 then touch TX 2 Touch a key for the transmission mode...

Page 242: ...n touch TX Marker i TX Marker is displayed only when the optional TX Marker is installed 2 Touch a key for the TX Marker position to be set as the initial value then touch Enter Refer to Section 2 10...

Page 243: ...ot be sent Output OFF Touch this to deactivate the automatic printing function for the transmission report The selected key is displayed in reverse Setting the Report Screen 1 Touch Output then touch...

Page 244: ...estination s name or location Up to 12 characters can be registered Abbreviated Number Enter a 3 digit number 000 499 which assigns a pre registered Abbreviated Number into a One Touch number Destinat...

Page 245: ...egistered correctly to avoid erroneous dialing and incomplete transmissions The registered data can be modified or deleted Also the display position of the One Touch key can be modified Confirmation o...

Page 246: ...er of the destination and touch Com Mode When the communications mode is not set touch Next after entering the facsimile number then go to step 10 i The destination s facsimile number can be up to 64...

Page 247: ...onal 2nd G3 Port is installed i G3 1 and G3 2 represent the two facsimile telephone lines connected to the machine This setting selects which line the machine will choose when dialing a destination 8...

Page 248: ...from step 3 Overseas International Transmission 1 Perform the same procedure as steps 1 to 5 under Registering the One Touch Keys Refer to Registering One Touch Keys on page 3 51 2 Use the 10 key Pad...

Page 249: ...procedure as steps 1 to 5 under Registering the One Touch Keys Refer to Registering One Touch Keys on page 3 51 2 Use the 10 key Pad to enter the facsimile number of the destination then touch F CODE...

Page 250: ...i To modify Select the item to be modified and re register it 6 Touch Next 7 Touch Enter repeatedly until the display returns to the stand by screen Modifying and Deleting Information 1 Perform the sa...

Page 251: ...irm the registered details and touch Del 4 Confirm the registered details Touch Enter if they are correct i To modify Select the item to be modified and re register it 5 Touch Enter repeatedly until t...

Page 252: ...sure the facsimile number is registered correctly to avoid erroneous dialing The registered details can be modified deleted or used by theOne Touch keys Items to be registered Name The abbreviated num...

Page 253: ...he Abbreviated Dial Number List in Chapter 7 Reports and Lists on page 7 13 Registering Abbreviated Numbers 1 Press Utility 2 Select Reg then touch Abbr 3 Select the abbreviated number to be registere...

Page 254: ...se may be added to the number by pressing Pause i If the NEC IT3510 IT2510 is set for dial pulse DP dialing a touch tone can be dialed by touching Tone Refer to Overseas International Transmission on...

Page 255: ...ion speed then touch Enter 9 Touch Next 10 Confirm the registered details Touch Enter if they are correct i To modify Select the item to be modified and re register it 11 Touch Enter repeatedly until...

Page 256: ...ring Abbreviated Numbers on page 3 58 2 Use the 10 key Pad to enter the facsimile number of the destination then touch Overseas i Overseas is displayed in reverse showing that this mode is enabled 3 T...

Page 257: ...page 3 58 2 Use the 10 key Pad to enter the facsimile number of the destination then touch F CODE 3 Select the key for the item to be registered Refer to Section 2 17 F CODE in Chapter 6 Advanced Sen...

Page 258: ...ed key to be modified 3 Select the tab for the item to be modified then change the registered details i To modify Select the tab for the item to be modified from Dest Mode and F CODE menus For details...

Page 259: ...Registering Abbreviated Numbers on page 3 58 2 Select One Touch and touch Register to One touch 3 Touch the One Touch key to be registered i The initial screen for the Index is automatically displayed...

Page 260: ...e g by region branch alphabetically etc The Index Keys provide a convenient method of organizing the one touch keys Before Starting Operations The index key name can be up to eight characters There ar...

Page 261: ...on Serial Broadcast Transmission Real time Transmission Priority Transmission Timer Transmission TSI Destination Insertion Transmission Report Remote Copying Password Transmission 2 TO 1 Transmission...

Page 262: ...istered However there cannot be more than 300 facsimile and one touch keys in total The name of the program key can be up to 12 characters Destinations must be pre registered as one touch or abbreviat...

Page 263: ...h Next 6 Select the destination i Using a One Touch key Touch One Touch touch the one touch key for the destination and touch Enter i Using Abbreviated Dialing Touch Abbr to select the destination Tou...

Page 264: ...selected Real Time Transmission Transmission Report Priority Transmission Remote Copying Timer Transmission Password Transmission TSI 2 TO 1 Transmission Destination Insert 2 Sided Transmission TX Mar...

Page 265: ...o modify and re register it 11 Touch Enter repeatedly until the standby screen returns i To consecutively register Repeat the steps from step 3 Register the Batch Program 1 Perform the same steps as i...

Page 266: ...Dialing Touch Abbr to select the destination Touch Enter after selecting the destination 4 Touch Next 5 Set the time and interval for transmission Setting the Hour 1 Touch Hour 2 Enter the digits usi...

Page 267: ...ions to be registered Touch Enter after selecting all of them i To select The Image Quality Reduction Contrast and Scan Area can be selected on the Quality Reduction screen When FAX Menu is touched th...

Page 268: ...egistering the Polling Reception Program 1 Perform the same steps as those of 1 4 under Registering the Transmission Program Refer to Registering the Transmission Program on page 3 68 2 Select Polling...

Page 269: ...Setting the Hour 1 Touch Hour 2 Enter the digits using the 10 key Pad i Numbers ranging from 0 23 may be entered Setting the Minutes 1 Touch Minute 2 Enter the digits using the 10 key Pad i Numbers r...

Page 270: ...item to be modified and re register it 9 Touch Enter repeatedly until the display returns to the stand by screen Registering the Relay Transmission Program 1 Perform the same steps as those of 1 4 und...

Page 271: ...and touch the One Touch key for the destination i Using Abbreviated Dialing Touch Abbr to select the destination 4 Select the receiving station s then touch Enter i The receiving stations are register...

Page 272: ...smission 2 Sided Transmission TX Marker option i Timer and Real Time Transmission cannot be selected concurrently If two or more destinations are selected and the Real Time Transmission is also used t...

Page 273: ...when the program type is modified Transmission Program i To modify Select the key for the item to be modified from the choices in the display i To delete Confirm the registered details and touch Del t...

Page 274: ...the choices in the display i To delete Confirm the registered details and touch Del to erase the information 4 Confirm the registered details Touch Enter if they are correct i To modify Select the it...

Page 275: ...ministrator The following items can be set Priority Image Quality Sets the default value for the Image Quality setting The factory default is Standard Priority Contrast Sets the default value for the...

Page 276: ...tation facsimile The factory setting is ON Line Selection when the optional 2nd G3 Port is used Sets whether you want to manually select which of the two facsimile lines is used or whether you want th...

Page 277: ...Registration and Setting Operations on page 3 12 2 TX Set 1 Menu selections 1 Select TX Set 1 then touch Priority Quality 2 Select the key for the Image Quality to be set as the initial default value...

Page 278: ...nal 2nd G3 Port is installed 3 TX Set 2 Menu selections 1 Select TX Set 2 then touch TX 2 Select the key for the transmission mode to be set as the default value then touch Enter 3 Select TX Set 2 the...

Page 279: ...Select TX Set 2 then touch TX Marker 8 Touch the key for the marking position default setting then touch Enter i TX Marker is displayed only when the optional TX Marker is installed Refer to Section 2...

Page 280: ...Line Selection 3 Select how the facsimile line is to be selected then touch Enter i Line Selection is displayed only when the optional 2nd G3 Port is installed i When Select is chosen the user must ma...

Page 281: ...ult is 1 ring Password Reception This parameter sets whether the password reception function is enabled The factory default is OFF RX Time Stamp Sets the style for printing the reception date and time...

Page 282: ...whether rotated printing is used Also whether the document is to be sorted too The factory default is ON Handling of Long Documents Sets whether the received document is to be reduced or if part of th...

Page 283: ...elect Auto Touch this to set the Automatic Reception mode Manual Touch this to set the Manual Reception mode 3 Set the number of rings before Automatic Reception takes place 1 Select RX 1 then touch N...

Page 284: ...2 Select ON or OFF for the password default then touch Enter 5 Setting for Reception Date and Time 1 Select RX3 then touch RX Time Stamp 2 Touch the key for the document receiving method for setting t...

Page 285: ...ethod desired when no paper matched up to the transmitted document size then touch Enter i To select Paper Priority Touch this to use paper in any cassette regardless of the paper size installed Casse...

Page 286: ...Priority Touch this to select paper that is not wider than the received document Constant Width Mode Touch this to select paper that is the same width as the received document 8 Setting for the Unsele...

Page 287: ...touch 2 TO 1 RX 2 Select ON or OFF for this function then touch Enter 10 Setting for Rotation Print 1 Select Paper2 then touch Rotation Print 2 Select Sort ON Sort OFF or Rotation OFF then touch Ente...

Page 288: ...uch Enter i To select Reduction Touch this to reduce the incoming document when the print paper is shorter than the document Cut Off Touch this to cut off the edge of the image data on the incoming do...

Page 289: ...t is reduced in size when printed in accordance with the length of the print paper The maximum reduction ratio should be set If the incoming document is still longer than the maximum reduction ratio c...

Page 290: ...ill be longer than the print paper selected even with the maximum cut off set the document is divided onto two sheets instead of being cut off i Cut off length The cut off length can be set between 0...

Page 291: ...a portion of the first transmitted page s image on the transmission report The factory default setting is ON Activity Report Set whether an activity report is automatically printed after every 50 com...

Page 292: ...uch this to automatically print a transmission report for every transmission If TX Fail Touch this to automatically print a transmission report only when the transmission could not be sent Output OFF...

Page 293: ...y Report 1 Touch Activity Report 2 Select Output ON or Output OFF for automatic printing then touch Enter 5 Setting the Memory Clear Report 1 Touch Memory Clear Report 2 Select Output ON or Output OFF...

Page 294: ...d if it is too small to be detected when the automatic paper selection is used The factory default is OFF 4 TO 1 Copy Order Sets the page order for 4 TO 1 copying The factory default is Output Priorit...

Page 295: ...default setting is ON Copy Settings 1 Touch Copy Setting on the Administrator Management screen Refer to Section 2 2 Accessing the Administrator Management Screen in Chapter 3 Registration and Settin...

Page 296: ...lecting the Document and Copy Format Orig Copy Screen in Chapter 2 Copy Operations on page 2 34 4 Setting for the Density Image Quality Priority 1 Select Scan and touch Density Priority 2 Select the d...

Page 297: ...automatic setting and the manual setting then touch Enter Refer to Section 1 12 Adjusting the Density for Copying in Chapter 2 Copy Operations on page 2 18 6 Setting for Small Original 1 Select Scan t...

Page 298: ...for the Output Priority 1 Select Sort then touch Output Priority 2 Select the default sorting method then touch Enter 9 Setting for Intelligent Sorting 1 Select Sort then touch Intelligent Sorting 2 S...

Page 299: ...set the default value then touch Enter 11 Setting for Original Copy menu 1 Select Func then touch Original Copy Default 2 Select the document and copying method to be set as the default value then to...

Page 300: ...Selecting the Zoom Ratio for Copying in Chapter 2 Copy Operations on page 2 13 13 Setting the Automatic Reset when User Changes 1 Select Func then touch Auto reset 2 Select ON or OFF to set the defau...

Page 301: ...oint including a cassette The factory default setting is Normal paper Print Exposure Sets the print exposure level to lighten or darken the printed output The factory default setting is 0 Output Tray...

Page 302: ...ting for Special Paper 1 Touch Special Paper 2 Select the key for the paper cassette containing special paper then select the special paper type Finally touch Enter i If Recycled or Special is set it...

Page 303: ...er sets which output bin is used when the PC printer function is used 6 Confirm the setting details when the screen returns as shown in step 2 Touch Enter if they are correct i To modify Touch the key...

Page 304: ...nel display returns to the stand by screen This length of time can be set by the user The factory setting is 1 minute Pre heat Sets the length of time before the unit automatically switches into the p...

Page 305: ...reen in Chapter 3 Registration and Setting Operations on page 3 12 2 Setting the Power Saving Function 1 Touch Auto reset 2 Set the length of time before Auto reset is activated then touch Enter i To...

Page 306: ...ting the timer for the Pre heat function Times ranging from 1 240 minutes can be set 4 Setting for the Heater Off Function 1 Touch Heater OFF 2 Enter digits using the 10 key Pad then touch Enter i Set...

Page 307: ...rom 1 240 minutes can be set i If the settings for the Pre heat and Heater OFF functions are shorter than the LCD Back light OFF function it turns off immediately 6 Confirm the setting details when th...

Page 308: ...r Status 1 Touch User Account on the Administrator Management screen Refer to Section 2 2 Accessing the Administrator Management Screen in Chapter 3 Registration and Setting Operations on page 3 12 2...

Page 309: ...ception of documents into mailboxes from other facsimiles The factory default setting is OFF Priority Screen Sets the initial display for the stand by screen The factory default setting is Auto mode s...

Page 310: ...le for reports used to confirm the facsimile transmission results The factory default setting is If TX Fail Document Image on Report Sets whether a copy of the transmitted document image is printed on...

Page 311: ...ration of the Access Number 1 Select User 1 and touch Access Number 2 Enter the Access Number four digits and touch Enter i Access Number If the Access Number has not been registered the user selectio...

Page 312: ...our digits then touch Enter i To re enter the number Press C and re enter the number When Cancel is touched the display returns to the initial status Registration of the User TSI 1 Select User 2 then...

Page 313: ...make sure that it is not duplicated in the bulletin boards and mailboxes i To re enter the number Use or to move the cursor and re enter the number or press C to re enter it When Delete is touched th...

Page 314: ...mber Use or to move the cursor and re enter the number or press C to re enter it When Delete is touched the character on the cursor is deleted When Cancel is touched it returns to the initial status R...

Page 315: ...To select FAX Touch this to display the FAX screen as priority Auto Touch this to display the Auto mode screen as priority Copy Touch this to display this screen as the priority The selected key is d...

Page 316: ...is to make this the initial screen displayed Abbr Touch this to make this the initial screen displayed 10 key Dialing Touch this to make this the initial screen displayed Index Touch this to make this...

Page 317: ...destination Prt Forwrd Touch this to transfer the received document to other facsimiles as well as printing it out immediately Use a One Touch key or Abbreviated dialing to select the final destinati...

Page 318: ...he initial value then touch Enter Refer to Section 2 9 Sending Fine Print and Photos in Chapter 5 Basic Sending and Receiving Operations on page 5 12 Setting for the Priority Contrast 1 Select TX 1 an...

Page 319: ...m Mode is displayed only when the optional 2nd G3 Port is installed 2 Select the key for the communications mode to be set as the initial value then touch Enter Setting the Initial Status of the Trans...

Page 320: ...X Marker option 1 Select TX 2 then touch TX Marker i TX Marker is displayed only when the optional TX Marker for transmission is installed 2 Select the key for the marking position to be set as the in...

Page 321: ...ouch this to automatically print a transmission report after each transmission If TX Fail Touch this to automatically print a transmission report only if a document fails to be sent Output OFF Touch t...

Page 322: ...installation technician will set the specific paper size Backside total Indicates the total number of 2 sided pages printed Backside size Indicates the total number of 2 sided prints on the paper siz...

Page 323: ...rts printed TX Indicates the total number of pages transmitted by facsimile Confirming the Page Counters 1 Touch Total Page on the Administrator Management screen Refer to Section 2 2 Accessing the Ad...

Page 324: ...changed i Items in the Counter tab screen cannot be modified 1 Use the 10 key Pad to enter a modified count figure then press Enter i To re enter the number Use or to move the cursor and re enter the...

Page 325: ...Up to five relay groups can be registered The groups are numbered 1 to 5 Up to 200 receiving stations can be registered per group Use abbreviated dialing numbers to select destinations registered in...

Page 326: ...ation can be confirmed using or i To select multiple destinations Select the destination then touch Abbr to select the next one i To delete a destination Touch Del to delete a registered destination i...

Page 327: ...ansmission occurs Registering the Self Abbreviated Number on the Originating Relay Station 1 Press Utility 2 Select Reg and touch Self Abbr 3 Use the 10 key Pad to enter the local abbreviated dialing...

Page 328: ...a bulletin board The password can be set for each board Up to 20 characters can be registered using numbers 0 9 and Title Register a title for a bulletin board according to its number Up to 16 charact...

Page 329: ...T3510 IT2510 Operations Manual 4 55 2 Select Reg then touch Bultn 3 Select a bulletin board number 4 Register the items required for the bulletin board Register the F CODE 1 Touch F CODE Establishing...

Page 330: ...mailbox i To re enter the number Use or to move the cursor and re enter the number or press C to re enter it When the Delete key is touched the character on the cursor is deleted When the Cancel key...

Page 331: ...C to re enter it When the Delete key is touched the character on the cursor is deleted When the Cancel key is touched the display returns to the initial status Refer to Section 2 17 F CODE in Chapter...

Page 332: ...Input Check 2 Select ON or OFF then touch Enter Setting the Remote Output Check 1 Touch Remote Output Check 2 Select ON or OFF then touch Enter 5 Confirm the registered details once the display has re...

Page 333: ...er in the copy programs For additional details on copying using the program keys refer to Section 2 16 Using Copy Programs in Chapter 2 Copy Operations on page 2 70 6 Touch Enter repeatedly until the...

Page 334: ...y that has already been registered after touching Check i To delete registration Touch the key that is already registered and touch Delete 5 Touch Check then touch the programmed key 6 Confirm the reg...

Page 335: ...d to send and receive a facsimile document 2 1 Quick Memory Transmission When the NEC IT3510 IT2510 scans the first page of a document it immediately begins dialing the destination number The IT3500 c...

Page 336: ...creen in Chapter 1 Getting Started on page 1 14 Using the Copy Screen Press FAX MAIL before transmission Transmitting when Using the Automatic Document Feeder 1 Load the document into the unit Refer t...

Page 337: ...6 Quitting an Operation in Chapter 1 Getting Started on page 1 30 Transmitting Using the Book Scanner 1 Open the Document Cover to place the document on the glass surface Refer to Section Section 5 H...

Page 338: ...7 Touch Scan End after all pages have been stored into memory i When scanning multiple documents Place the next document on the glass surface and press Start while the screen indicates Restart Scan t...

Page 339: ...ress Start after scanning all the pages of the document As soon as the Start key is pressed dialing will begin Up to 64 documents can be stored in memory If 64 documents have already been stored or if...

Page 340: ...g timing to occur It is recommended that Pause be pressed twice to enter a six second pause after the international code After this the rest of the number may be dialed as normal 2 5 When Transmission...

Page 341: ...re Starting Operations The destination s number must be registered in advance Refer to Section 2 16 Registering One Touch Keys in Chapter 3 Registration and Setting Operations on page 3 50 If One Touc...

Page 342: ...red key i To select multiple destinations Touch all the keys needed The selected keys are displayed in reverse i To correct an entry An entry can be cancelled by touching the key again The desired key...

Page 343: ...Operations The destination s facsimile number must be registered in advance as One Touch or Abbreviated numbers Up to 500 numbers can be registered including the 300 numbers for One Touch dialing For...

Page 344: ...g keys The total number of One Touch keys and Program Dialing keys cannot exceed 300 For more information refer to Section 2 19 Registering Program Keys in Chapter 3 Registration and Setting Operation...

Page 345: ...hose with borders i Using Index Keys The first index screen is automatically displayed Touch the index tabs Index List or to find the desired key 4 Press Start Transmission now begins i If a time spec...

Page 346: ...ality 1 Load the document in the unit Refer to Section 5 Handling Documents in Chapter 1 Getting Started on page 1 25 2 Press FAX MAIL 3 Touch Quality Reduction Selecting the appropriate image quality...

Page 347: ...Fine print newspapers magazines reports etc or detailed drawings Fine Super Fine Photos and text mixed Text Photo Photos GSR Super GSR If the destination s facsimile does not support Super Fine Super...

Page 348: ...rs and paper used when sending a document For example if the characters are printed on colored paper the contrast can be adjusted to compensate for the colored paper Adjusting Contrast 1 Load the docu...

Page 349: ...ing i Adjusting the contrast level Five levels are available The transmitted document gets lighter each time Lighter is touched use this for dark colored paper The level gets darker each time Darker i...

Page 350: ...5 16 Basic Sending and Receiving Operations Issue 1 NEC IT Series 2 Press FAX MAIL 3 Touch Quality Reduction 4 Touch Reduction Area 5 Touch Reduction Nonreduction Mode Continued...

Page 351: ...Reduction is selected the document is sent in its original size regardless of the recipient s paper size 7 Select the destination 8 Press Start Transmission now begins i The size reduction setting ret...

Page 352: ...ment to be scanned can be specified Part of a large document can be sent or irregular sized documents can be sent Selecting the Scan Area 1 Load the document in the unit Refer to Section 5 Handling Do...

Page 353: ...o adjust the size and direction of the area of the document to be scanned When Auto Detect is touched the scanned area that most closely matches the document size is automatically set 7 Select the des...

Page 354: ...ble by using the 10 key Pad or via Abbreviated dialing in combination with a One Touch key Numbers up to 192 digits long can be dialed when chain dialing is used Numbers up to 40 digits long are displ...

Page 355: ...ssue 1 NEC IT3510 IT2510 Operations Manual 5 21 Using Chain Dialing 1 Load the document in the unit Refer to Section 5 Handling Documents in Chapter 1 Getting Started on page 1 25 2 Press FAX MAIL 3 T...

Page 356: ...Dialing on page 5 7 i When a One Touch key is touched This icon is displayed i To confirm the number When the cursor is moved to the icon after 10 key Dialing is touched the number is displayed that i...

Page 357: ...on page 5 9 i When the Abbreviated Dialing number is entered This icon is displayed i To confirm the number When the cursor is moved to the icon after 10 key Dialing is touched the number is displaye...

Page 358: ...e two methods to receive a facsimile Automatic Reception The NEC IT3510 IT2510 will automatically answer the incoming call and receive the facsimile without any action from the user 6 Select a destina...

Page 359: ...erations on page 3 27 3 2 While Receiving a Document The touch panel displays a receiving icon When reception is complete a beep is heard Refer to Section 2 1 Confirming the Communications Status in C...

Page 360: ...3510 IT2510 has only letter sized paper installed the document is reduced and printed on the letter sized paper Refer to Section 2 10 Settings for Received Documents in Chapter 3 Registration and Sett...

Page 361: ...red when printed For more details refer to Section 2 10 Settings for Received Documents in Chapter 3 Registration and Setting Operations on page 3 27 3 6 Making and Receiving Telephone Calls The NEC I...

Page 362: ...call is complete Making an On hook Call 1 Press FAX MAIL 2 With the handset in place touch On hook Dial i Make sure that a dial tone is heard from the handset 3 Select the destination number 4 When y...

Page 363: ...ger is heard Refer to Section 2 10 Settings for Received Documents in Chapter 3 Registration and Setting Operations on page 3 27 2 If a facsimile tone is heard press Start and hang up the handset The...

Page 364: ...5 30 Basic Sending and Receiving Operations Issue 1 NEC IT Series THIS PAGE INTENTIONALLY LEFT BLANK...

Page 365: ...g via the touch panel display Before Starting Operations Use Activity List to check the communications status Data about communications is classified into five categories Status The active functions a...

Page 366: ...ive function i Confirming the status Up to four functions are displayed at a time If the desired function is not displayed touch and to locate it 3 Confirm the operational details 1 Touch the function...

Page 367: ...layed If Interim Rep is touched while a document is being scanned or transmitted an interim transmission report is printed i When Del is displayed If Del is touched when there is a document awaiting t...

Page 368: ...2 Touch RX 3 Confirm the reception status i Confirming the status Touch and to retrieve the desired document and confirm the reception status i When waiting for Polling Reception If Retry is touched...

Page 369: ...confirmed i To confirm a document Touch and to retrieve the desired document and confirm the registered document When a number key is touched details about the document are displayed 4 Confirm the det...

Page 370: ...e documents stored in the box i To confirm a document Touch and to retrieve the desired document and confirm the document stored in the box i When the document needs to be printed Touch Print i When t...

Page 371: ...Registering One Touch Keys in Chapter 3 Registration and Setting Operations on page 3 50 and Section 2 17 Registering Abbreviated Numbers in Chapter 3 Registration and Setting Operations on page 3 58...

Page 372: ...eiving Operations on page 5 9 Selecting with the 10 key Pad 1 Enter the destination s facsimile number using the 10 key Pad 2 To add another location touch Add Dest 3 Enter the next number 4 Repeat st...

Page 373: ...possible to send a facsimile without hanging up and redialing the number Before Starting Operations An external telephone not provided is required for this feature Use the Automatic Document Feeder f...

Page 374: ...age 5 7 or Section 2 7 Using Abbreviated Dialing in Chapter 5 Basic Sending and Receiving Operations on page 5 9 5 After talking the recipient must press the facsimile start button on their machine A...

Page 375: ...he Use of the NEC IT3510 IT2510 as a Relay Station The NEC IT3510 IT2510 can be used as both an originating station and a relay hub station Only NEC facsimile units can be used as a relay hub station...

Page 376: ...e Transmission feature allows sending documents page by page without first storing them into memory Before Starting Operations The ADF is the only scanning method available with this feature Real Time...

Page 377: ...eal Time 4 Select the destination Refer to Section 2 1 Quick Memory Transmission in Chapter 5 Basic Sending and Receiving Operations on page 5 1 Section 2 6 Using One Touch Dialing in Chapter 5 Basic...

Page 378: ...recipient can be specified for this feature The Timer Transmission feature cannot be used with this feature Priority Transmission 1 Load the document in the unit Refer to Section 5 Handling Documents...

Page 379: ...he time must be set accurately in order for the document to be sent at the correct time The timer setting is reset after each transmission Up to 64 documents can be stored for Timer Transmission Real...

Page 380: ...r and paper are used Before Starting Operations Only the Automatic Document Feeder can be used to scan documents for the 2 TO 1 feature Only letter sized documents can be used The letter paper must be...

Page 381: ...c feeding Any document sent by using this feature can only be printed on one side of the paper at the recipient s end Real Time Transmission cannot be used with this feature The 2 Sided Transmission s...

Page 382: ...Chapter 1 Getting Started on page 1 25 2 Press FAX MAIL 3 Select Set 1 from FAX Menu then touch 2 Sided TX 4 Select the destination 5 Press Start Scanning is displayed 6 After the front side of the d...

Page 383: ...r when the print becomes too light Refer to Section 9 4 Installing and Replacing the Transmission TX Marker Stamp in Chapter 1 Getting Started on page 1 59 The TX Marker cannot be used with the copy f...

Page 384: ...In this case refer to the Activity List or the Transmission Report to verify that the transmission was successful Position of the TX Marker The TX Marker can be set to stamp the bottom of a page or t...

Page 385: ...tification TSI in Chapter 3 Registration and Setting Operations on page 3 17 and Section 1 4 Required Initial Registration Settings and Confirmation in Chapter 3 Registration and Setting Operations on...

Page 386: ...ion must be registered in advance as a One Touch key or as an Abbreviated Dialing key The recipient s name cannot be inserted when using 10 key dialing or when the Chain Dialing feature is used The na...

Page 387: ...Each user can set their own individual transmission report settings 3 Select Set 2 from FAX Menu the touch Dest Insert 4 Select the destination 5 Press Start Transmission now begins Printing the Trans...

Page 388: ...inted at the receiving end Before Starting Operations Up to 99 copies can be specified This function is only available if the receiving facsimile has the Remote Copying function using F CODE otherwise...

Page 389: ...on 5 Handling Documents in Chapter 1 Getting Started on page 1 25 2 Press FAX MAIL 3 Select Set 2 from FAX Menu the touch Remote Copy 4 Use the 10 key Pad to enter the number of copies to be printed a...

Page 390: ...h sides the communication fails Before Starting Operations The same password must be registered at both sending and receiving sides Refer to Section 2 11 Registering Passwords for Secured Communicatio...

Page 391: ...deleted after it is transmitted Polling Transmission is not available if the memory is full Only one document can be selected for Polling Transmission This feature cannot be used if there is another...

Page 392: ...er to Section 2 10 Adjusting Contrast in Chapter 5 Basic Sending and Receiving Operations on page 5 14 6 Select the reduction and the scanning area of the document to be sent then touch Next Refer to...

Page 393: ...an F CODE SEP Specified to retrieve a document stored on a facsimile at the transmitting side by calling that facsimile Receive Polling SID PWD Specified when the called facsimile is password protect...

Page 394: ...en registering a user a mailbox can be used The F CODE registered at this stage will be the mailbox number Using the Mailbox Depending on the settings documents received in the mailbox can be printed...

Page 395: ...ing a registered document from a Bulletin Board Refer to Section 3 5 Retrieving from a Bulletin Board on page 6 39 Procedure for Confidential F CODE Transmission 1 Select F CODE then F CODE SUB when f...

Page 396: ...0 receives an F CODE it first searches for the F CODE from the Bulletin Board 1 to 10 and if there is no appropriate F CODE it goes on to search the mailboxes 1 to 100 that have been set for each user...

Page 397: ...red Refer to Section 3 3 Establishing a Bulletin Board in Chapter 4 Advanced Registration and Setting Operations on page 4 54 When documents are registered on a Bulletin Board from a remote facsimile...

Page 398: ...IT Series 4 Touch the Bulletin Board number to register the document 5 Select the image quality then touch Next 6 Select the contrast setting then touch Next 7 Select the reduction and scan area sett...

Page 399: ...mote Facsimile 1 Place the document in the unit 2 Set the transmission features such as image quality contrast etc 3 Enter SUB for the F CODE of the Bulletin Board to register the document 4 Enter SID...

Page 400: ...t s Start key or its equivalent The document is sent to the IT3510 IT2510 and is registered into the proper Bulletin Board i Any previously registered document in the Bulletin Board will be replaced b...

Page 401: ...re Starting Operations The sender s facsimile must be registered with the same group password as registered in the IT3510 IT2510 Depending on the sender s make and model of facsimile password communic...

Page 402: ...3 4 Receive Polling and Start Timer When Receive Polling is selected a document stored at the remote side can be retrieved by the NEC IT3510 IT2510 A timer may be added to the polling feature so that...

Page 403: ...Board number must be confirmed with the other party in advance of starting If access to the Bulletin Board is password restricted by the other party s facsimile the F CODE password also needs to be c...

Page 404: ...load documents registered on your own facsimile s Bulletin Board Refer to Section 2 1 Confirming the Communications Status on page 6 1 Retrieving a Document from a Bulletin Board 1 Press FAX MAIL 2 Se...

Page 405: ...Use the 10 key Pad to enter the facsimile number then touch F CODE 2 Touch F CODE SEP i Inputting the F CODE password Touch F CODE p w SID PWD in the same way and enter the F CODE password 3 Use the 1...

Page 406: ...letin Board Continued 4 Select the reception time i Procedure for setting Touch Hour or Minute and use the 10 key Pad to enter the time The digits can be deleted by pressing C i When reception time is...

Page 407: ...program keys index keys etc 1 1 Printing the Activity Report TX The transmission activity report verifies in report form important details about the transmitted communications Before Starting Operatio...

Page 408: ...7 2 Reports and Lists Issue 1 NEC IT Series 3 Touch Enter The Activity Report TX is printed Figure 7 1 Activity Report TX Example Printing the Activity Report TX Continued...

Page 409: ...bout the received communications Before Starting Operations This section describes how to manually print out the report Refer to Section 2 3 Report Print Settings in Chapter 4 Advanced Registration an...

Page 410: ...a Bulletin Board in Chapter 4 Advanced Registration and Setting Operations on page 4 54 Section 2 18 Registering a Document on a Bulletin Board in Chapter 6 Advanced Sending and Receiving Operations o...

Page 411: ...1 NEC IT3510 IT2510 Operations Manual 7 5 2 Select Report1 then touch Bulletin Board List 3 Touch Enter The Bulletin Board List is printed Figure 7 3 Bulletin Board List Example Printing the Bulletin...

Page 412: ...nications data can be confirmed for each user Before Starting Operations Each user can only print out his her own list The administrator can print out all data registered for each user Printing the Us...

Page 413: ...User List By the Administrator 1 Touch Rep Print on the Administrator management screen Refer to Section 2 2 Accessing the Administrator Management Screen in Chapter 3 Registration and Setting Operat...

Page 414: ...s 1 5 Printing the User Account Report The total number of transmissions and prints accumulated per user are documented on the User Account Report Before Starting Operations This report can only be pr...

Page 415: ...Account Report 1 Touch Rep Print on the Administrator Management screen Refer to Section 2 2 Accessing the Administrator Management Screen in Chapter 3 Registration and Setting Operations on page 3 1...

Page 416: ...Setting List Before Starting Operations This report can only be printed by the administrator Figure 7 5 User Account Report Example Printing the Setting List 1 Touch Rep Print on the Administrator Man...

Page 417: ...NEC IT Series Issue 1 NEC IT3510 IT2510 Operations Manual 7 11 2 Touch Setting List 3 Touch Enter The Setting List is printed Figure 7 6 Setting List Example Printing the Setting List Continued...

Page 418: ...s 1 7 Printing the One Touch Key List The facsimile destinations registered in One Touch Keys can be printed Printing the One Touch Key List 1 Press Utility 2 Select Report2 then touch One Touch List...

Page 419: ...eviated Dial Number List The destinations registered in Abbreviated Dial Numbers can be printed i Unregistered abbreviated numbers will not be printed Figure 7 7 One Touch Key List Example Printing th...

Page 420: ...14 Reports and Lists Issue 1 NEC IT Series 3 Touch Enter The Abbreviated Dial Number List is printed Figure 7 8 Abbreviated Dial Number List Example Printing the Abbreviated Dial Number List Continue...

Page 421: ...Printing the Program List The information registered in the facsimile program keys can be printed Printing the Program List 1 Press Utility 2 Select Report2 then touch FAX Program List 3 Select the p...

Page 422: ...IT Series 1 10 Printing the Relay Group List Details of the Relay Transmission destination groups can be printed Figure 7 9 Program List Example Printing the Relay Group List 1 Press Utility 2 Select...

Page 423: ...NEC IT Series Issue 1 NEC IT3510 IT2510 Operations Manual 7 17 3 Touch Enter The Relay Group List is printed Figure 7 10 Relay Group List Example Printing the Relay Group List Continued...

Page 424: ...7 18 Reports and Lists Issue 1 NEC IT Series THIS PAGE INTENTIONALLY LEFT BLANK...

Page 425: ...will be displayed on the touch panel to indicate various unit operations Table 8 1 Display Icons Symbol Message Description Dialing Now dialing the number Dial Wait Waiting to re dial Copying Now cop...

Page 426: ...tration mode No print paper Restock the recording paper No toner Replace the toner bottle Replace the drum The imaging unit needs to be replaced Periodic inspection It is time for periodic inspection...

Page 427: ...f accumulated number of copied pages Toner is running low The toner supply is running low Replace the toner bottle Please add toner The toner has run out Replace the toner bottle It is time to replace...

Page 428: ...Auto Size mode cannot used with the selected paper size Please select a zoom ratio The scaling factor calculated from the selected paper size and document size is not within the proper range Set the...

Page 429: ...Feed Tray while documents remain in ADF Place the document in the Single Feed Tray after removing the document from the ADF This application cannot be changed now Select Interrupt mode to change the a...

Page 430: ...om The document size could not be detected with the automatic size mode Set the zoom ratio Select a different paper size Original s size cannot be detected Select original size The document size could...

Page 431: ...around the roller the page should be pulled out carefully It may be possible to pull out the sheet from the back side of the document feeder 3 Close the Document Feeder Cover Jam under the Document F...

Page 432: ...the jammed sheet 4 Lower the Document Feeder Tray and close the Document Feeder Cover Jam in the 2 Sided Document Feeder Option Jam in the FN1 Cover 1 If a sheet is jammed in the FN1 cover Open the FN...

Page 433: ...ations Manual 8 9 3 Close the FN1 cover Jam in the FN2 Cover 1 If the jammed sheet is in the FN2 cover Open the FN2 Document Feed Cover 2 Slowly withdraw the jammed sheet 3 Close the FN2 cover Jam in...

Page 434: ...oubleshooting Issue 1 NEC IT Series Jam in the Single Feed Tray 1 Open the Single Feed Tray 2 Slowly withdraw the jammed page 3 Close the Single Feed Tray Jam in the 2 Sided Document Feeder Option Con...

Page 435: ...size is incorrectly set If the Side Cover is Opened to Remove Jammed Paper Care should be taken if the imaging unit is needed to be withdrawn in order to remove jammed paper A toner spill may occur T...

Page 436: ...e jammed paper i Try to remove the jammed paper without removing the imaging unit if possible Doing so may cause the toner to spill i Never touch the Transfer Roller black roller Printed image quality...

Page 437: ...Universal Cassette Fixed Universal Cassette Side Cover 1 Open the Side Cover 2 Slowly withdraw the jammed paper 3 Close the Side Cover i If the jammed paper cannot be removed from the Side Cover Pull...

Page 438: ...Cover 1 Open the Side Cover 2 Slowly withdraw the jammed paper while rotating the cog in the direction of the arrow 3 Close the Side Cover i If the jammed paper cannot be removed from the Side Cover...

Page 439: ...am at the Fuser Cover 1 Lift up on the R1 lever to open the Side Cover 2 Press the R2 lever to open the Fuser Unit Cover 3 Slowly withdraw the jammed paper i The area around the Fuser Unit is very hot...

Page 440: ...Side Cover Paper Jam at the Job Tray Shift Tray Unit optional 1 Lift up on the R1 lever to open the Side Cover 2 Press the R2 lever to open the Fuser Unit Cover 3 Open the Side Cover and open the Job...

Page 441: ...al 8 17 5 Close the Job Tray Cover Paper Jam at the 2 Sided Print Unit optional 1 Open the cover of the 2 Sided Print Unit 2 Slowly withdraw the jammed paper 3 Close the 2 Sided Print Unit cover Paper...

Page 442: ...oting Issue 1 NEC IT Series Paper Jam at the Mail bin Finisher 1 Disconnect the Finisher from the main unit 2 Open the horizontal conveyor cover 3 Slowly remove the jammed paper 4 Close the horizontal...

Page 443: ...FN2 cover 6 If the hole punching function is set rotate the dial upwards ten times 7 Slowly remove the jammed paper 8 Open the FN3 jam guide and slowly remove the jammed paper 9 Close the FN3 jam gui...

Page 444: ...IT Series 10 Open the FN1 first tray cover 11 Slowly remove the jammed paper 12 Close the FN1 first tray cover 13 If equipped with a Mail bin Finisher open FN4 on the right hand side door Paper Jam at...

Page 445: ...ssue 1 NEC IT3510 IT2510 Operations Manual 8 21 14 Remove the paper while opening FN5 15 Slowly remove the jammed paper then close FN4 16 Securely reconnect the Finisher Paper Jam at the Mail bin Fini...

Page 446: ...NEC IT Series Paper Jam at the Single staple Finisher Multi staple Finisher 1 Disconnect the Finisher from the main unit 2 Open the horizontal conveyor cover 3 Slowly remove the jammed paper 4 Close t...

Page 447: ...the FN1 cover 6 Lift up FN2 and slowly remove the jammed paper 7 Press down FN3 and slowly remove the jammed paper 8 Open FN4 and slowly remove the jammed paper while rotating the FN5 dials 2 dials Pa...

Page 448: ...s 10 Open the FN7 door to access the Multi staple Finisher 11 Press down the FN8 cover press down the FN7 to clear a jam in the Single staple finisher and slowly remove the jammed paper 12 Close the F...

Page 449: ...0 IT2510 Operations Manual 8 25 13 Securely reconnect the Finisher Paper Jam at the Third Tray Optional 1 Open the tray cover 2 Slowly remove the jammed paper Paper Jam at the Single staple Finisher M...

Page 450: ...leshooting Issue 1 NEC IT Series 3 Open the FN4 jammed paper removing guide and slowly remove the jammed paper by rotating the FN5 dials 2 dials 4 Close the cover Paper Jam at the Third Tray Optional...

Page 451: ...can be adjusted to run off the Touch Panel LCD The thermostat inside the unit has activated due to excessive heat within the product or electrical interference due to thunderstorms etc Turn off the po...

Page 452: ...ace down for the ADF Place the document face up and retry copying Copy is too faint The copy density setting is inappropriate Adjust the copy density setting Adjust the contrast priority level on the...

Page 453: ...y The periphery of the copied area is shaded The document pad is dirty Clean the document pad The print paper selected is larger than the origianl document when direct mode x 1 000 is used for copying...

Page 454: ...placed correctly in the cassette Line up the edges of the paper with the guides on the cassette The paper is curled or damp Replace the paper The Copy function cannot be set The Interrupt mode is on W...

Page 455: ...up in the ADF and resend Automatic transmission is impossible The number is wrong Confirm the facsimile number The number is a voice number Confirm the facsimile number There is a problem at the rece...

Page 456: ...nding side Make a copy at this unit If the copy is clear contact the sending side to check for trouble Telephone Condition Cause Countermeasure Nothing is heard through the handset The external teleph...

Page 457: ...prior to the power failure After two hours the data is subject to being erased If any documents are lost during a power failure a Power Failure Report will be printed once power is restored to the uni...

Page 458: ...sture can accumulate and cause image quality to degrade This section describes how the anti dew condensation function can be set to prevent this problem from occurring Anti Dew Procedure The lamp in t...

Page 459: ...r Management screen 2 Enter the start time to begin the procedure then touch Enter i To Select Touch Hour or Minute and then enter the time using the 10 key Pad When Cancel is touched the function is...

Page 460: ...be manually replenished to improve the print quality Before Starting Operations Do not turn off the power and open the side cover while the toner is being replenished Only replenish the toner if the...

Page 461: ...being transmitted one by one When the registered time is met all the stored documents are then sent during one call This can save on costly telephone charges if the registered timer is set for after...

Page 462: ...such as grayscale GSR images and photos Manual Reception Transmission The ability for the operator to send and receive a facsimile after answering and speaking on the telephone Memory The device s in...

Page 463: ...uick Memory Transmission A feature which dials a facsimile telephone number immediately after the first document page is scanned The remaining pages continue to scan into memory while the pages alread...

Page 464: ...A 4 Glossary of Terms Issue 1 NEC IT Series THIS PAGE INTENTIONALLY LEFT BLANK...

Page 465: ...Operations Manual NEC America Inc Document Solutions Issue 1 CC49001 NEC IT3510 IT2510 ND 22668 E March 2001...

Page 466: ......

Reviews: