


8
All technical manuals are available in PDF format at
tech.napcosecurity.com
Napco iSecure Security System
Central Station CS Reporting Screen
If you wish to use IP
-
based reporting (radio or Dual Path)
instead of telephone
-
based reporting, contact your central
station and ask for the specific IP information (for example,
Sur
-
Gard System II, Sur
-
Gard System V, Bosch D6100IPV6
or Bosch D6600 Receiver, with ITS
-
D6686 Ethernet Adapt-
er via TCP/IP using standard line security central station
receivers). To enter the required information for their re-
ceiver, including the
IP ADDRESS
,
PORT
number, encryp-
tion
KEY
characters, central station
ACCT #
(also known as
Account Code Field
, click the "
?
" icon and contact your cen-
tral station for specific details regarding how they pro-
grammed their receiver to accept data) and
DNIS SET-
TINGS
number (if used).
Note:
For IP reporting, each digit
if the
IP ADDRESS
must be 0
-
9 (do not use hex). In addi-
tion, Bosch receivers require a
Static Key
; this field ap-
pears when a Bosch
RECEIVER TYPE
is selected.
Poll Fail Timeout
The duration set determines how long the system will wait
for a radio check
-
in packet. If not received, a Supervision
signal will be sent to the specified central station. Select
from the pull
-
down the appropriate
Poll Fail Timeout
dura-
tion available, depending on the service plan purchased.
CS Test Timer
The selections are Non, Daily or Weekly. If enabled, an
automatic test report will be transmitted to the central station
on the schedule selected when
First Primary
central sta-
tion telephone number is configured. If
Cell Radio Only
is
selected, Hub generated
Test Timers
are reportable sig-
nals and are forwarded to the central station.
Example:
If a signal is sent to the central station, the su-
pervision time counter will reset to that day. For example, if
the supervision time is supposed to occur on March 25, but
an alarm signal was tripped earlier on March 15, if no other
signals are sent, the next time the radio will check in is in 30
days after the March 15 date.
The iSecure Cloud Web Portal also has the ability to send
emails and text messages to dealers and/or customers
(only available if supported by your service plan).
Enable IP Supervision
Check to enable the IP path of the integral dual path radio
communicator (this selection is available depending on plan
purchased).
Configuration Type
Click the
Configuration Type
pull
-
down to select the re-
porting pathway preference:
•
Ethernet Preferred with Wi
-
Fi Backup
•
Wi
-
Fi Preferred with Ethernet Backup
•
Wi
-
Fi is Only IP Path
•
Ethernet is Only IP Path
IP Configuration Type
•
DHCP
•
Static
Click the pull
-
down to select how the IP settings are config-
ured. Select
DHCP
to have the IP address automatically
assigned when the radio connects to the Internet, or select
Static
if you wish to manually designate a specific IP ad-
dress that will remain permanently assigned to the radio.
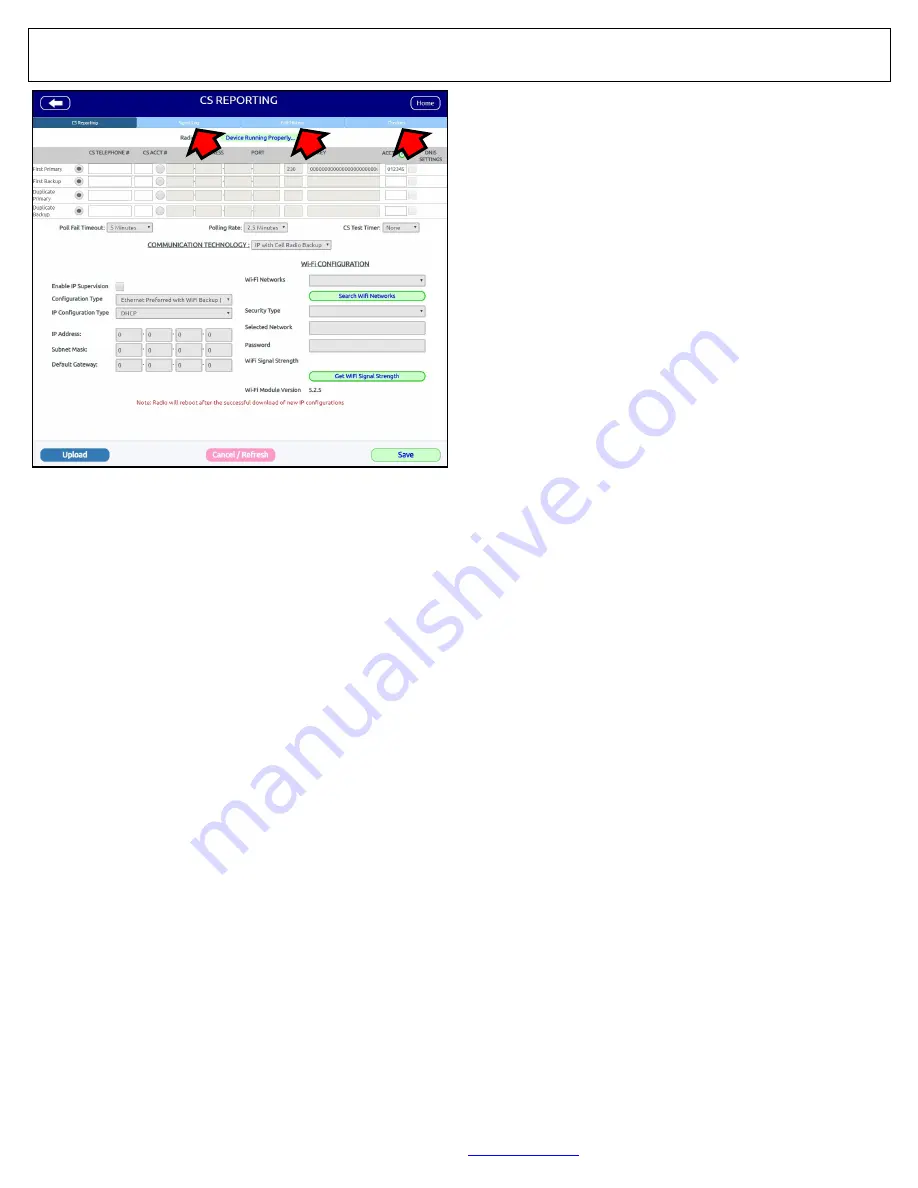
Central Station Reporting Screen
Select
Central Station Reporting
and the above screen
opens. In this screen you can change the reporting data, cen-
tral station account numbers, supervision timeout durations
and other selections appropriate for the installation and the
service plan purchased. Always check that the radio commu-
nicator is active by ensuring the
Radio Status
indicates
"
Device Running Properly
…
", verify the correct
Radio #
ap-
pears at the very top of the screen, and to the right of the
Ra-
dio #
, enable the
Central Station Reporting
radio button.
Note:
To ensure that the iSecure Cloud Web Portal has the
latest configuration data stored in the Hub, click the
Upload
Radio Status
button. Use this button the first time a radio
communicator is to be managed by the Cloud Web Portal.
At any time you can change the reporting central station receiv-
er telephone numbers, account numbers, IP reporting infor-
mation and other settings by simply entering alternate data and
clicking
Save
. Enable the appropriate radio button if backup or
duplicate reports are to be sent, i.e. "
First Primary
", "
First
Backup
", "
Duplicate Primary
",
"Duplicate Backup
". Other
selections include:
CS TELEPHONE #
Enter all digits of the central station receiver telephone num-
ber including area code.
CS ACCT #
Enter all digits of the central station account number (both a
CS TELEPHONE #
and
CS ACCT #
must be entered in the
fields, otherwise the
Save
button remains disabled).
IP
-
Based Reporting
(to an IP Receiver)
In the
COMMUNICATION TECHNOLOGY
pull
-
down, there
are three selections:
•
Cell Radio Only
(default)
•
IP with Cell Radio Backup
•
IP Only
At the top of this screen, three "tabs" are available (arrows):
Signal Log
,
Checkins
and
Edit History
logs for status and reporting information


