QPix 450 or QPix 460 Colony Picking System User Guide
130
5031498 G
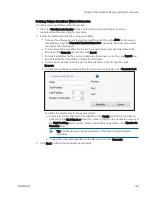
To adjust the test image:
1. From the Receptacle list, select the number of the receptacle to view and then click the
region to view in the receptacle image below the list. The region is in red.
2. Under Acquisition, adjust the Exposure and Gain settings.
In the Exposure (ms) field, enter the number of milliseconds (from 10 to 1000) to expose
the sample to light when acquiring the image.
Adjust the Gain to increase the image signal without changing the light exposure.
After you adjust the Exposure or Gain settings, click Grab Image to apply the new settings
to the test image.
3. Select the Detection tab.
4. Select the Use Auto Thresholding check box to have the software automatically detect the
colonies in the image.
To manually detect the colonies, clear this check box and drag the slider until all the
desired colonies are detected and the background is not.
5. With the Use Auto Thresholding check box selected, select the Auto Threshold Each
Region check box to process each region with its own uniquely calculated value.
To process the regions using a value calculated of the entire image, clear this check box.
6. With the Auto Threshold Each Region check box selected, enter threshold values in the
Low Limit and High Limit fields.
To determine the Low Limit value, clear the Use Auto Thresholding check box and then
drag the slider to the left until some background is clearly detected. Select the Use
Auto Thresholding check box and the Auto Threshold Each Region check box again
and then enter the value from the Threshold field into the Low Limit field.
To determine the High Limit value, clear the Use Auto Thresholding check box and
then drag the slider to the right until some colonies start to become undetected. Select
the Use Auto Thresholding check box and the Auto Threshold Each Region check box
again and then enter the value from the Threshold field into the High Limit field.
7. Select the Invert Image check box to make dark areas bright and bright areas dark.
8. Select the Subtract Background check box to have the background become nearly black.
9. Select the Display tab.
Summary of Contents for QPix 450
Page 1: ...5031498 G August 2022 QPix 450 or QPix 460 Colony Picking System User Guide ...
Page 6: ...QPix 450 or QPix 460 Colony Picking System User Guide 6 5031498 G ...
Page 22: ...QPix 450 or QPix 460 Colony Picking System User Guide 22 5031498 G ...
Page 56: ...QPix 450 or QPix 460 Colony Picking System User Guide 56 5031498 G ...
Page 102: ...QPix 450 or QPix 460 Colony Picking System User Guide 102 5031498 G ...
Page 158: ...QPix 450 or QPix 460 Colony Picking System User Guide 158 5031498 G ...
Page 176: ...QPix 450 or QPix 460 Colony Picking System User Guide 176 5031498 G ...
Page 218: ...QPix 450 or QPix 460 Colony Picking System User Guide 218 5031498 G ...
Page 226: ...QPix 450 or QPix 460 Colony Picking System User Guide 226 5031498 G ...
Page 250: ...QPix 450 or QPix 460 Colony Picking System User Guide 250 5031498 G ...
Page 256: ...QPix 450 or QPix 460 Colony Picking System User Guide 256 5031498 G ...


